Approval System
Approval System - Employee User Manual
1. Introduction
The Approval System is an internal workflow management tool designed to streamline the submission, tracking, and management of various organisational requests. This system allows employees to submit formal requests (such as Expense or Leave approvals) and enables designated authorities to review and process them efficiently.
2. Accessing the System
-
Log in using your corporate credentials. eg: ([employee] Sample Employee — employee@lalco.la - emp12345)
-
The system opens to the Dashboard, providing a summary of the activities.
-
Use the Sidebar Navigation on the left to switch between modules: Dashboard, Submit Request, Approval Centre, and Out-of-Office.
3. Menu Options Overview
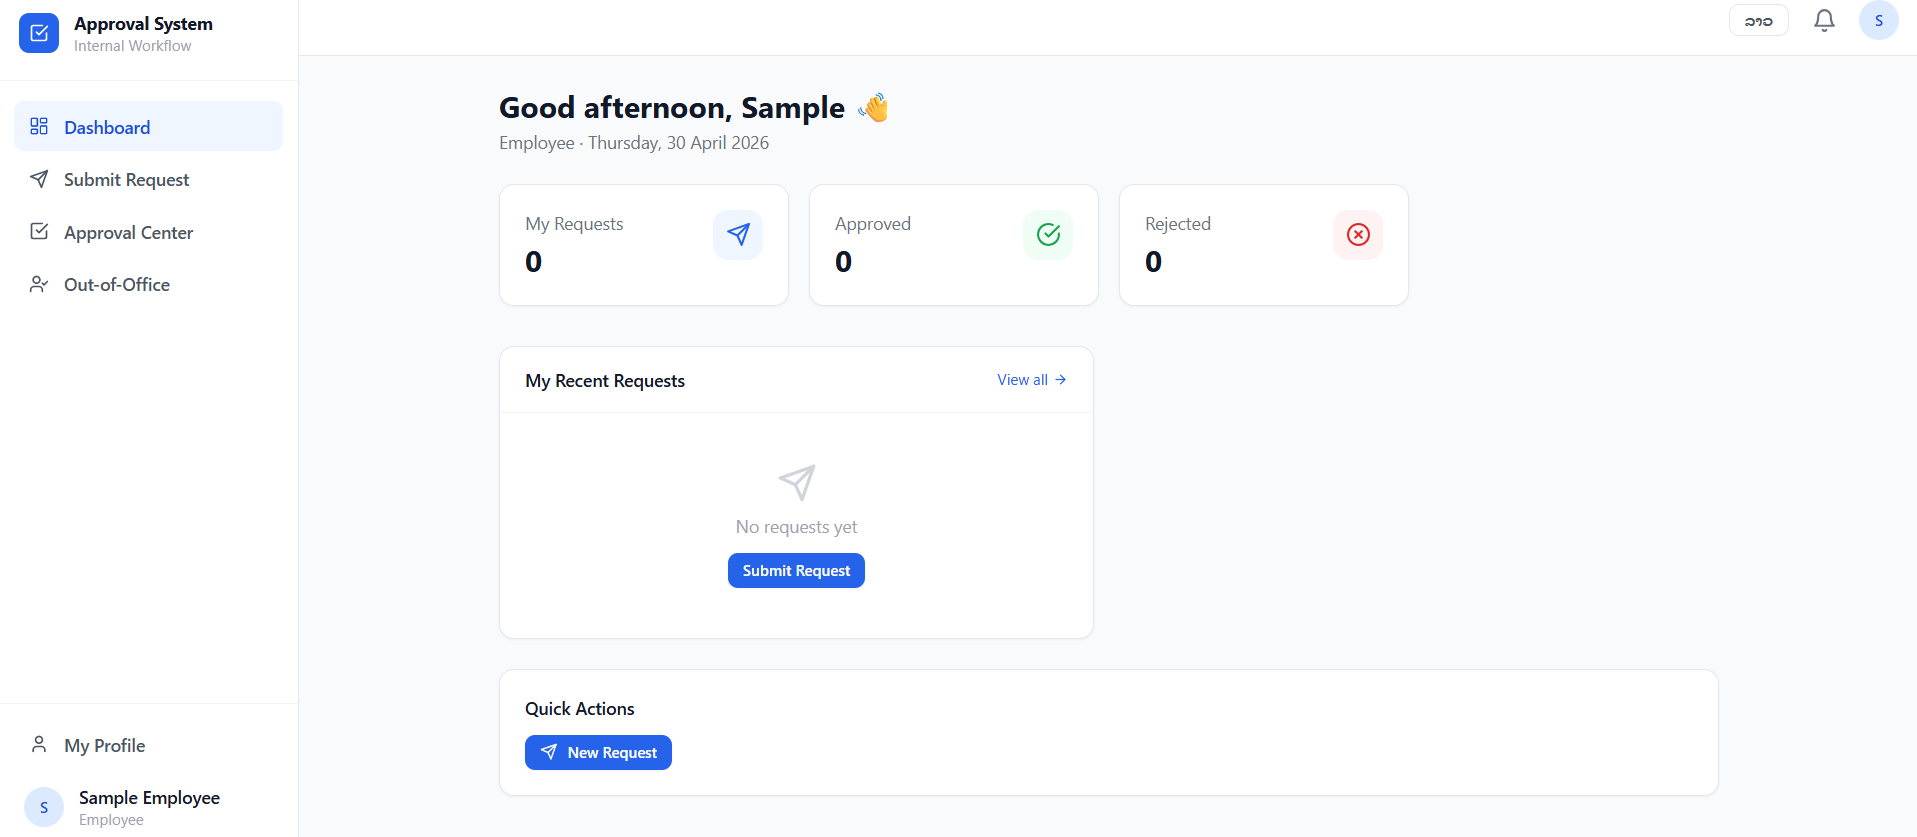
3.1 Dashboard
The Dashboard serves as the personal command center. It provides real-time statistics and quick access to your workflow.
-
Status Cards: View the total count of My Requests, Approved requests, and Rejected requests at a glance.
-
My Recent Requests: A dedicated section showing the status of your latest submissions. You can click "View all" and navigate to the "Approval Center" and see your full history. You can also submit a request using the "Submit Request" button.
-
Quick Actions: Contains a "+ New Request" button to quickly navigate to the "Submit Request" page and access submission forms.
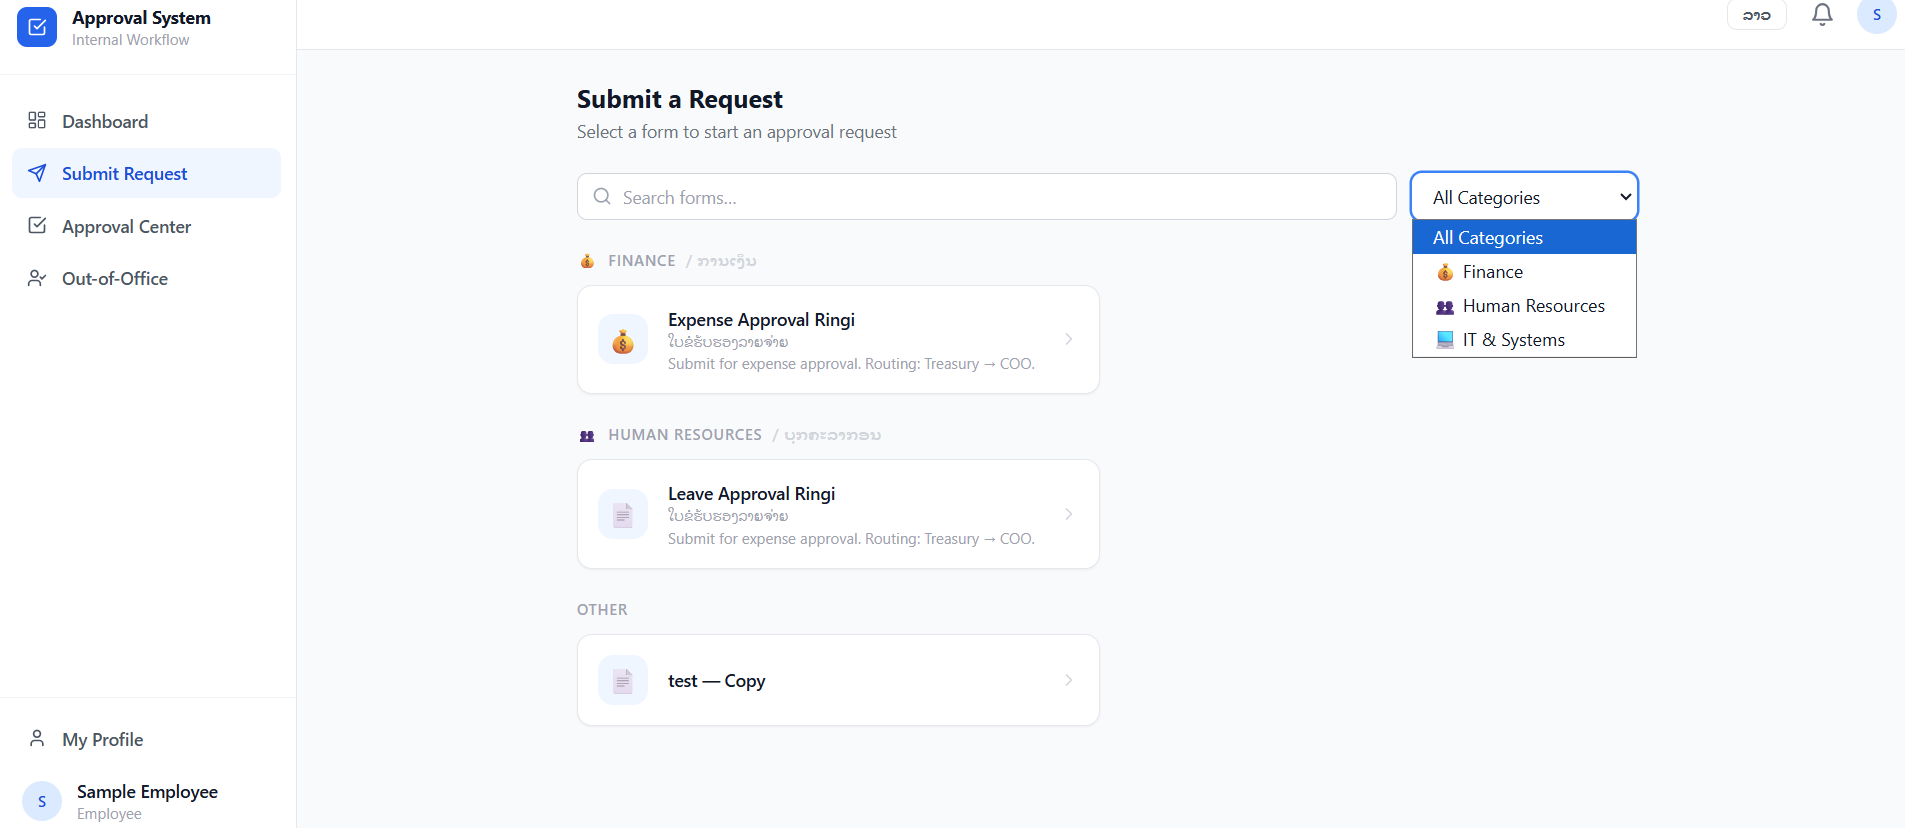
3.2 Submit Request
The Submit Request page lists all available forms categorized by department(Admin).
-
Searching for Forms: Use the Search bar or the Category filter (e.g., Finance, Human Resources, IT & Systems) to find specific request types.
-
Available Forms:
-
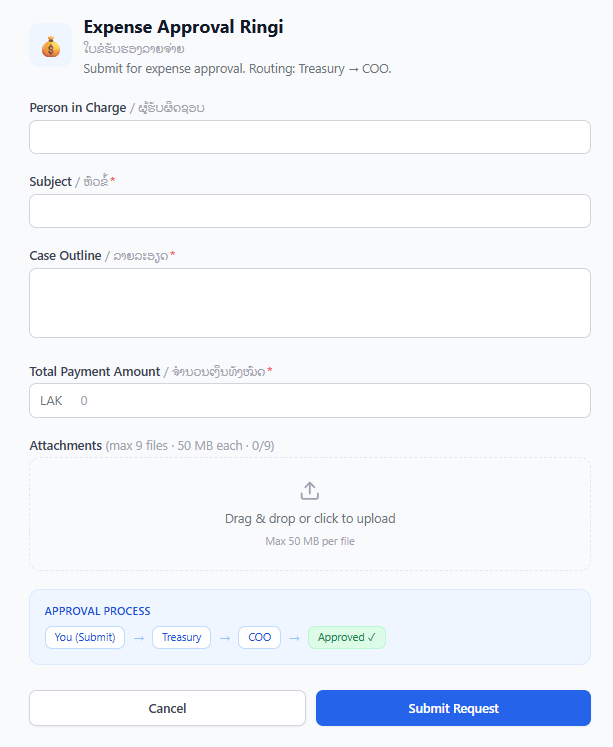
Finance: Expense Approval Ringi – Used for submitting financial reimbursement or expenditure requests.
-
Human Resources: Leave Approval Ringi – Used for requesting time off or vacations.
- IT & Systems: Dedicated category for technical requests.
-
Other: Miscellaneous forms.
-
-
How to Submit: Click on the desired form, fill in the required details, and click the submission button to start the approval routing (e.g., Treasury → COO).
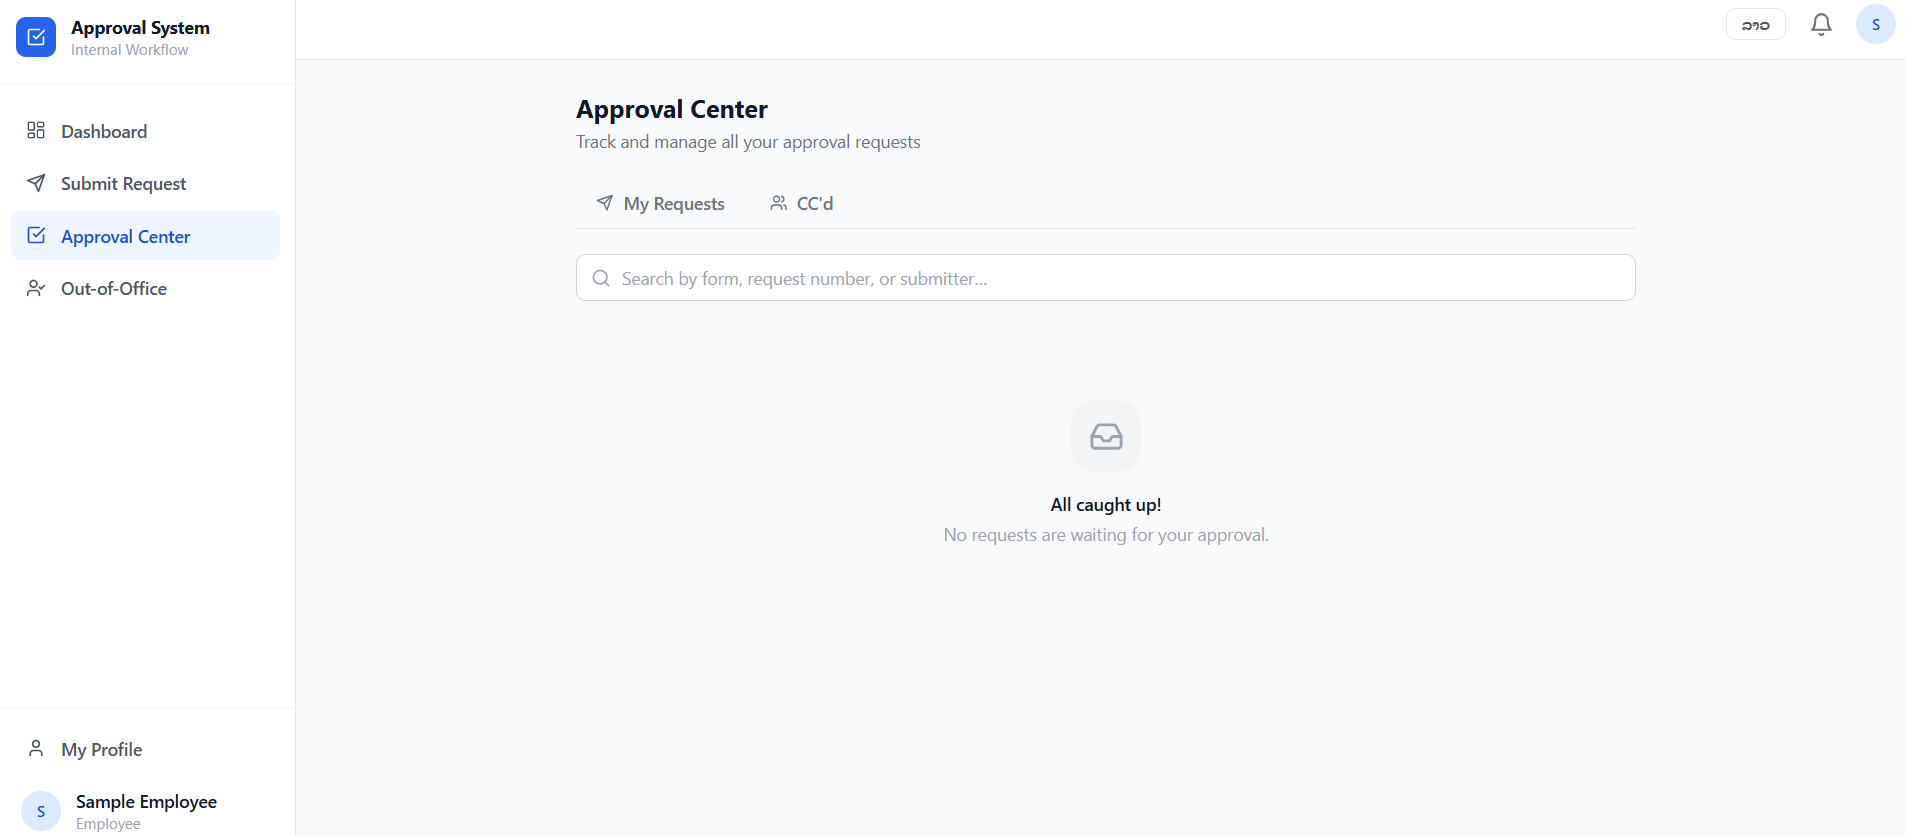
3.3 Approval Center
The Approval Center is where users manage requests that require their specific intervention.
-
My Requests Tab: Displays the status and history of requests you have submitted to others.
-
CC’d Tab: Displays requests where you have been added as a "Carbon Copy" (CC) recipient for informational purposes only.
-
Search & Filter: Use the search bar to locate specific requests by form name, request number, or the name of the submitter.
3.4 Out-of-Office (Delegation)
This feature ensures that workflows are not delayed while you are away from the office. When active, any approval tasks assigned to you will be automatically forwarded to your designated delegate.
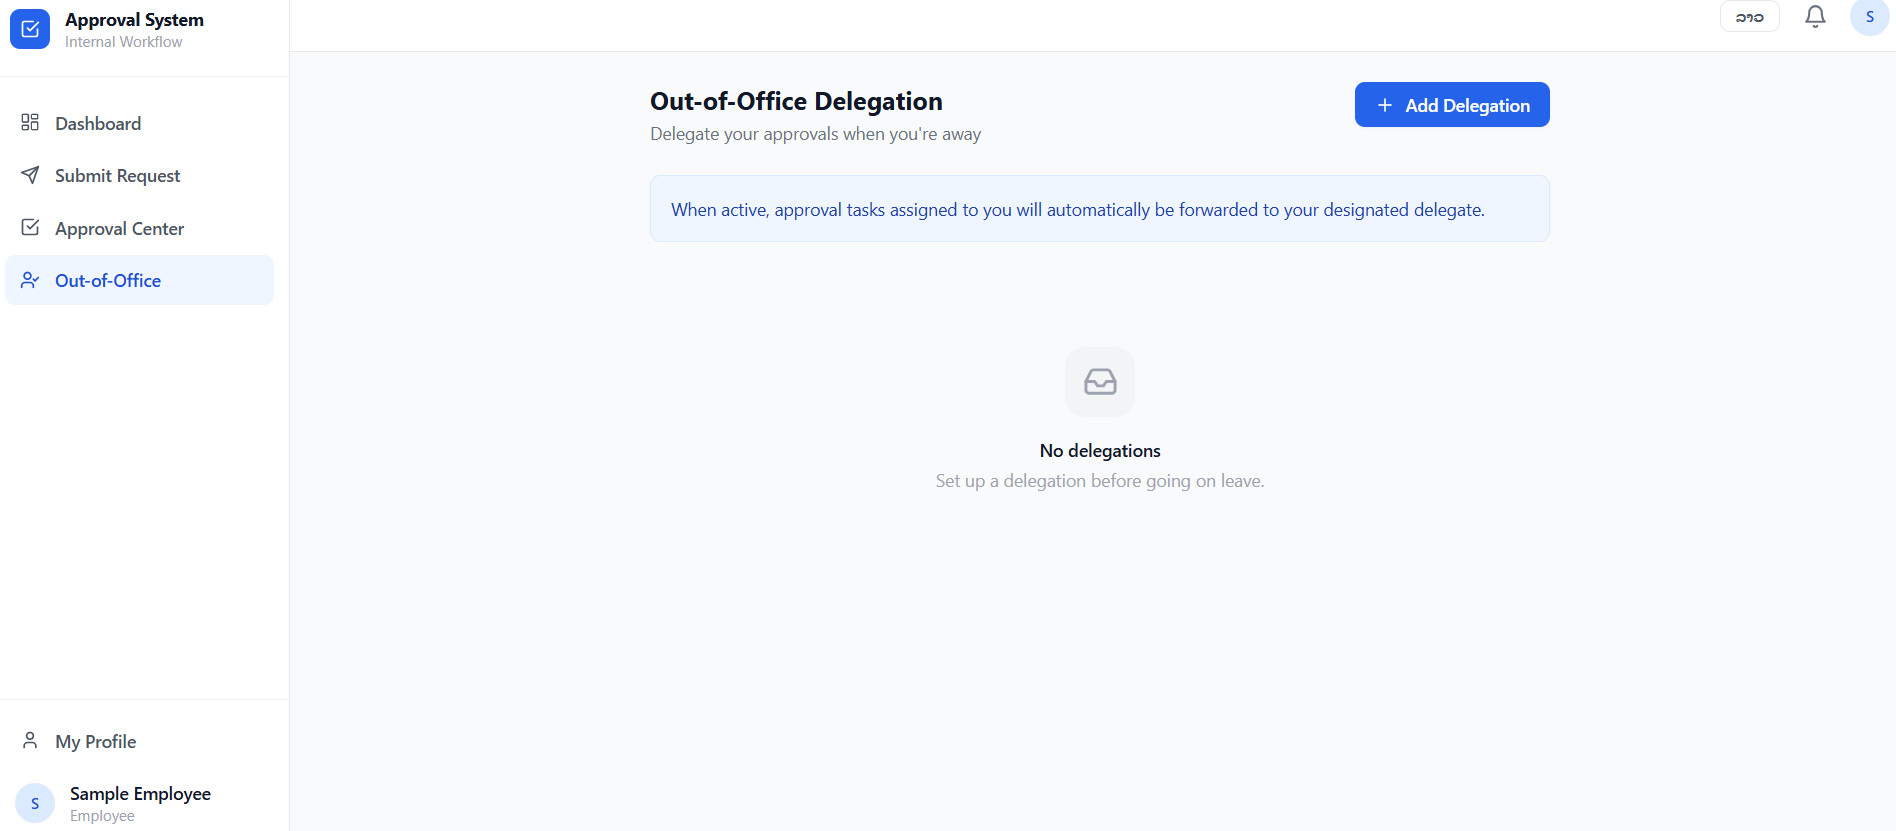
3.4.1. Adding a New Delegation
To set up a delegate, follow these steps:
3.4.2. How it Works
-
Automatic Forwarding: Once the start date is reached, the system automatically redirects all new approval requests to the chosen delegate.
-
Duration: The delegation will remain active until the end of the "To" date, after which it will expire automatically.
3.4.3. Managing Delegations
-
View: All current and upcoming delegations are listed on the main Out-of-Office page.
-
Edit/Remove: You can modify the dates or cancel a delegation early by selecting the specific entry from the list.
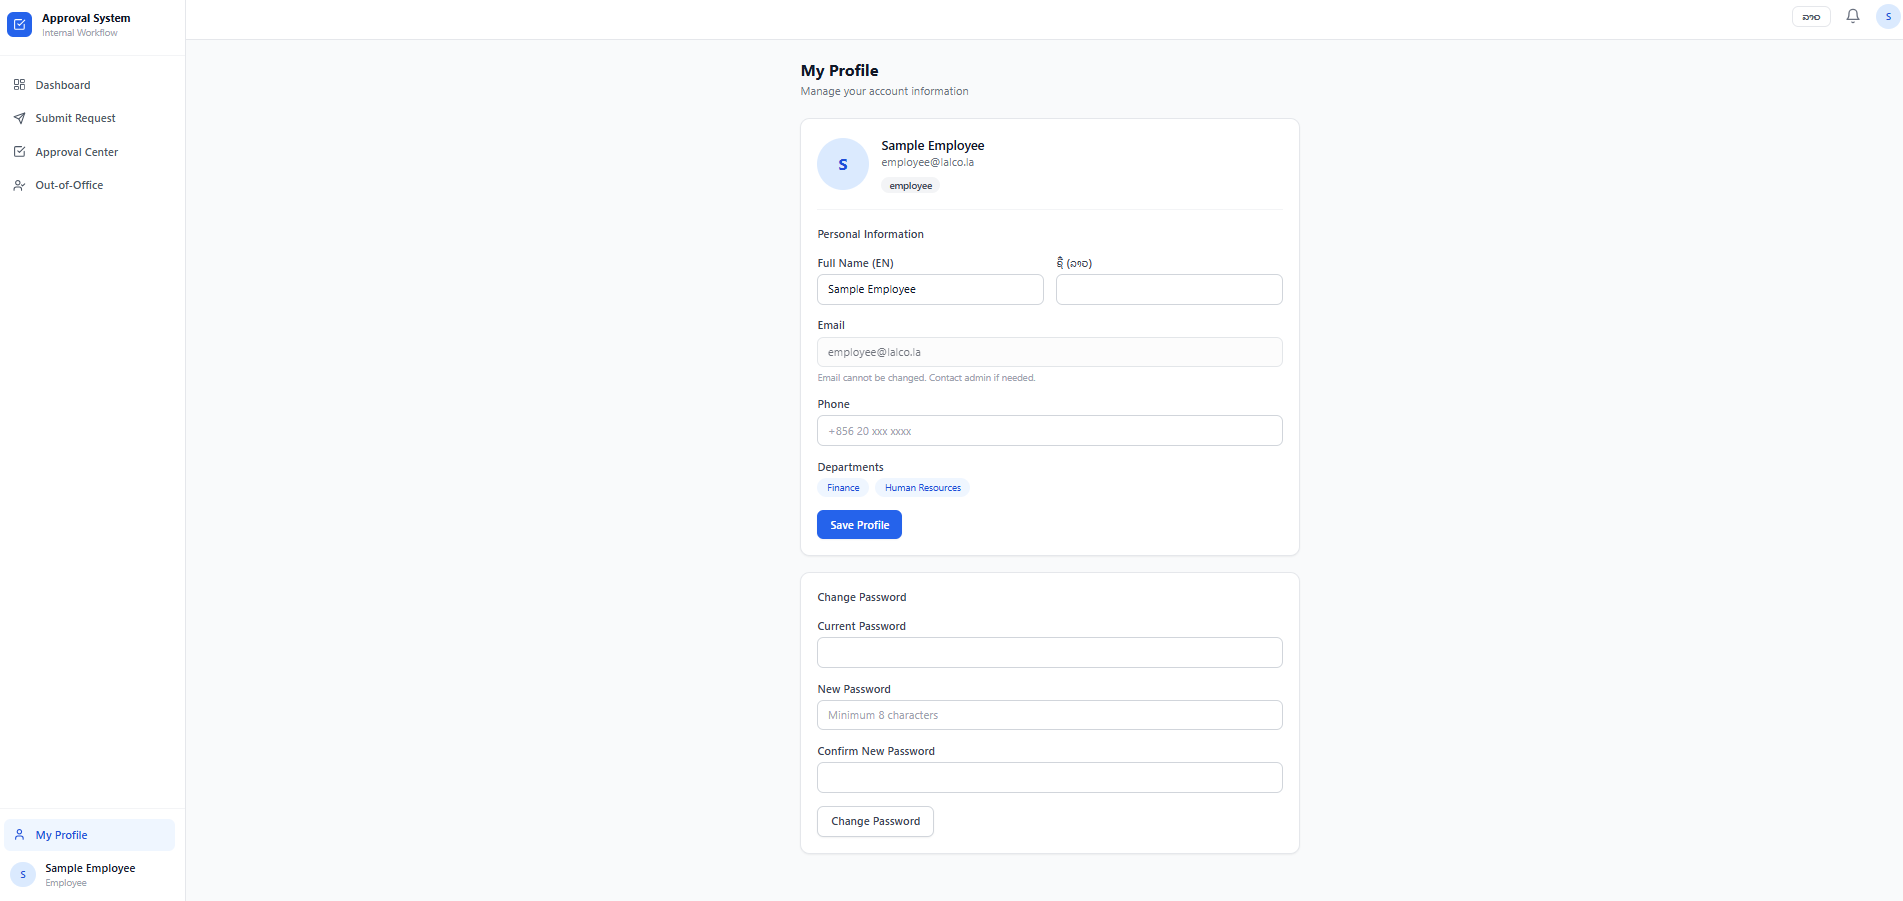
4. User Profile & Preferences
Located at the bottom of the left sidebar, the Profile section allows you to:
-
My Profile: View your employee details and account settings. It can edit details, change passwords and save profile.
-
Language Selection: (Top right of the header) Switch the interface language between EN (English) & Lao(Laos) local languages.
-
Notifications: Click the Bell Icon in the top header to view recent alerts regarding your requests.
Approval System – Admin User Manual
Introduction
The Admin Module of the Approval System provides authorized administrators with full control over the workflow lifecycle. This includes designing approval forms, defining multi-step workflows, managing user permissions, and auditing system activity. This manual guides system admins through the advanced features required to maintain an efficient internal workflow.
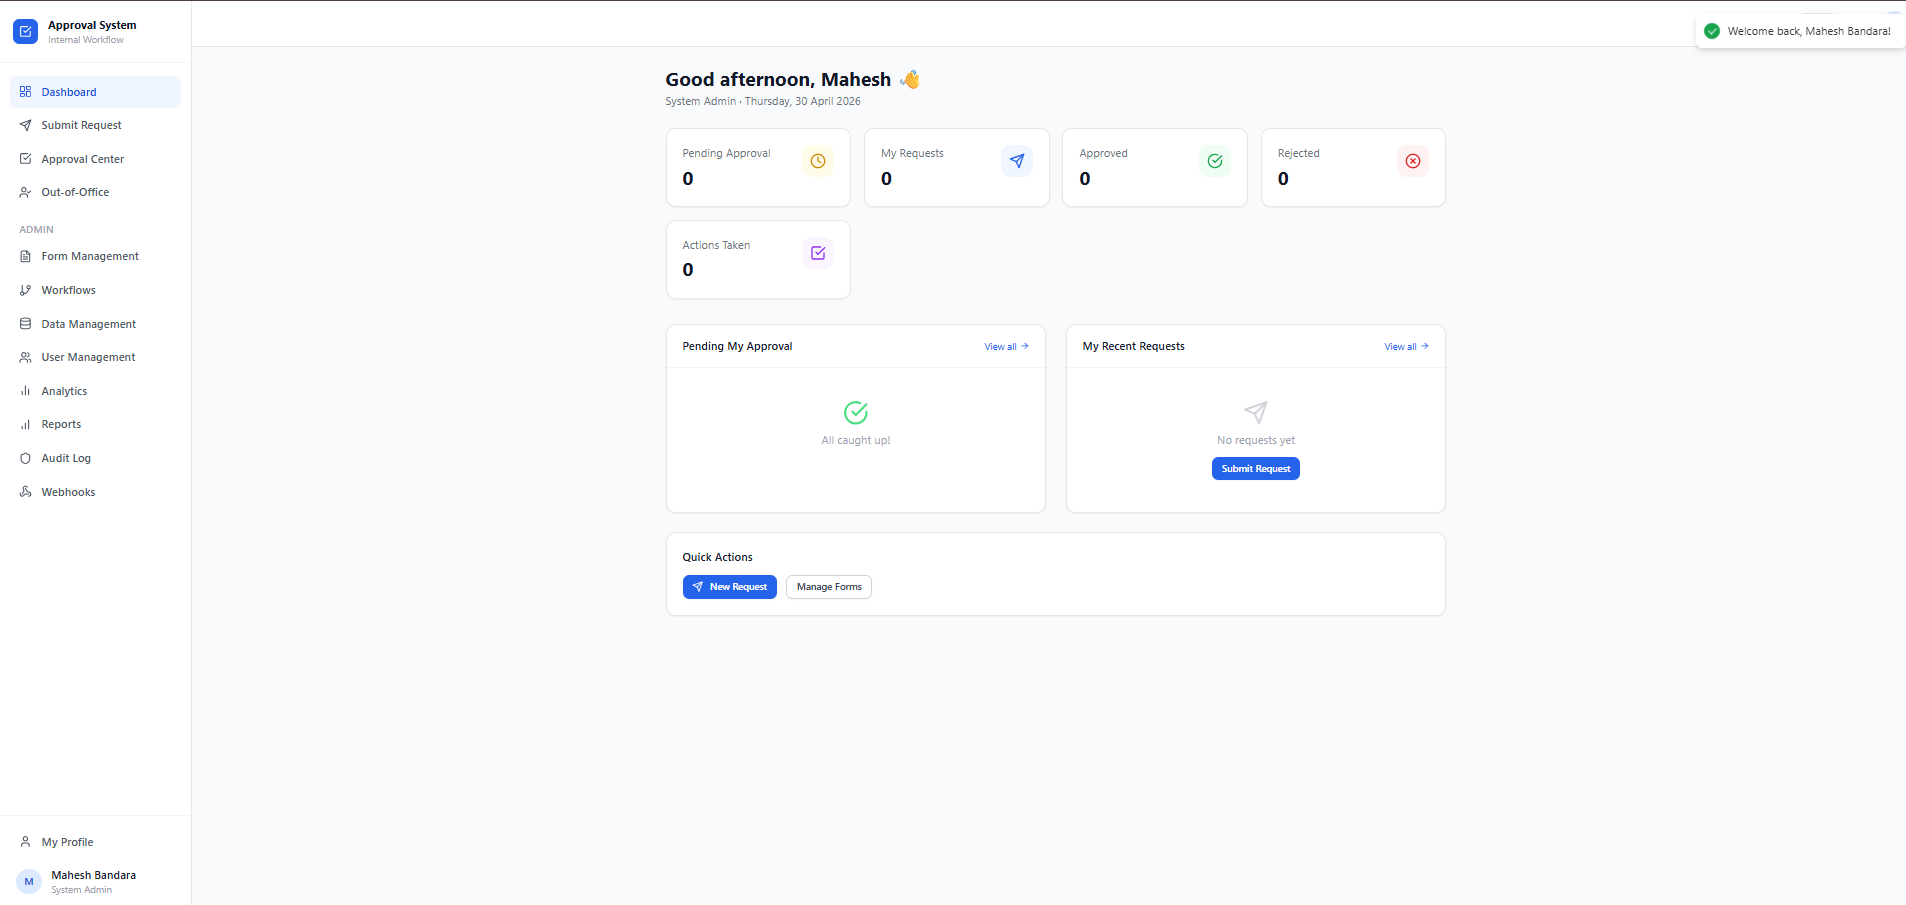
1. Admin Dashboard Overview
Upon logging in with administrator privileges, the Dashboard expands to include specialized Admin Statistics:
-
Status Cards: View the total count of Pending Approval, My Requests, Approved, Rejected requests, and Actions Taken requests at a glance.
-
Pending My Approval: A specific queue for requests where the admin is the next designated reviewer. When clicking "View all" navigate to the "Approval Canter" page.
-
Quick Actions: Contains a "+ New Request" button to quickly navigate to the "Submit Request" page and access submission forms. Also, Admins have an additional "Manage Forms" shortcut to quickly access the "Form Management" page.
2. Submit Request
The Submit Request page lists all available forms categorized by department(Admin).
-
Searching for Forms: Use the Search bar or the Category filter (e.g., Finance, Human Resources, IT & Systems) to find specific request types.
-
Available Forms:
-
Finance: Expense Approval Ringi – Used for submitting financial reimbursement or expenditure requests.
-
Human Resources: Leave Approval Ringi – Used for requesting time off or vacations.
- IT & Systems: Dedicated category for technical requests.
-
Other: Miscellaneous forms.
-
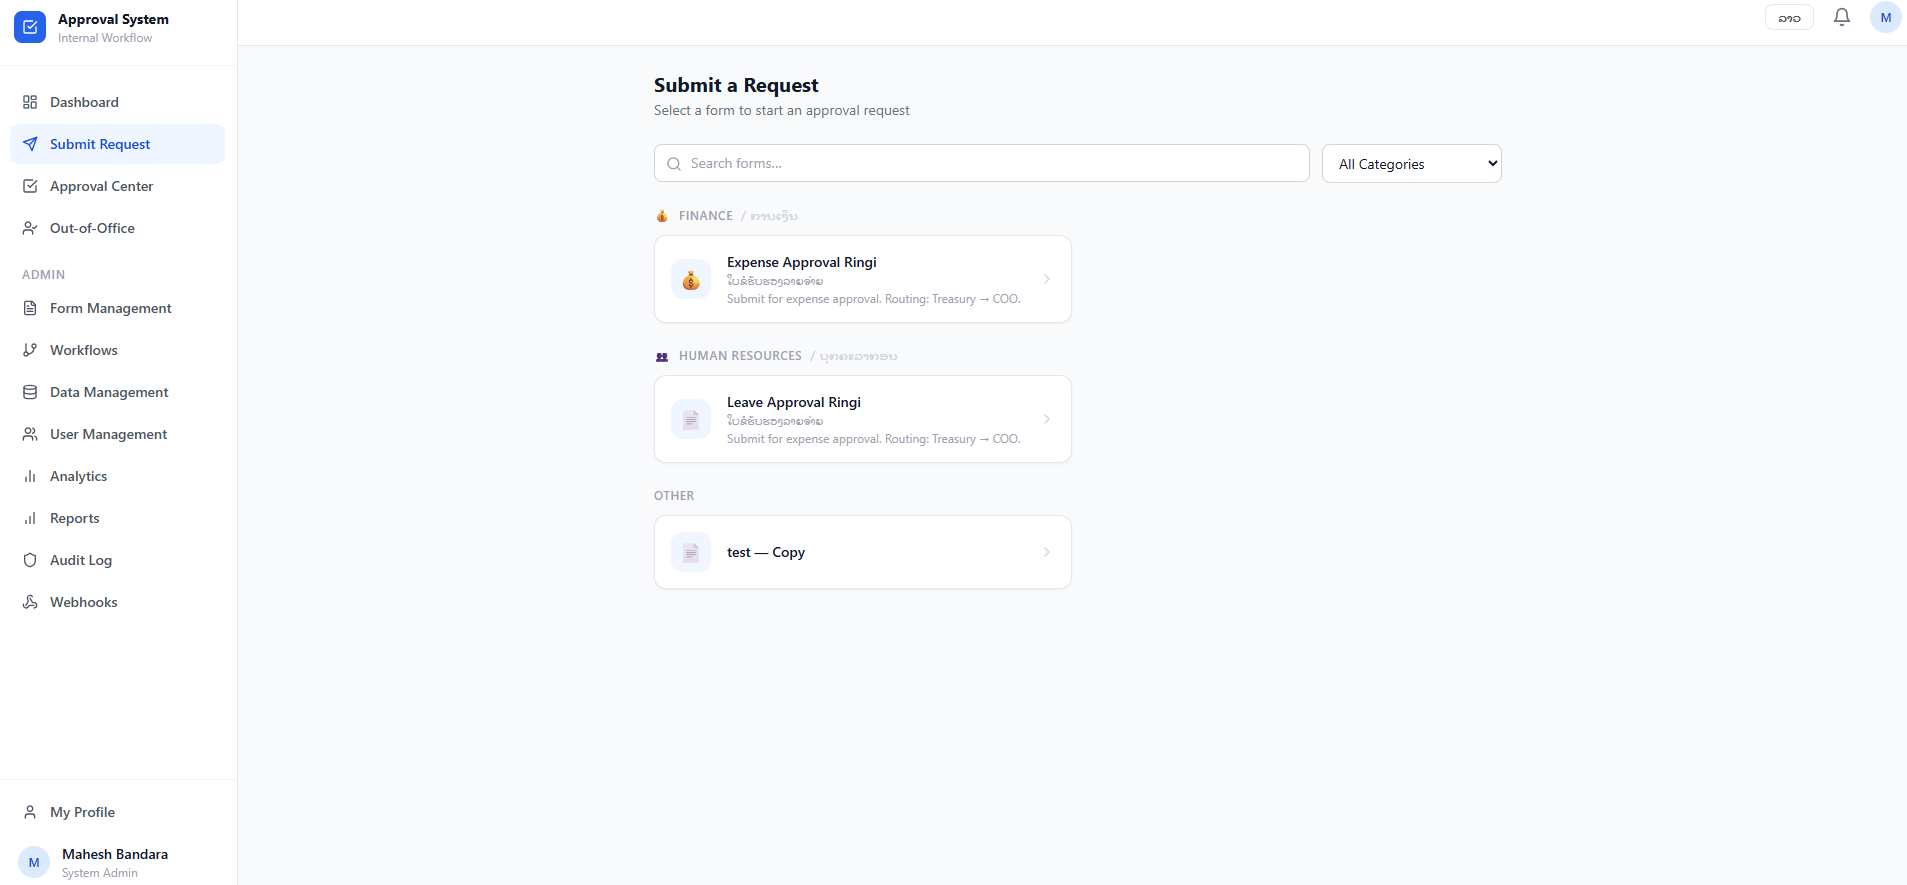
- How to Submit: Click on the desired form, fill in the required details, and click the submission button to start the approval routing (e.g., Treasury → COO).
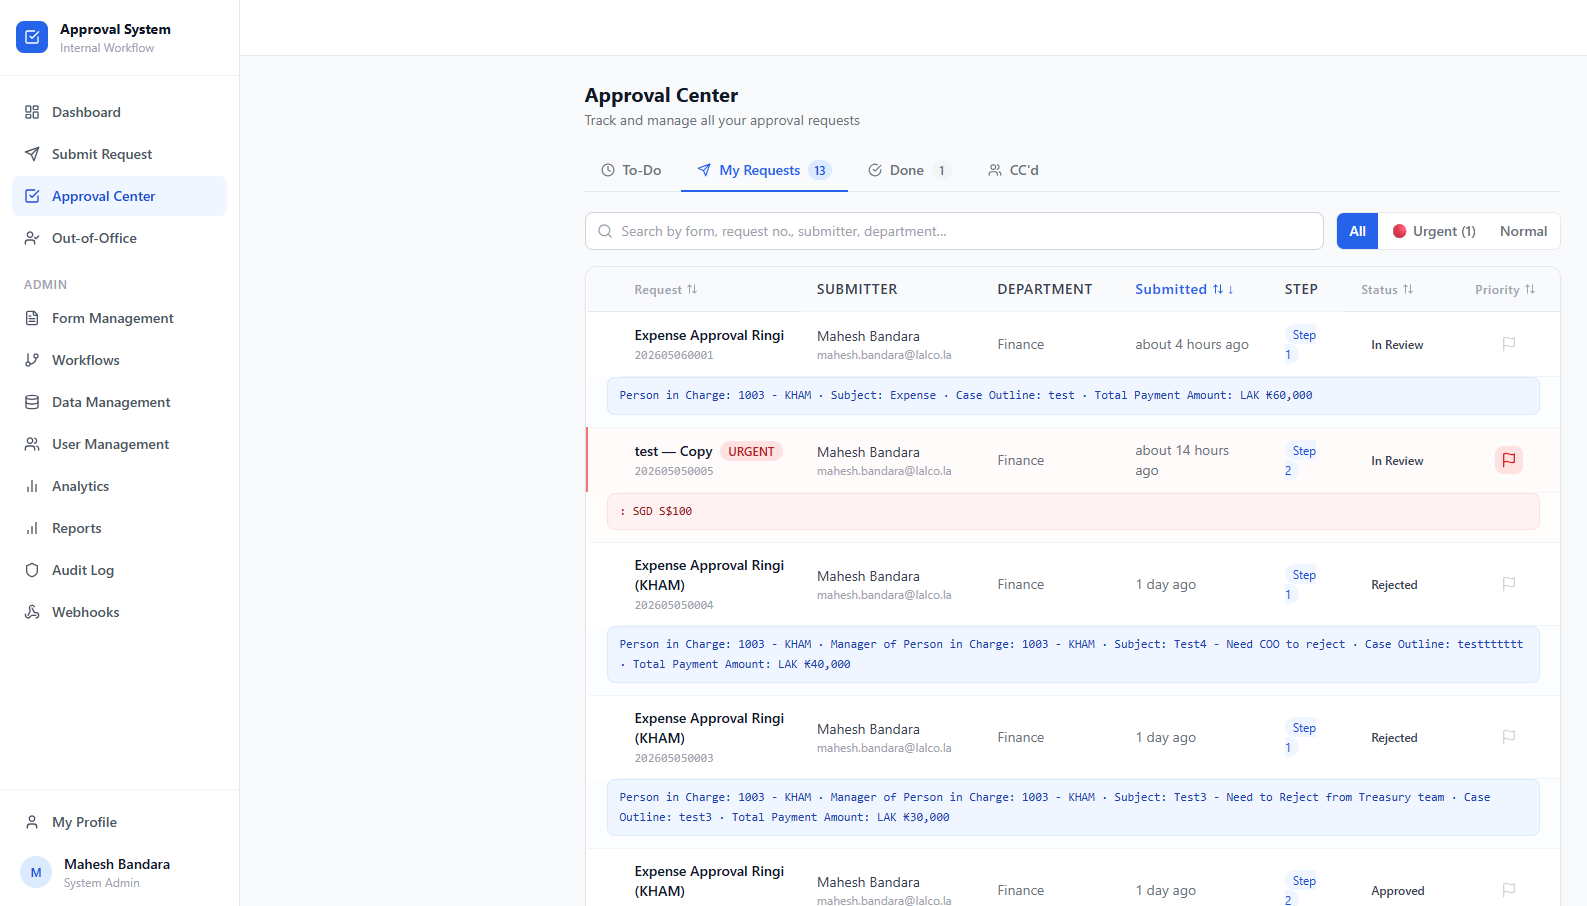
3. Approval Center
The Approval Center is where users manage requests that require their specific intervention.
3.1. Navigation Tabs
The interface is organized into four main categories to streamline the workflow:
-
To-Do Tab: Contains requests that are currently awaiting your action (e.g., approval or rejection).
-
My Requests Tab: Displays the status and history of requests user have submitted to others.
- Done Tab: A log of requests that user have already processed or that have reached a final status.
-
CC’d Tab: Displays requests where you have been added as a "Carbon Copy" (CC) recipient for informational purposes only.
3.2. Search, Filter, and Priority
Admins and users can quickly locate and prioritize specific tasks using the following tools:
-
Search & Filter: Use the search bar to locate specific requests by form name, request number, or the name of the submitter.
-
Priority Filters: Quickly sort the list by selecting All, Urgent, or Normal priority levels to focus on the most time-sensitive tasks.
-
Urgent Indicators: Requests marked as "Urgent" are highlighted with a red badge and a flag icon for immediate visibility.
3.3. Request List Details
Each entry in the Approval Center provides a comprehensive overview of the request's current state.
-
General Info: Displays the form title (e.g., Expense Approval Ringi), request number, and the submitter's name and email.
-
Workflow Progress: Shows the current Step number and the overall Status (e.g., In Review, Approved, or Rejected).
-
Timeline: Indicates exactly when the request was submitted (e.g., "about 4 hours ago" or "1 day ago").
-
Case Summary: Provides a detailed breakdown of the request, including the person in charge, subject, case outline, and total payment amounts in local or foreign currencies.
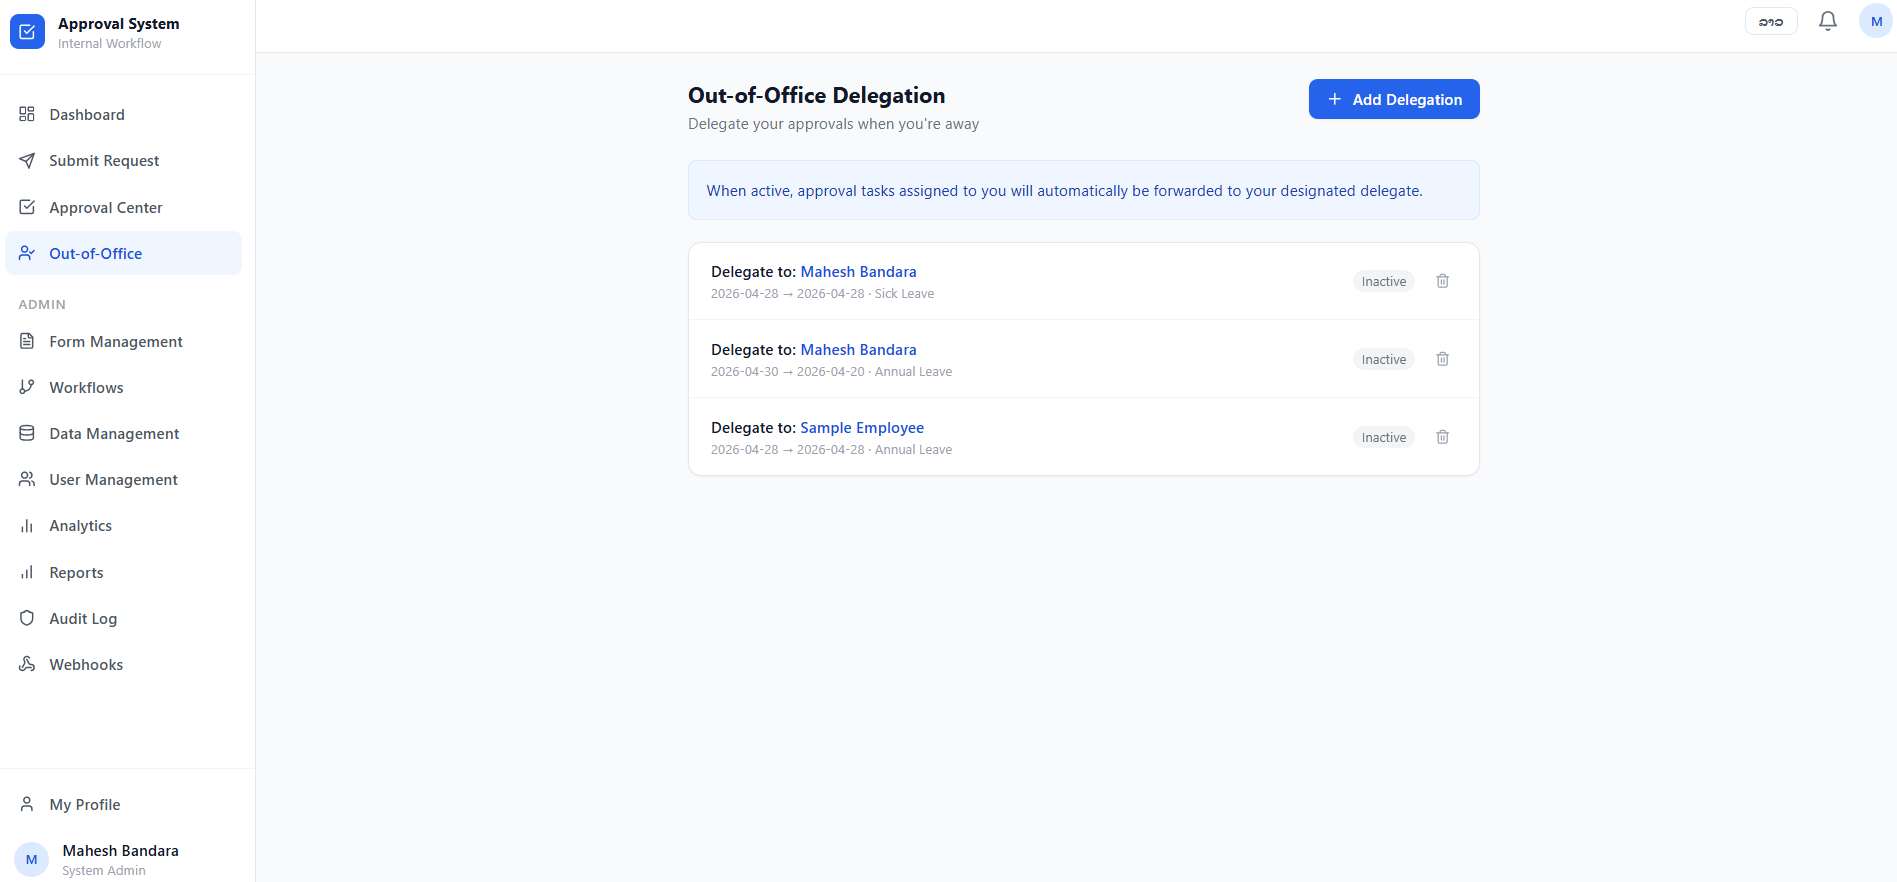
4. Out-of-Office (Delegation)
This feature ensures that workflows are not delayed while you are away from the office. When active, any approval tasks assigned to you will be automatically forwarded to your designated delegate.
4.1. Adding a New Delegation
To set up a delegate, follow these steps:

4.2. How it Works
-
Automatic Forwarding: Once the start date is reached, the system automatically redirects all new approval requests to the chosen delegate.
-
Duration: The delegation will remain active until the end of the "To" date, after which it will expire automatically.
4.3. Managing Delegations
-
View: All current and upcoming delegations are listed on the main Out-of-Office page.
-
Edit/Remove: You can modify the dates or cancel a delegation early by selecting the specific entry from the list.
5. Form Management
The Form Management module allows you to create and customize the digital forms employees use to submit requests.
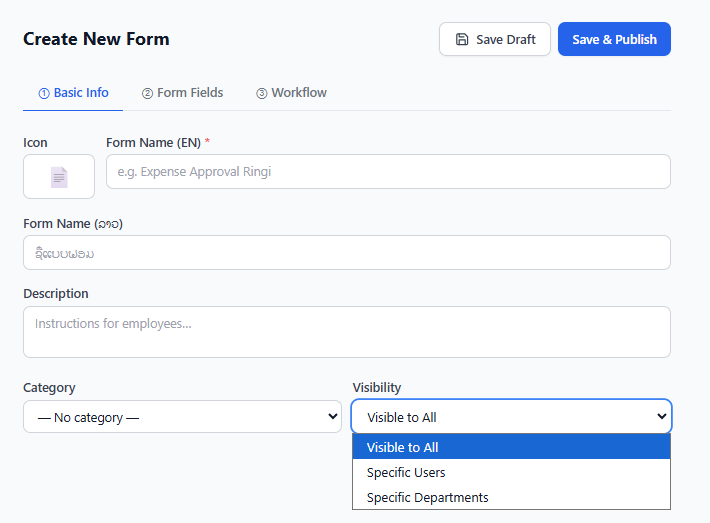
5.1. Creating a New Form
Step 1: Basic Info
-
Icon & Name: Assign a recognizable icon and a name in both English and Local languages.
-
Description: Provide instructions to help employees fill out the form correctly.
-
Category: Group the form under Finance, Human Resources, or IT & Systems.
-
Visibility: Control who can see the form (Visible to All, Specific Users, or Specific Departments).
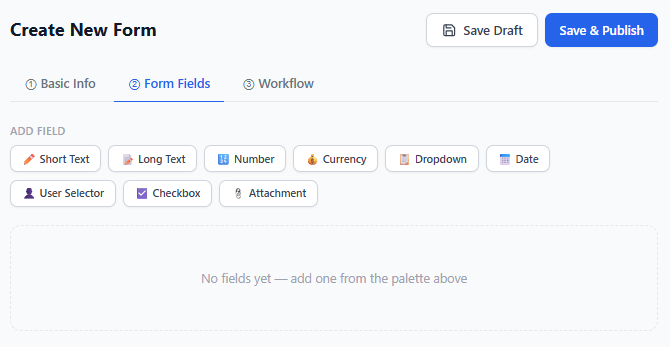
Step 2: Form Fields Build your form by clicking on the desired field types from the palette:
-
Text Options: Short Text, Long Text.
-
Data Fields: Number, Currency, Dropdown, Date.
-
Special Fields: User Selector (to pick employees), Checkbox, and Attachment (for file uploads).
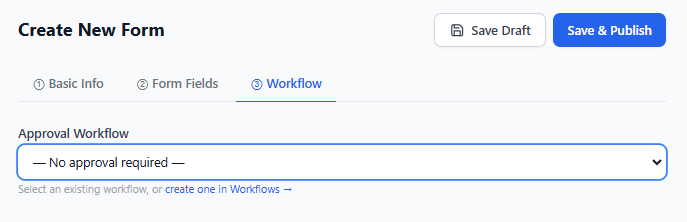
Step 3: Workflow
-
Define the sequence of approvers (e.g., Treasury → COO → Final Approval).
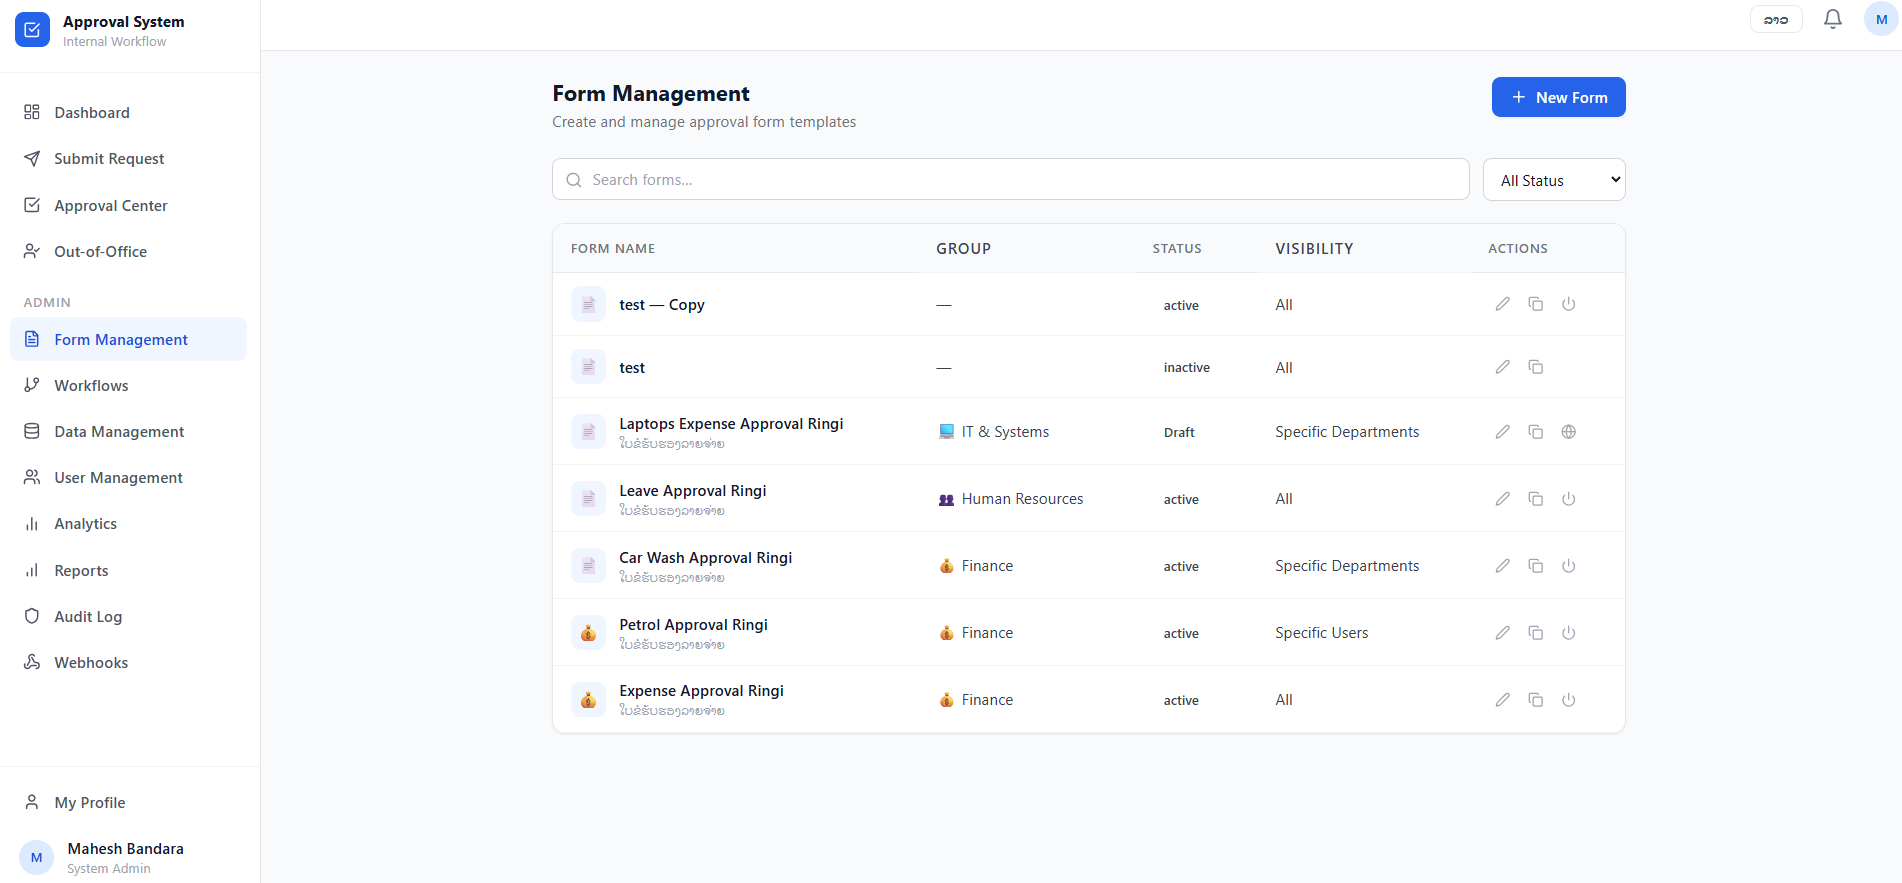
5.2. Managing Existing Forms
In the Form Management list, you can view the status of every template:
-
Status Filters: Filter by Active, Inactive, or Draft using the dropdown menu.
-
Actions: Use the icons to Edit (pencil), Duplicate (copy), or Deactivate (power) a form. Draft forms have a Publish icon; clicking it will publish the form and change the status from Draft to Active.
6. Workflows
6.1. Workflow Management
Admins can create complex, multi-step approval chains that are user can select manually when creating a form.
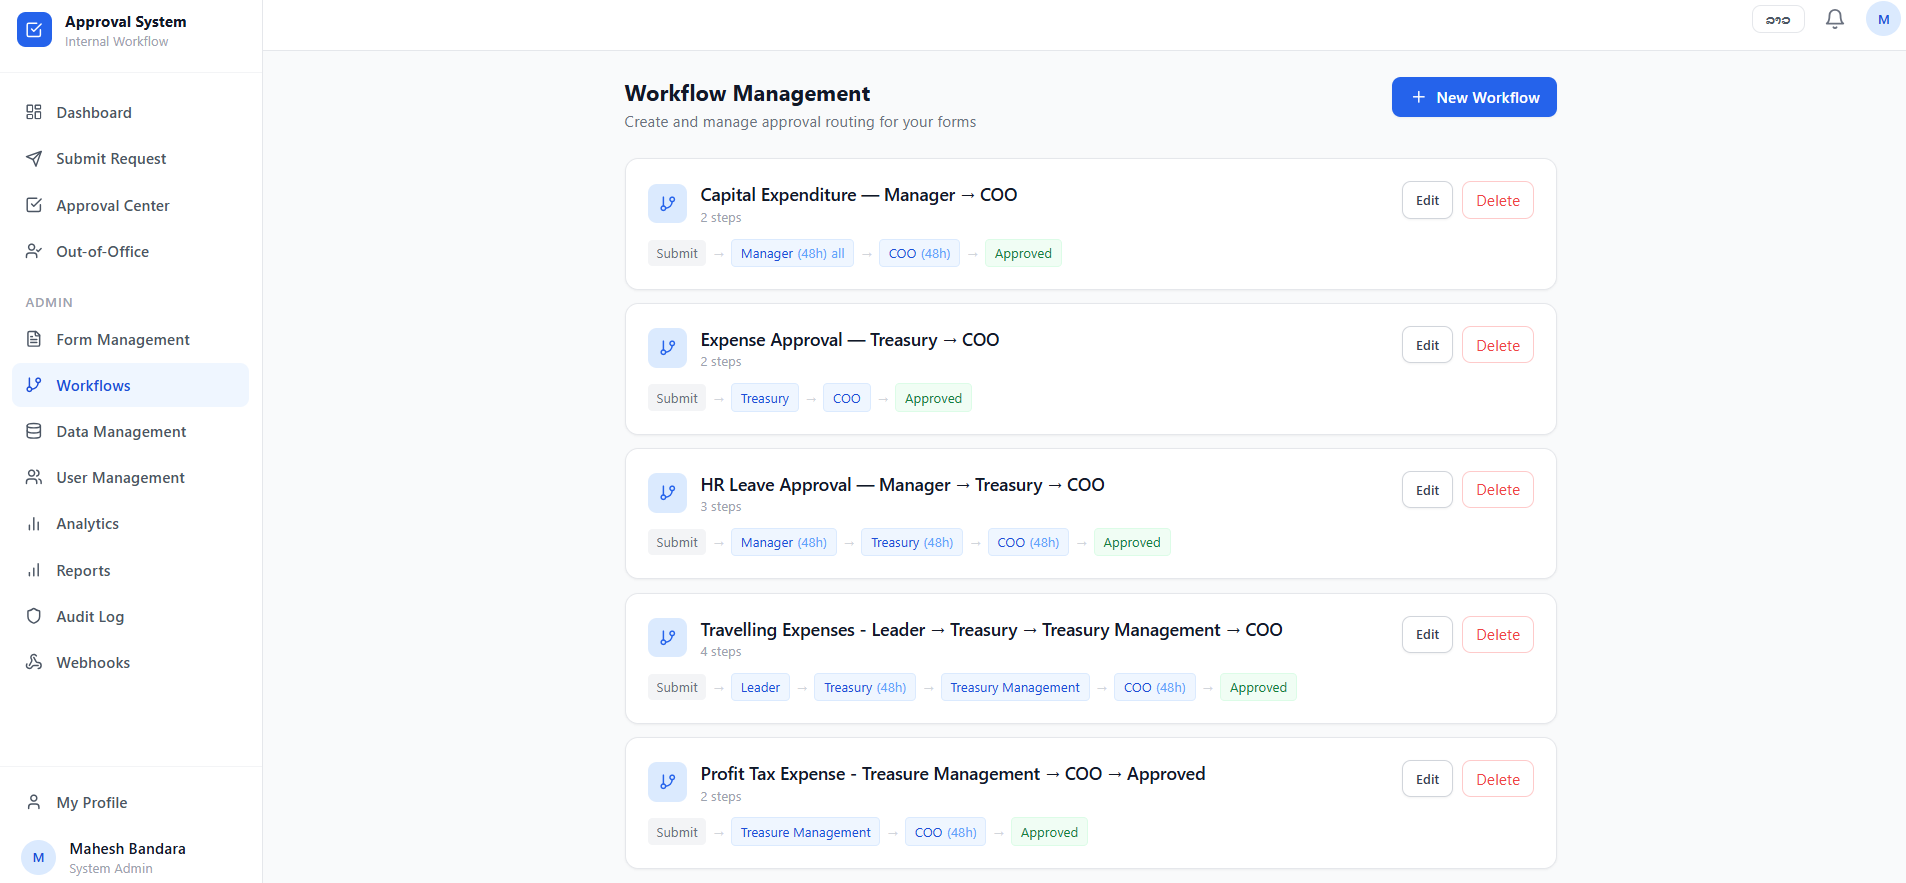
6.1 Workflow Overview
The main Workflow Management page displays all existing routing paths:
-
Workflow Cards: Each card displays the workflow name, the number of steps, and a visual flowchart of the routing path (e.g., Submit → Treasury → COO → Approved).
-
Step Indicators: Some steps may show a time limit (e.g., 48h), indicating a deadline for that specific approver.
-
Management Actions: Use the Edit button to modify an existing path or Delete to remove a routing chain that is no longer needed.
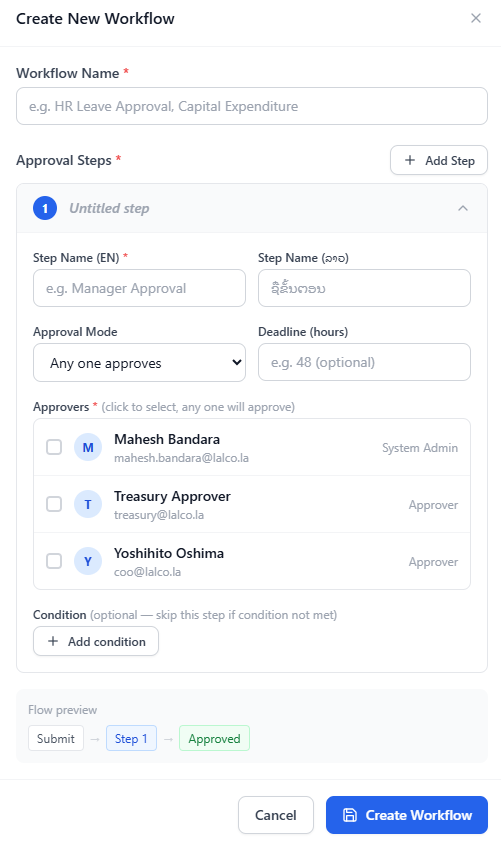
6.2 Creating a New Workflow
Click the + New Workflow button to open the configuration window:
-
Workflow Name: Enter a descriptive title (e.g., "Capital Expenditure" or "HR Leave Approval").
-
Adding Steps: Click + Add Step to build the approval chain. For each step, you must define:
-
Step Name: Provide a title for the step in both English and local languages.
-
Approval Mode: Choose between "Any one approves" (only one designated person needs to sign off) or "All must approve" (requires unanimous agreement from all listed approvers in that step).
-
Deadline: Optionally set a time limit in hours for the approver to take action.
-
Select Approvers: Choose the specific users or roles responsible for this step from the user list.
-
-
Conditions (Optional): Click + Add condition to create rules for skipping a step (e.g., "Skip Manager approval if the amount is less than 1,000,000 LAK").
-
Flow Preview: Review the real-time diagram at the bottom to confirm the routing sequence is correct before clicking Create Workflow.
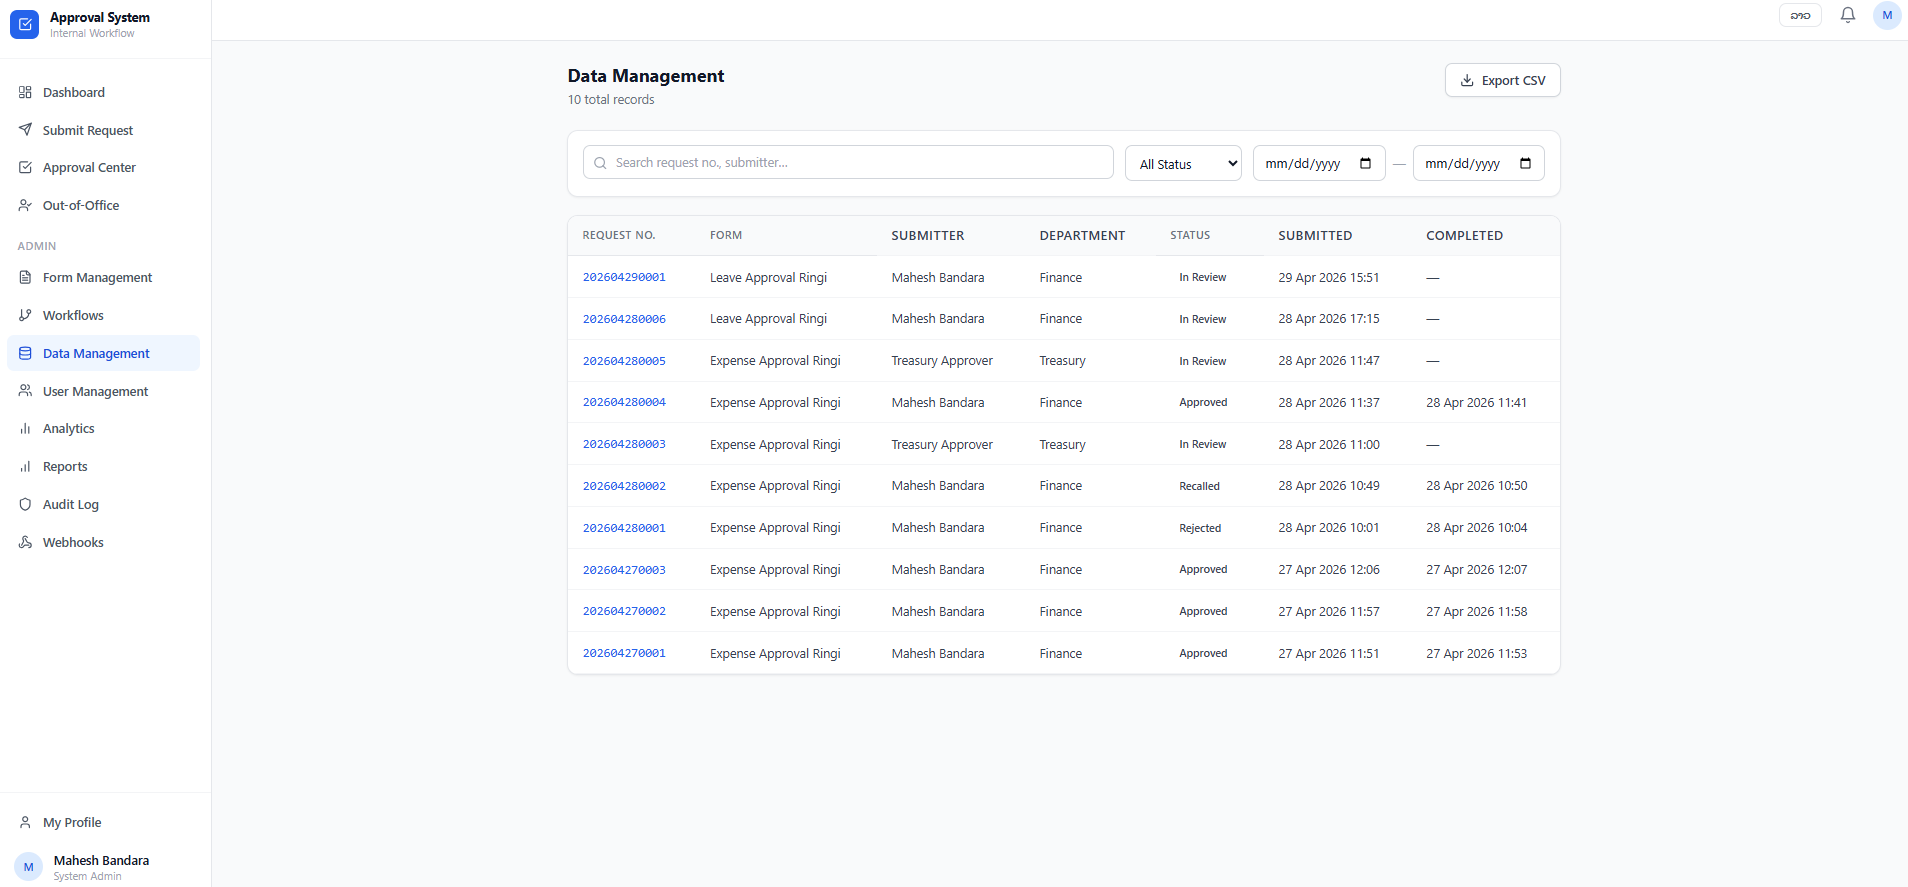
7. Data Management
The Data Management module provides administrators with a centralized repository of all requests submitted through the system. This interface is essential for auditing, tracking the history of specific requests, and exporting data for organizational reporting.
7.1. Records Overview
The main table displays a comprehensive list of all system records. Key information for each request includes:
-
Request No: The unique identification number assigned to each submission.
-
Form: The type of request form used (e.g., Leave Approval Ringi / Expense Approval Ringi).
-
Submitter: The name of the individual who initiated the request.
-
Department: The organizational unit associated with the submitter.
-
Status: The current standing of the request (e.g., Pending, In Review, Approved, Rejected, or Recalled).
-
Submitted & Completed: Precise timestamps indicating when the request was first filed and when it reached its final status.
7.2. Filtering and Searching
To efficiently manage large volumes of data, the module includes several search and filter tools:
-
Search Bar: Allows admins to find specific entries by searching for a request number or the name of a submitter.
-
Status Filter: A dropdown menu that enables users to view records by their current workflow stage, such as "Pending", "In Review", "Approved", "Rejected", or "Recalled".
-
Date Range Selector: Allows for filtering records based on specific start and end dates to track activity over defined periods.
7.3. Exporting Data
For offline analysis or integration with external financial and HR systems, admins can use the Export CSV button located at the top right of the page. This action generates a downloadable file containing the filtered set of records currently displayed in the table.
8. User Management
The User Management module allows system administrators to oversee the organizational hierarchy and manage access to the system. From this interface, you can add new employees, assign specific roles, and update existing user profiles.
8.1. User Directory Overview
The primary User Management screen provides a table of all registered users:
-
User: Displays the employee's name and corporate email address.
-
Role: Indicates the user's permission level (e.g., system admin, employee, or approver).
-
Departments: Shows the department(s) to which the user is assigned, which is critical for request routing. (e.g., Finance/ HR).
-
Actions: Use the pencil icon to modify an existing user's information.
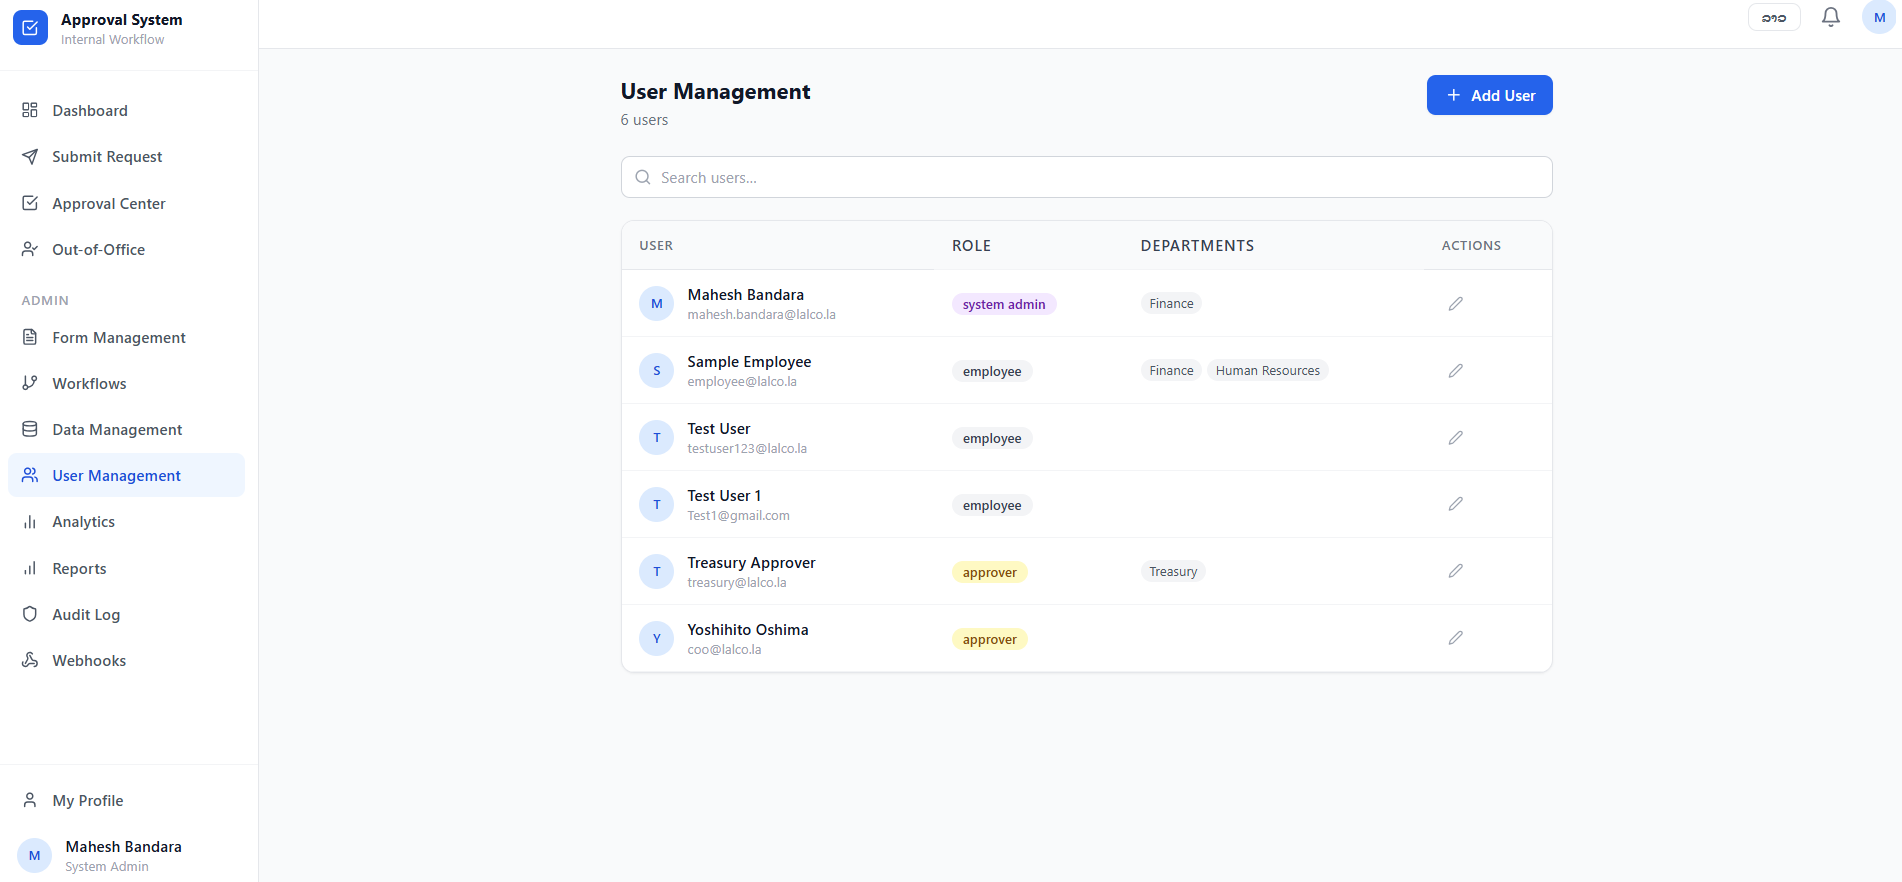
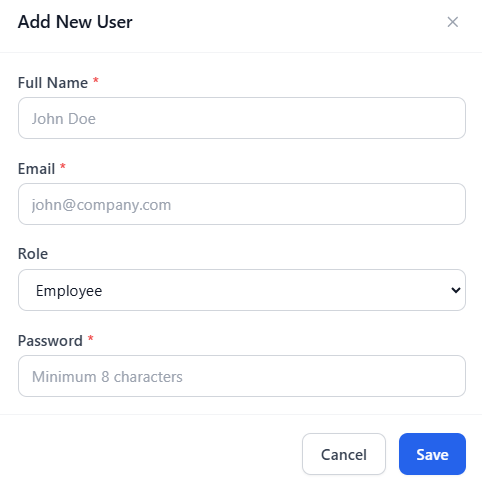
8.2. Adding a New User
To register a new employee, click the + Add User button at the top right of the dashboard. A modal will appear requiring the following details:
-
Full Name: Enter the employee's official name.
-
Email: Provide the employee's unique email address.
-
Role: Select the appropriate access level from the dropdown menu:
-
Employee: Standard access for submitting requests.
-
Approver: Designated for managers or personnel authorized to review requests.
-
Process Admin: Authorized to manage specific workflow processes.
-
System Admin: Full administrative access to all settings and data.
-
-
Password: Set an initial password with a minimum of 8 characters.
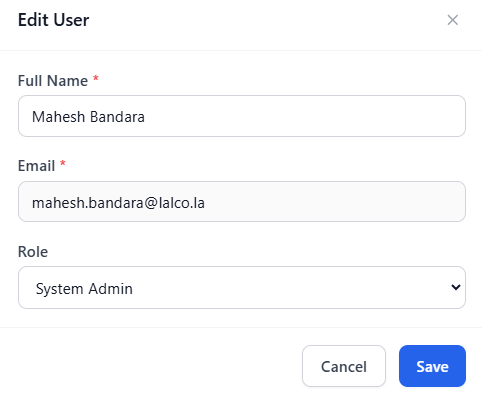
8.3. Editing User Profiles
Administrators can update user details at any time by selecting the edit action. This allows for modifications to the user's Full Name, Email, and Role as their responsibilities within the organization change.
9. Analytics
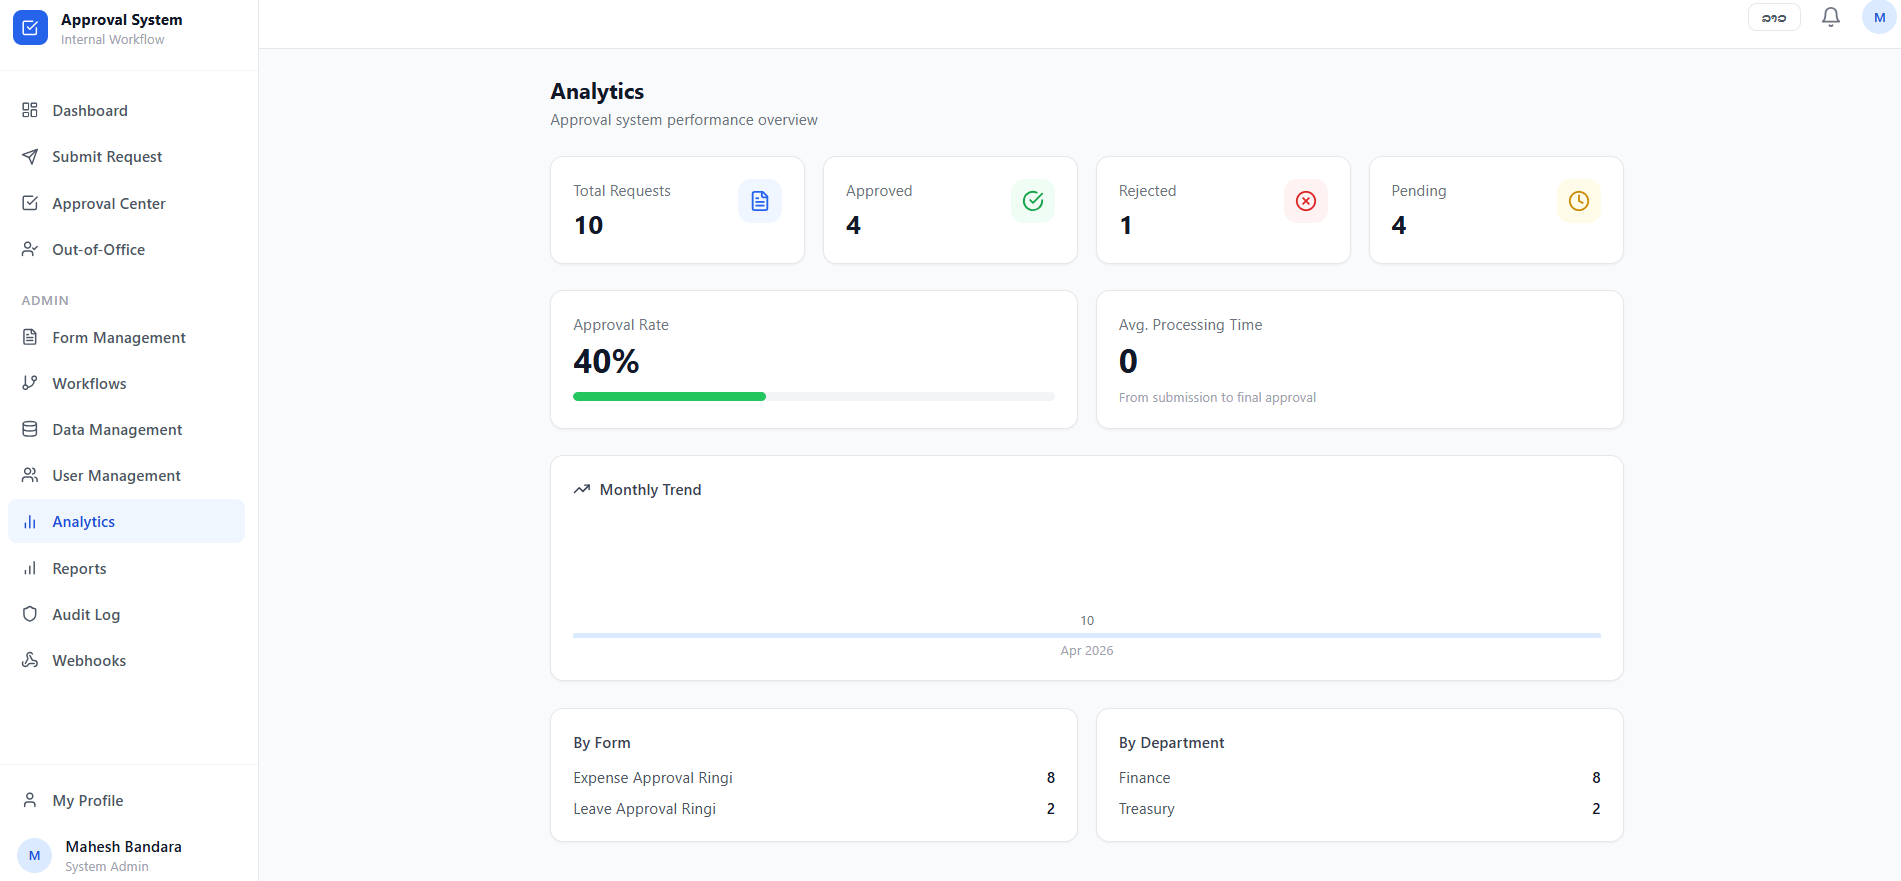
The Analytics module provides a high-level performance overview of the approval system, allowing administrators to monitor efficiency and identify trends within organizational workflows.
9.1. Performance Summary
The top section of the dashboard highlights key metrics based on current data:
-
Total Requests: The aggregate number of submissions processed by the system (e.g., 10).
-
Request Status Breakdown: A visual count of requests that are currently Approved, Rejected, or Pending.
-
Approval Rate: The percentage of total requests that have successfully reached "Approved" status.
-
Avg. Processing Time: The average duration from the initial submission to final approval, used to measure system efficiency.
9.2. Monthly Trend
The Monthly Trend chart displays request volume over time (e.g., showing activity for April 2026), helping admins visualize peak periods of system usage.
9.3. Categorized Data
At the bottom of the module, data is further segmented to identify where the most activity is occurring:
-
By Form: Lists specific forms (e.g., Expense Approval Ringi, Leave Approval Ringi) and the number of times each has been submitted.
-
By Department: Shows request volume filtered by organizational units, such as Finance or Treasury, to track departmental workloads.
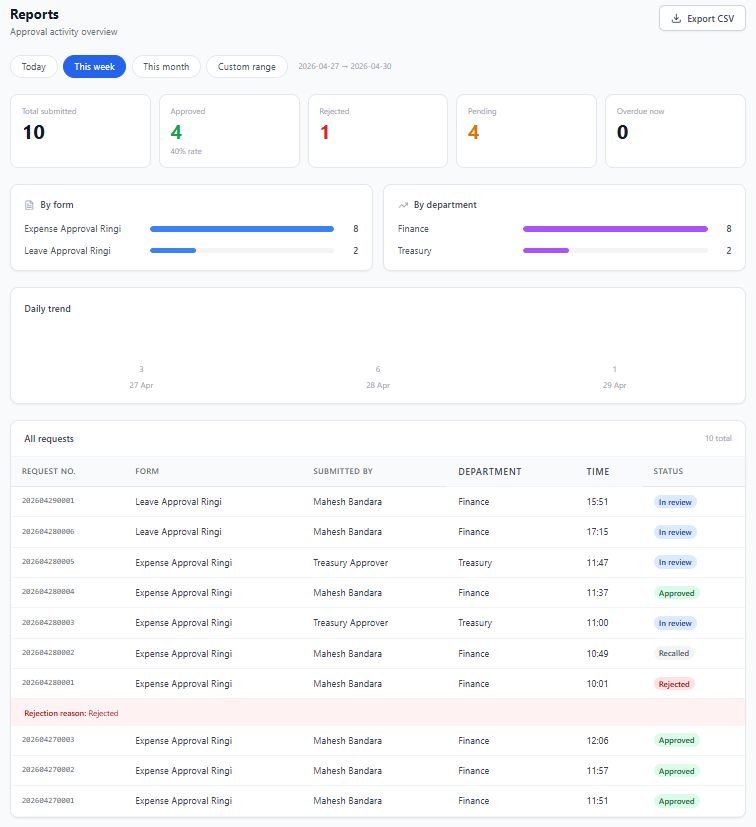
10. Reports
The Reports module offers a granular look at approval activity, allowing administrators to filter data by specific timeframes to analyze organizational productivity and workload.
10.1. Time-Based Filtering
Administrators can quickly toggle between different reporting periods using the navigation buttons at the top of the page:
-
Today: Shows all activities recorded on the current date.
-
This week: Displays data aggregated for the current work week.
-
This month: Provides a summary of all requests and actions for the current calendar month.
-
Custom range: Clicking this option opens additional date fields, allowing you to specify a precise start and end date (e.g., mm/dd/yyyy to mm/dd/yyyy) for a tailored report.
10.2. Dynamic Report Content
Selecting a timeframe automatically updates all components within the report:
-
Approval Statistics: The total submitted, approved, rejected, and pending counts adjust to reflect the chosen period.
-
Overdue metrics: Shows the number of requests that have currently exceeded their defined workflow deadlines.
-
Visual Distributions: The By form and By department charts update to show which request types and teams were most active during the selected window.
-
Daily Trend: Provides a line graph of submission volume over the specified days.
-
Request Table: The All requests list filters to show only the individual records that fall within the selected dates.
If no data exists for a chosen timeframe, particularly when using a specific Custom range, the system will display a message stating, "No requests found for this period".
10.3. Exporting Data
For offline analysis or integration with external financial and HR systems, admins can use the Export CSV button located at the top right of the page. This action generates a downloadable file containing the filtered set of records currently displayed in the table.
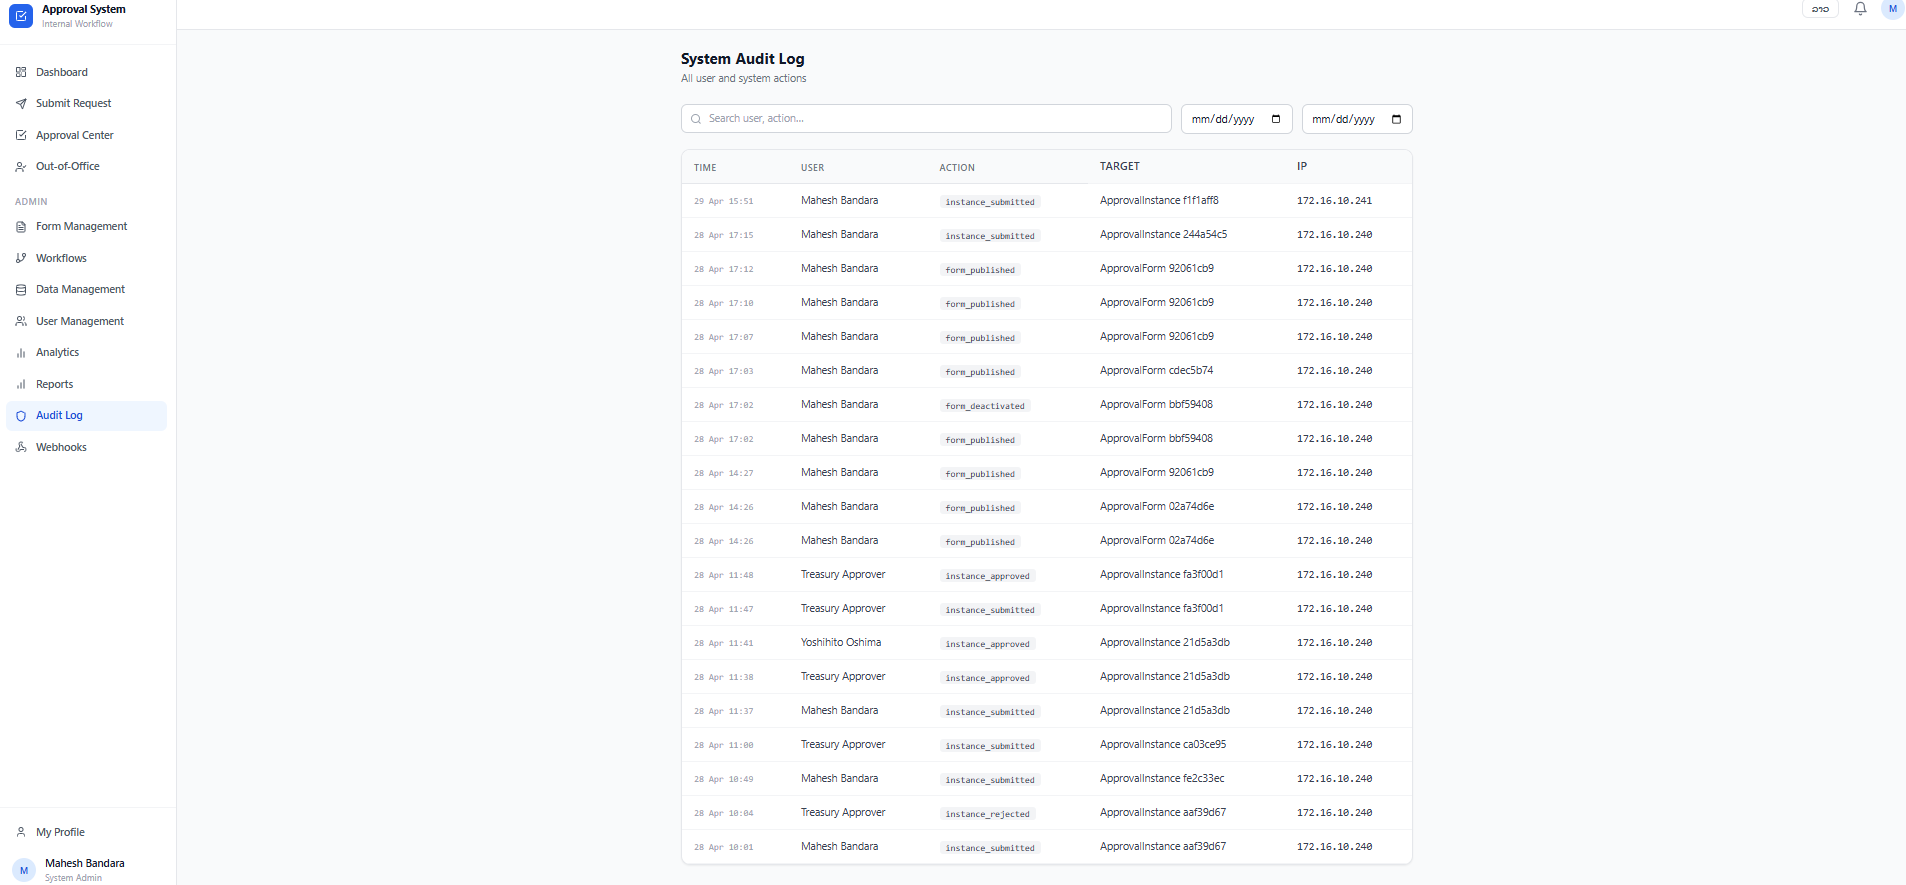
11. Audit Log
The System Audit Log provides a comprehensive, chronological record of all user and system actions within the Approval System. This module is critical for maintaining security, accountability, and transparency across all administrative and submission activities.
11.1. Log Details
The audit table tracks specific data points for every event captured by the system:
-
Time: The precise date and timestamp when the action occurred.
-
User: The name of the individual responsible for the action.
-
Action: The specific type of activity performed, such as:
-
form_published: When a new form is made active.
-
form_deactivated: When a form is removed from active use.
-
instance_submitted: When a user files a new request.
-
instance_approved / instance_rejected: When an approver makes a decision on a request.
-
-
Target: The specific entity affected by the action, identified by a unique ID.
-
IP: The IP address from which the user accessed the system, helping to identify the origin of the request.
11.2. Search and Filter Functions
To find specific historical events, administrators can use the built-in search and filtering tools:
-
Search Bar: Filter the log by typing in a specific user name or action type.
-
Date Range Selector: Narrow the log entries to a specific timeframe using the "mm/dd/yyyy" date pickers to audit activity during a particular period.
12. Webhooks
The Webhooks module allows administrators to configure outbound event notifications, enabling real-time data integration between the Approval System and external third-party applications.
12.1. Managing Webhooks
The main Webhooks interface displays a list of currently configured endpoints:
-
Webhook Identity: Shows the name of the webhook (e.g., "TEST") and the target destination URL.
-
Status & Type: Displays assigned tags, such as "all" for event coverage and HTTP response codes (e.g., 405) to monitor connection health.
-
Testing & Deletion: Admins can use the Test button to send a sample payload to verify the connection (e.g., receiving the message "Test sent – status: 405" when clicking the Test button) or the trash icon to remove the webhook entirely.

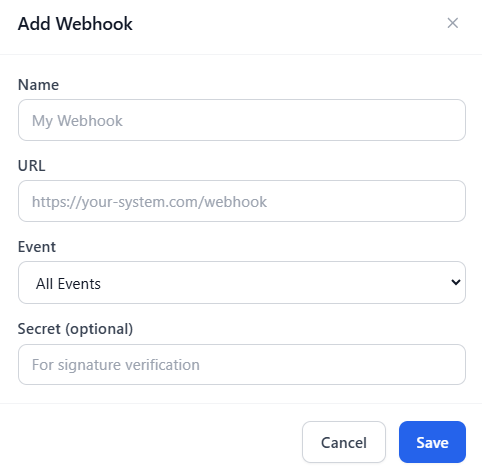
12.2. Adding a New Webhook
To create a new integration, click the + Add Webhook button. A configuration modal will appear requiring the following details:
-
Name: A descriptive title for the webhook.
-
URL: The destination endpoint provided by your external system where notifications will be sent.
-
Event: A dropdown menu to select which system triggers will initiate a notification (e.g., "All Events, Instance Submitted, Instance Approved & Instance Rejected").
-
Secret (optional): An optional field for providing a secret key used for signature verification to ensure the security of the transmitted data.
Important Admin Points
Note: ...........................................................................................................................................................................................................................................................................................................................................................................