# BOL Report Module – User Manual
#### **1. Introduction**
The **BOL Report module** is designed to help users view, verify, and generate reports related to financial and member data required for BOL reporting. This module provides structured access to balances, contracts, deposits, member shares, mfi and final report processing.
This user manual explains each menu item and guides users on how to use the BOL Report module effectively.
#### **2. Accessing the BOL Report Module**
1. Log in to the system using your authorized user credentials.
2. From the left-side navigation panel, click **BOL Report**.
3. The BOL Report submenu will expand and display the available report options.
#### **3. Menu Options Overview**
The BOL Report module contains the following options:
- Trial Balance
- Contracts List
- MFI Details
- Deposits Details
- Member Shares Details
- Report Info
- Process BOL Report
Each option is explained in detail below.
##### **3.1 Trial Balance**
The **Trial Balance** page allows users to upload trial balance data using a predefined Excel template and review the uploaded data before it is used in the BOL reporting process. This ensures consistency, accuracy, and proper validation of financial data.The trail balance sheet final calculated amount is automatically calculated in the BOL report uploading system. Upload the correct data carefully.If any mistake the xml report can not be uploaded to the report submitting system.
**3.1.1 Download Trial Balance Template**
1. Navigate to **BOL Report → Trial Balance**.
2. Locate the **Download Template** section at the top of the page.
3. Click on **Template**.
4. An Excel (.xlsx) file will be downloaded to your computer.
**Note:** The template contains predefined columns and formatting. Do not modify column names or structure.[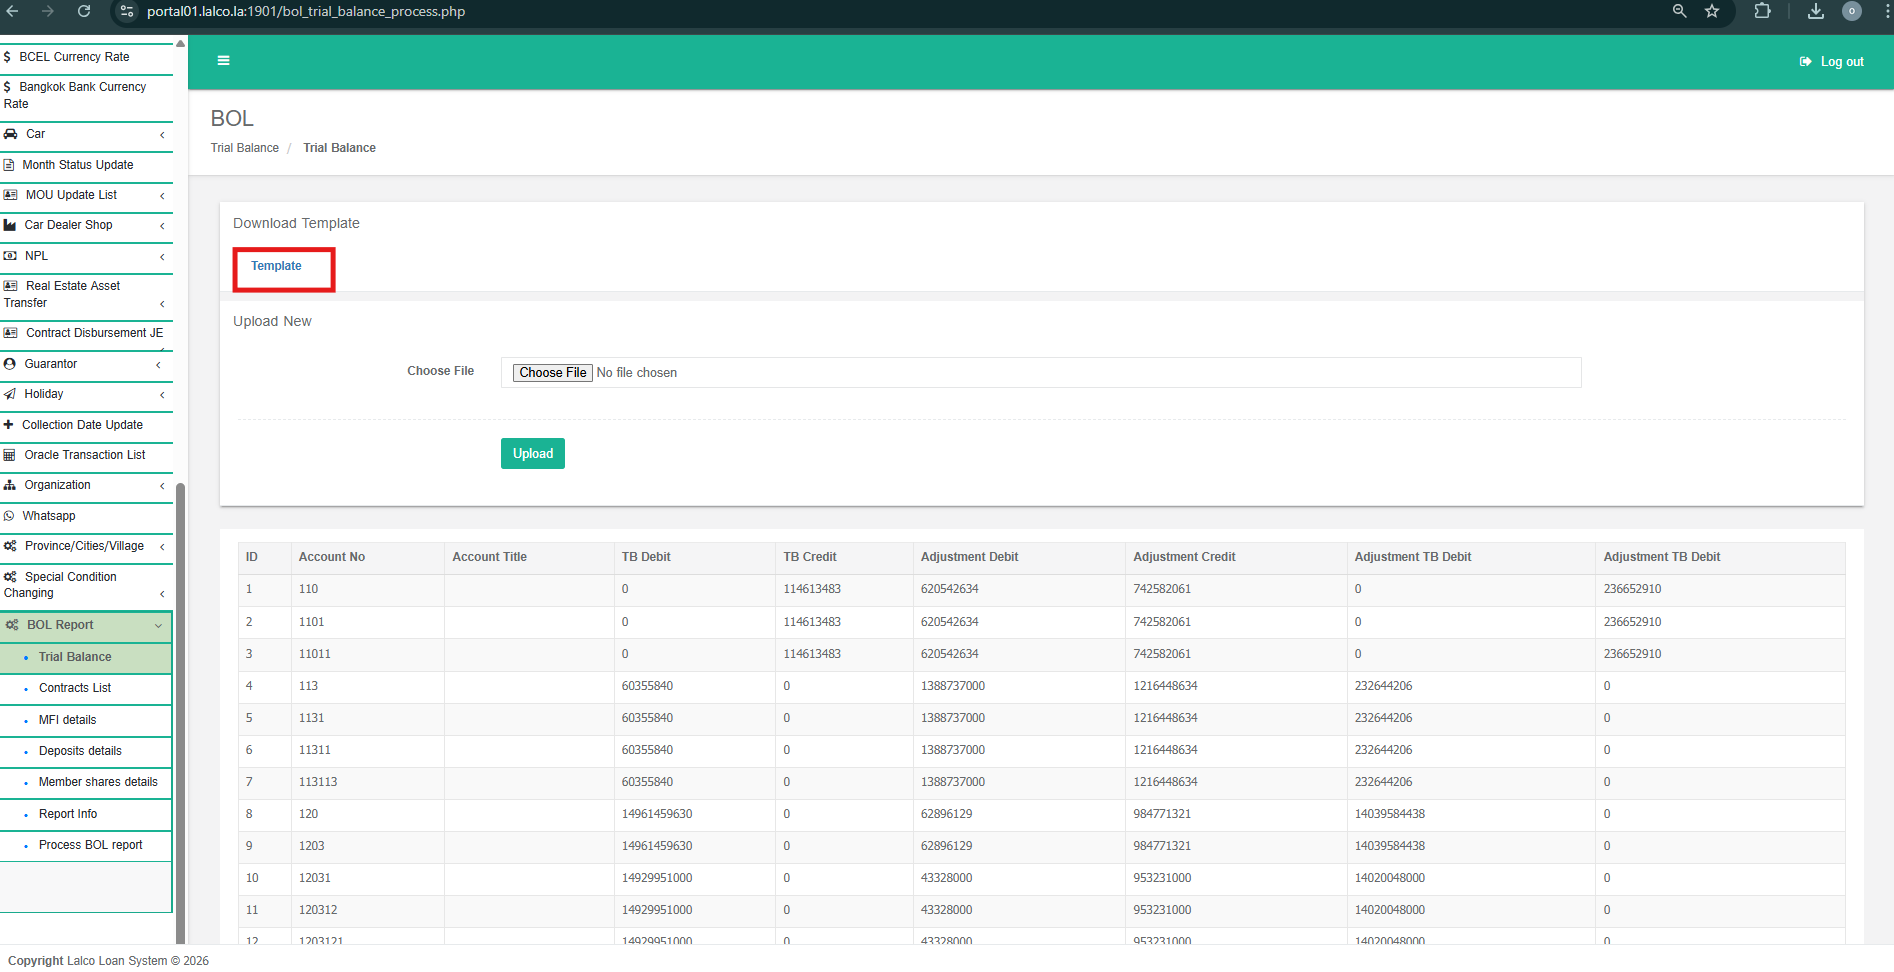](http://wiki.lalco.la/uploads/images/gallery/2026-01/1.png)
**3.1.2. Fill in the Template**
1. Open the downloaded Excel template.
2. Enter the trial balance details according to the given columns (e.g., Account No, Account Title, Debit, Credit, Adjustments).
3. Ensure all values are entered in the correct format.
4. Save the file after completing data entry.
**3.2.3 Upload Trial Balance File**
1. In the **Upload New** section, click **Choose File**.
2. Select the completed Excel (.xlsx) file from your computer.
3. Click the **Upload** button.
4. Wait for the system to process the file.
**3.2.4. View Uploaded Trial Balance Data**
- After a successful upload, the uploaded data will be displayed in the table below.
- Review the displayed records carefully.[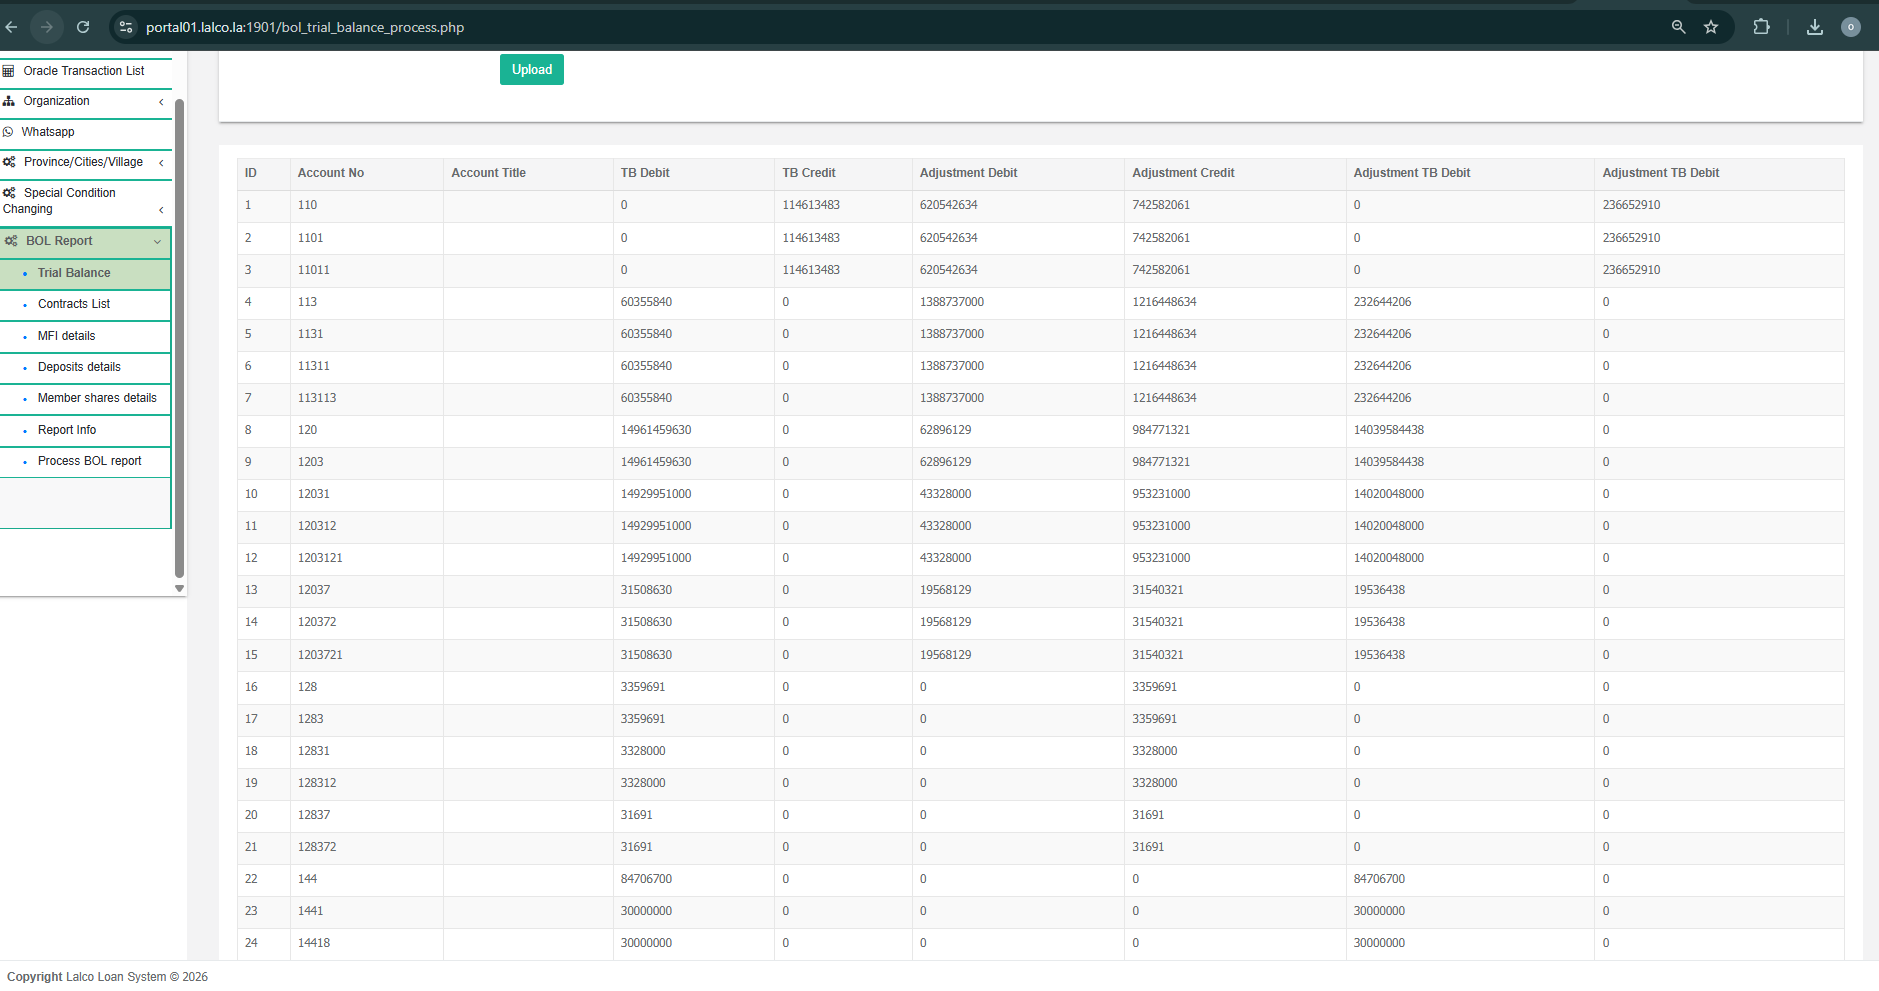](http://wiki.lalco.la/uploads/images/gallery/2026-01/2.png)
##### **3.2. Contract List**
The Contracts List page allows you to bulk-upload contract numbers into the system using a standardized Excel template. Follow these steps to ensure your data is processed correctly.
**3.2.1. Download the Template**
- Before uploading any data, you must use the official format to prevent errors.
- Navigate to the BOL Report menu on the left sidebar and select Contracts List.
- Under the Download Template section, click the blue Template link.
- An .xlsx file will download to your computer.
[](http://wiki.lalco.la/uploads/images/gallery/2026-01/3.png)
**3.2.2. Fill in the Template**
- Open the downloaded Excel template.
- Enter your contract details into the designated columns (e.g., Contract Number).
- Note: Do not change the column headers or the file format, as this may cause the upload to fail.
- Save the file on your local drive.
**3.2.3. Upload the Completed File**
- Once your file is ready, you can import it into the system:
- Go to the Upload New section on the page.
- Click the Choose file button.
- Select the saved Excel file from your computer.
- Click the green Upload button to process the file.
- The system rejects pending and close contracts. Only active contracts are eligible for upload.
**3.2.4. View Uploaded Contract Data**
- After a successful upload, the uploaded data will be displayed in the table below.
- Review the displayed records carefully.
[](http://wiki.lalco.la/uploads/images/gallery/2026-01/4.png)
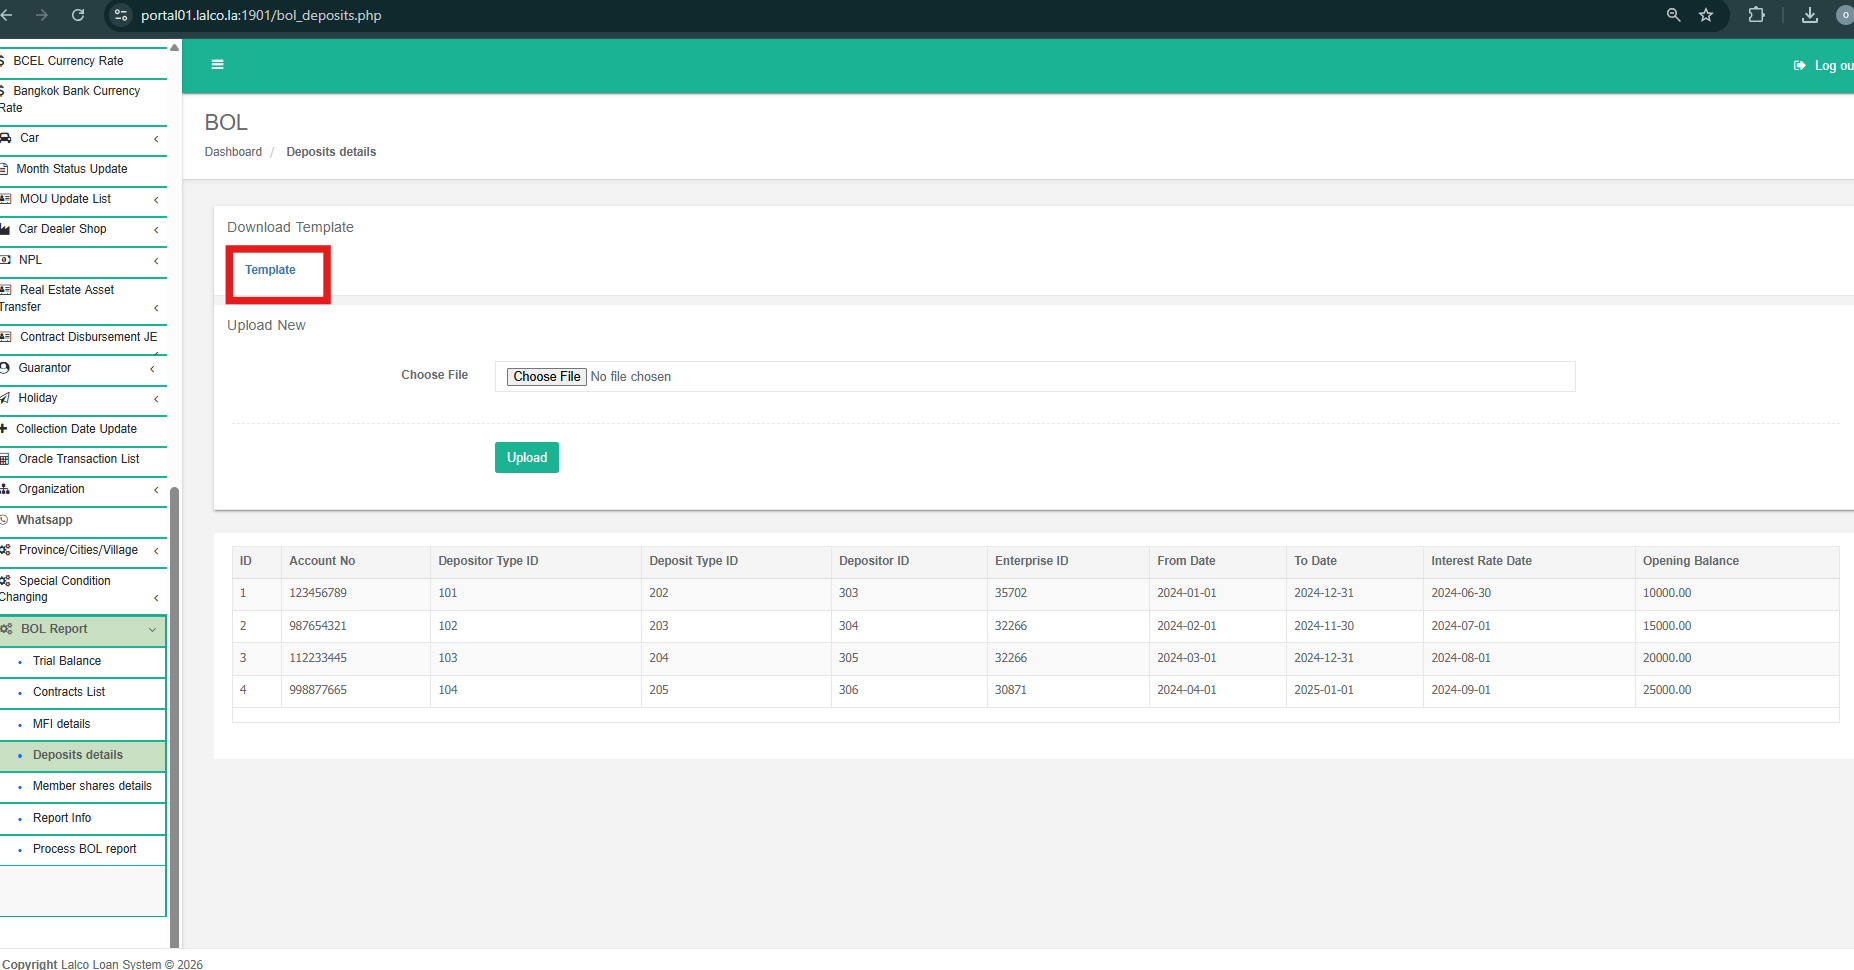
##### **3.3 Deposits Details**
The Deposits Details page allows users to upload deposit-related data using a predefined Excel template and review the uploaded records before they are included in the BOL reporting process. This ensures accuracy and standardization of deposit information.
**3.3.1. Download Deposits Template**
- Navigate to **BOL Report → Deposits Details**.
- Locate the **Download Template** section at the top of the page.
- Click **Template** to download the Excel (.xlsx) file.
[](http://wiki.lalco.la/uploads/images/gallery/2026-01/5.png)
**3.3.2. Fill in the Deposits Template**
1. Open the downloaded Excel template.
2. Enter deposit-related information according to the predefined columns, such as:
- Account No
- Depositor Type ID (need to 1 or 2 )
| Depositor Type |
| id | value |
|
|
| 1 | ລູກຄ້າບຸກຄົນ |
|
|
| 2 | ລູກຄ້ານິຕິບຸກຄົນ |
- Deposit Type ID
- | deposit\_types |
| id | value |
|
|
| 1 | ເງິນຝາກກະແສລາຍວັນ |
|
|
| 2 | ເງິນຝາກປະຢັດ |
|
|
| 3 | ເງິນຝາກປະຈໍາ |
|
|
| 4 | ອື່ນໆ |
- Depositor ID
- Enterprise ID
- From Date and To Date
- Interest Rate Date
- Opening Balance
3. Ensure date formats and numeric values are entered correctly.
4. The Depositor ID need to contain the company system.
5. The Enterprise ID should be company enterprise ID(4015)
6. Save the completed file.
**3.3.3. Upload Deposits File**
1. In the **Upload New** section, click **Choose File**.
2. Select the completed Excel (.xlsx) file.
3. Click the **Upload** button.
4. Wait for the system to validate and process the file.
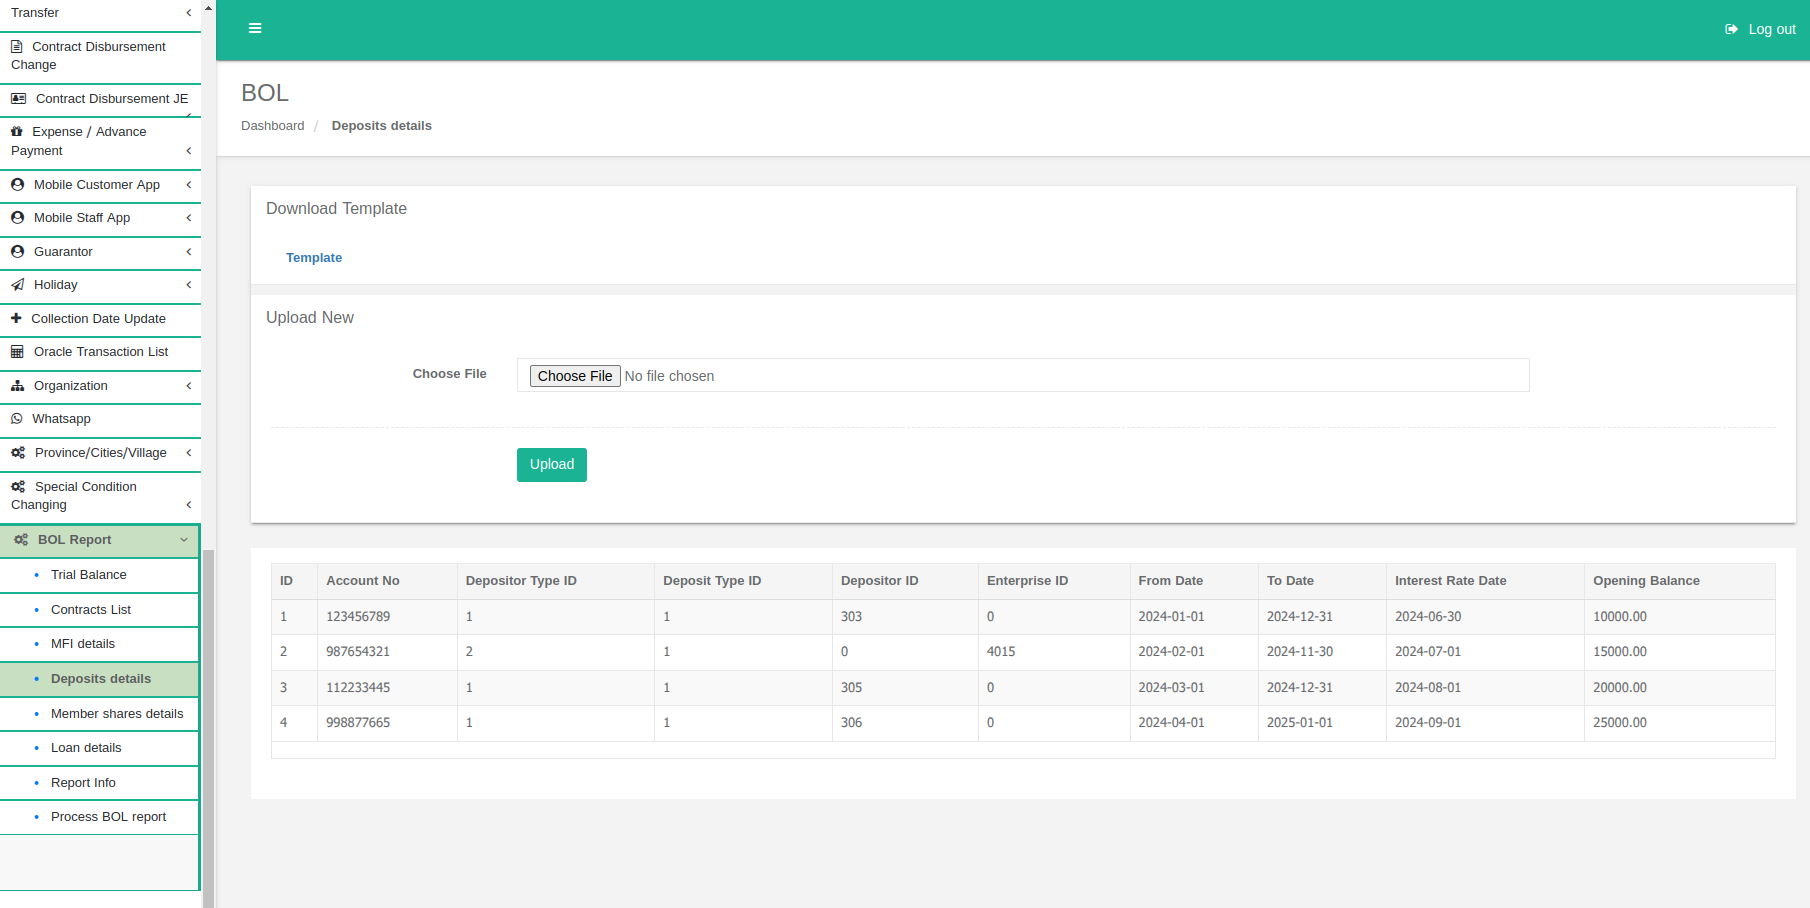
**3.3.4. View Uploaded Deposits Data**
1. After a successful upload, the uploaded deposit records will be displayed in the table below.
2. Review each record carefully, including:
- Account Number
- Depositor and Deposit Type IDs
- Date ranges
- Opening balance amounts
3. If errors are identified, correct the Excel file and re-upload it.
[](http://wiki.lalco.la/uploads/images/gallery/2026-01/wOuimage.png)
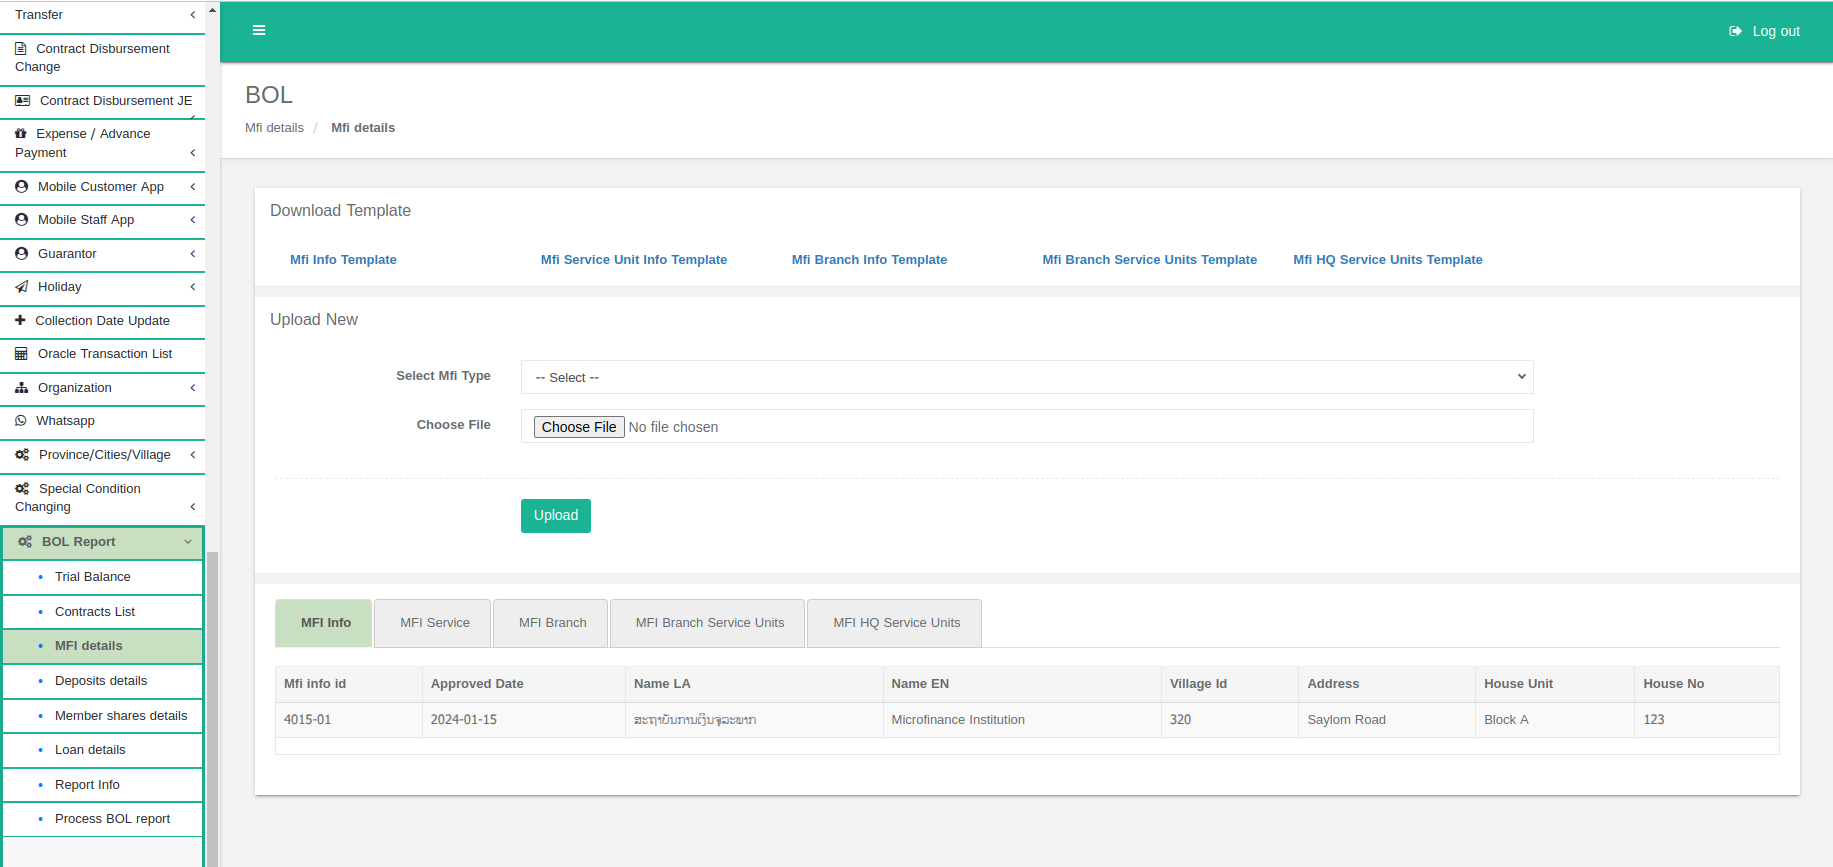
##### **3.4 MFI Details**
The MFI Details page allows users to upload MFI data using a predefined Excel template and review the uploaded records before they are included in the BOL reporting process. This ensures accuracy and standardization of MFI information.
This page has five Tabs.
- MFI Info.
- MFI Service.
- MFI Branch.
- MFI Branch Service Units
- MFI HQ Service Units
After uploading the sample excel sheets.The data will be displayed.Need to navigate the tabs.
[](http://wiki.lalco.la/uploads/images/gallery/2026-01/fFjimage.png)
**3.4.1. Download MFI Info Templates**
- Navigate to **BOL Report → MFI details**.
- Locate the **Download Template** section at the top of the page.
- Click **Mfi Info Template** to download the Excel (.xlsx) file.
**3.4.2. Upload MFI Info File**
[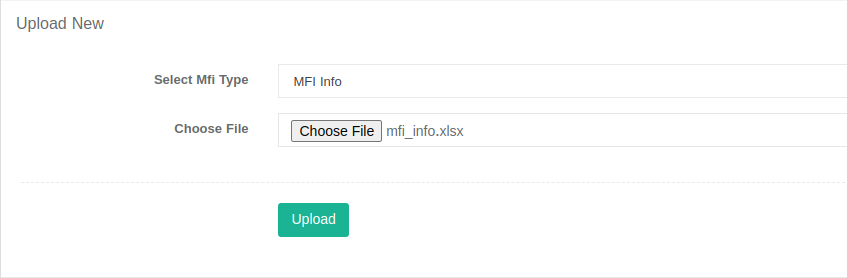](http://wiki.lalco.la/uploads/images/gallery/2026-01/6qBimage.png)
1. In the **Upload New** section, select Mif Type as **MFI Info**
2. click **Choose File**.
3. Select the completed Excel (.xlsx) file.
4. Click the **Upload** button.
5. Wait for the system to validate and process the file.
6. The uploaded data will display under **MFI Info Tab.**
[](http://wiki.lalco.la/uploads/images/gallery/2026-01/qOZimage.png)
**3.4.3. Download MFI Service Unit Info Templates**
- Navigate to **BOL Report → MFI details**.
- Locate the **Download Template** section at the top of the page.
- Click **Mfi Service Unit Info Template** to download the Excel (.xlsx) file.
**3.4.4. Upload MFI Service Unit Info File**
1. In the **Upload New** section, select Mif Type as **MFI Service .**
2. click **Choose File**.
3. Select the completed Excel (.xlsx) file.
4. Click the **Upload** button.
5. Wait for the system to validate and process the file.
6. The uploaded data will display under **MFI Service Tab.**
**3.4.5. Download MFI Branch Info Templates**
- Navigate to **BOL Report → MFI details**.
- Locate the **Download Template** section at the top of the page.
- Click **Mfi Branch Info Template** to download the Excel (.xlsx) file.
**3.4.6. Upload MFI Branch Info File**
1. In the **Upload New** section, select Mif Type as **MFI Branch .**
2. click **Choose File**.
3. Select the completed Excel (.xlsx) file.
4. Click the **Upload** button.
5. Wait for the system to validate and process the file.
6. The uploaded data will display under **MFI Branch Tab.**
**3.4.7. Download MFI Branch Service Units Info Templates**
- Navigate to **BOL Report → MFI details**.
- Locate the **Download Template** section at the top of the page.
- Click **Mfi Branch Service Units Template** to download the Excel (.xlsx) file.
**3.4.8. Upload MFI Branch Service Units File**
1. In the **Upload New** section, select Mif Type as **MFI Branch Service Units.**
2. click **Choose File**.
3. Select the completed Excel (.xlsx) file.
4. Click the **Upload** button.
5. Wait for the system to validate and process the file.
6. The uploaded data will display under **MFI Branch Service Units Tab.**
**3.4.9. Download MFI HQ Service Units Templates**
- Navigate to **BOL Report → MFI details**.
- Locate the **Download Template** section at the top of the page.
- Click **Mfi Branch Service Units Template** to download the Excel (.xlsx) file.
**3.4.10. Upload MFI HQ Service Units File**
1. In the **Upload New** section, select Mif Type as **MFI HQ Service Units.**
2. click **Choose File**.
3. Select the completed Excel (.xlsx) file.
4. Click the **Upload** button.
5. Wait for the system to validate and process the file.
6. The uploaded data will display under **MFI HQ Service Units Tab.**
**3.4.11. Creation between MFI Branch Service Units file**
When creating the **MFI Branch Service Units file** need to map the **mfi\_branch\_id** according to it **service\_unit\_id .**
[](http://wiki.lalco.la/uploads/images/gallery/2026-01/4R1image.png)
**3.4.12. Creation MFI HQ Service Units file**
When creating the **MFI HQ Service Units file** need to map the **mfi\_hq\_id** according to it **service\_unit\_id .**
[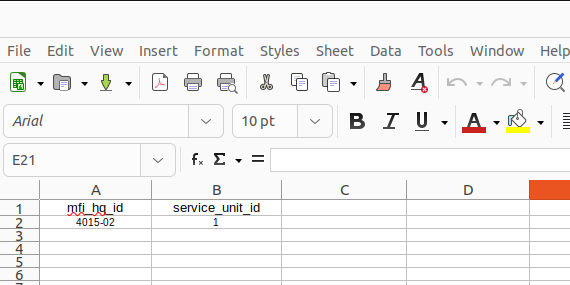](http://wiki.lalco.la/uploads/images/gallery/2026-01/nDKimage.png)
##### **3.5 Member Share Details**
##### Currently this section is not required for BOL report.User can Skip this section
The Member Details page allows users to upload member-related data using a predefined Excel template and review the uploaded records before they are included in the BOL reporting process. This ensures accuracy and standardization of member share information.
##### **3.5 Loan Details**
The Loan Details page allows users to upload Loan-related ECL balance data using a predefined Excel template and review the uploaded records before they are included in the BOL reporting process. This ensures accuracy and standardization of loan details information.
[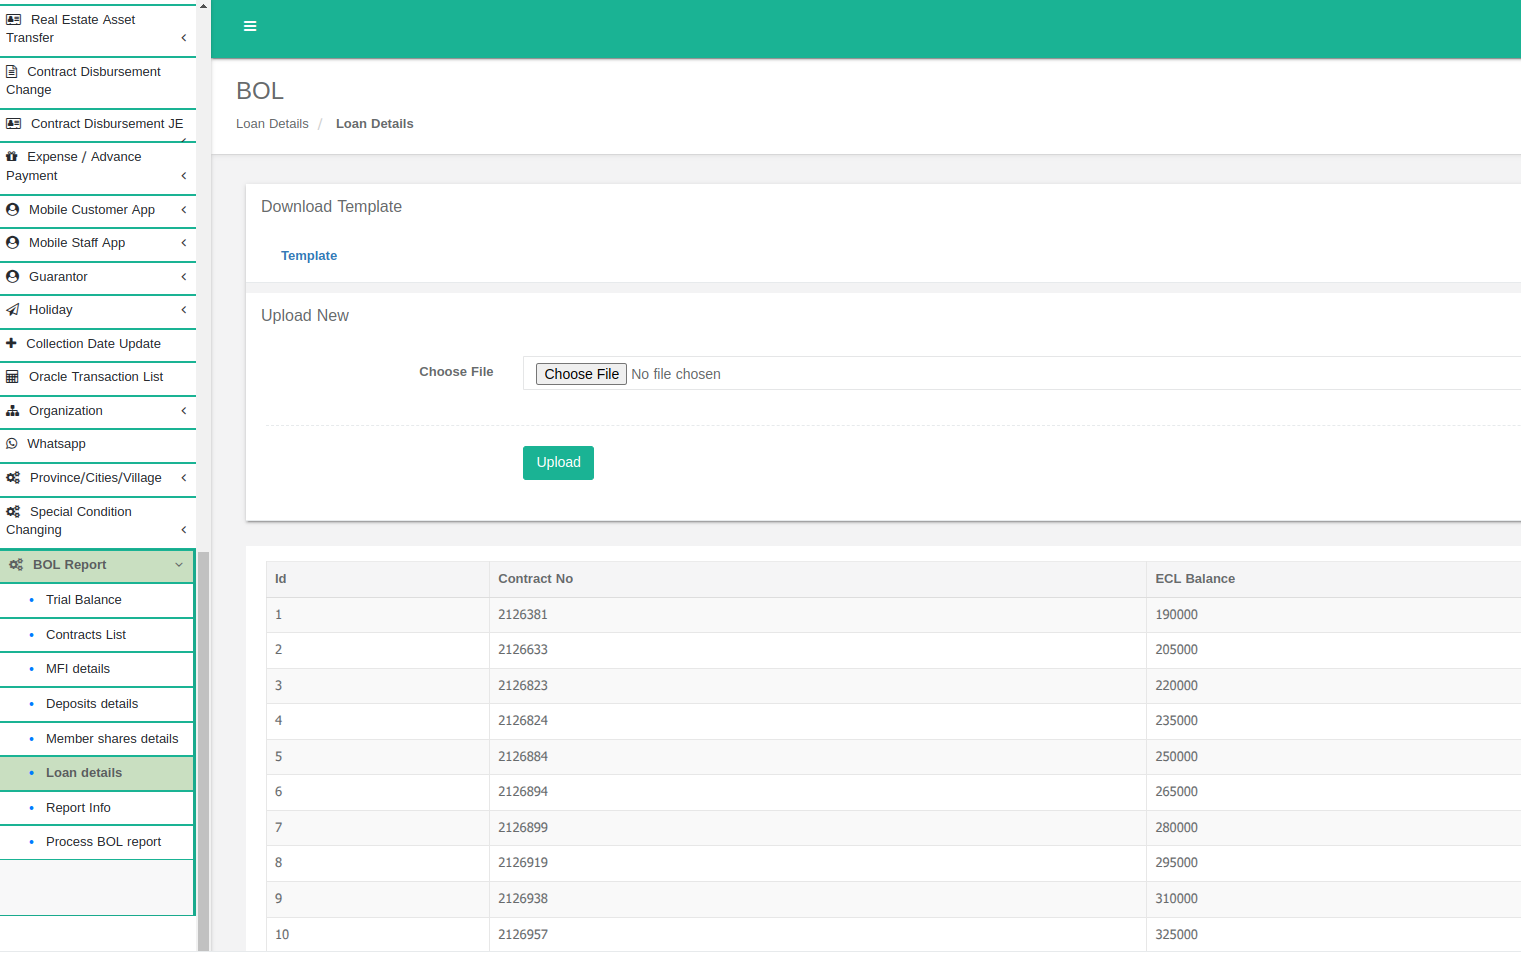](http://wiki.lalco.la/uploads/images/gallery/2026-01/OcLimage.png)
**3.5.1. Download Loan details Template**
- Navigate to **BOL Report → Loan details**.
- Locate the **Download Template** section at the top of the page.
- Click **Template** to download the Excel (.xlsx) file.
**3.5.2. Upload Loan Details File**
1. In the **Upload New** section, click **Choose File**.
2. Select the completed Excel (.xlsx) file.
3. The uploaded file need to contain the active contract number with ECL balances.
4. Click the **Upload** button.
5. Wait for the system to validate and process the file.
6. The uploaded data will display below of the page**.**
##### **3.6 Report Info**
The report info section is a Form.That need to complete with correct details.
Navigate to **BOL Report → Report Info.**
[](http://wiki.lalco.la/uploads/images/gallery/2026-01/BpIimage.png)
##### **3.7 Process BOL report.**
After successfully uploading the relevant document sheets , user need to click the **Process** button to process the report.
Navigate to **BOL Report → Process BOL report**
[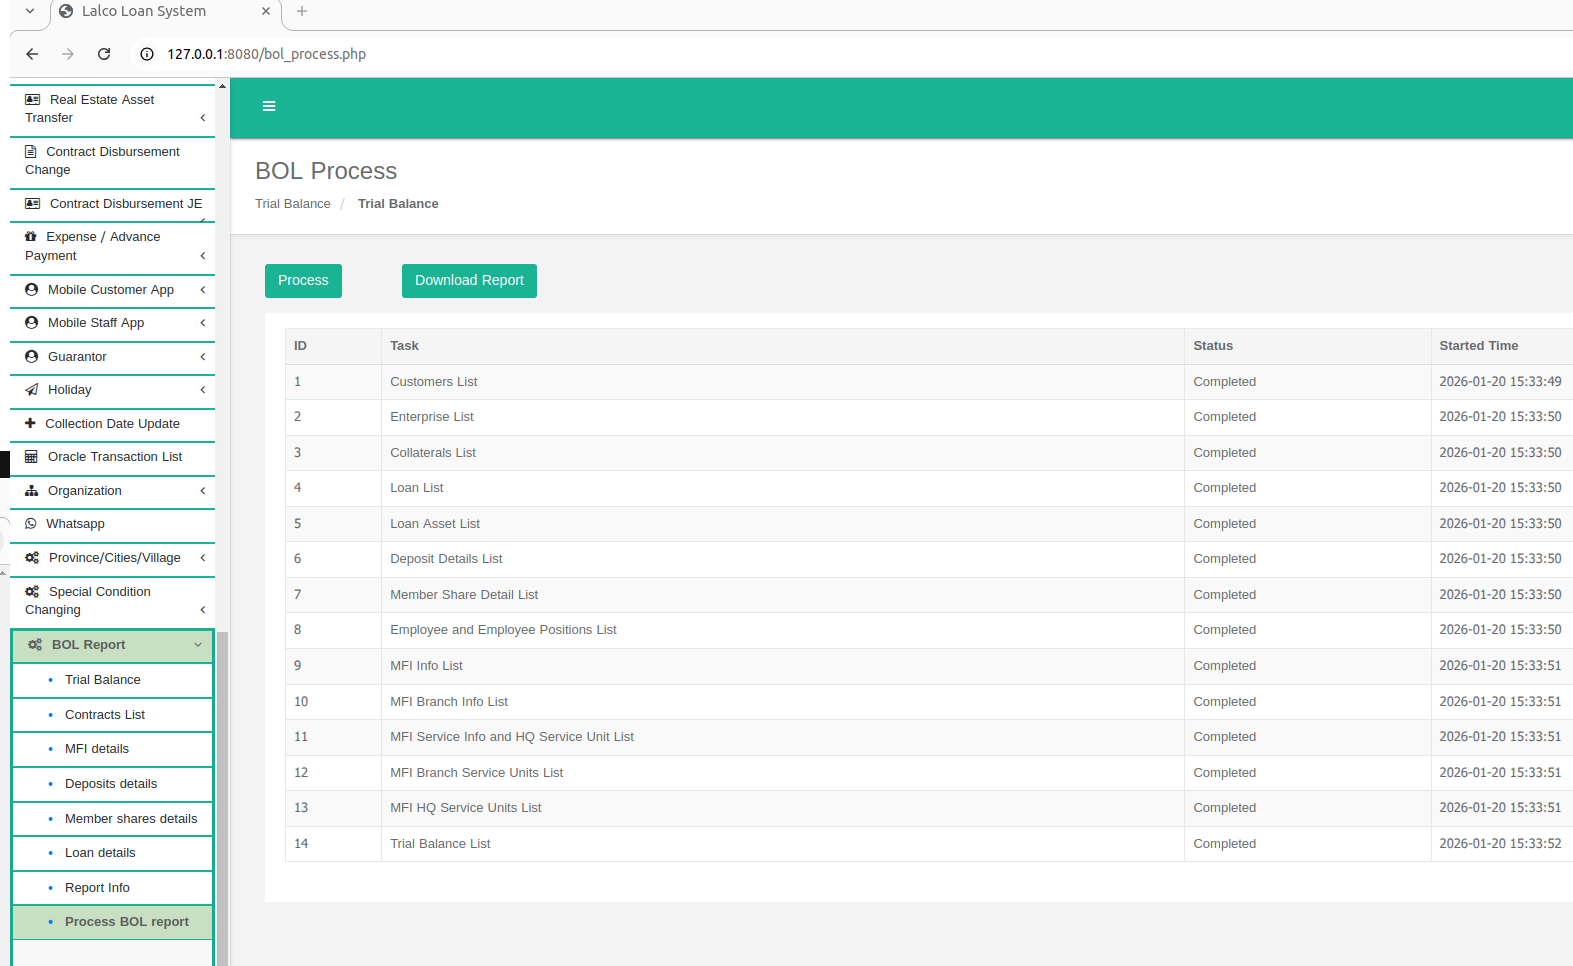](http://wiki.lalco.la/uploads/images/gallery/2026-01/ORoimage.png)After completing the report processing, user can download using the **Download Report** button.
Relevant XML file will be downloaded.
##### **3.7 Important Points.**
- The **Trial balance sheet final amount** need to **equal** to the **Sum** of the **Remaining Balance** of the Loan section in XML file
##### **3.8 Report verification.**
- After successfully downloading the XML report, user need to upload the XML report to below test report site.
- This site -> [http://139.5.159.175:8556/report/report-xml-import/0](http://139.5.159.175:8556/report/report-xml-import/0)
- Username - user24
- Password - ddtpo5568866
- This site displays multiple validation messages if the report contains errors. If any errors are found, they should be reviewed, corrected, and the report should be resubmitted.