CRM(Customer Relationship Management) Module
Welcome to the CRM Module – The central hub for managing and nurturing all customer interactions within the Loan Management System. While the "Loan Detail List" provides comprehensive information about the loans themselves, the CRM Module shifts the focus to the individuals and entities behind those loans – valued customers.
Loan Details
Page Overview
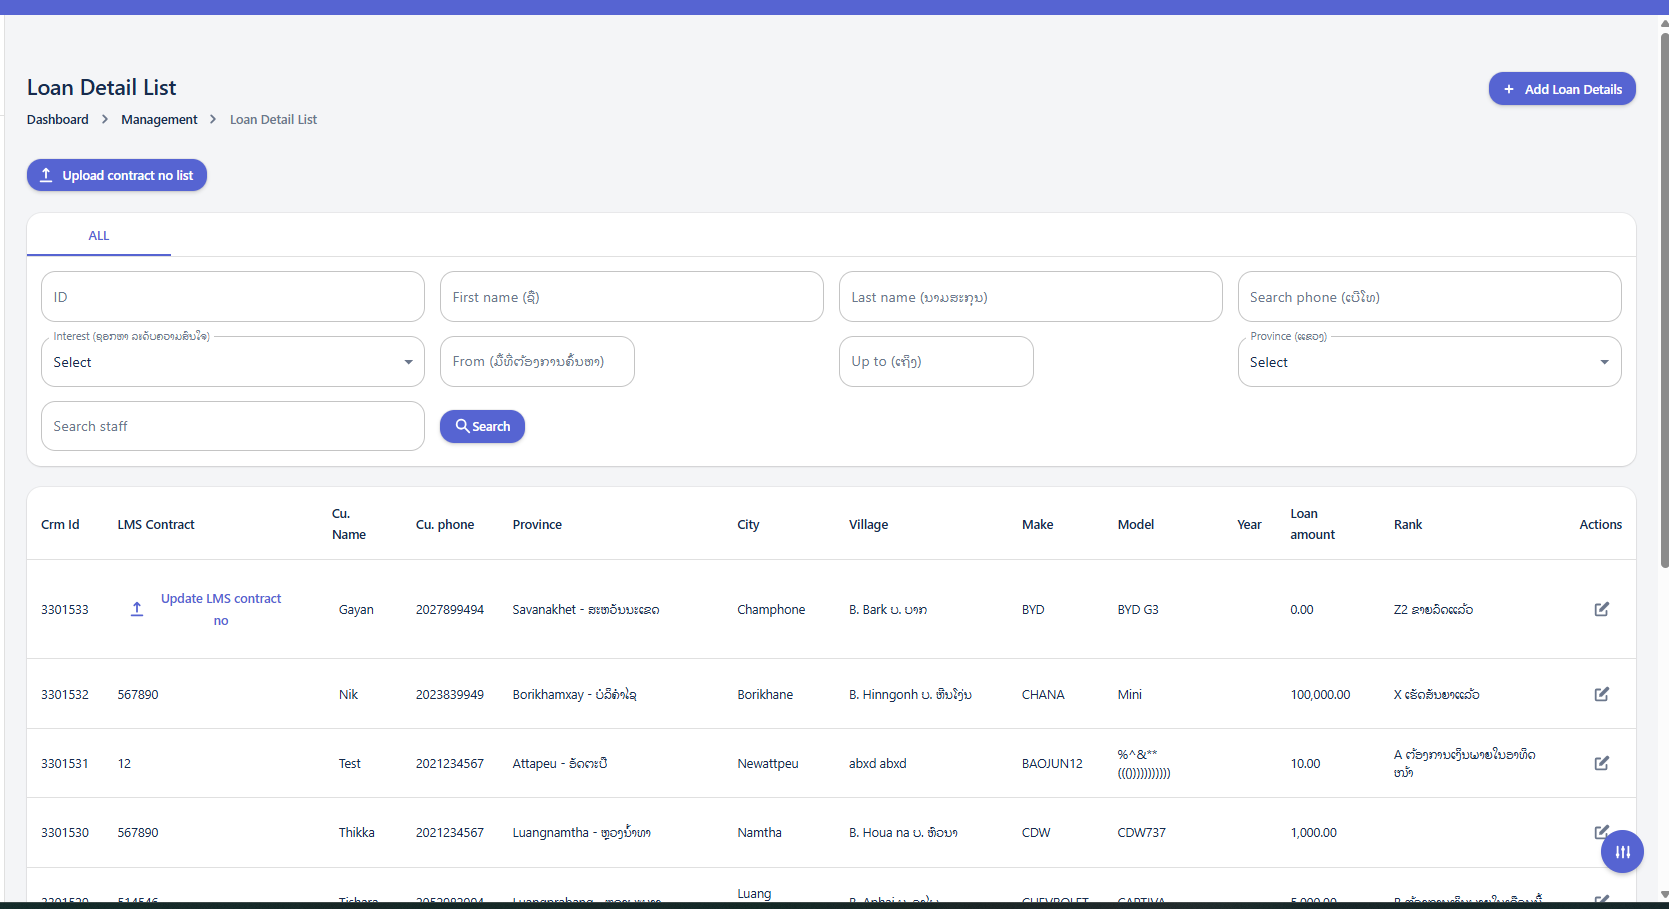
The "Loan Detail List" page provides a comprehensive view of all loan details. It includes a dashboard navigation, search and filter options, and a detailed table displaying various loan attributes.
Using the Search and Filter Panel
The search and filter panel allows you to quickly find specific loan details by applying various criteria.
Available Filters:
-
ID: Enter a specific loan ID to find an exact match.
-
First name: Search for loans associated with a customer's first name.
-
Last name: Search for loans associated with a customer's last name.
-
Search phone: Enter a phone number to find loans linked to that contact.
-
Interest: Use the dropdown to select a specific interest rate.
-
From [Date Field]: Select a start date for a date range search.
-
Up to [Date Field]: Select an end date for a date range search.
-
Province (ລາວ): Use the dropdown to select a specific province for filtering.
-
Search staff: Enter the name or ID of a staff member to filter loans by staff.
Upload Contract No List
When click the Upload contract no list button, The "Update contract no list" popup window will appear in the center of the screen.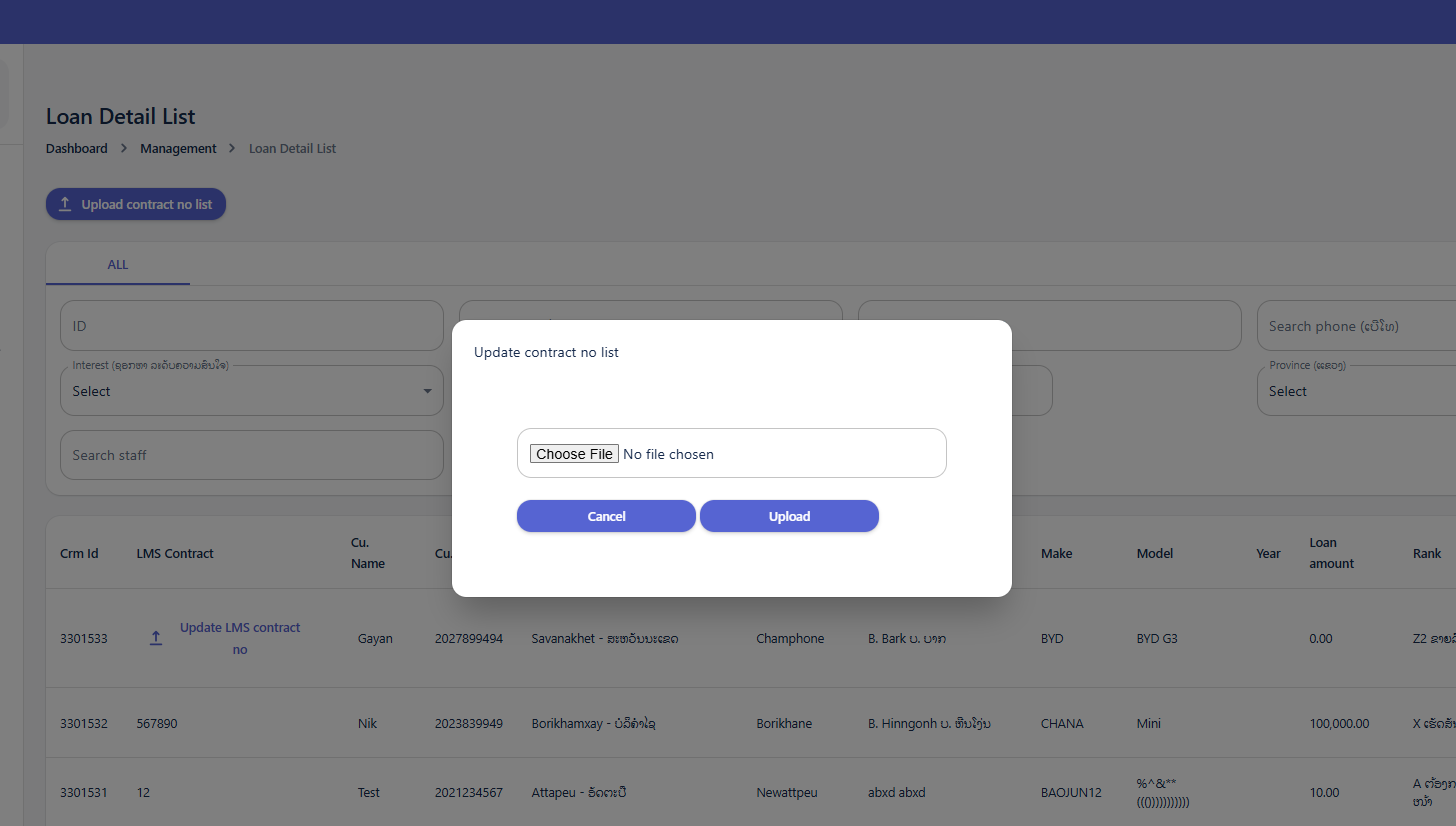
-
File Input Field:
Choose File No file chosen- This is where you select the file you wish to upload. -
Action Buttons:
-
Cancel: Closes the popup without uploading any file. -
Upload: Initiates the file upload process after a file has been selected.
-
Loan Details Table
The table displays detailed information for each loan. You can view the following columns:
-
Crm Id: Unique identifier for the CRM entry.
-
LMS Contract: Contract number associated with the Loan Management System.
-
Cu. Name: Customer's Name.
-
Cu. phone: Customer's Phone Number.
-
Province: Province where the loan is associated.
-
City: City where the loan is associated.
-
Village: Village where the loan is associated.
-
Make: The make of the item associated with the loan (e.g., vehicle make).
-
Model: The model of the item associated with the loan (e.g., vehicle model).
-
Year: The year of the item associated with the loan.
-
Loan amount: The total amount of the loan.
-
Rank: The rank or category of the loan/customer.
-
Actions:
-
Edit Icon (Pencil): Click to modify the details of a specific loan entry.
-
Add Loan Details
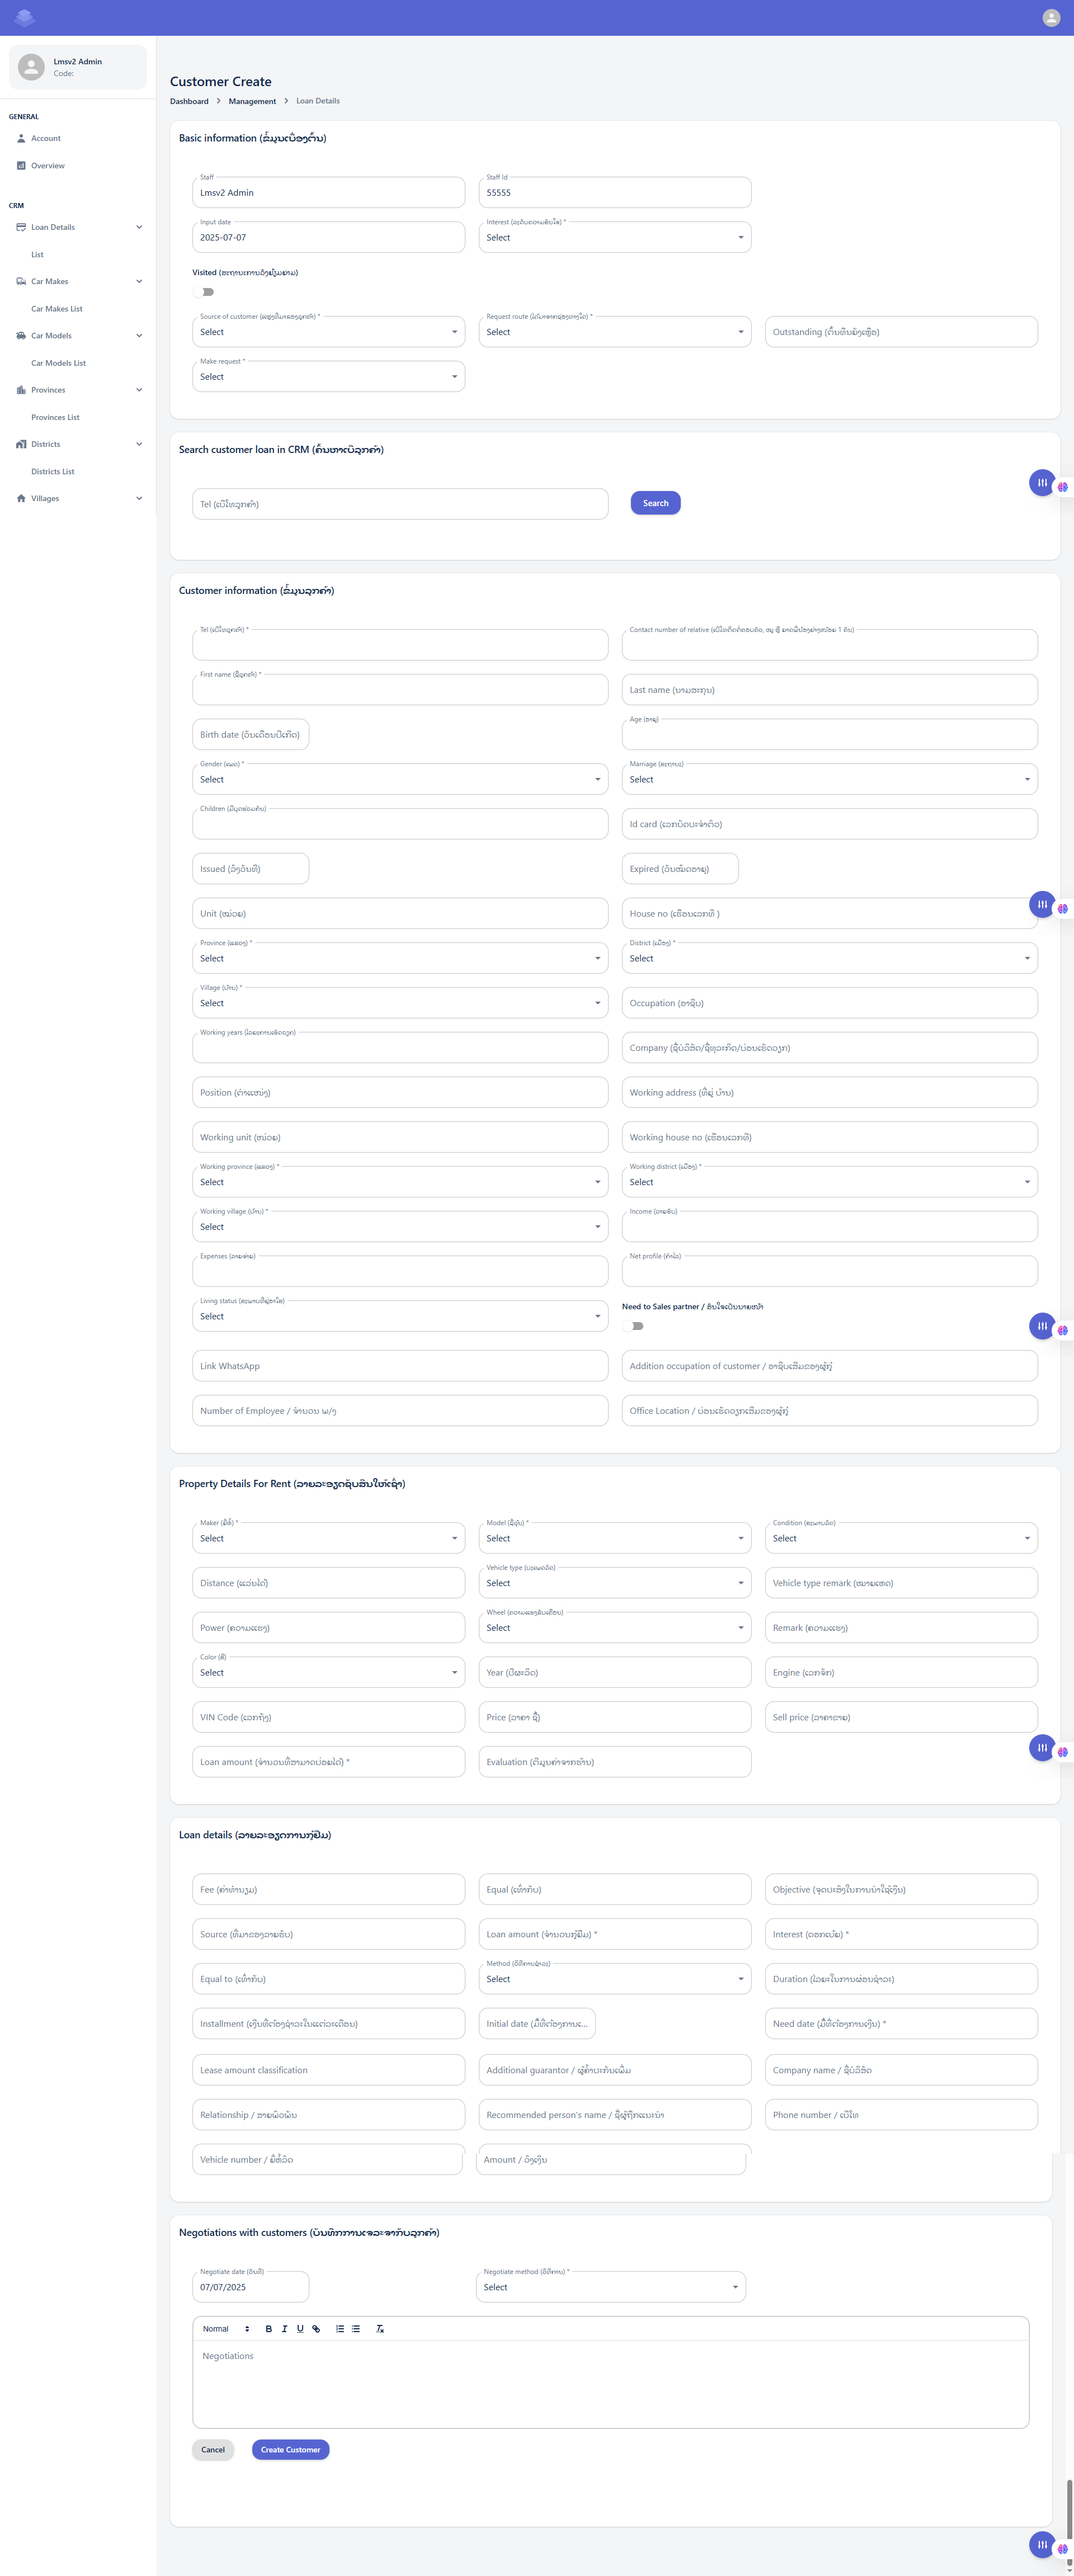
The "Customer Create" page is designed for entering new customer information into the system, potentially linking them to loan applications or existing loan records.
-
Dashboard > Management > Loan Details: This breadcrumb trail indicates that you are accessing this "Customer Create" form as part of a broader management process, likely linked to creating new loan details.
Customer Basic Information (ព័ត៌មានមូលដ្ឋានអតិថិជន)
This section captures essential administrative details for the customer.
Basic Information Fields (ຂໍ້ມູນພື້ນຖານ)
This section contains crucial fields for setting up the customer record:
-
Staff: This field displays the name of the staff member who is creating or managing this customer record.
-
Example Value: "Lmsv2 Admin"
-
Action: This is likely a read-only field, automatically populated with your logged-in user name.
-
-
Staff Id: This field displays the ID of the staff member.
-
Example Value: "55555"
-
Action: Similar to "Staff," this is probably a read-only field, automatically populated.
-
-
Input date: This indicates the date when the customer information is being entered into the system.
-
Example Value: "2025-07-07"
-
Action: This field is likely auto-populated with the current date. You may or may not be able to change it depending on system configuration.
-
-
Interest (ເງິນສົນໃຈ/ດອກເບ້ຍ)*: This is a mandatory dropdown field. It likely refers to the type of interest or perhaps the initial interest status related to the customer's inquiry or potential loan.
-
Action: Click the dropdown and select the appropriate option from the list.
-
-
Visited (ສະຖານະການເດີນທາງໄປຢ້ຽມຢາມ): This field features a toggle switch. It indicates whether the customer has been physically visited by staff.
-
Action: Click the toggle switch to turn it ON (indicating "Visited") or OFF (indicating "Not Visited").
-
-
Source of customer (ແຫຼ່ງທີ່ມາຂອງລູກຄ້າ)*: This is a mandatory dropdown field. It's crucial for tracking how the customer came to know about your services.
-
Action: Click the dropdown and select the source (e.g., Referral, Advertisement, Walk-in).
-
-
Request route (ເສັ້ນທາງການຮ້ອງຂໍ)*: This is a mandatory dropdown field. It specifies the channel or process through which the customer's request (e.g., for a loan) was initiated or is being processed.
-
Action: Click the dropdown and select the appropriate request route.
-
-
Outstanding (ຄ້າງຄືນ/ຍັງຄ້າງຊຳລະ): This field likely indicates any outstanding balance or pending issues related to the customer.
-
Action: Enter the outstanding amount or relevant information if applicable.
-
-
Make request (ເຮັດຄໍາຮ້ອງຂໍ)*: This is a mandatory dropdown field. It probably refers to the type of request the customer is making (e.g., Loan Application, Information Inquiry, Service Request).
-
Action: Click the dropdown and select the specific request type.
-
Customer Create: Customer Information (ព័ត៌មានអតិថិជន)
This section is dedicated to capturing detailed personal, demographic, and work-related information about the customer. It is crucial for building a comprehensive customer profile.
I. Search Customer in CRM (ស្វែងរកអតិថិជន)
Before entering new customer information, it's good practice to check if the customer already exists in the CRM.
-
Tel (លេខទូរស័ព្ទ): Enter the customer's phone number here.
-
Click the Search Button after entering the phone number to search for existing records. If found, you might not need to fill out all the details below.
Customer Information (ຂໍ້ມູນអតិថិជន)
This is the main section for entering new or updating existing customer data. Fields marked with an asterisk (*) are typically mandatory.
-
Tel (លេខទូរស័ព្ទ)*: Enter the customer's primary phone number. This is a mandatory field.
-
Contact number of relative (លេខទំនាក់ទំនងសាច់ញាតិ, សុំ 2 នាក់ដែលមិននៅក្នុងផ្ទះ 1 នាក់): Enter the phone numbers of at least two relatives who do not live with the customer.
-
First Name (ឈ្មោះ)*: Enter the customer's first name. This is a mandatory field.
-
Last Name (នាមត្រកូល)*: Enter the customer's last name. This is a mandatory field.
-
Birth date (ថ្ងៃកំណើត)*: Select the customer's date of birth on this calendar. This is a mandatory field.
-
Age (អាយុ): This field will likely auto-calculate based on the birth date entered.
-
Gender (ភេទ)*: Select the customer's gender from the dropdown list. This is a mandatory field.
-
Marriage (អាពាហ៍ពិពាហ៍): Select the customer's marital status (e.g., Single, Married, Divorced) from the dropdown list.
-
Children (ចំនួនកូន)*: Enter the number of children the customer has.
-
Id card (លេខប័ណ្ណសំគាល់ខ្លួន): Enter the customer's national identification card number.
-
Issued (ចេញដោយ): Enter the issuing authority or place for the ID card.
-
Expired (ផុតកំណត់): Enter the expiration date of the ID card.
-
Unit (អង្គភាព): Enter information about the unit or apartment if applicable.
-
House No (លេខផ្ទះ): Enter the customer's house number.
-
Province (ខេត្ត)*: Select the customer's province from the dropdown list. This is a mandatory field.
-
District (ស្រុក)*: Select the customer's district from the dropdown list. This is a mandatory field.
-
Village (ភូមិ)*: Select the customer's village from the dropdown list. This is a mandatory field.
-
Occupation (មុខរបរ): Enter the customer's occupation.
-
Working years (ឆ្នាំធ្វើការ): Enter the number of years the customer has been working in their current occupation or overall.
-
Company (ក្រុមហ៊ុន/ទីស្ថាប័ន/សហគ្រាស): Enter the name of the customer's company or organization if employed.
-
Position (តំណែង): Enter the customer's job position or title.
-
Working address (កន្លែងធ្វើការ): Enter the customer's work address.
-
Working unit (អង្គភាព): Enter details about the customer's working unit or department.
-
Working house no (លេខផ្ទះកន្លែងធ្វើការ): Enter the house number of the customer's workplace.
-
Working province (ខេត្ត)*: Select the province where the customer works from the dropdown list. This is a mandatory field.
-
Working district (ស្រុក)*: Select the district where the customer works from the dropdown list. This is a mandatory field.
-
Working village (ភូមិ)*: Select the village where the customer works from the dropdown list. This is a mandatory field.
-
Income (ប្រាក់ចំណូល): Enter the customer's income.
-
Expenses (ចំណាយ): Enter the customer's monthly or regular expenses.
-
Net profile (ប្រាក់ចំណេញ): This field might auto-calculate as Income minus Expenses, or it might be a field for entering net profit if the customer is self-employed.
-
Net profile (ប្រាក់ចំណេញ): This field might auto-calculate as Income minus Expenses, or it might be a field for entering net profit if the customer is self-employed.
-
Living status (ស្ថានភាពរស់នៅ): Select the customer's current living situation from the dropdown (e.g., Own home, Renting, Living with family). This is a mandatory field.
-
Need to Sales partner / ទីតាំងចែករំលែក: This field has a toggle switch. It might indicate whether the customer needs to be assigned to a sales partner or if their information should be shared for sales purposes.
-
-
Action: Click the toggle switch to turn it ON or OFF
-
-
- Link WhatsApp: Enter the customer's WhatsApp number or a link to their WhatsApp profile for communication.
-
Addition occupation of customer / អាជីពបន្ថែមរបស់អតិថិជន: Enter any additional occupations or sources of income the customer has.
-
Number of Employee / ចំនួនបុគ្គលិក: If the customer owns a business, enter the number of employees they have.
- Office Location / ទីតាំងការិយាល័យរបស់អតិថិជន: Enter the physical address of the customer's office or business location.
Property Details For Rent (ពត៌មានលម្អិតទ្រព្យសម្បត្តិសម្រាប់ជួល)
This is a critical section for loans or leases that involve a specific asset, most likely a vehicle, being rented out or used as collateral. Fields marked with an asterisk (*) are typically mandatory.
-
-
Maker (ម៉ាក)*: Select the manufacturer or brand of the property/vehicle from the dropdown list. This is a mandatory field.
-
Model (ម៉ូដែល)*: Select the specific model of the property/vehicle from the dropdown list. This is a mandatory field.
-
Condition (ស្ថានភាព)*: Select the condition of the property/vehicle from the dropdown list (e.g., New, Used, Excellent, Good, Fair, Poor). This is a mandatory field.
-
Distance (ចម្ងាយ): If it's a vehicle, enter the mileage or kilometers driven.
-
Vehicle type (ប្រភេទយានយន្ត): Select the type of vehicle (e.g., Car, Motorcycle, Truck) from the dropdown list.
-
Vehicle type remark (កំណត់សម្គាល់ប្រភេទ): Add any additional remarks or specific details about the vehicle type.
-
Power (ថាមពល): Enter the power specifications (e.g., horsepower, engine displacement).
-
Wheel (កង់/សំបកកង់): Select details about the wheels or tires from the dropdown list.
-
Remark (កំណត់សម្គាល់): Add any general remarks or notes about the property/vehicle.
-
Color (ពណ៌): Select the color of the property/vehicle from the dropdown list.
-
Year (ឆ្នាំផលិត): Enter the manufacturing year of the property/vehicle.
-
Engine (ម៉ាស៊ីន): Enter details about the engine (e.g., engine number, engine type).
-
VIN Code (លេខតួ): Enter the Vehicle Identification Number (VIN) for vehicles.
-
Price (តម្លៃ): Enter the purchase price or estimated market value of the property/vehicle.
-
Sell price (តម្លៃលក់): Enter the selling price of the property/vehicle, if applicable.
-
Loan amount (ចំនួនទឹកប្រាក់កម្ចី)*: Enter the specific loan amount being requested or granted for this property. This is a mandatory field.
-
Evaluation (តម្លៃវាយតម្លៃ)*: Enter the appraised or evaluated value of the property/vehicle. This is a mandatory field.
-
Loan Details Fields
-
Fee (ຄ່າທຳນຽມ): Enter any administrative fees or charges associated with the loan.
-
Equal (ເທົ່າກັນ): This field might relate to equal installments or a specific calculation method. Enter relevant value if applicable.
-
Objective (ຈຸດປະສົງໃນການກູ້ຢືມ): Clearly state the purpose or objective for which the loan is being taken (e.g., business expansion, vehicle purchase, personal expenses).
-
Source (ແຫຼ່ງເງິນກູ້ຢືມ): Enter or select the source of the loan funds (e.g., Bank, Microfinance Institution, Private Lender).
-
Loan amount (ຈຳນວນເງິນກູ້ຢືມ)*: Enter the principal amount of money being borrowed. This is a mandatory field.
-
Interest (ດອກເບ້ຍ)*: Enter the interest rate applicable to the loan. This is a mandatory field.
-
Equal to (ເທົ່າກັນ): (Similar to the "Equal" field above) Enter relevant value if applicable.
-
Method (ວິທີການຄິດໄລ່): Select the method used for calculating loan interest or repayments from the dropdown list (e.g., Flat Rate, Reducing Balance).
-
Duration (ໄລຍະເວລາການກູ້ຢືມ): Enter the total duration of the loan (e.g., in months, years).
-
Installment (ເງິນທີ່ຕ້ອງຊຳລະໃນແຕ່ລະເດືອນ)*: Enter the amount of each regular payment (installment) the borrower needs to make. This is a mandatory field.
-
Initial date (ວັນທີເລີ່ມຕົ້ນ...): Select the date when the loan officially begins.
-
Need date (ວັນທີຕ້ອງການກູ້ຢືມ)*: Select the date by which the loan is needed or required. This is a mandatory field.
-
Lease amount classification: If this is a lease, categorize the lease amount here.
-
Additional guarantor / ຜູ້ຄ້ຳປະກັນເພີ່ມເຕີມ: Enter the name or details of any additional guarantor for the loan, beyond the primary borrower.
-
Company name / ຊື່ບໍລິສັດ: If the loan is for a company or associated with a business, enter the company's name.
-
Relationship / ການພົວພັນ: Describe the relationship between the borrower and the additional guarantor or the company.
-
Recommended person's name / ຊື່ຜູ້ຖືກແນະນໍາ: Enter the name of the person who recommended the borrower or the loan.
-
Phone number / ເບີໂທ: Enter the phone number of the additional guarantor or the recommended person.
-
Vehicle number / ເລກທະບຽນ: If this loan is for a vehicle, enter its registration or license plate number.
-
Amount / ຈຳນວນ: Enter a specific amount related to the vehicle or other relevant context if applicable.
Negotiations with customers (ການເຈລະຈາກັບລູກຄ້າ)
This section records the negotiation process and outcome with the customer.
-
Negotiate date (ວັນທີ): Date of the negotiation (e.g., 07/07/2025).
-
Negotiate method (ວິທີການ)*: Select the method of negotiation (mandatory dropdown).
-
Negotiations (text area): Use the rich text editor to type detailed notes about the negotiation, including offers, counter-offers, and agreed terms.
-
Formatting tools: Normal, Bold, Italic, Underline, Bullet List, Numbered List, Link, Clear Formatting.
-
-
Cancel: Discard all entered information and return to the previous page.
-
Create Customer: Save all the entered information and create the new customer and loan record.
Loan Details Edit
Here is the "Loan Details Edit" interface of the Loan Management System! This is the central hub for viewing, modifying, and managing all aspects of a specific loan and its associated customer. This form consolidates various information points, from customer demographics to property details and loan terms.
Many sections here mirror the data entry process you experienced when creating a new loan, ensuring a consistent user experience.
II. Managing Negotiations and Related Information (Sections Specific/Expanded in Edit)
These sections are particularly relevant for reviewing ongoing relationships and historical data, or for adding details that evolve after initial creation.
-
Negotiations with customers (ການເຈລະຈາກັບລູກຄ້າ):
Input Fields: You can add new negotiation entries using Negotiate date and Negotiate method dropdown, along with the rich text editor for Negotiations notes. This allows you to log follow-up discussions and changes.
Negotiation History Table: This crucial table below the input fields provides a chronological record of all past negotiations. You can review:
-
Negotiation date: The date each negotiation took place.
-
Negotiations: The detailed notes from that specific interaction.
-
Negotiation method: How the negotiation was conducted.
-
The expect of staff / ລາຍຮັບທີ່ຄາດໄວ້: Staff's projected income or outcome from that negotiation.
-
Interest in product / ດອກເບี้ยຜະລິດຕະພັນ: Customer's interest level in the product during that discussion.
-
Location / ສະຖານທີ່: Where the negotiation occurred.
-
Description of visiting / ລາຍລະອຽດການຢ້ຽមຢາມ: Details about any physical visits.
-
Manager info: Information about the manager involved in that particular negotiation.
Action: (Likely icons for viewing or editing specific negotiation entries).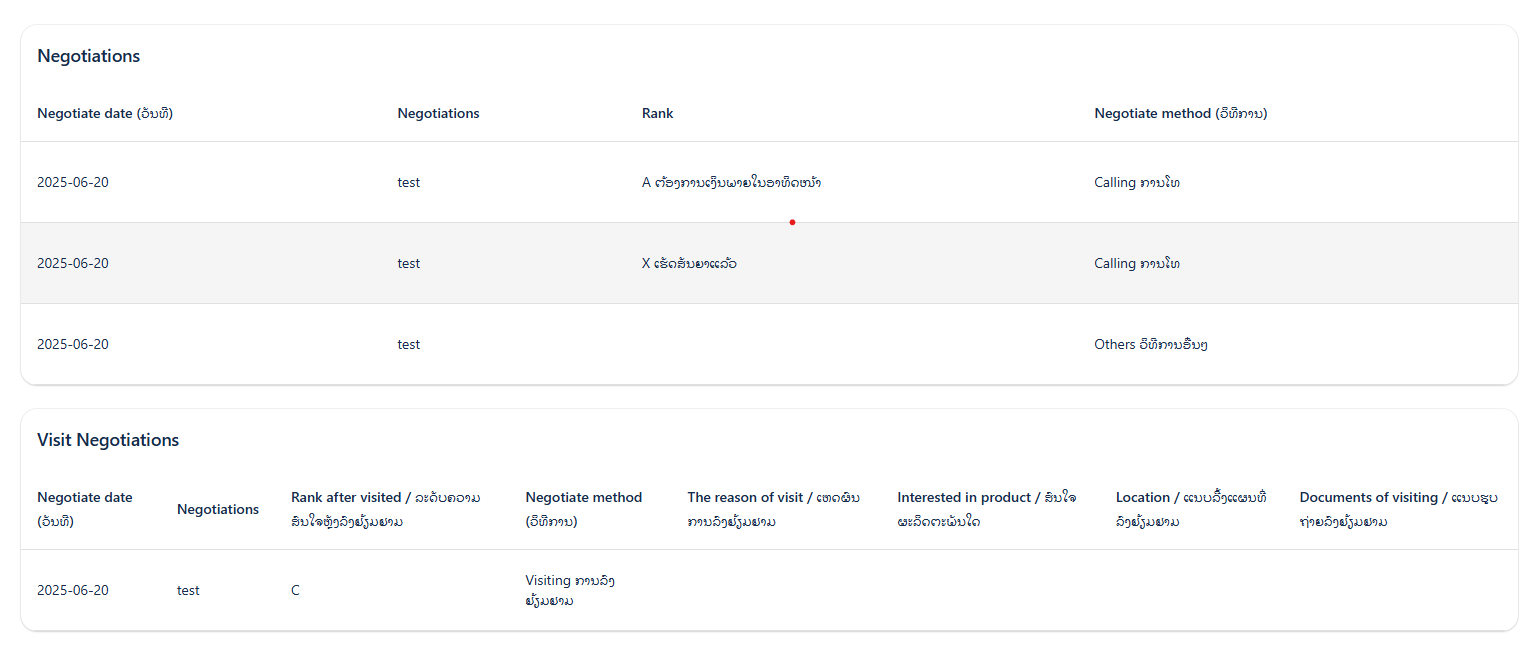
- Manager notes
-
This section allows managers or authorized personnel to add internal notes related to the customer or loan.
-
A text box is provided for entering the note (e.g., "test" is visible).
-
Add manager note button: Click this button to save the entered note.
-
Purpose: This is likely for internal communication, approvals, or special instructions not directly visible to the customer.
-

-
Customer relatives (ຍາດພີ່ນ້ອງ):
-
This section presents a table listing the customer's relatives.
-
Columns: Name, Phone, Relationship, Job, Company, Address, ID Card, Province, District, Commune, Village, Income, Who is it.
-
Actions: (Likely icons to View/Edit individual relative records). You can add or modify emergency contact details or guarantor information here.

-
-
Vehicles Information (ព័ត៌មានយានយន្ត):
-
This table displays all vehicles associated with the customer, whether as collateral or owned assets.
-
Columns: Make, Model, Year, VIN, Chassis No., Plate No., Previous Loan Home, Price, Current Loan Amount.
-
Actions: (Likely icons to View/Edit individual vehicle records). This allows you to update vehicle status or details if they change over time.

-
-
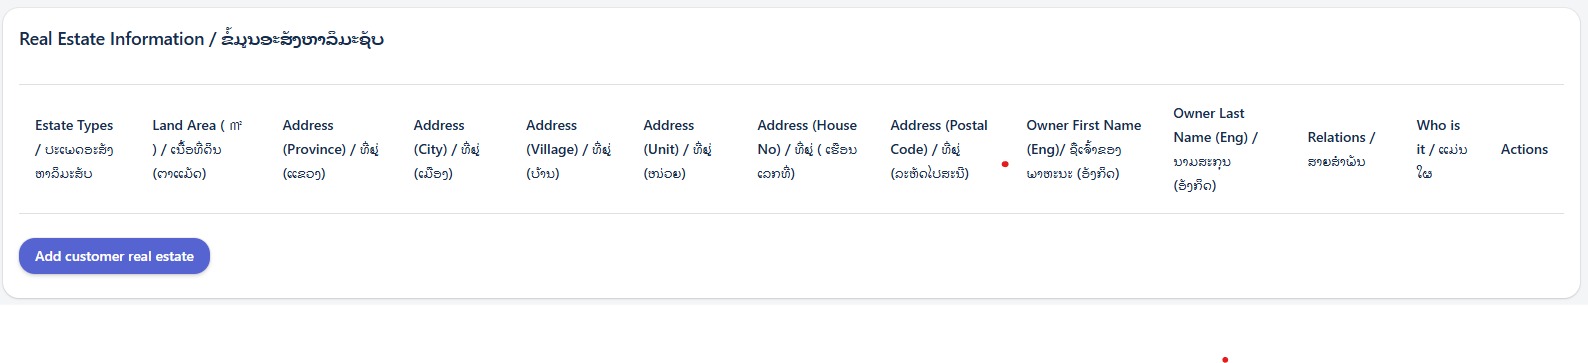
Real Estate Information / ຊັບສິນຄືບອສ:
-
This table lists any real estate assets linked to the customer.
-
Columns: Property Type, Address, Area (sqm), Estimated Value, Current Loan Home, Current Loan Amount.
-
Actions: (Likely icons to View/Edit individual real estate records). Useful for updating property valuations or status.

-
-
Non-securities Property Information / ຊັບສິນមិនមែនមូលប័ត្រ:
-
This table displays other non-security properties owned by the customer.
-
Columns: Property Type, Amounts.
-
Actions: (Likely icons to View/Edit individual property records). This covers miscellaneous assets.

-
-
Letter of Credit / Bank Loan (លិខិតឥណទាន/ប្រាក់កម្ចីធនាគារ):
-
This table details any Letters of Credit or external bank loans associated with the customer.
-
Columns: LC ID, Name in Letter/Bank, First Start Date, End Date.
-
Actions: (Likely icons to View/Edit individual LC/Bank Loan records). This provides a financial overview of the customer's other obligations.

-


Saving Your Changes
Car Makes
Page Overview
The "Car Make List" page provides a comprehensive view of all car makes managed within the system. It includes a dashboard navigation, search and filter options, and a detailed table displaying various car make attributes.
-
Search and Filter Panel: Helps you narrow down the displayed list of car makes based on specific criteria.
- Car Make Details Table: Displays the list of car makes with their respective information.

Using the Search and Filter Panel
The search and filter panel allows you to quickly find specific car makes by applying various criteria.
Available Filters:
-
Car make: Enter a specific car make name to find an exact match.
Car Make Create
The "Car Make Create" page allows users to add new car make entries to the system. It provides input fields for essential car make information.
-
Car make information panel: This section contains the fields necessary to define a new car make.
Creating a New Car Make
To create a new car make, fill in the following fields:
-
Title: (Mandatory field) Enter the official name of the car make.
-
Code: (Optional field) Enter a unique code or abbreviation for the car make, if applicable.
After filling in the required information, click the "Create Car Make" button. Upon successful creation, a popup message "car make created!" will appear, and the system will automatically navigate to the "Car Make List" page. If you wish to discard the entry, click the "Cancel" button.
Province
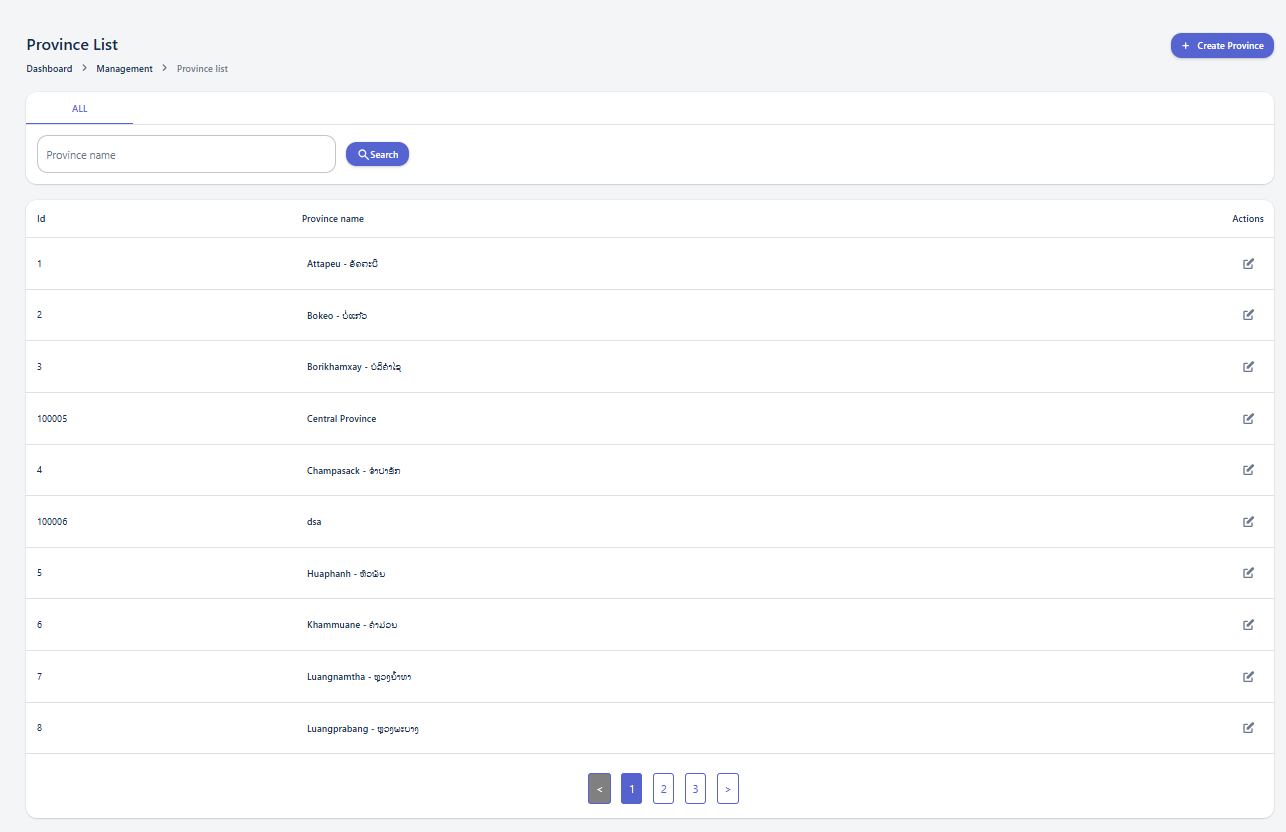
Page Overview
The "Province List" page provides a comprehensive view of all provinces managed within the system. It includes dashboard navigation, search and filter options, and a detailed table displaying various province attributes.
Using the Search and Filter Panel
The search and filter panel allows you to quickly find specific provinces by applying various criteria.
Available Filters:
Province Create
The "Province Create" page allows users to add new province entries to the system. It provides input fields for essential province information.
-
Province information panel: This section contains the fields necessary to define a new province.
Creating a New Province
To create a new province, fill in the following field:
-
Province name: (Mandatory field) Enter the name of the province.
After filling in the required information, click the "Create Province" button. Upon successful creation, a popup message "Province created!" will appear, and the system will automatically navigate to the "Province List" page. If you wish to discard the entry, click the "Cancel" button.
District
Page Overview
The "District List" page provides a comprehensive view of all districts managed within the system. It includes dashboard navigation, search and filter options, and a detailed table displaying various district attributes.
-
Search and Filter Panel: Helps you narrow down the displayed list of districts based on specific criteria.
-
District Details Table: Displays the list of districts with their respective information, including the associated Province and the District name.
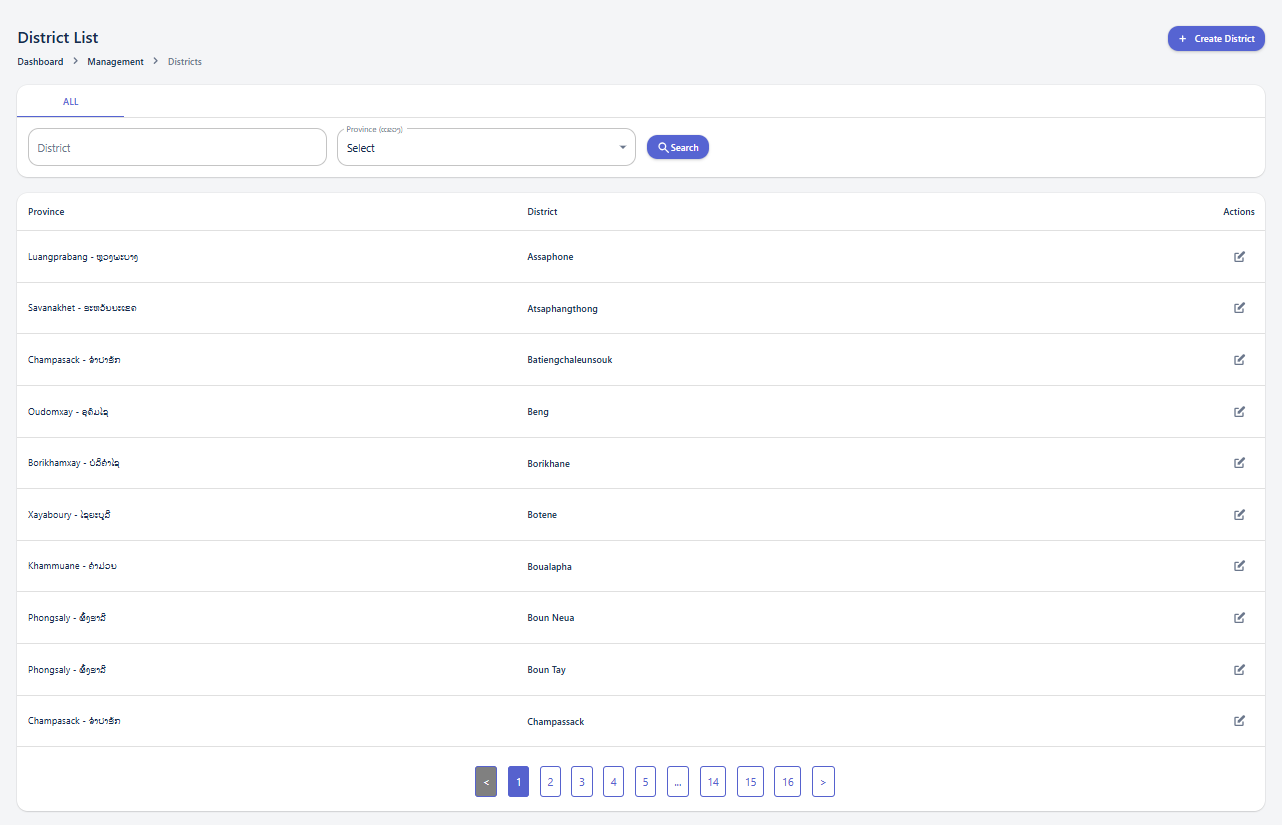
Using the Search and Filter Panel
The search and filter panel allows you to quickly find specific districts by applying various criteria.
Available Filters:
-
District: Enter a specific district name to find an exact match.
District Create
The "District Create" page allows users to add new district entries to the system. It provides input fields for essential district information.
-
District information panel: This section contains the fields necessary to define a new district.
Creating a New District
To create a new district, fill in the following fields:
-
Province (ແຂວງ): (Mandatory field) Select the province to which this district belongs from the dropdown list.
-
District name: (Mandatory field) Enter the name of the district.
After filling in the required information, click the "Create District" button. Upon successful creation, a popup message "District created!" will appear, and the system will automatically navigate to the "District List" page. If you wish to discard the entry, click the "Cancel" button.
Village
Page Overview
The "Village List" page provides a comprehensive view of all villages managed within the system. It includes dashboard navigation, search and filter options, and a detailed table displaying various village attributes.
-
Search and Filter Panel: Helps you narrow down the displayed list of villages based on specific criteria.
-
Village Details Table: Displays the list of villages with their respective information, including the associated District and the Village name.
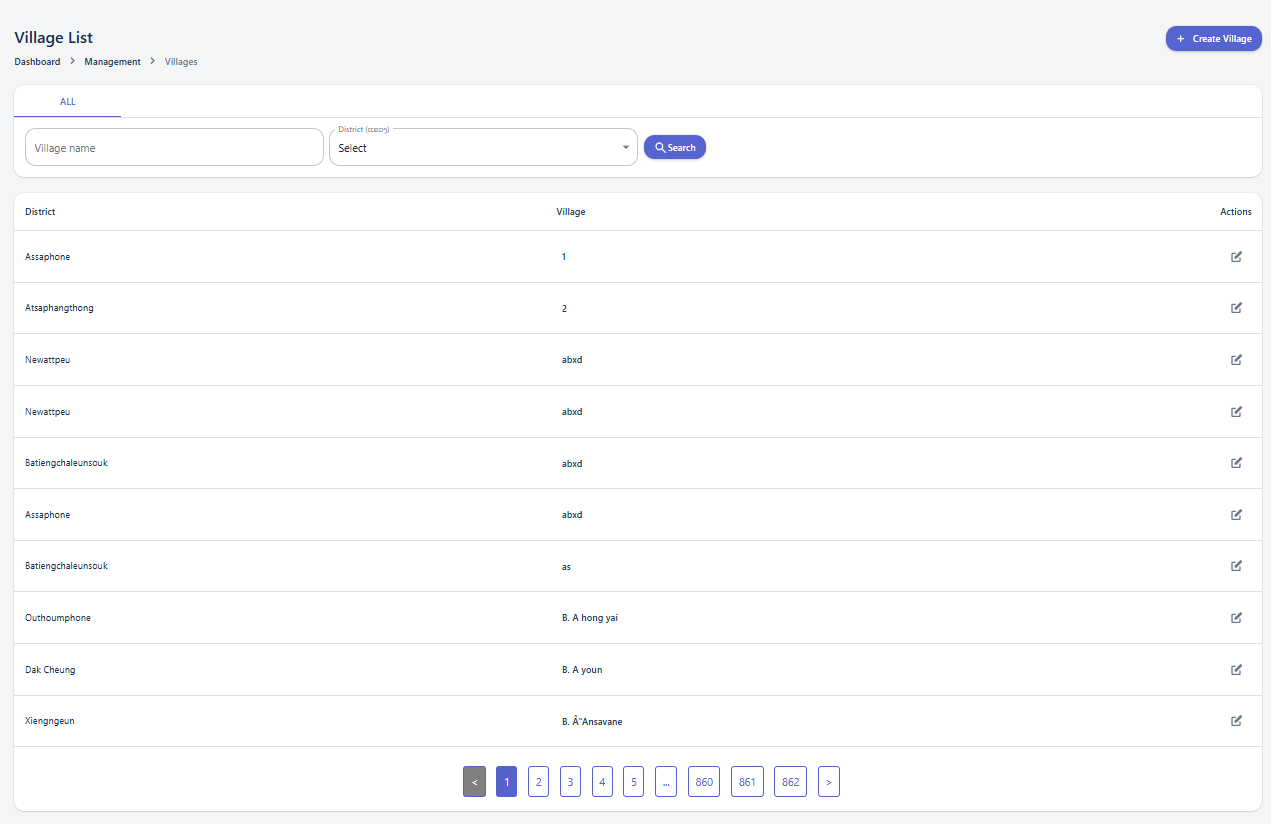
Using the Search and Filter Panel
The search and filter panel allows you to quickly find specific villages by applying various criteria.
Available Filters:
-
Village name: Enter a specific village name to find an exact match.
-
District (ແຂວງ): Select a district from the dropdown list to filter villages belonging to that specific district.
Village Create
The "Village Create" page allows users to add new village entries to the system. It provides input fields for essential village information.
-
Village information panel: This section contains the fields necessary to define a new village.
Creating a New Village
To create a new village, fill in the following fields:
-
District (ແຂວງ): (Mandatory field) Select the district to which this village belongs from the dropdown list.
-
Village name: (Mandatory field) Enter the name of the village.
-
Village name Lao: (Optional field) Enter the name of the village in Lao script, if applicable.
After filling in the required information, click the "Create Village" button. Upon successful creation, a popup message "Village created!" will appear, and the system will automatically navigate to the "Village List" page. If you wish to discard the entry, click the "Cancel" button.
Customer Types List
"Customer Types List New" page, which is designed to manage customer types, synchronize organizational structures, and view customer reports and details. The "Customer Types List New" page serves as a central hub for viewing customer data, filtering it by various organizational units, and accessing summary reports.
Action Buttons:
+ Add Loan Details (Top Right):
Sync organization structure:
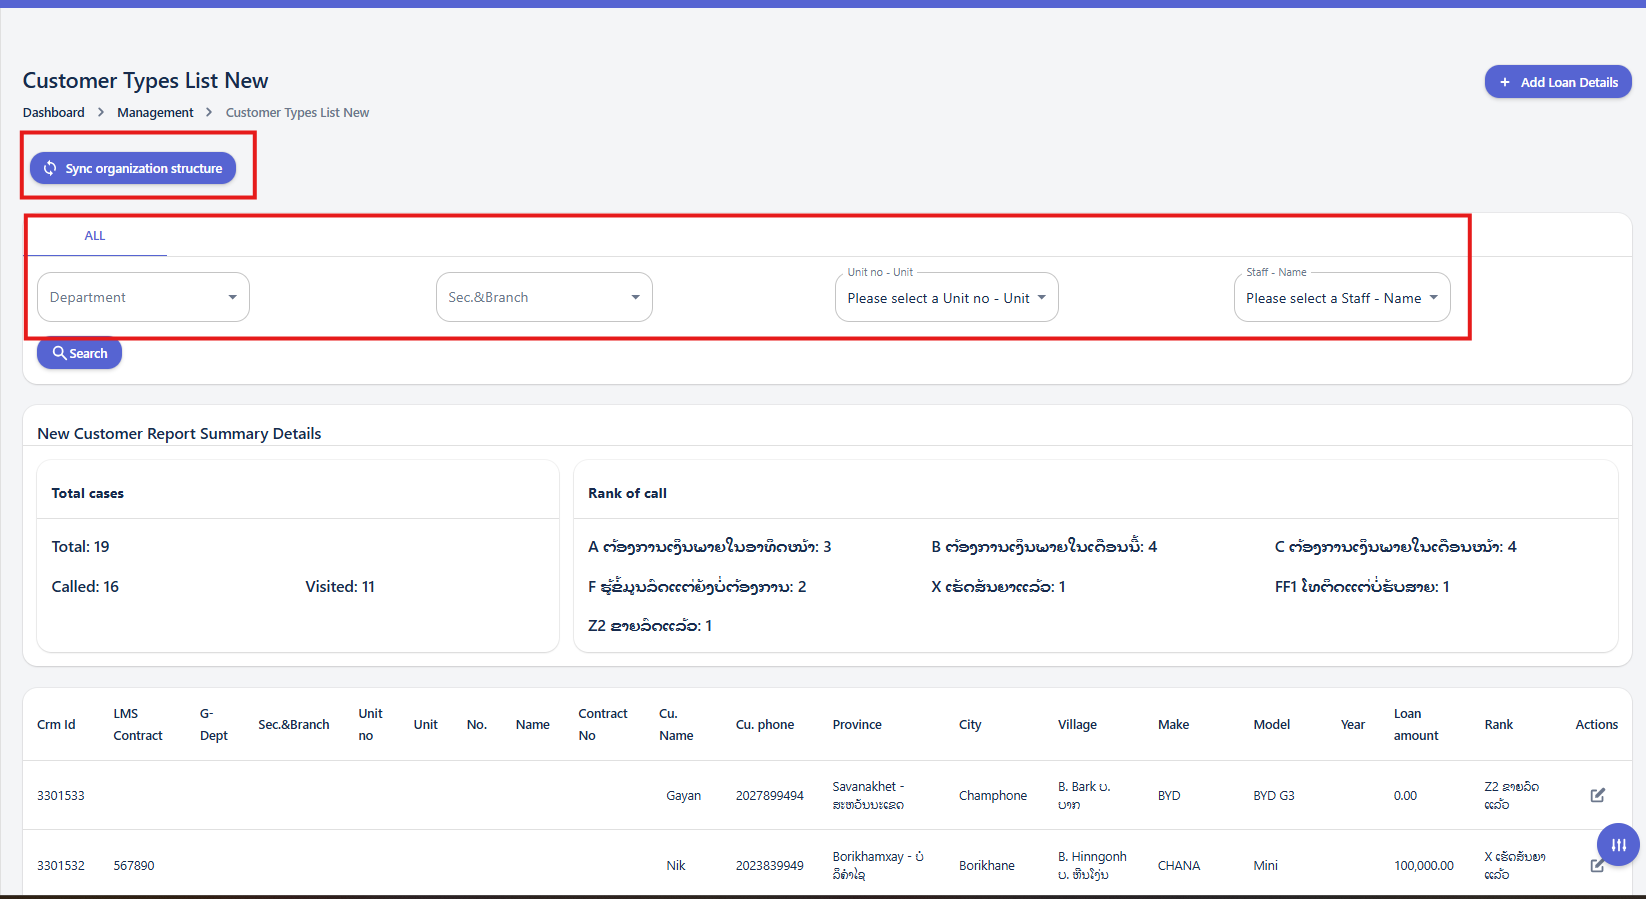
Search Filters
- Department: Filter data by specific departments within your organization.
- Sec.&Branch: Filter data by specific sections or branches.
- Unit No - Unit: Filter data by specific unit numbers or unit names.
- Staff - Name: Filter data by the name of a specific staff member.
New Customer Report Summary Details
This section provides a summary of new customer-related activities.
Total cases:
-
Total: [Number]: The total count of new customer cases. -
Called: [Number]: The number of cases where a call has been made. -
Visited: [Number]: The number of cases where a visit has occurred.
Rank of call:
-
This section likely categorizes customers or calls based on a "rank" system.
Customer Details Table
This table displays individual customer records with various attributes.
Columns:
-
Crm Id: Unique identifier from the CRM system.
-
LMS Contract: The contract number associated with the Loan Management System.
-
G-Dept:
-
Sec.&Branch: Section and Branch information.
-
Unit no: Unit Number.
-
Unit: Unit Name.
-
Contract No: The specific contract number.
-
Cu. Name: Customer's Name.
-
Cu. phone: Customer's Phone Number.
-
Province: Customer's Province.
-
City: Customer's City.
-
Village: Customer's Village.
-
Make:
-
Model: Model of an associated item.
-
Year: Year of an associated item.
-
Loan amount: The loan amount.
-
Rank: Customer or loan rank.
-
Actions:
-
Edit Icon (Pencil): Click to edit the details of a specific customer entry.
-

Car Models
Page Overview
The "Car Model List" page provides a comprehensive view of all car models managed within the system. It includes dashboard navigation, search and filter options, and a detailed table displaying various car model attributes.
-
Search and Filter Panel: Helps you narrow down the displayed list of car models based on specific criteria.
-
Car Model Details Table: Displays the list of car models with their respective information, including the associated Car Make.
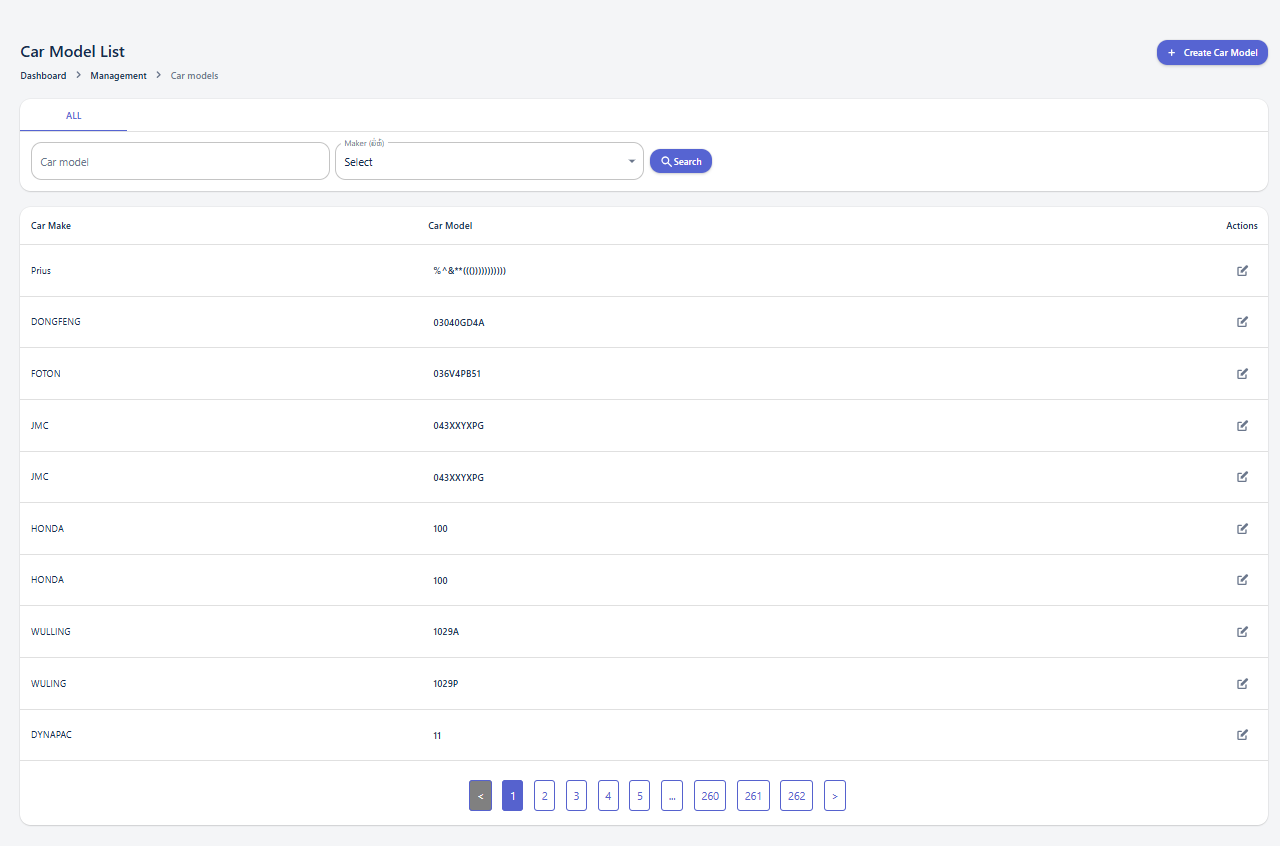
Using the Search and Filter Panel
The search and filter panel allows you to quickly find specific car models by applying various criteria.
Available Filters:
-
Car Model: Enter a specific car model name to find an exact match.
-
Maker (ຍີ່ຫໍ້): Select a car make from the dropdown list to filter car models belonging to that specific make.
Car Model Create
The "Car Model Create" page allows users to add new car model entries to the system. It provides input fields for essential car model information.
-
Car model information panel: This section contains the fields necessary to define a new car model.
Creating a New Car Model
To create a new car model, fill in the following fields:
-
Maker (ຍີ່ຫໍ້): (Mandatory field) Select the car make to which this model belongs from the dropdown list.
-
Title: (Mandatory field) Enter the official name of the car model.
-
Code: (Optional field) Enter a unique code or abbreviation for the car model, if applicable.
After filling in the required information, click the "Create Car Model" button. Upon successful creation, a popup message "car model created!" will appear, and the system will automatically navigate to the "Car Model List" page. If you wish to discard the entry, click the "Cancel" button.