Expense
The Expense module is flexible to add and track your expenses in a structured manner by categorizing expenses. Additionally, the module allows to create ringi lists, which are essentially expense requests that need approval from relevant authorities. This streamlines the approval process and ensures transparency in expense management.
Expense Title
The Expense Module is a comprehensive system designed to streamline and manage the expense reimbursement process within an organization. It provides a structured framework for entering expenses, obtaining necessary approvals, and ensuring accurate and timely disbursements.
this organized into four primary sections: Filter, My Applications, To Approve, and To Disburse.
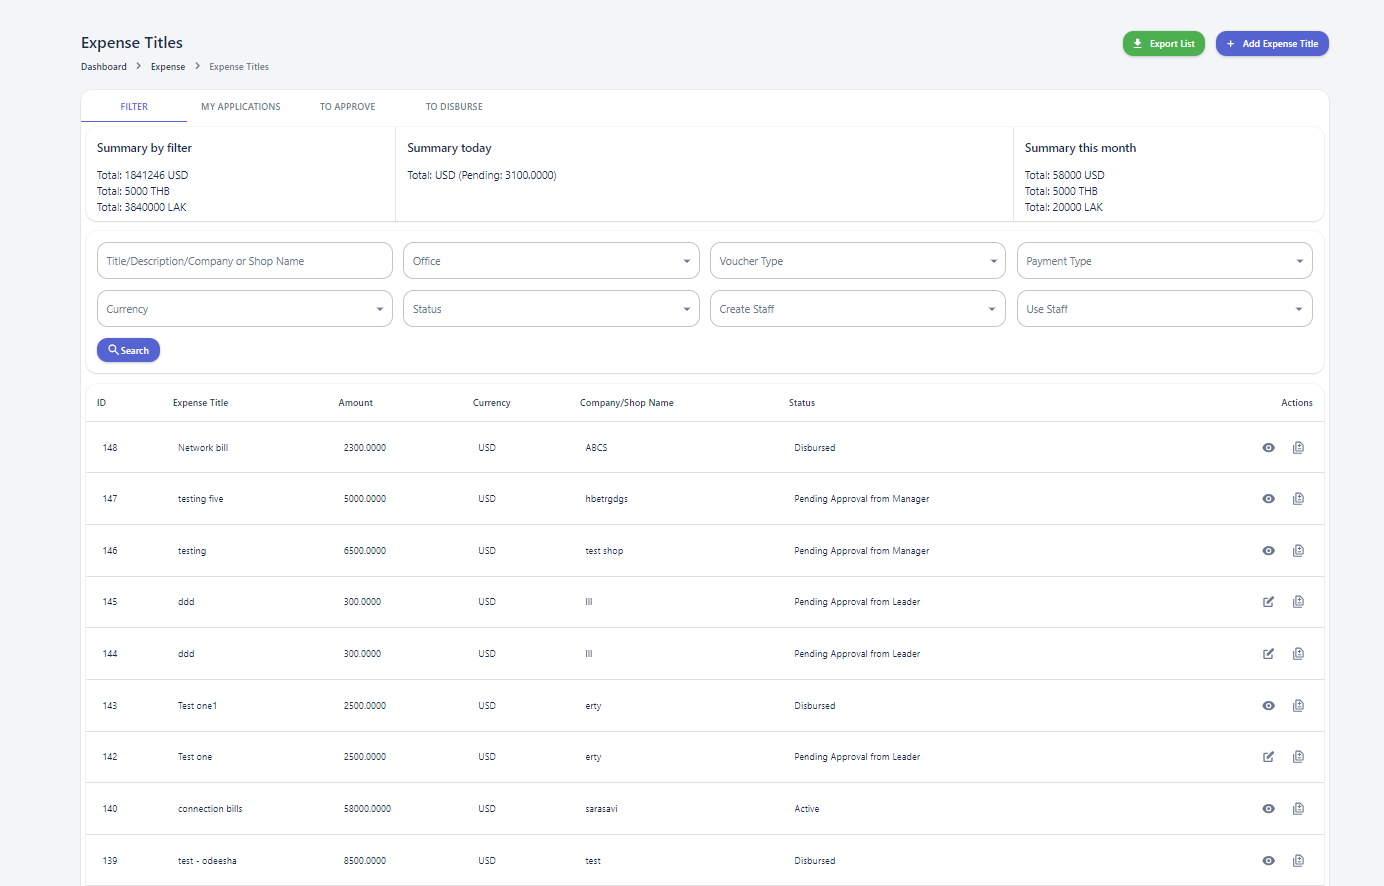
Filter Section
The Filter section offers a granular view of expense data, allowing users to analyze and summarize information based on various criteria. Key features include:
- Summary by Filter: Displays the total amount of active expenses across three currencies: USD, THB, and LAK.
- Summary Today: Presents a breakdown of expenses created on the current day.
- Summary This Month: Provides a summary of expenses generated during the current month.
Search Filters: Eight search filters are available to refine expense data, These filters enable users to identify specific expenses based on their attributes, such as Title, Office, Voucher Type, Payment Type, Currency, Status ,Create Staff & Use Staff.
Expense Table: The Expense Table provides a detailed view of individual expenses, including a few columns.
My Applications Section
This section allows users to view and manage expenses they have personally created.
To Approve Section
This section lists expenses that are ready to be approve.
To Disburse Section
This section lists expenses that are ready to be disbursed.
Expense Approval Process
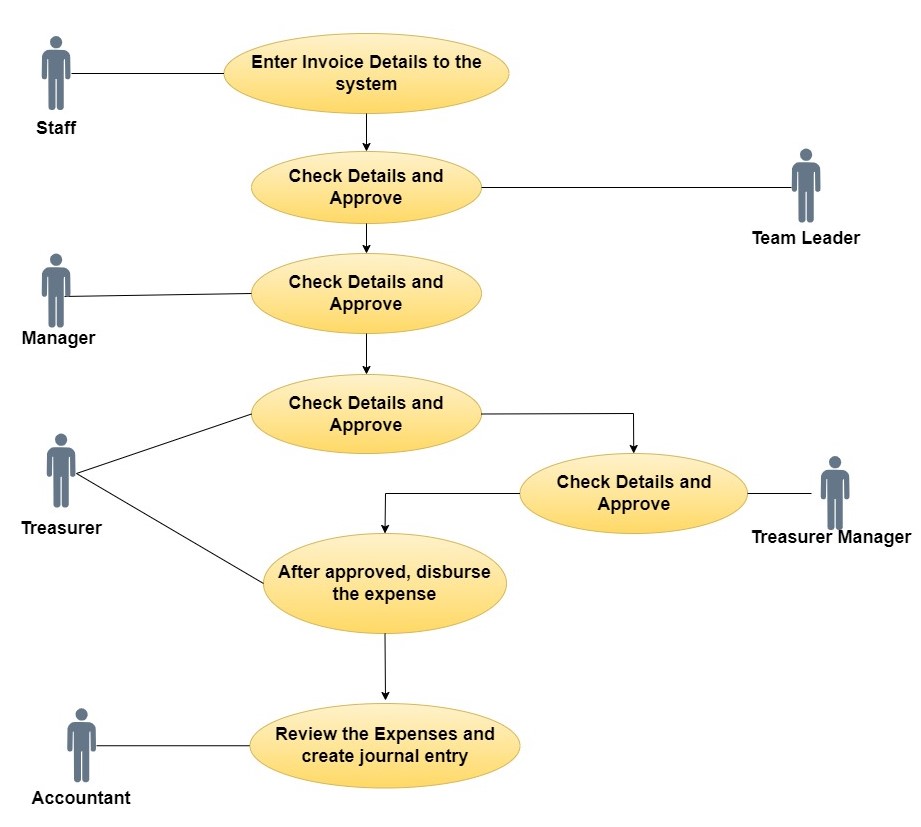
The expense approval process involves several steps and actors, ensuring that expenses are authorized and processed correctly. This can be done in two ways.
- Manual Entry: Enter invoice details and download for manual approval.
- Direct Assignment: Assign invoice to the next approver within the system.
Actors:
-
-
- Staff
- Team Leader
- Manager
- Treasurer
- Treasurer Manager
-
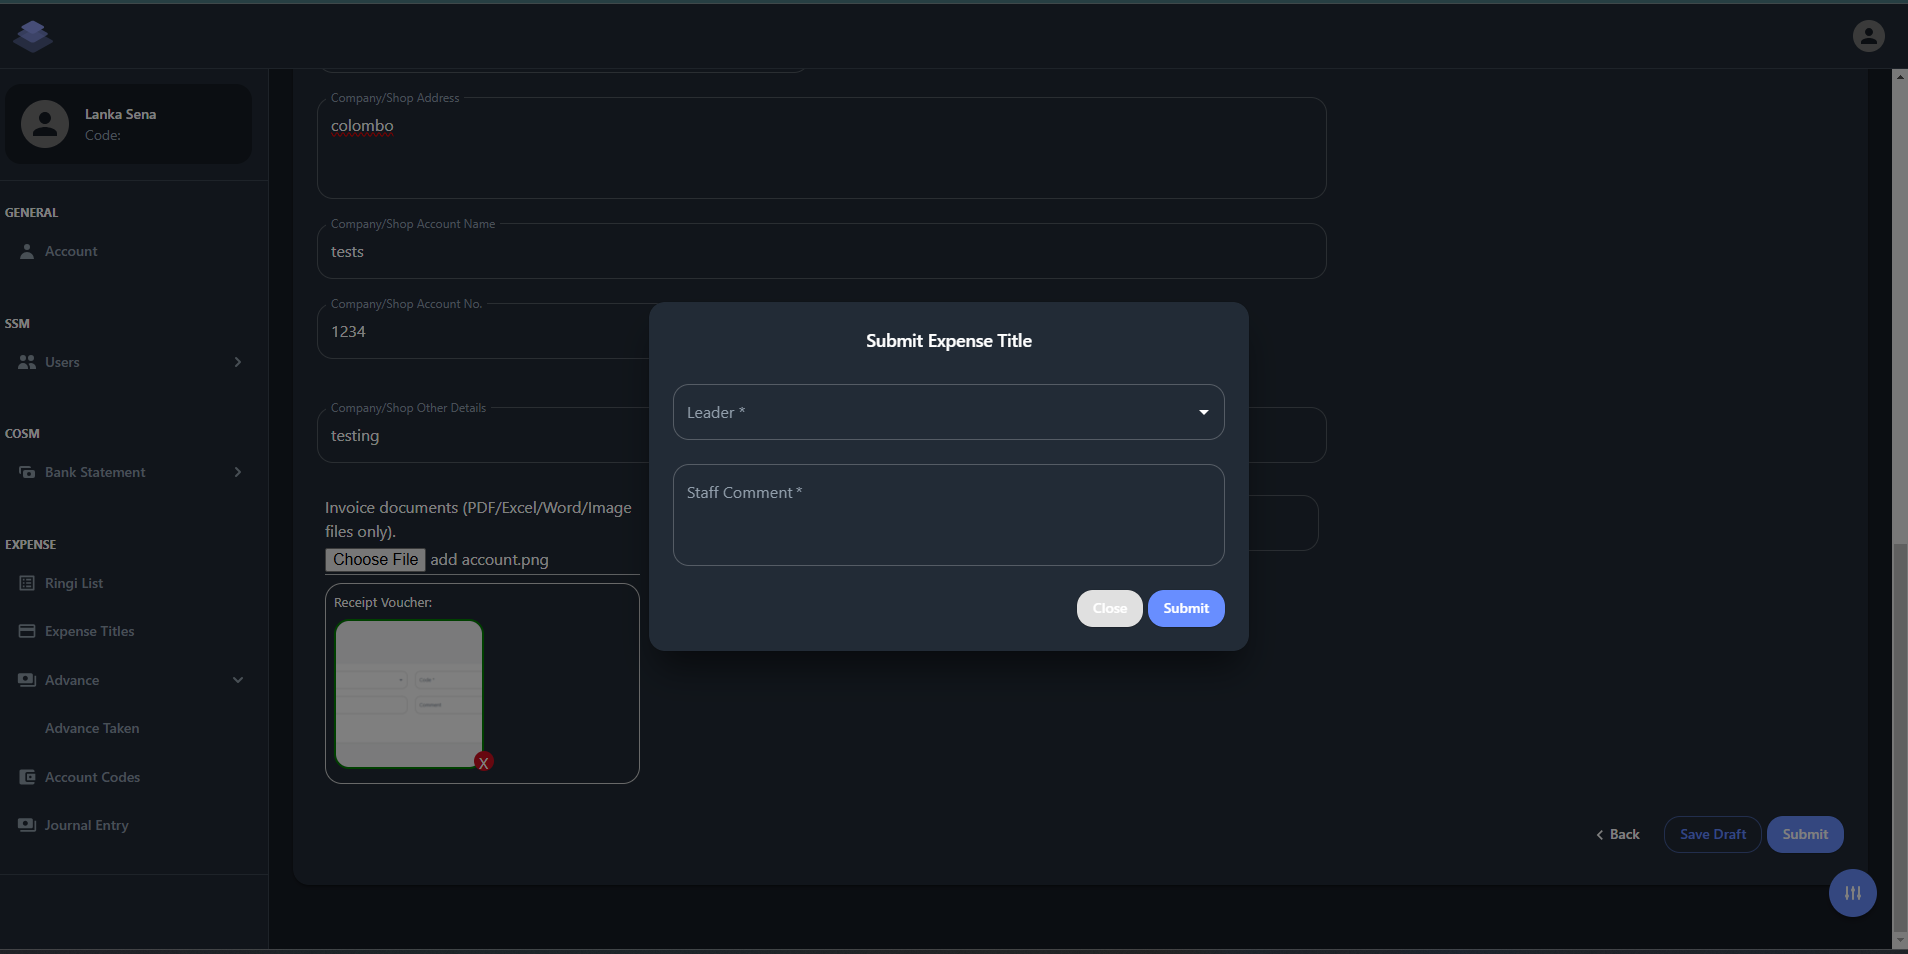
Step 1: Invoice Submission
- Actor: Staff
- Action:
- Receives an invoice from a company or shop.
- Enter the invoice details into the system and submit it to the Team Leader.
- Prints the entered invoice details, signs it, and sends it to the Team Leader for review and approval.
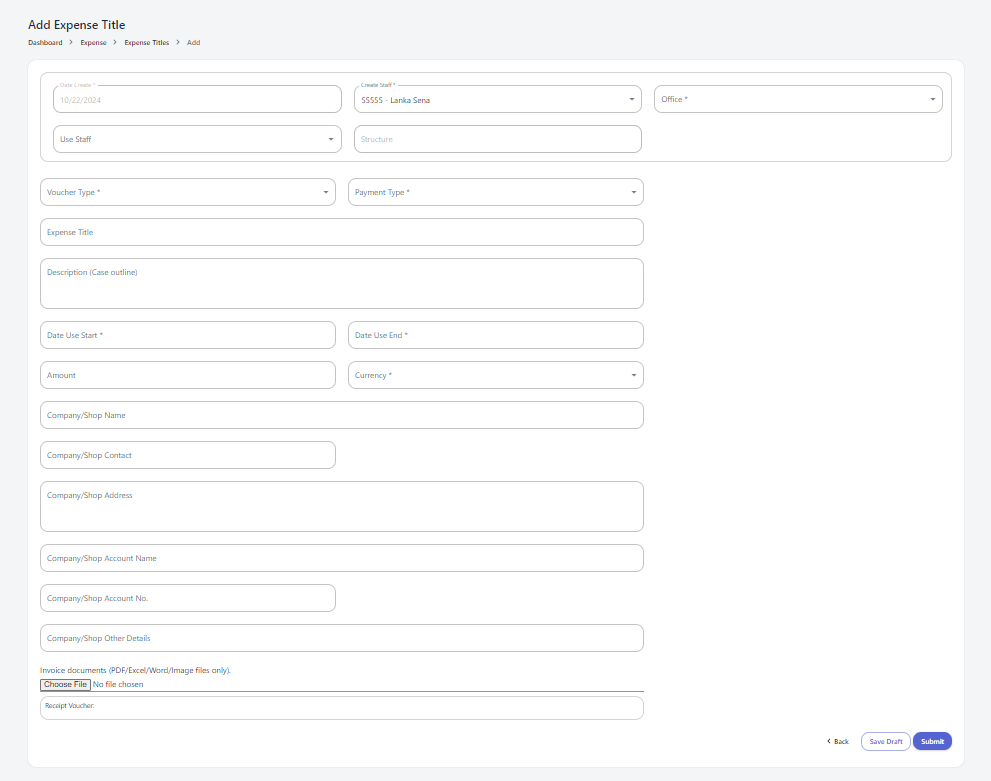
There are three Voucher types.
- Voucher Payment
- Payment Report
- Advance
There are two(2) payment types.
- Cash
- IBank
After submit this for, the user can download the payment voucher according to the given details.
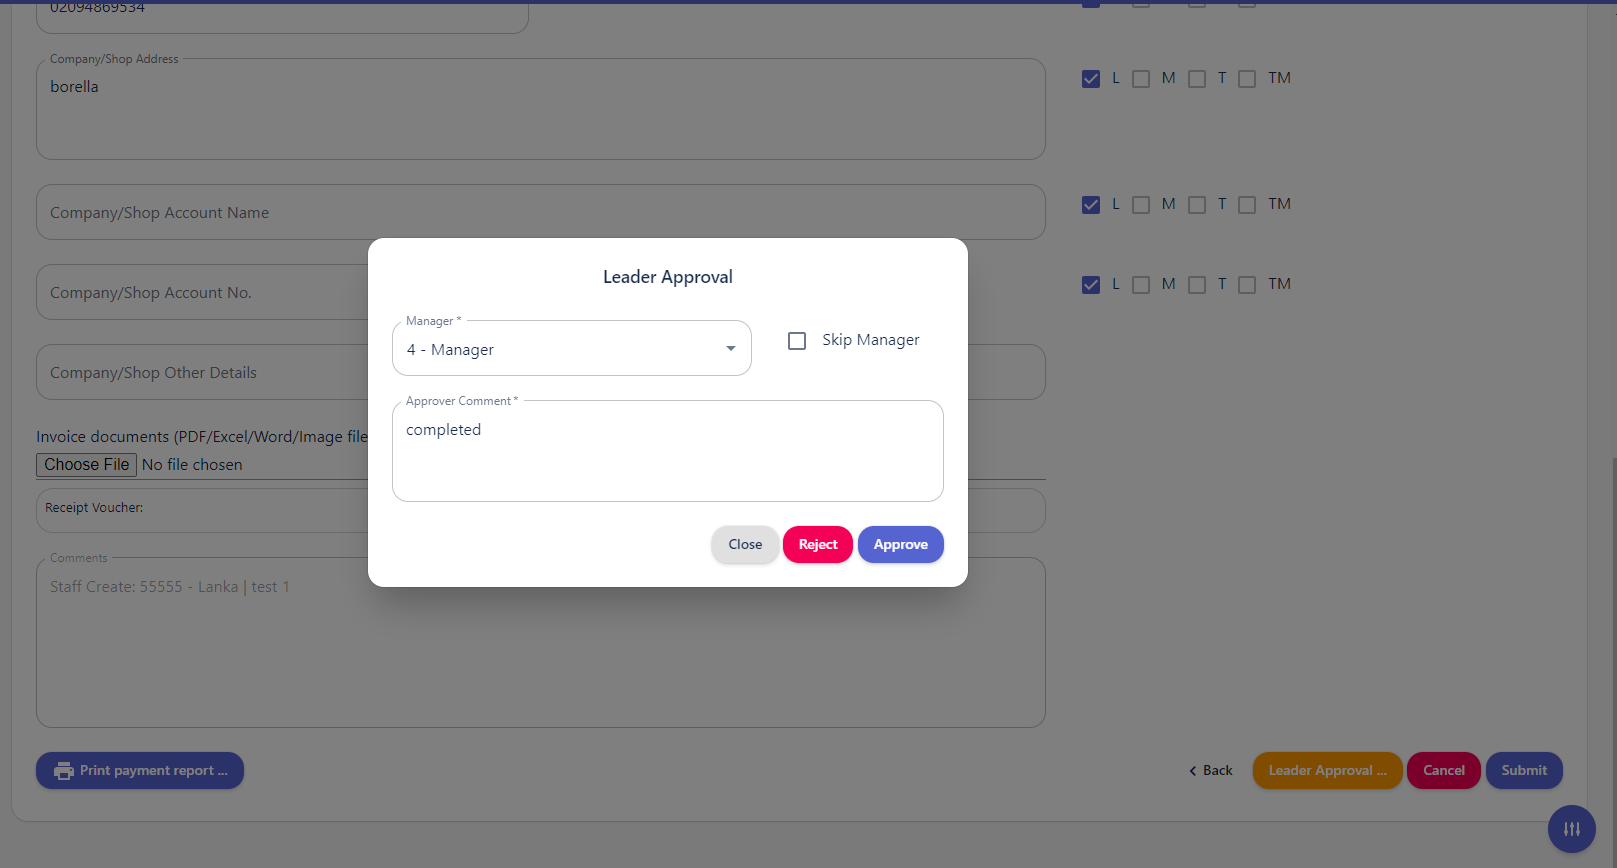
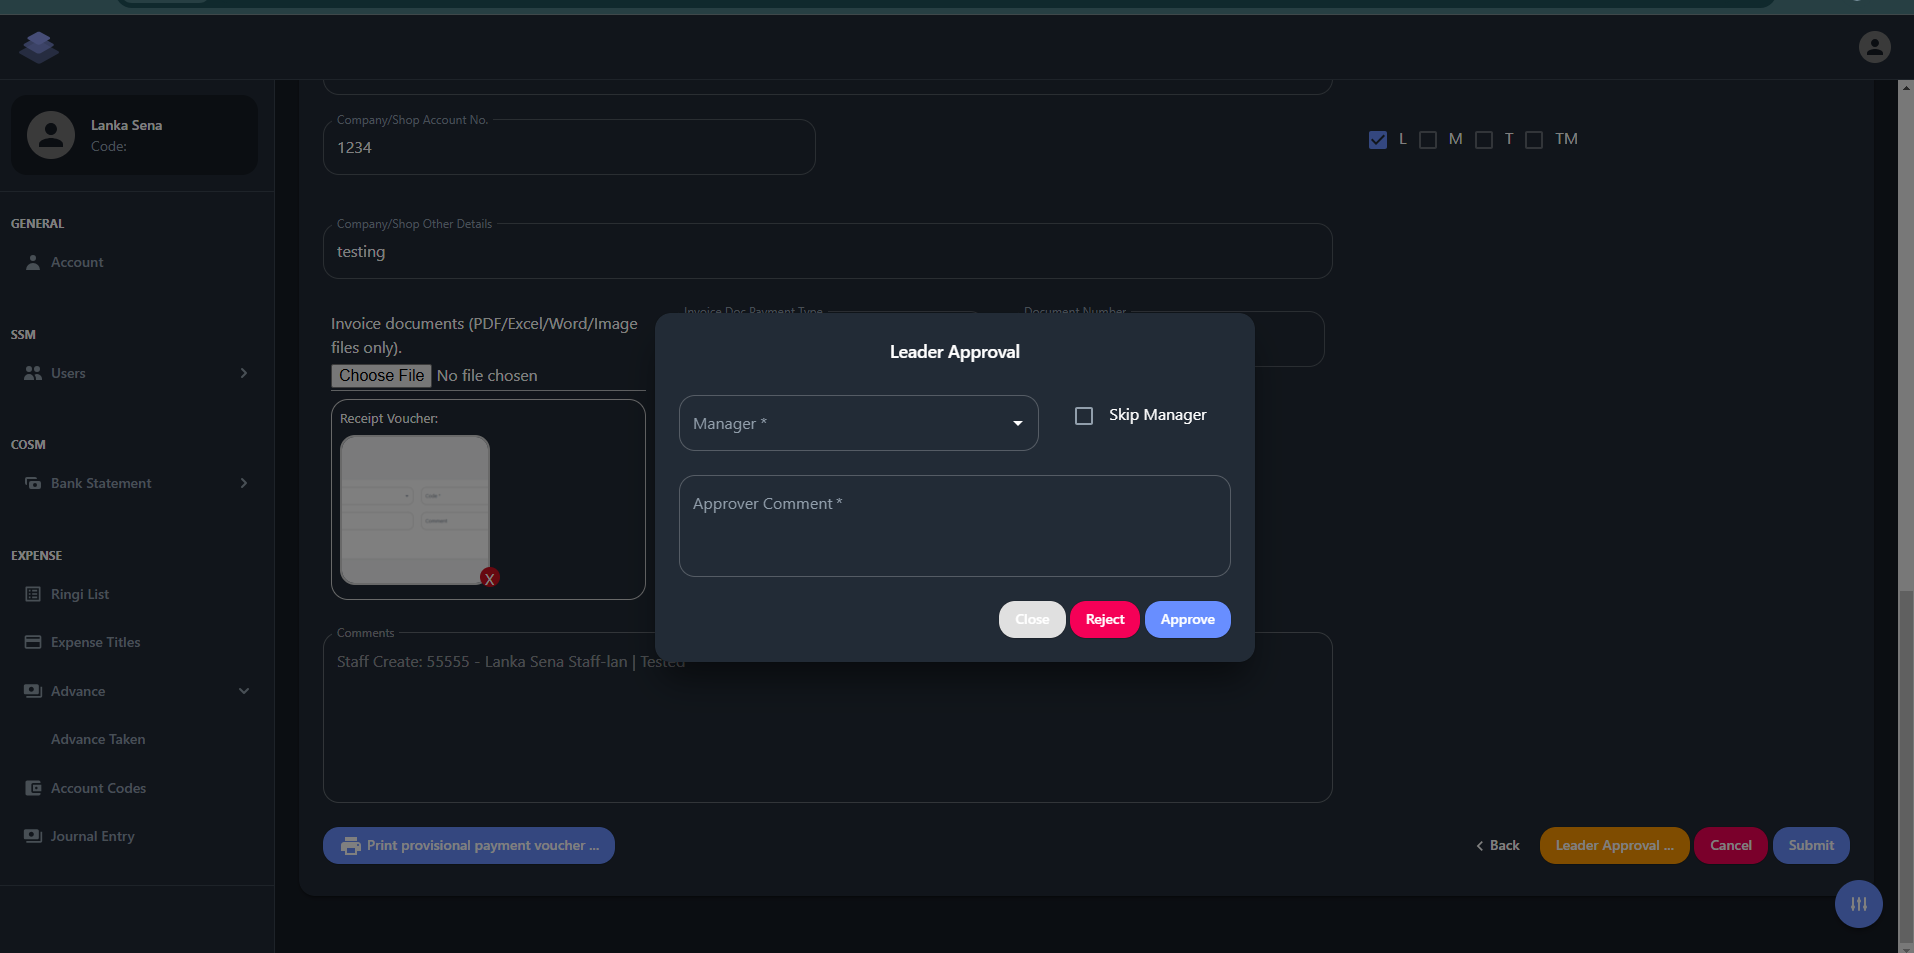
Step 2: Team Leader Approval
- Actor: Team Leader
- Action:
- Reviews and approves the invoice in the system.
- Checks and signs the physical document.
- Sends the approved invoice to the Manager.
Manager Skip
-
- The manager's approval step is completely skipped, and the expense goes directly to the next level
The manager will not approve it and will forward it to the next named approver, and this bypass is indicated by the checkmarks below..
- The manager's approval step is completely skipped, and the expense goes directly to the next level
Without Manager Skip
Follow below process
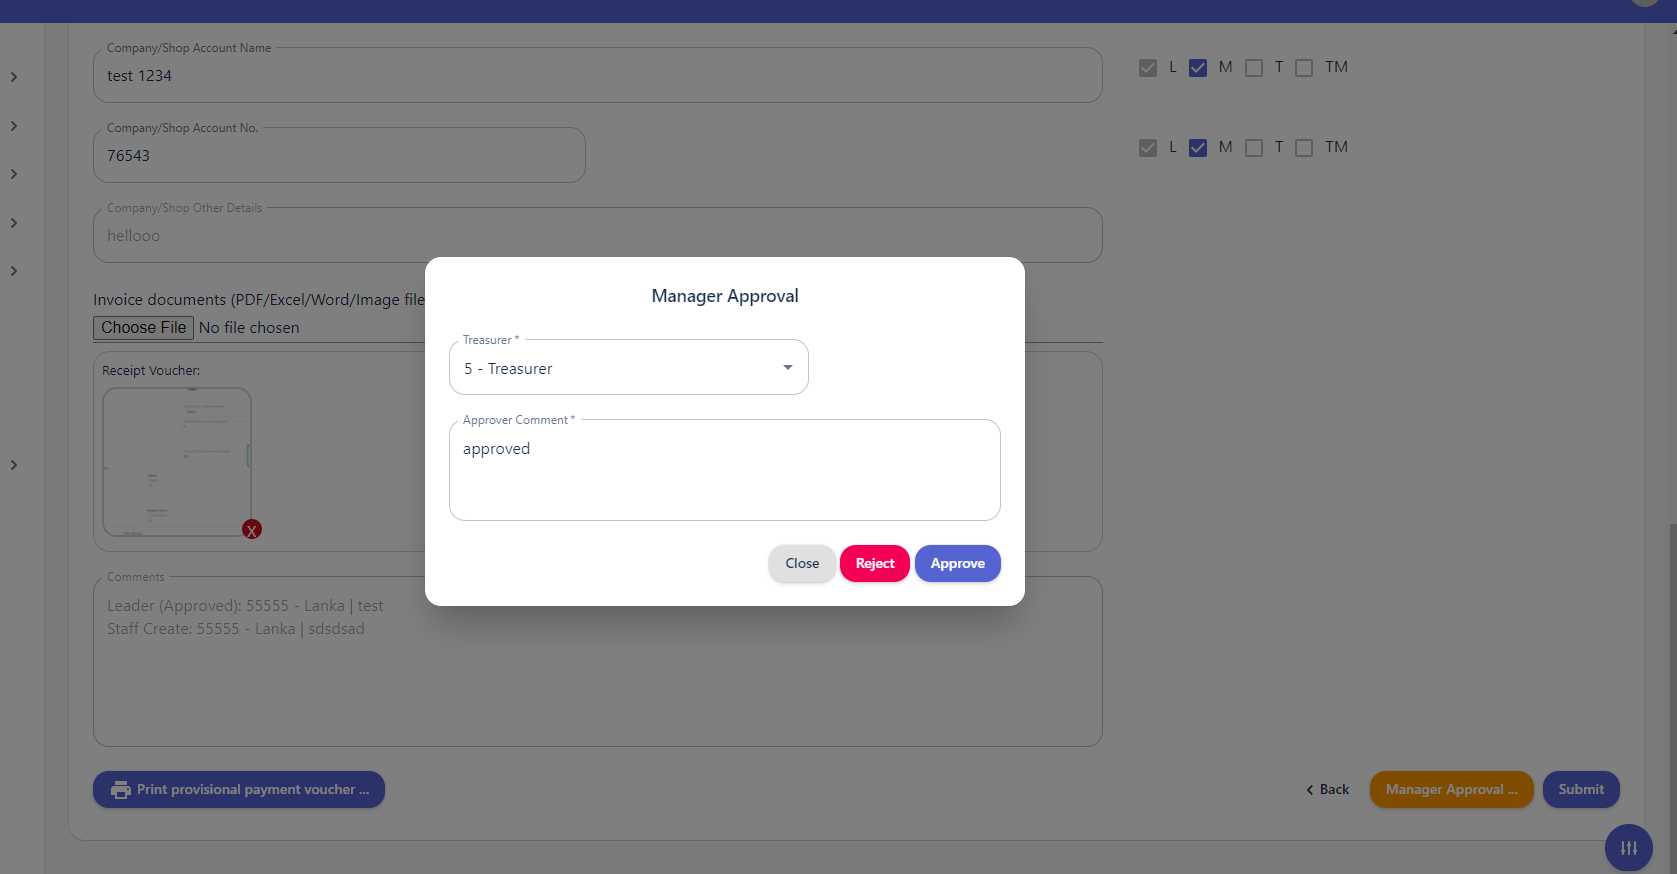
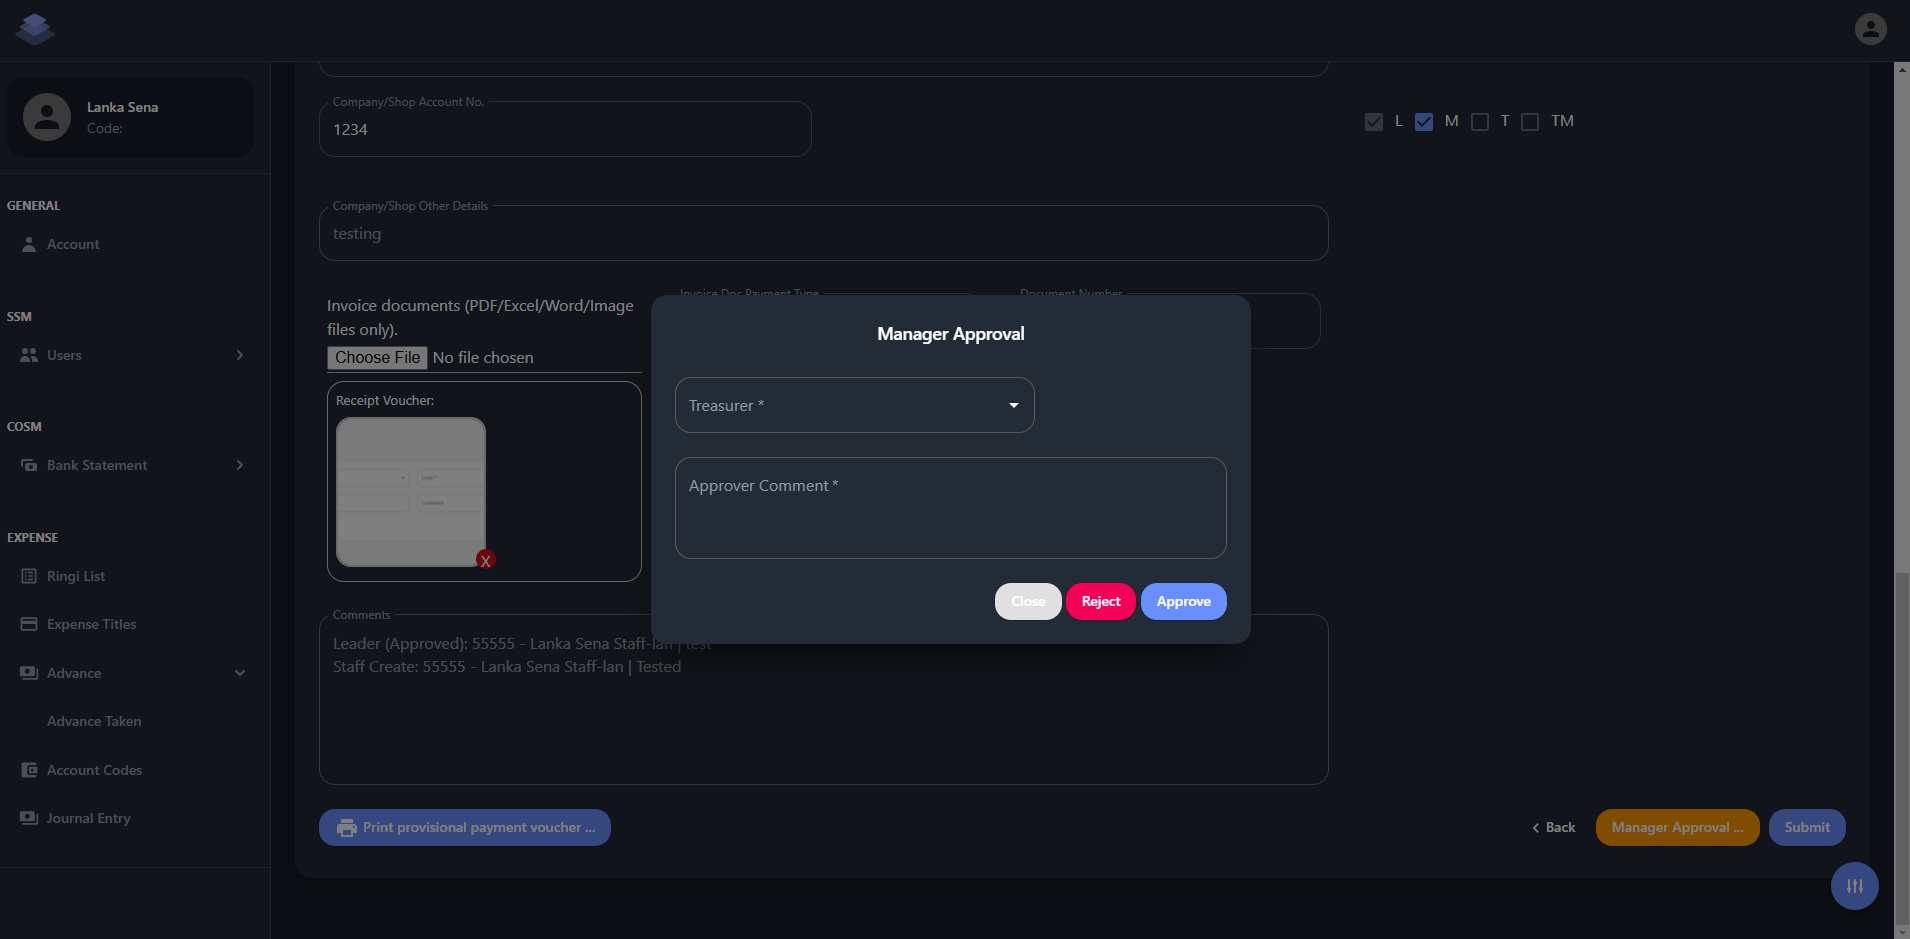
Step 3: Manager Approval
- Actor: Manager
- Action:
- Reviews and approves the invoice in the system.
- Checks and signs the physical document.
- Sends the approved invoice to the Treasurer.
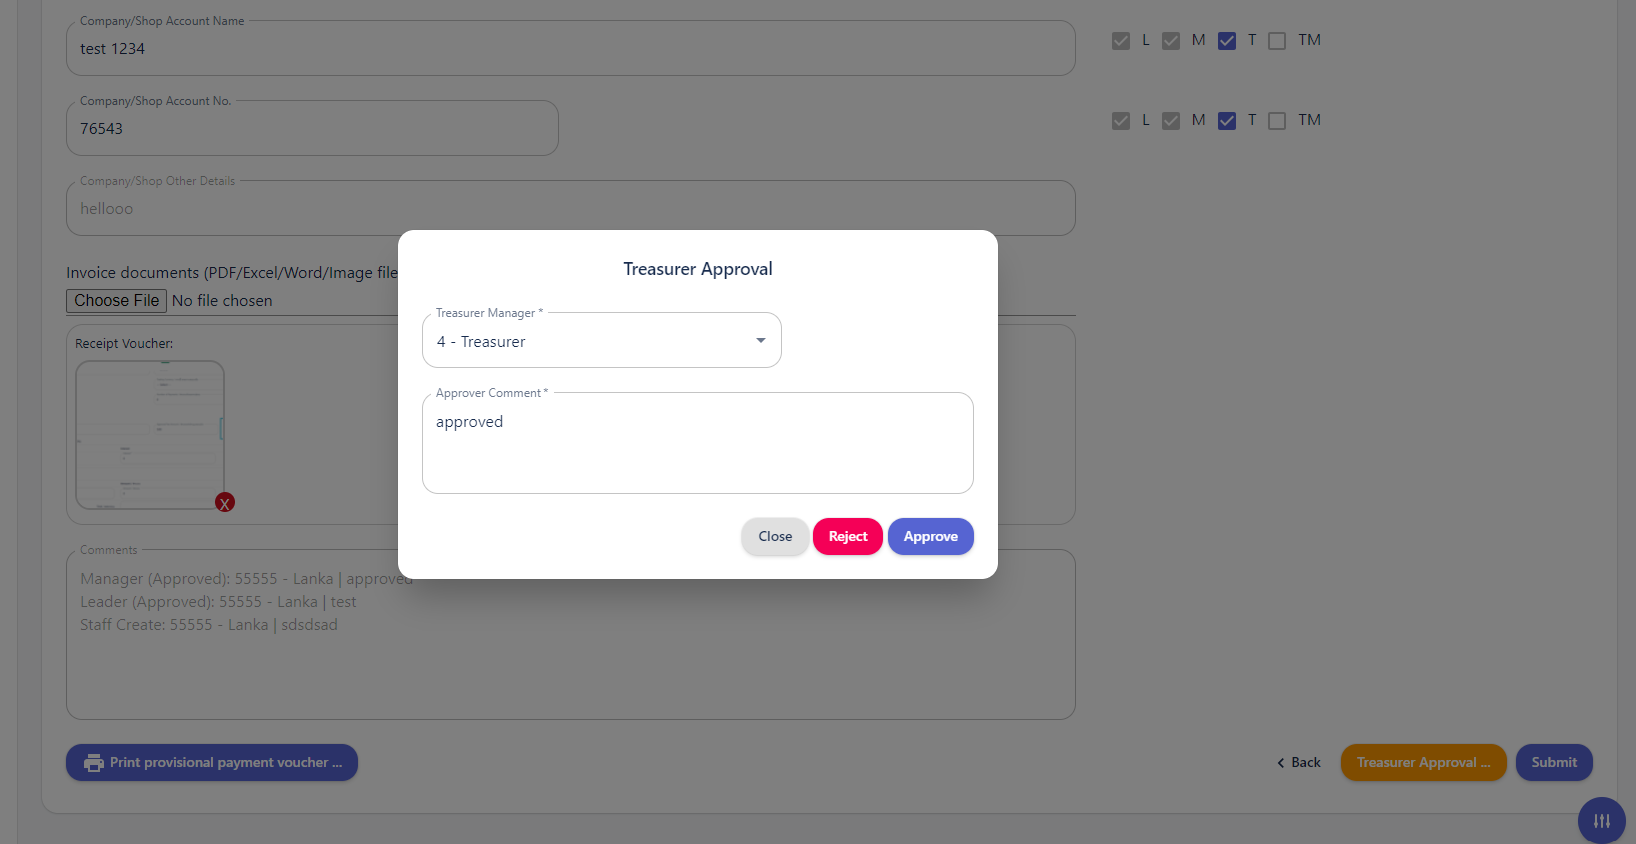
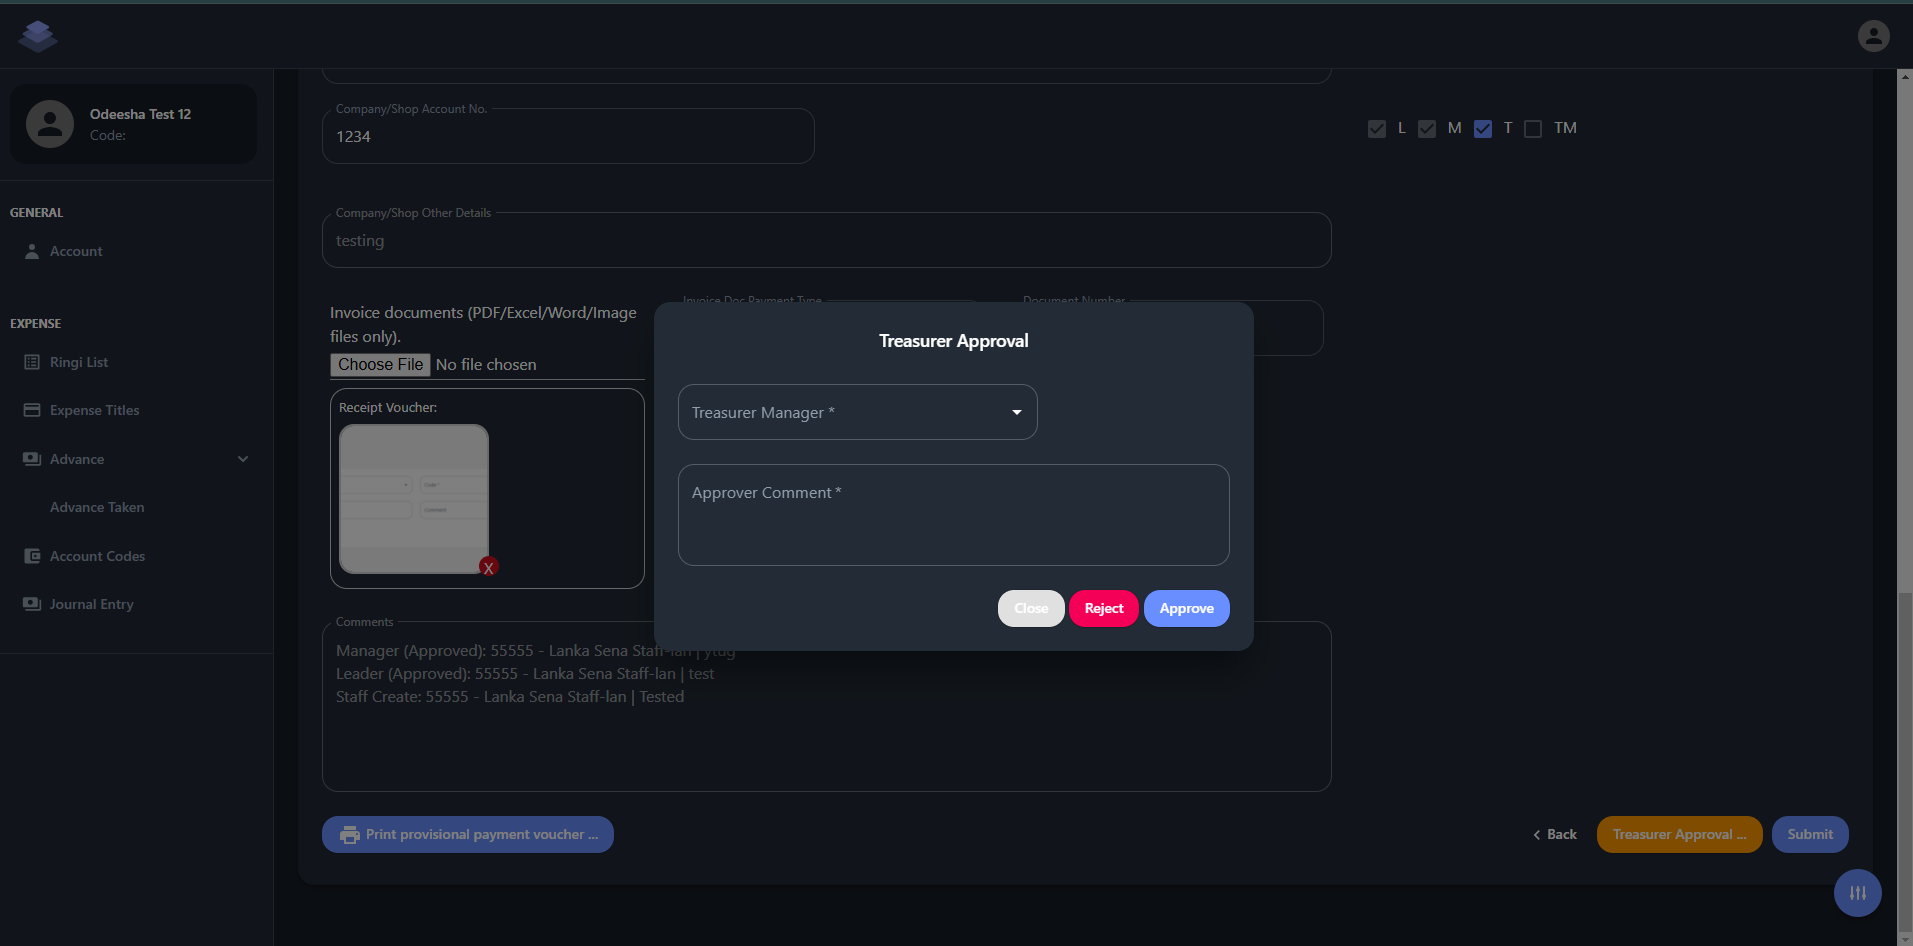
Step 4: Treasurer Approval and Bank Transfer Initiation
- Actor: Treasurer
- Action:
- Reviews and approves the invoice in the system.
- Checks and signs the physical document.
- Initiates an I Bank transfer in the system and sends it to the Treasurer Manager for confirmation.
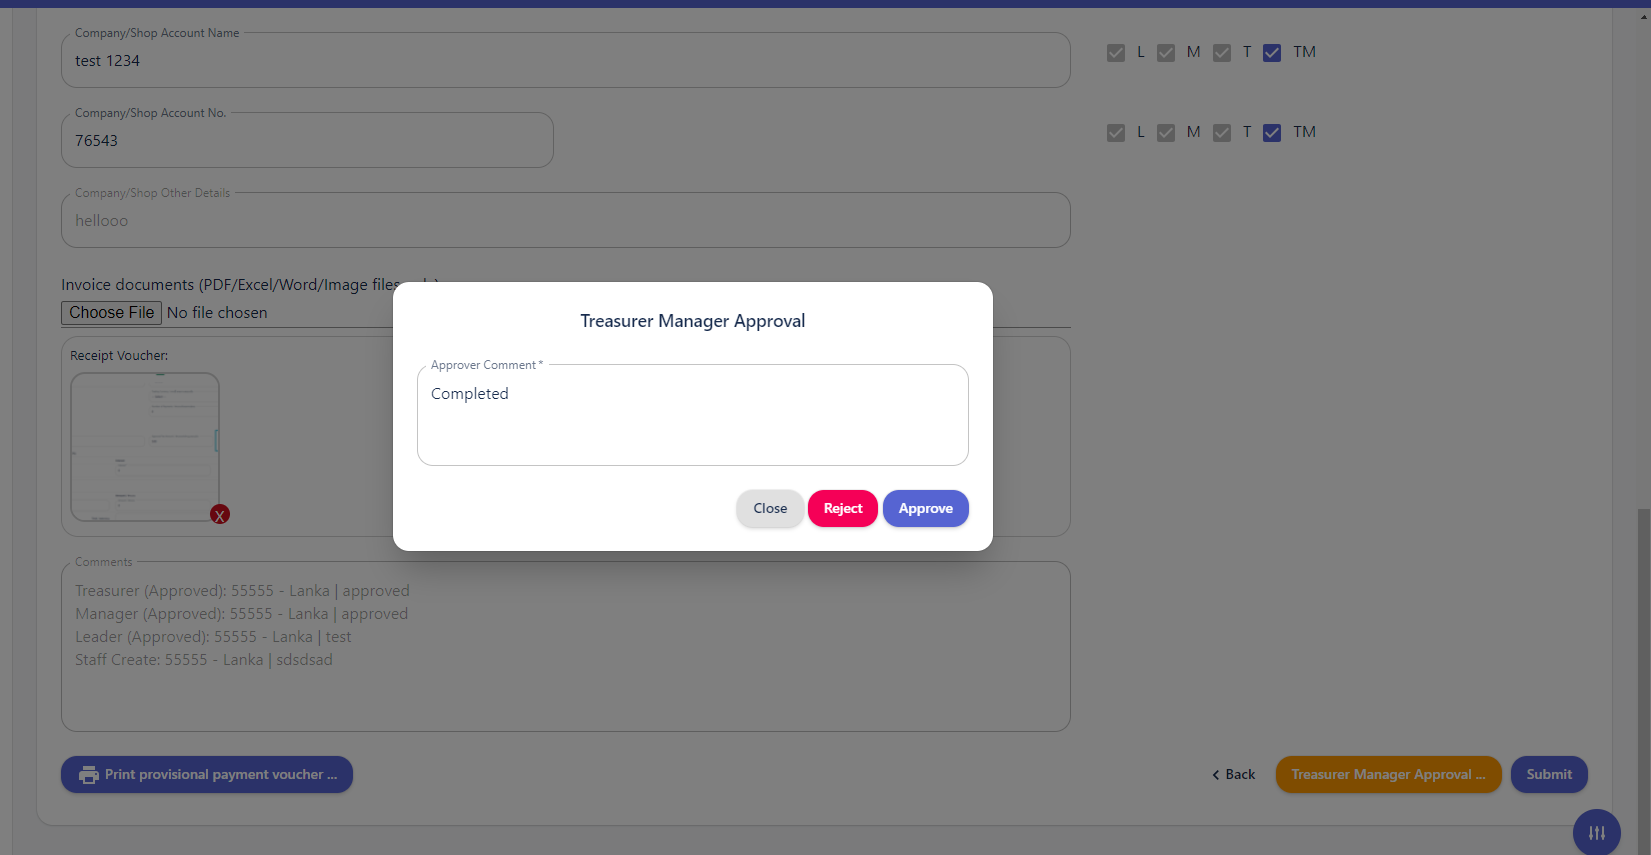
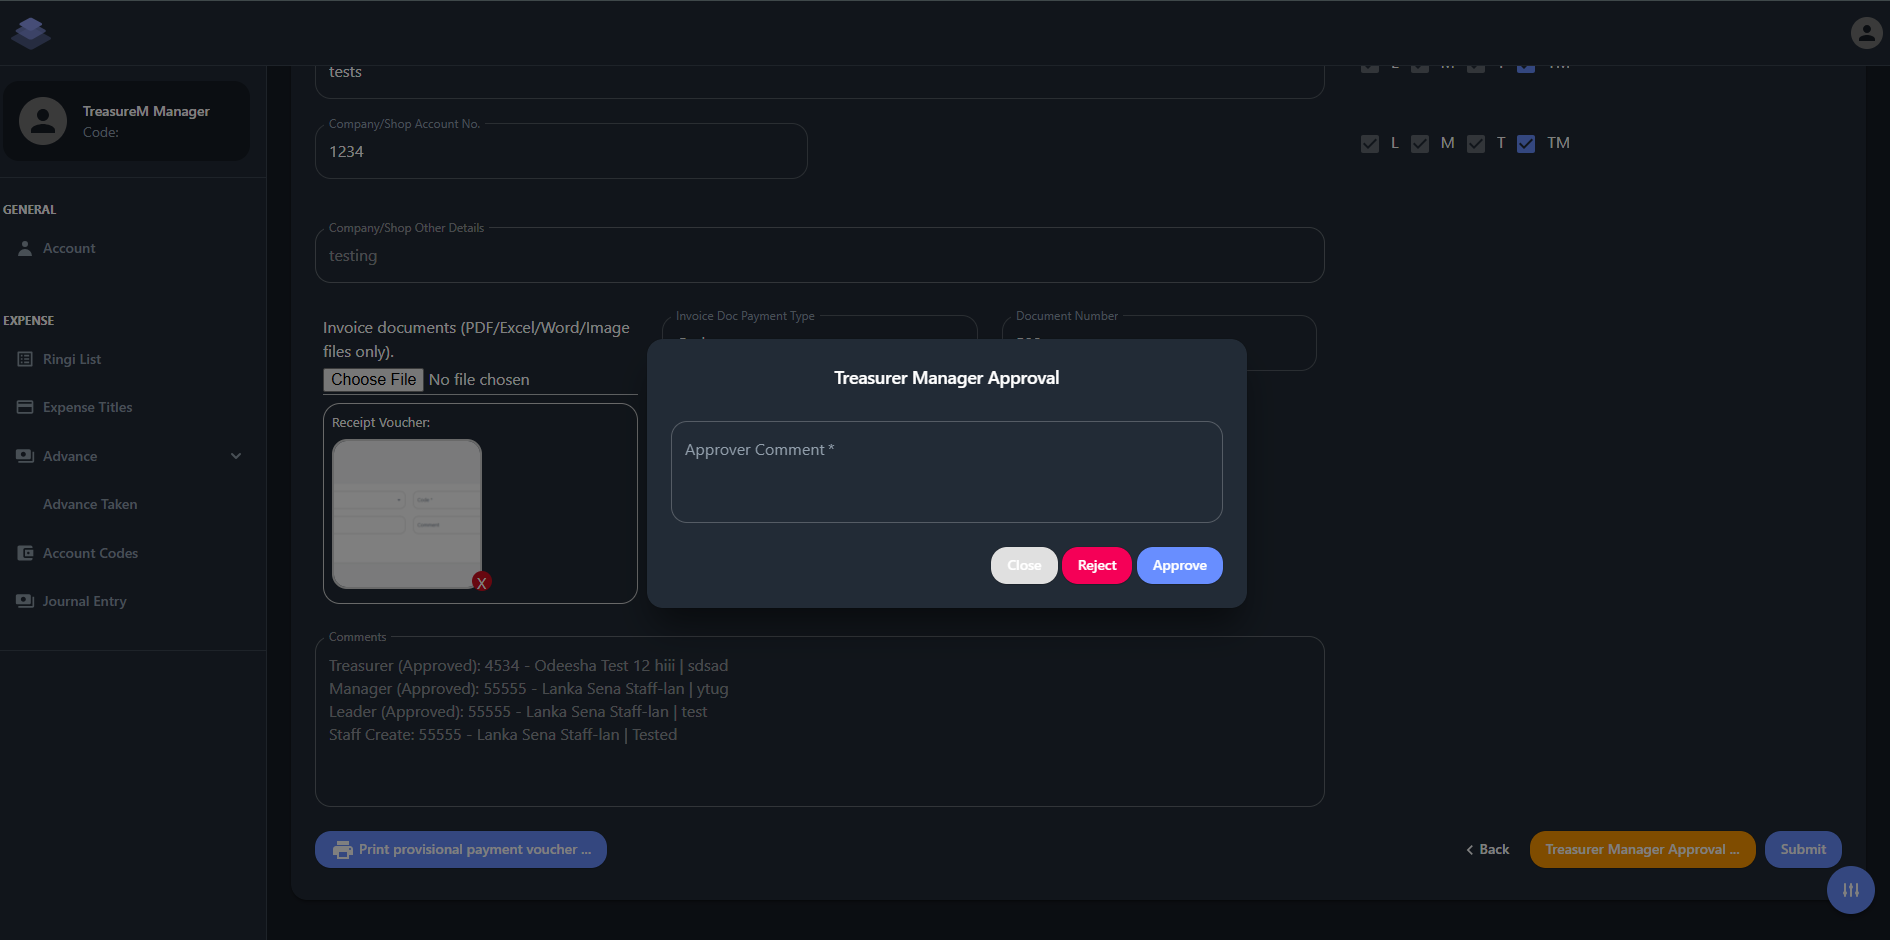
Step 5: Treasurer Manager Confirmation
- Actor: Treasurer Manager
- Action:
- Reviews and approves the invoice in the system.
- Checks and signs the physical document.
- Confirms the I Bank transfer in the bank system.
- Sends the approved invoice back to the Treasurer.
- After approve the Treasurer Manager, Expense title status changed as Active.
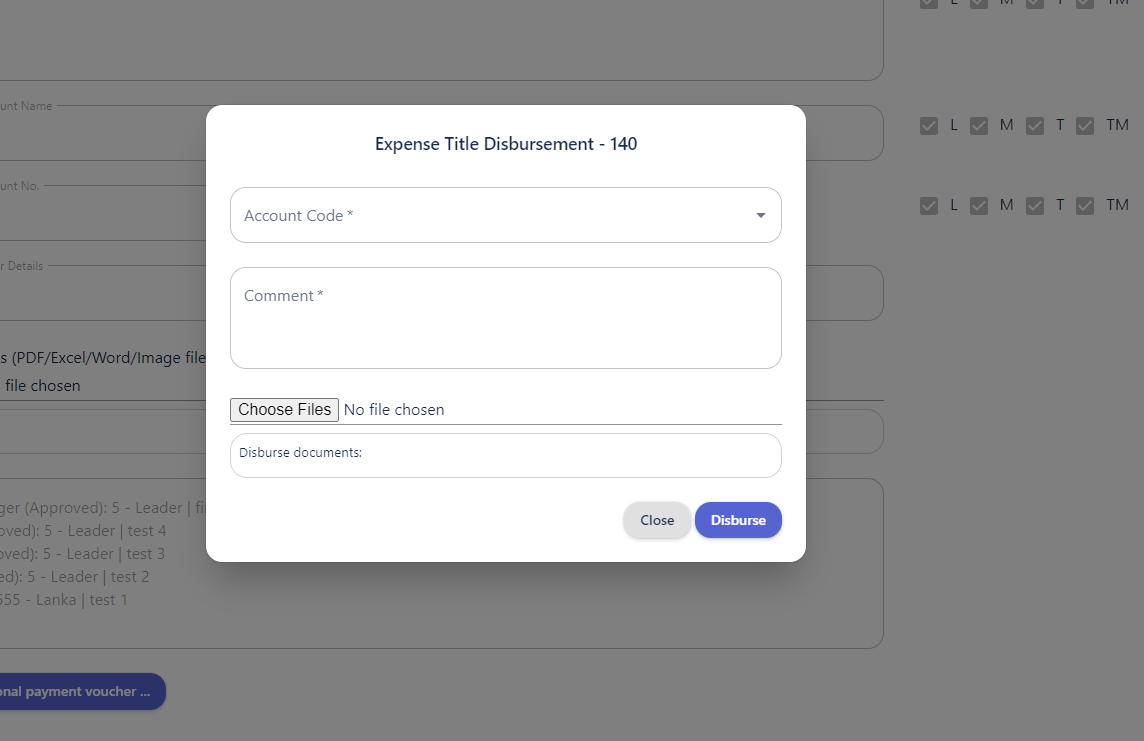
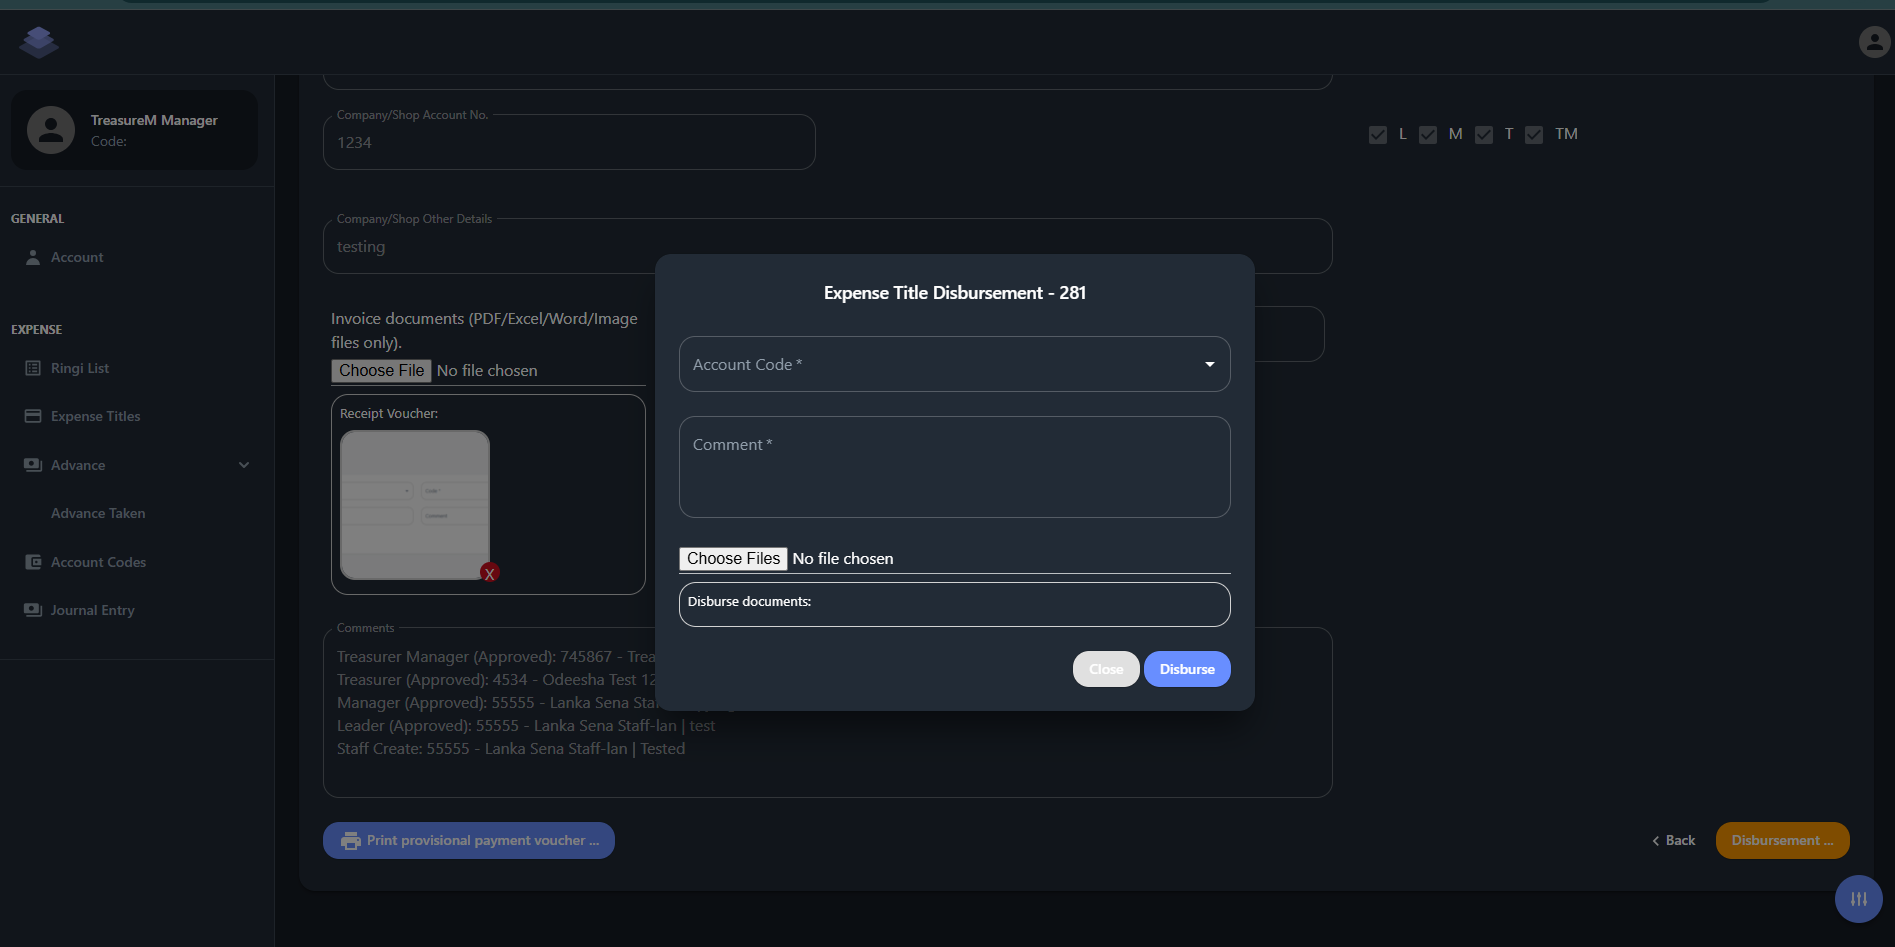
Step 6: Treasurer Disbursement
- Actor: Treasurer
- Action:
- Records the disbursement in the system.
- If cash disbursement, provides the staff with the cash and gets their signature.
- If I Bank transfer, downloads the transfer slip and uploads it to the system.
- Confirms the disbursement.
Step 7: Staff Confirmation (Cash Disbursement)
- Actor: Staff
- Action:
- Receives cash from the Treasurer.
- Signs a confirmation document.
Step 8: Accounting Review and Journal Entry
- Actor: Accountant
- Action:
- Reviews the expense title list and attached documents.
- Creates a journal entry record.
- Exports the journal entry record for upload to MF-Frame or Oracle.
This process ensures that expenses are properly authorized, documented, and recorded for financial reporting purposes.
Ringi List
Ringi List Page is designed to facilitate the management and tracking of Ringi/Expense documents. It provides a comprehensive overview of Ringi Status, allowing users to efficiently monitor and manage the document approval process.
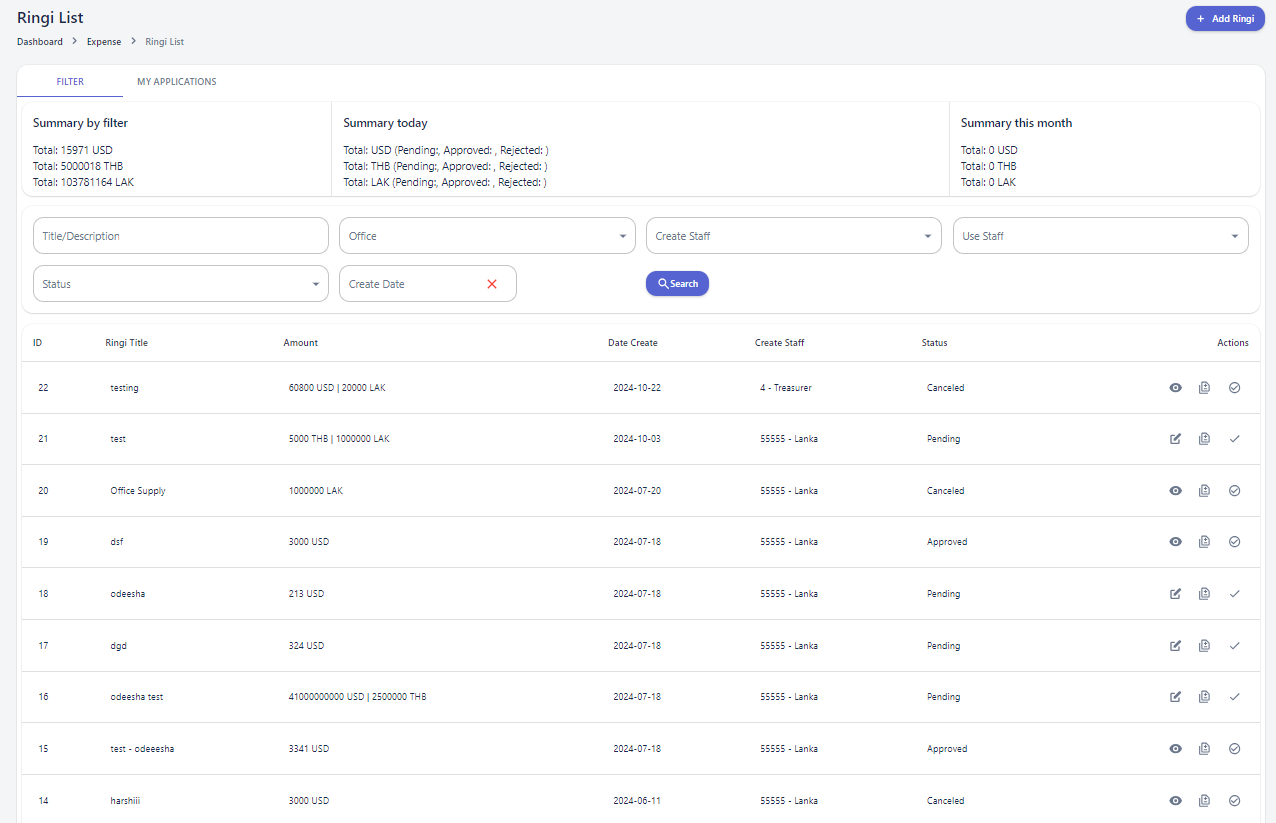
The page is divided into two main sections: Filter and My Applications.
Filter Section
The Filter section offers a granular view of Ringi documents, categorized by various criteria. Key components include:
- Summary by Filter: Displays the total number of Ringi documents in different statuses (e.g., pending, approved, rejected).
- Summary Today: Presents the number of Ringi documents created on the current day.
- Summary This Month: Shows the number of Ringi documents created during the current month.
Six search filters are available to refine the Ringi search based on specific criteria, enabling users to customize their view.
Ringi Table: The Ringi table provides a detailed view of individual Ringi documents.
My Applications Section
This section allows users to view and manage Ringi documents they have created.
Ringi Process
Ringi Process is a module within the system that enables users to create and manage Ringi lists. A Ringi list is a collection of expenses that require approval from designated authorities before they can be processed.
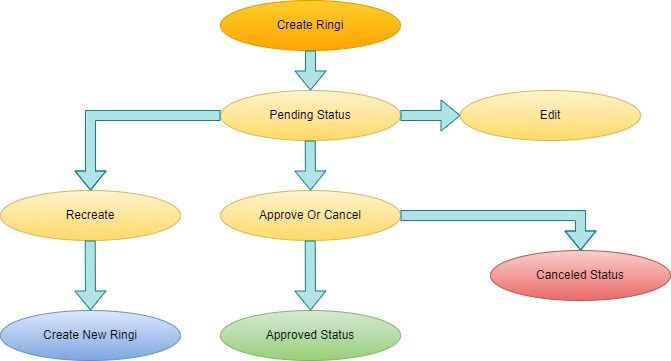
Creating a Ringi List: Only expense IDs with the following status can be added
- Pending approval from Leader
- Pending approval from Manager
- Pending approval from Treasurer
- Pending approval from Treasurer Manager
- Active
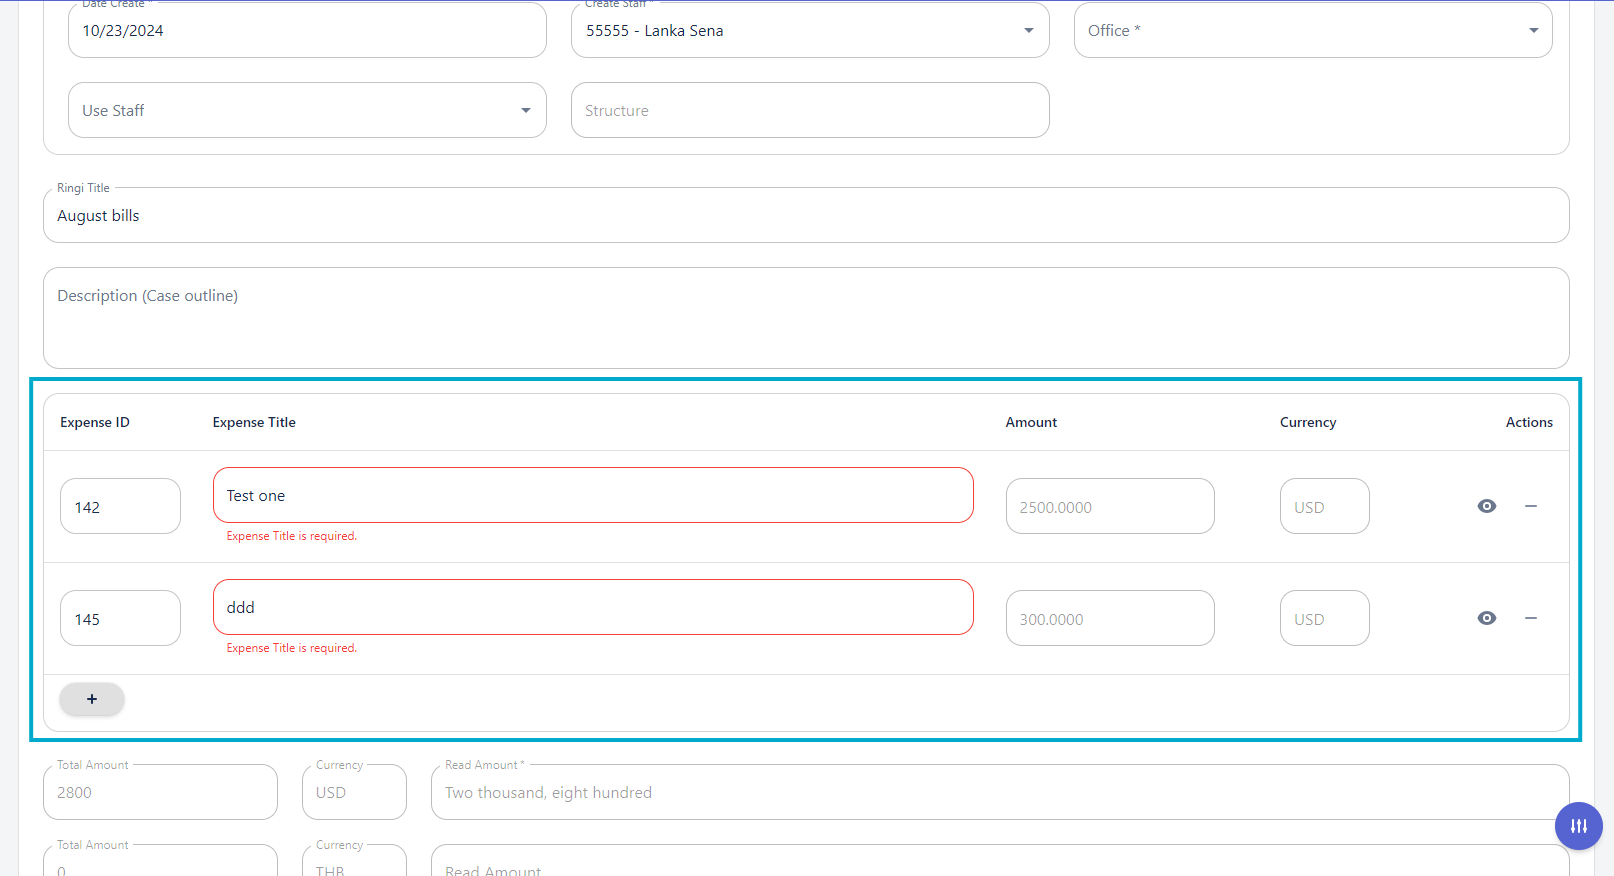
Users can add multiple expenses to a single Ringi list. When an expense ID is entered, the system automatically populates the corresponding expense title, amount, and currency details.
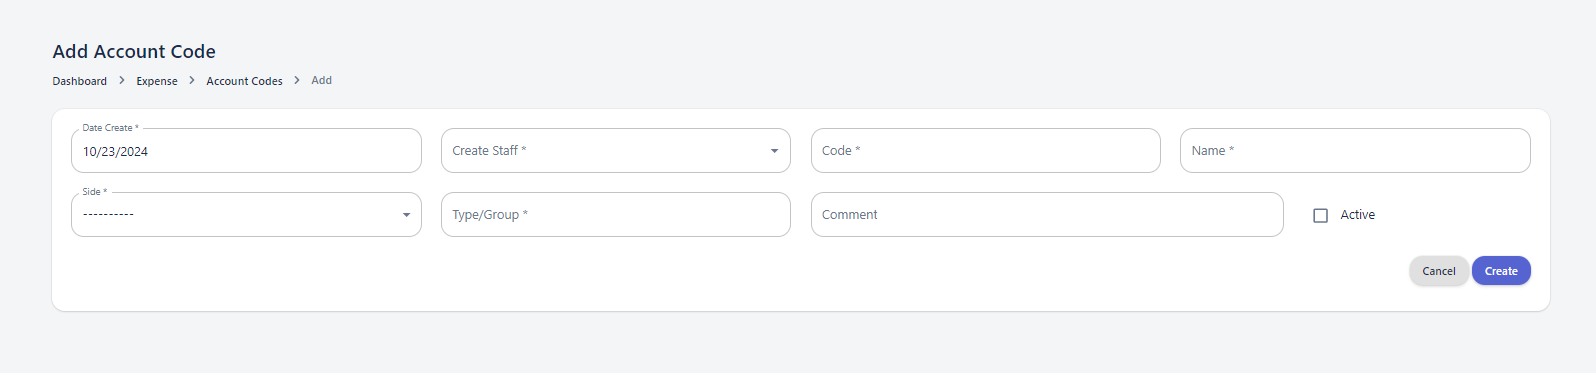
Account Code
The Account Code Module is a centralized platform designed to manage and organize account codes. It provides a comprehensive overview of account code information, allowing users to efficiently create, search, and update account codes.
Account Code Search: Allows users to search for existing account codes based on various criteria, such as code, side, and status.
Account Code Table: Displays a list of created account codes, providing details such as
-
-
- ID
- Code
- Name
- Create Staff
- Side
- Type/Group
- Status
- Date Created
- Comment
- Actions
-
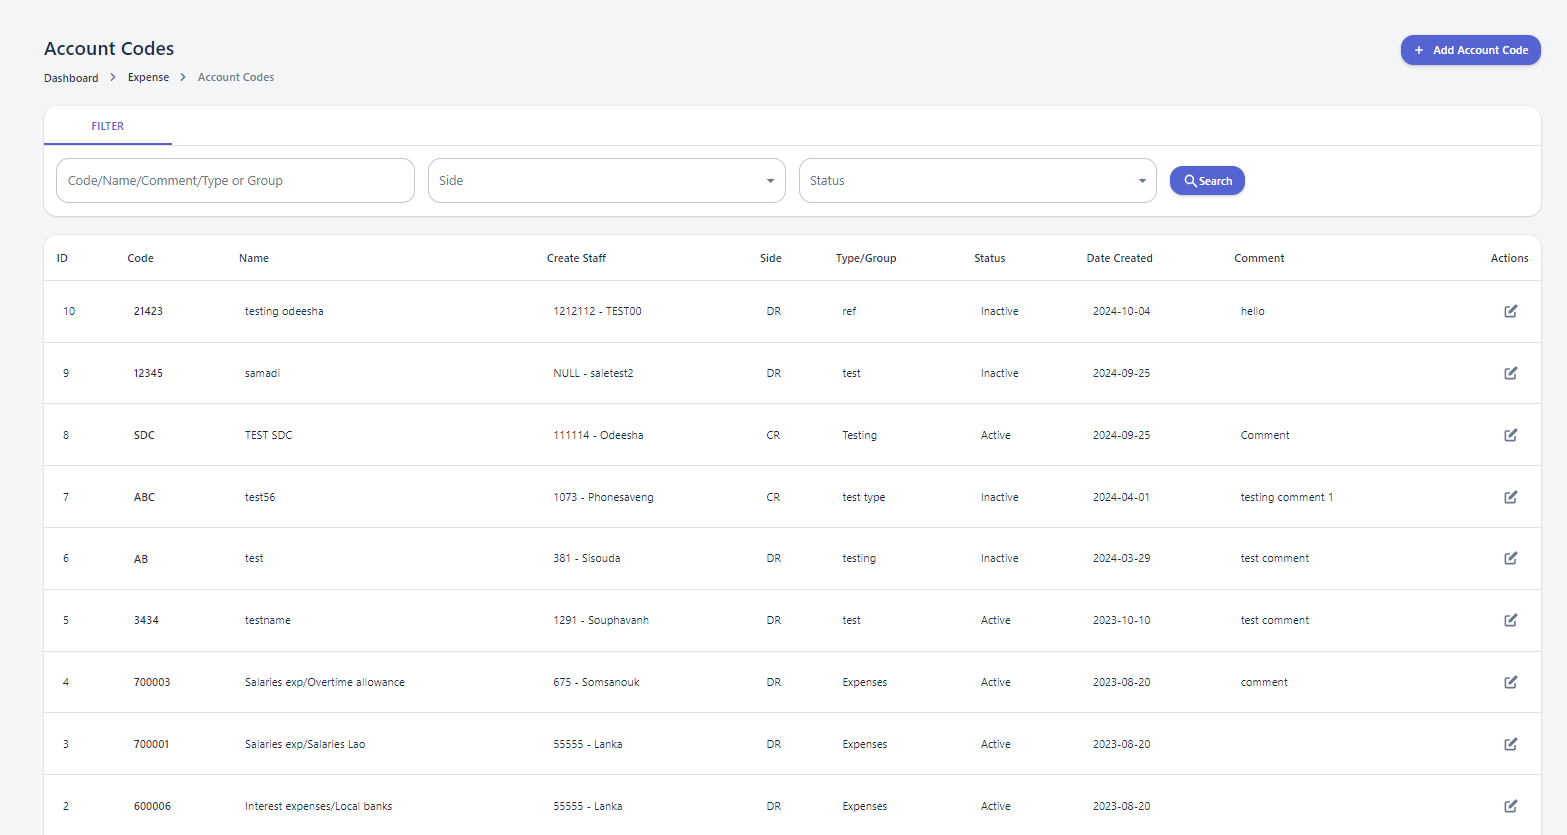
Account Code Creation: Enables users to create new account codes with specific attributes.
Advance
Advance Taken
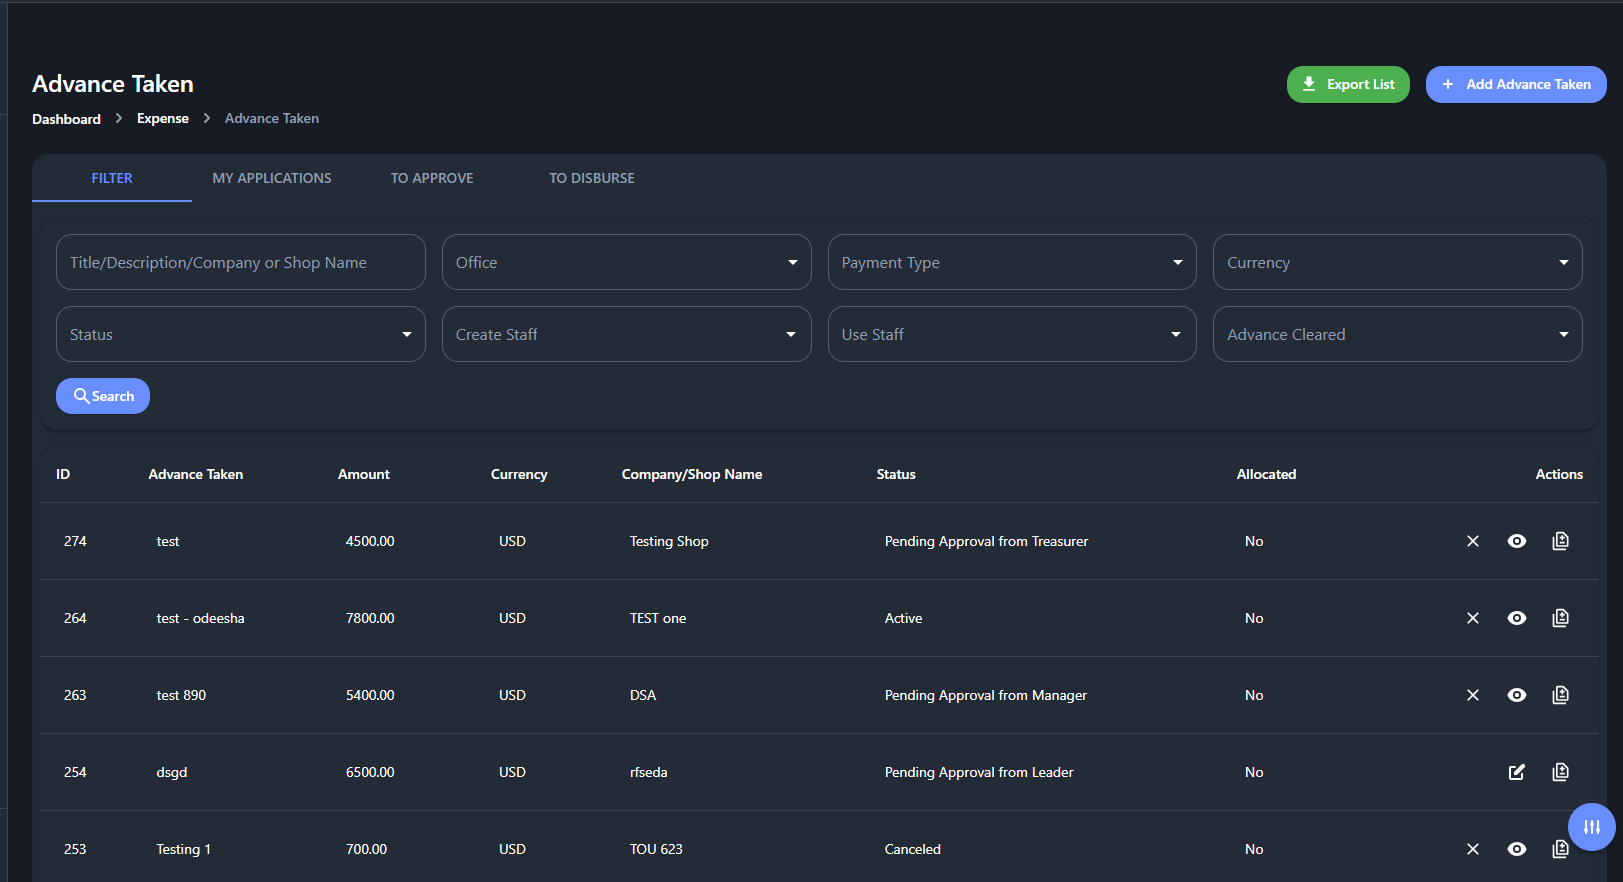
The advance taken page design will incorporate a user-friendly interface to facilitate the addition of advance expenses. A key feature will be the ability to link these expenses to specific expense titles, streamlining the categorization and tracking of funds.
this organized into four primary sections: Filter, My Applications, To Approve, and To Disburse.
Filter Section
The Filter section offers a granular view of expense data, allowing users to analyze and summarize information based on various criteria.
Search Filters : Eight search filters are available to refine expense data, These filters enable users to identify specific expenses based on their attributes, such as status, payment type, or currency.
Advance Table: The Expense Table provides a detailed view of individual expenses, including few columns.
My Applications Section
This section allows users to view and manage expenses they have personally created.
To Approve Section
This section lists expenses that are ready to be Approve.
To Disburse Section
This section lists expenses that are ready to be disbursed.
Actors:
- Staff
- Team Leader
- Manager
- Treasurer
- Treasurer Manager
- Accountant
Step 1: Invoice Submission
- Actor: Staff
- Action:
- Receives an invoice from a company or shop.
- Enters the invoice details into the system and submits it to the Team Leader.
- Prints the entered invoice details, signs it, and sends it to the Team Leader for review and approval.
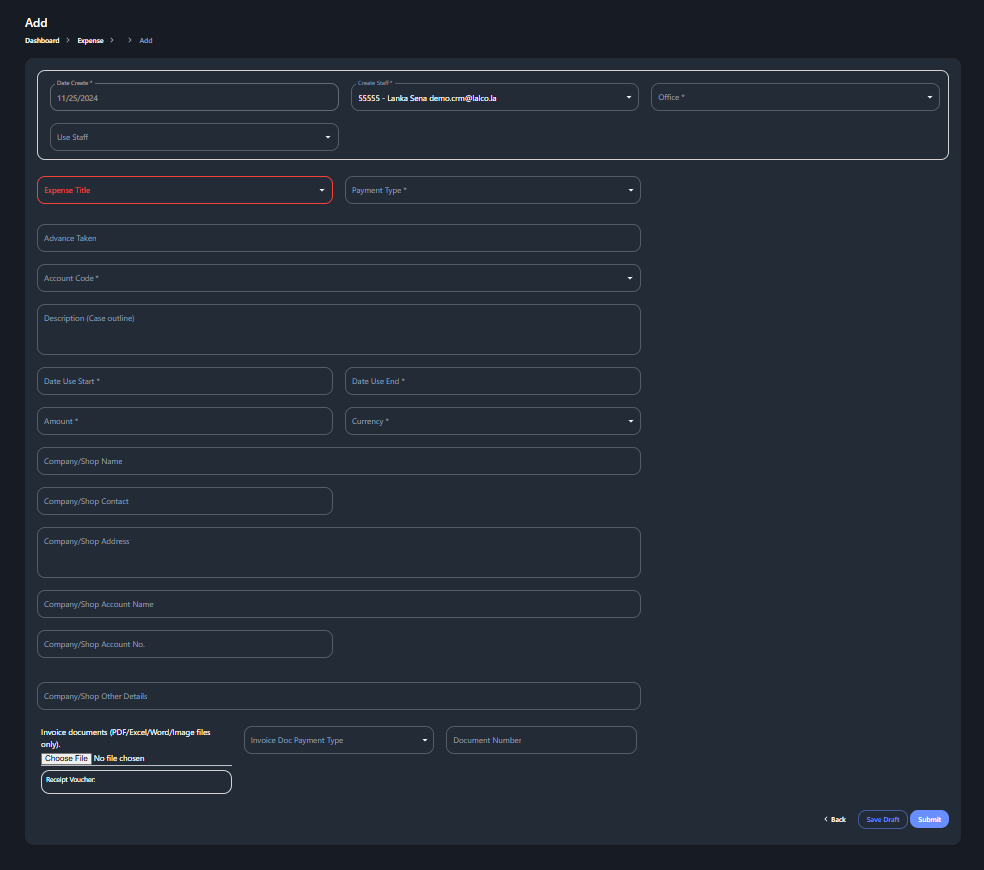
Here, user can link expense title with Advance taken. after submit this, user can download payment voucher according to the given details.
If user select I bank as Payment type, it will add new three(3) fields.
- Bank Name
- Recipient Name
- Bank Account Currency
If user select cash as Payment type, these three(3) fields are hide.
Step 2: Team Leader Approval
- Actor: Team Leader
- Action:
- Reviews and approves the invoice in the system.
- Checks and signs the physical document.
- Sends the approved invoice to the Manager.
Step 3: Manager Approval
- Actor: Manager
- Action:
- Reviews and approves the invoice in the system.
- Checks and signs the physical document.
- Sends the approved invoice to the Treasurer.
Step 4: Treasurer Approval
- Actor: Treasurer
- Action:
- Reviews and approves the invoice in the system.
- Initiates an I Bank transfer in the system and sends it to the Treasurer Manager for confirmation.
Step 5: Treasurer Manager Confirmation
- Actor: Treasurer Manager
- Action:
- Reviews and approves the invoice in the system.
- Sends the approved invoice back to the Treasurer.
- After approve the Treasurer Manager, Expense title status changed as Active.
Step 6: Treasurer Disbursement
- Actor: Treasurer
- Action:
- If cash disbursement, provides the staff with the cash and gets their signature.
- If I Bank transfer, downloads the transfer slip and uploads it to the system.
- Confirms the disbursement.
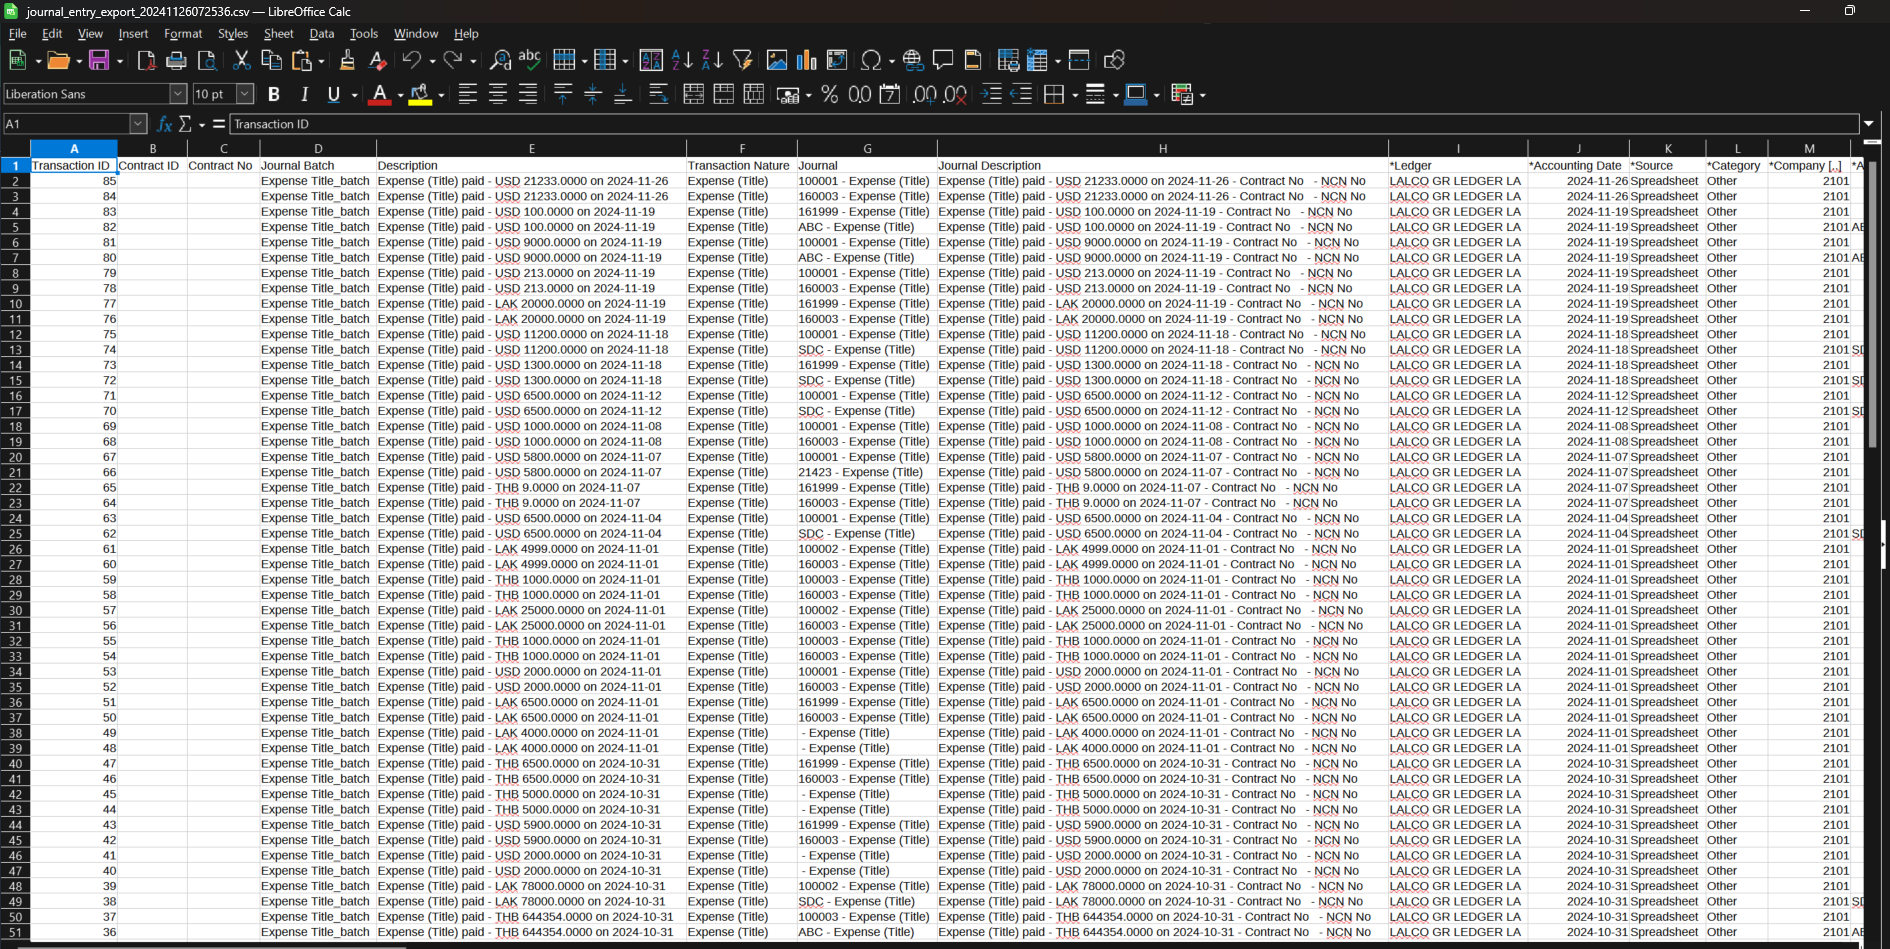
After Doing the disbursement, Journal Entry recorded automatically.
Journal Entry
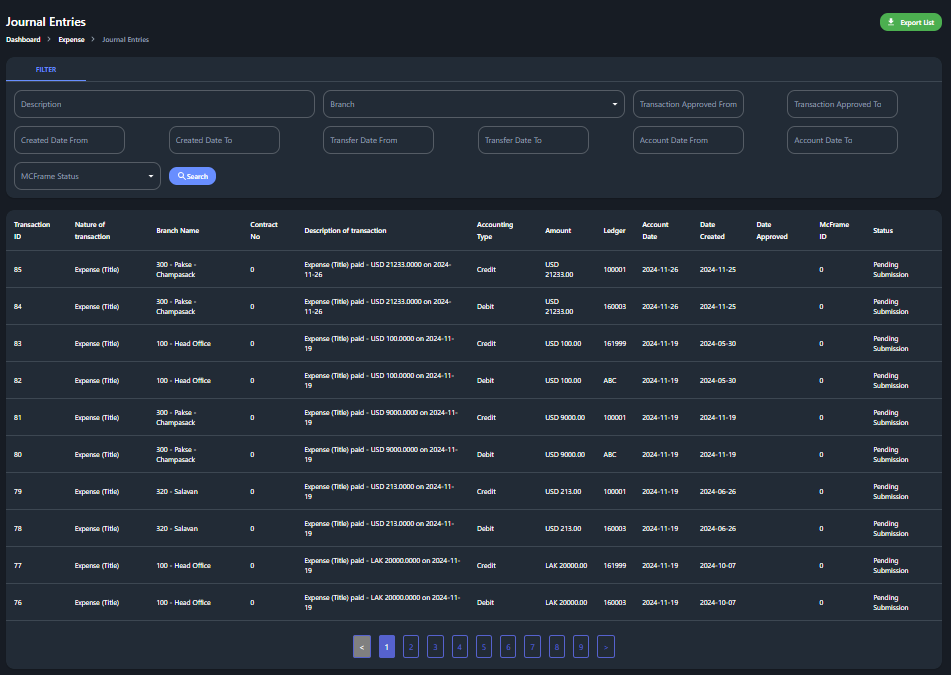
Upon successful disbursement, the system automatically generates and records the following journal entries:
1. Voucher Payment
Bank Transfer:
- Debit: Expense Account (700001)
- Credit: Suspense Account (161999)
Cash Disbursement:
- Debit: Expense Account (700001)
- Credit:
- Cash Account (100001) - USD
- Cash Account (100002) - LAK
- Cash Account (100003) - THB
2. Advance Creation
Bank Transfer:
- Debit: Advance to Staff Account (160003)
- Credit: Suspense Account (161999)
Cash Disbursement:
- Debit: Advance to Staff Account (160003)
- Credit:
- Cash Account (100001) - USD
- Cash Account (100002) - LAK
- Cash Account (100003) - THB
These journal entries are accessible and can be reviewed on the Journal Entry page within the system. Also, user can export JE report using "Export List" button. it will download CSV file as follows.