LALCO STAFF APP
LALCO Staff App is a mobile application designed for LALCO employees to manage their daily work activities efficiently. It allows staff to access important information, manage assigned tasks, and update work-related data directly from their smartphones. The app helps employees stay connected with company systems anytime and anywhere, improving productivity and communication.
- Introduction
- Login Screen
- Home Screen
- Sales Screen
- Legal Screen
- Customers Screen
- Team Dashboard Screen
- GPS Offline Screen
- Call History Screen
- Note Details Screen
- Staff Screen
- Reassigned Tasks Screen
- Offer Loan Screen
- Location Screen
- Profile Screen
- Capture Screen
- Task Screen
Introduction
What is LALCO Staff App?
Brief overview of the app
LALCO Staff App is a mobile application designed for LALCO employees to manage their daily work activities efficiently. It allows staff to access important information, manage assigned tasks, and update work-related data directly from their smartphones. The app helps employees stay connected with company systems anytime and anywhere, improving productivity and communication.
Key features at a glance
-
Task management and tracking
-
View and update contract details
-
Customer information access
-
Sales activity updates
-
Real-time notifications and alerts
-
Secure staff login
Who should use this app
This app is for:
-
LALCO sales staff
-
Field officers and operational staff
-
Company employees who manage customer contracts
-
Staff who need to access company systems remotely
Login Screen
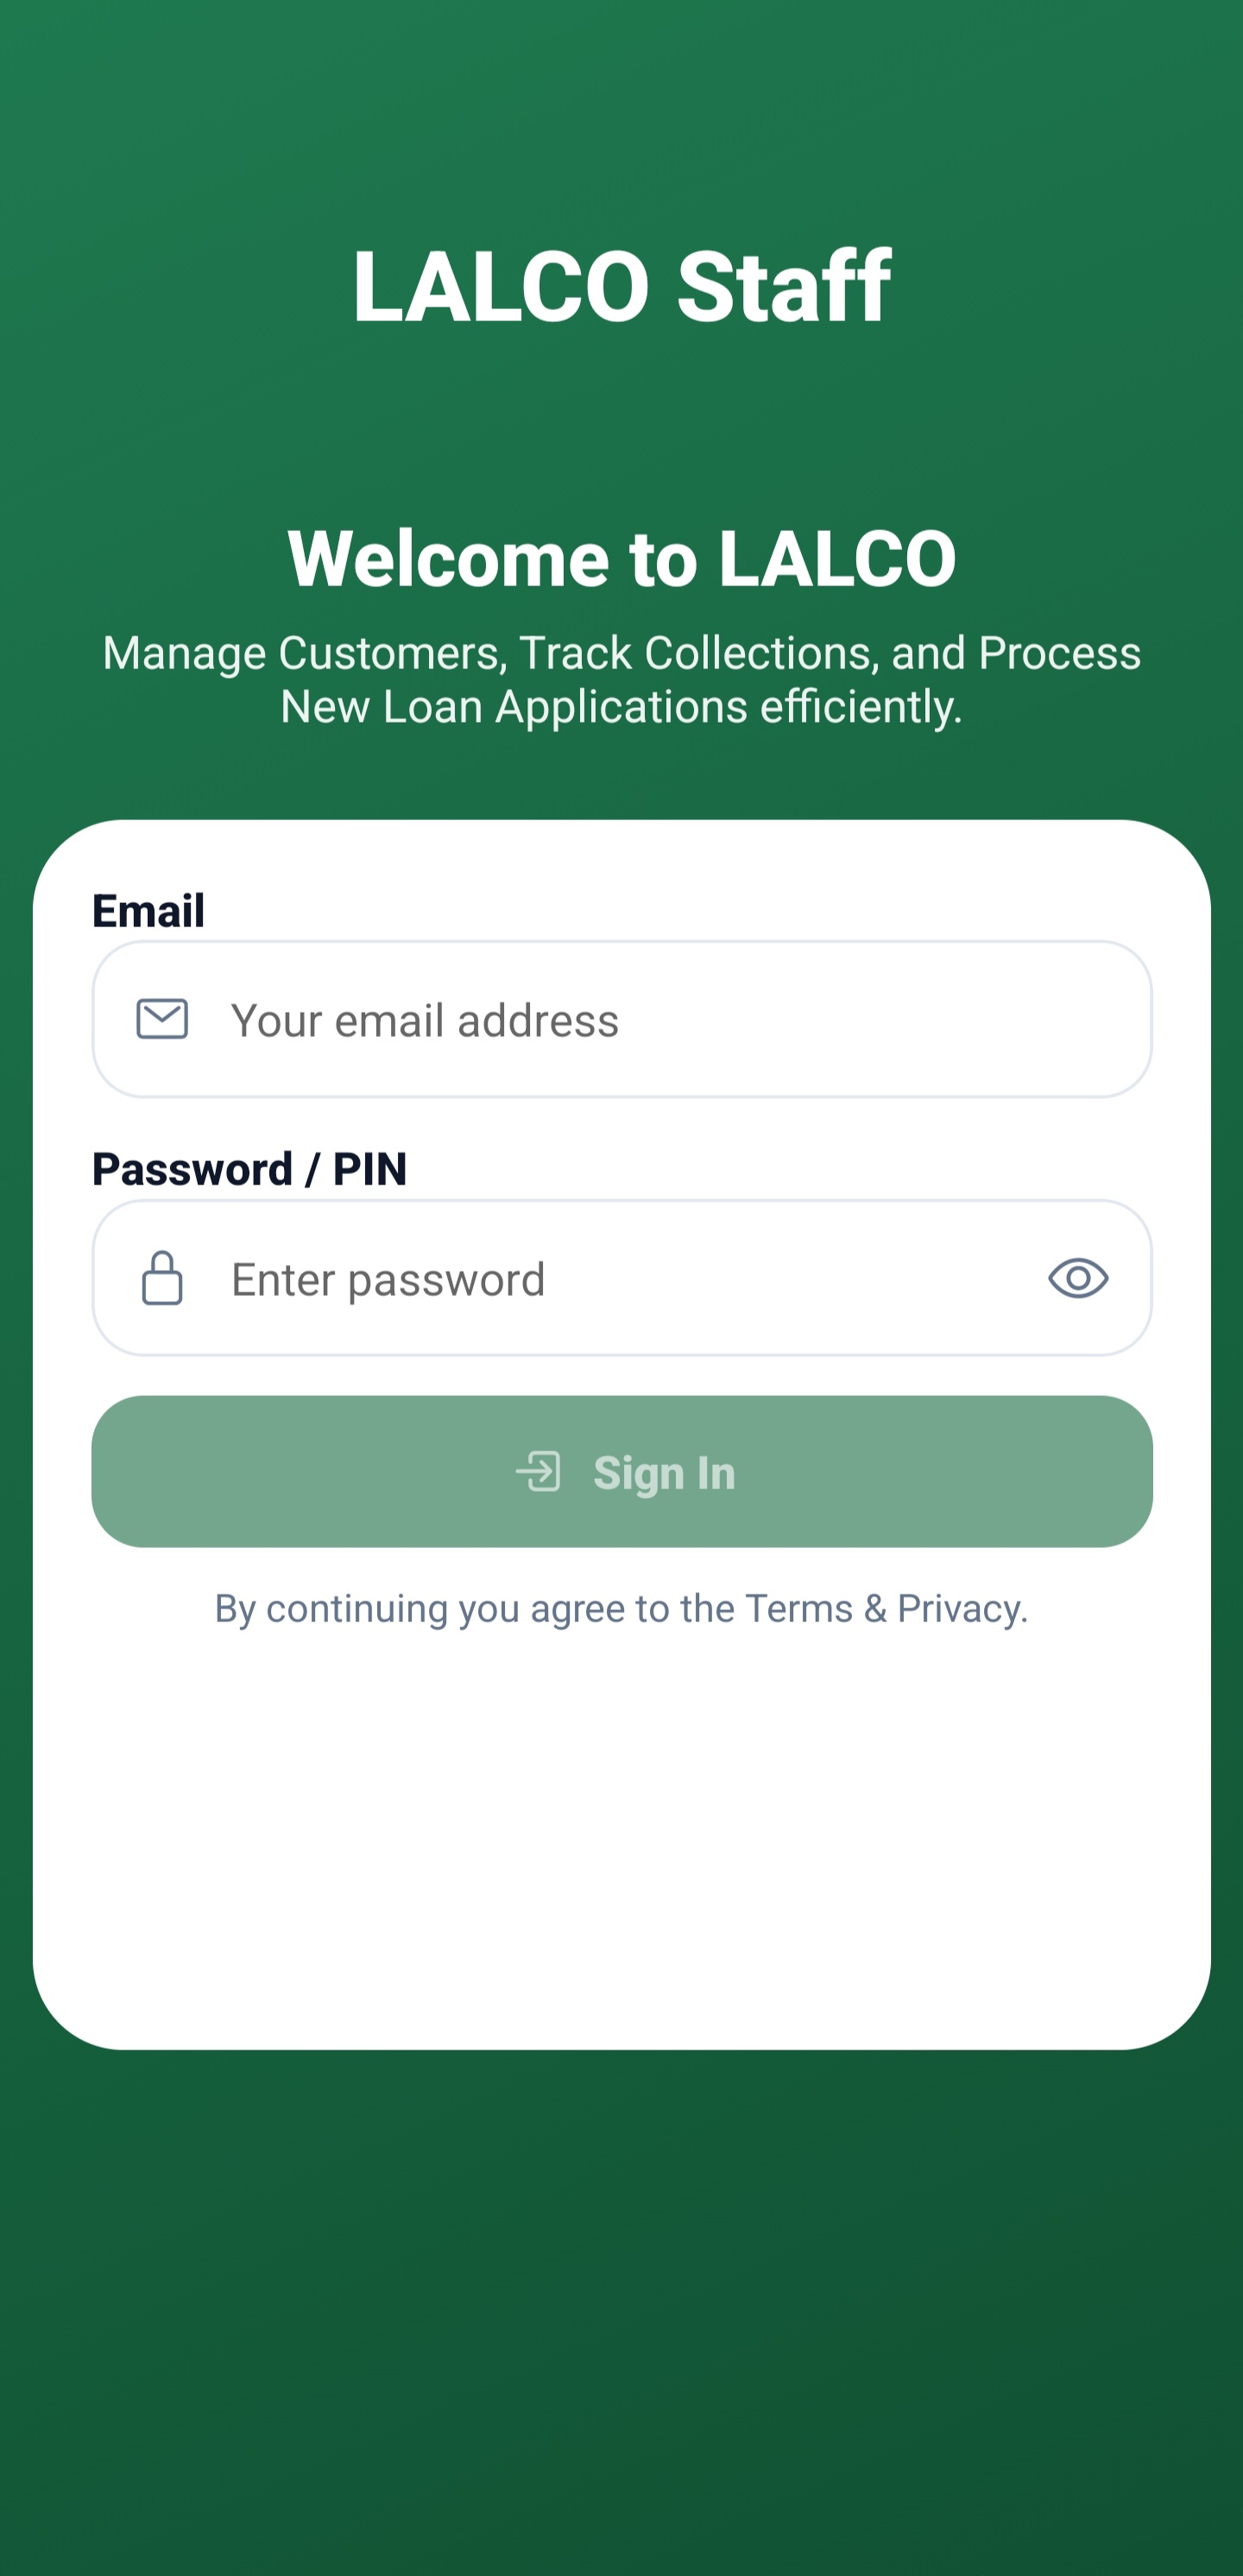
The Login Screen allows authorized staff members to access the LALCO Staff application. From here, employees can log in to manage customers, track collections, and process loan applications.
Screen Fields
Email Address
Users must enter their registered company email address.
Example:
This email must be provided by the system administrator.
Password / PIN
Users must enter their secure password associated with their account.
Security features:
Sign In Button
After entering valid credentials, press Sign In to access the system.
If login is successful, the system will open the dashboard.
Terms & Privacy
At the bottom of the screen, users will see the message:
This indicates that by logging in, the user agrees to the company's usage policies.
How to Log In
-
Open the LALCO Staff application.
-
Enter your email address.
-
Enter your password.
-
Tap Sign In.
-
You will be redirected to the main dashboard.

Common Login Issues
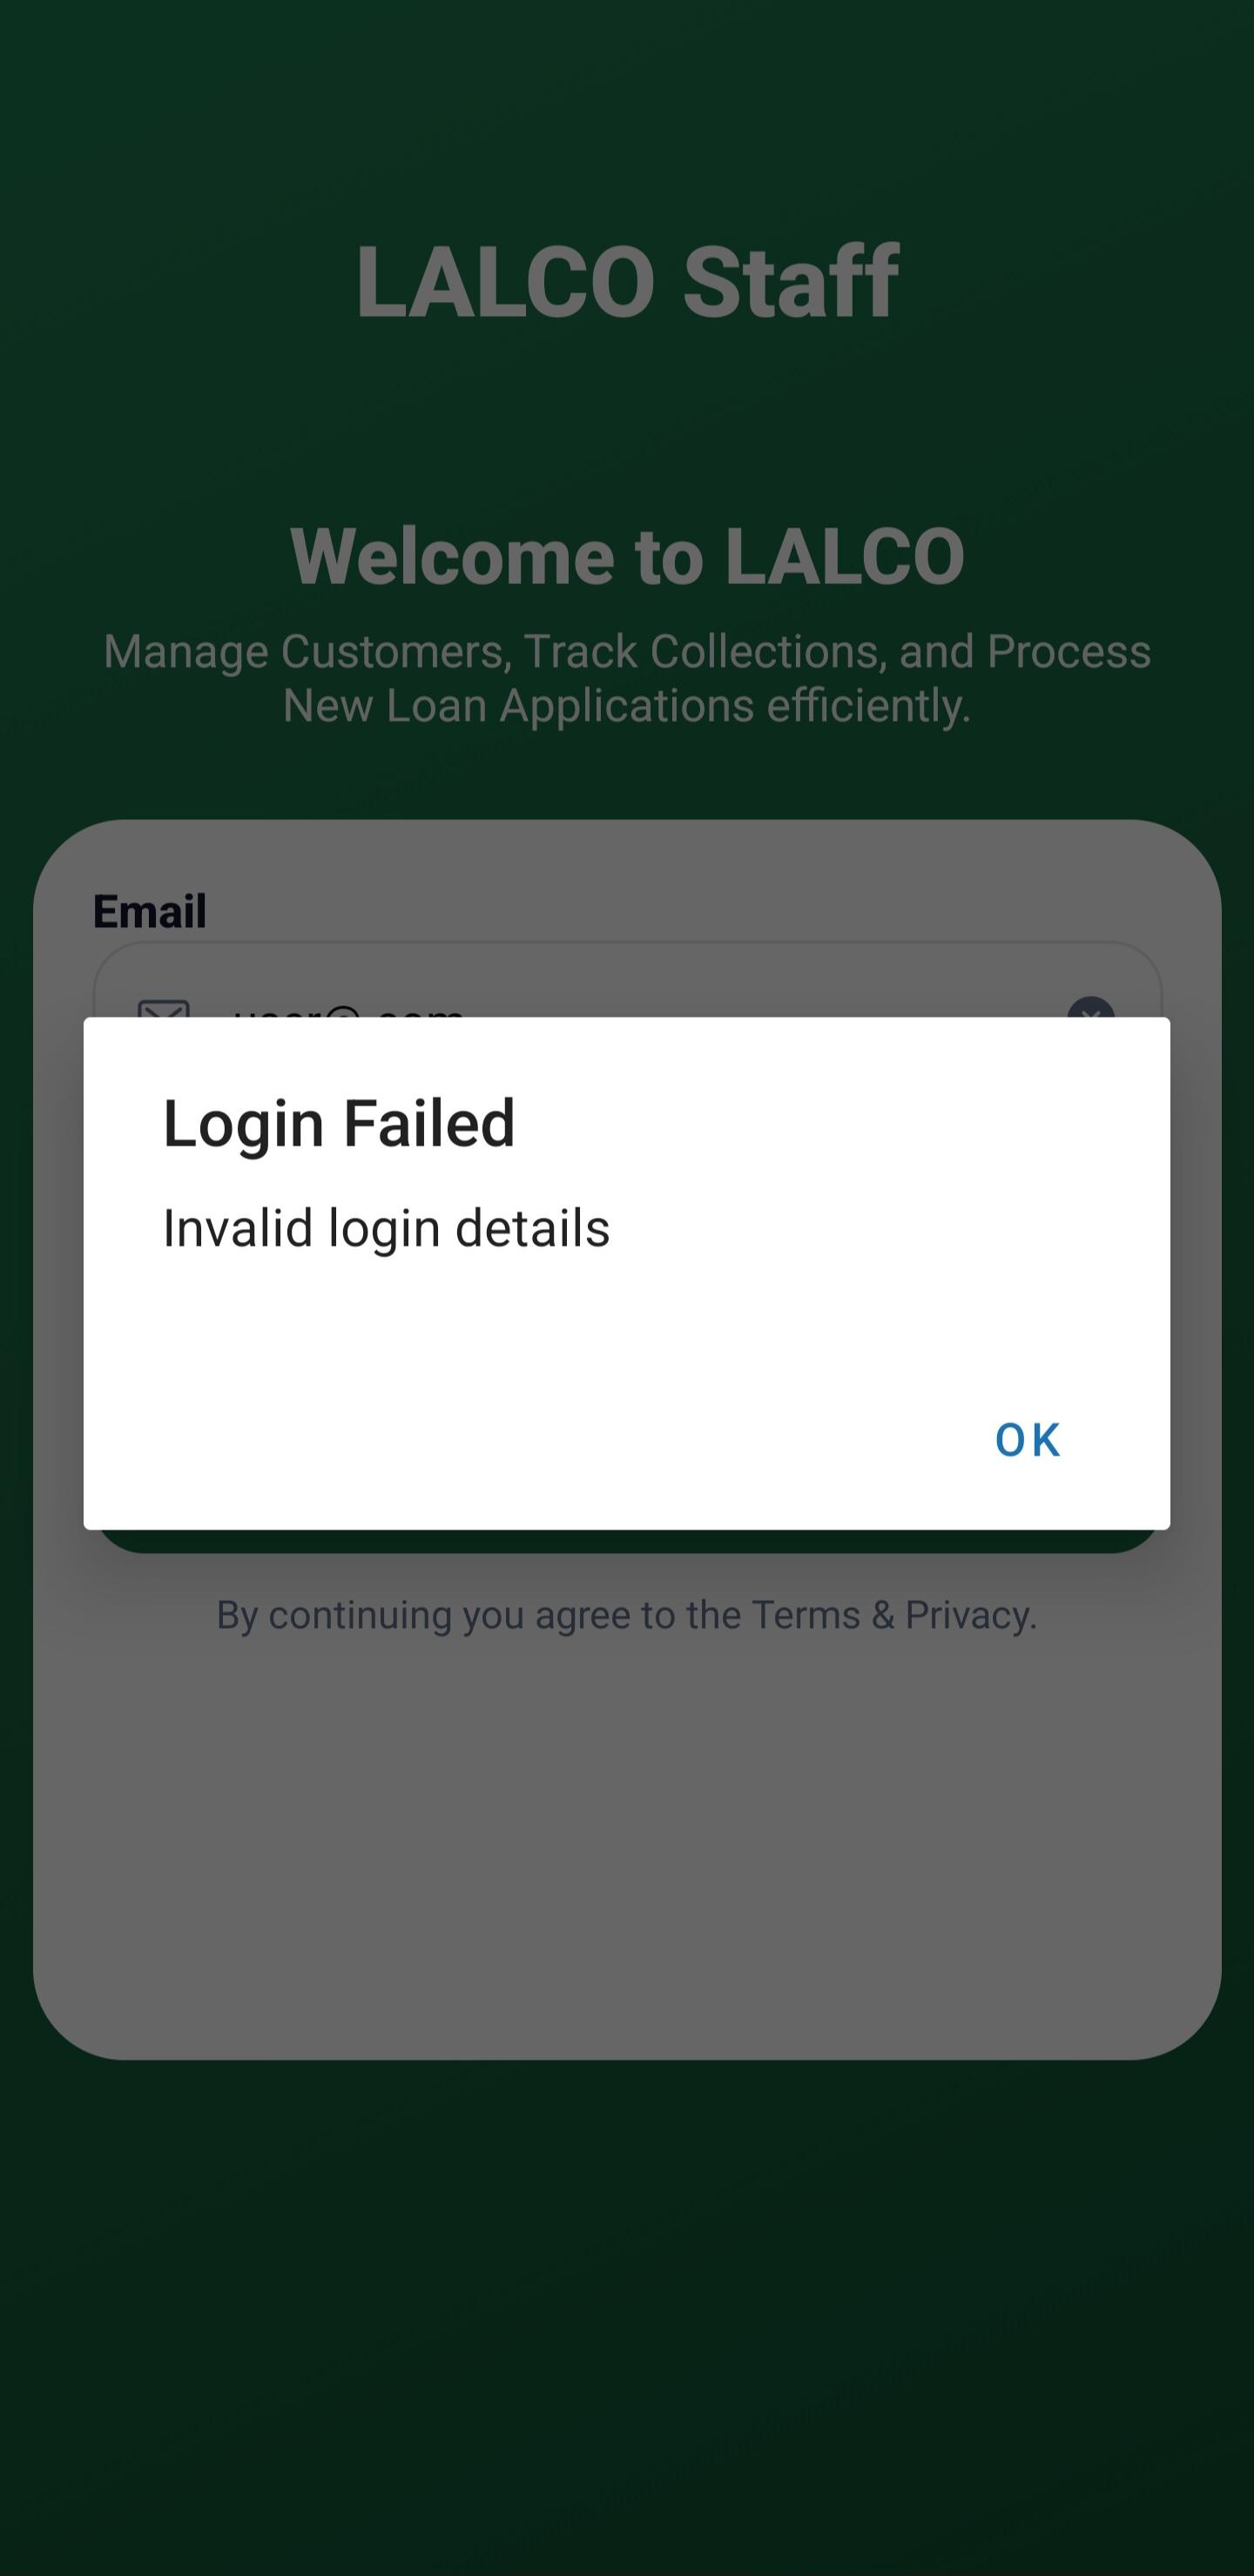
Incorrect Password
If the password is incorrect:
-
Check if Caps Lock is enabled.
-
Re-enter the password carefully.
Invalid Email
Make sure you are using your official company email.
Example:
Security Guidelines
Change your password regularly.
Home Screen
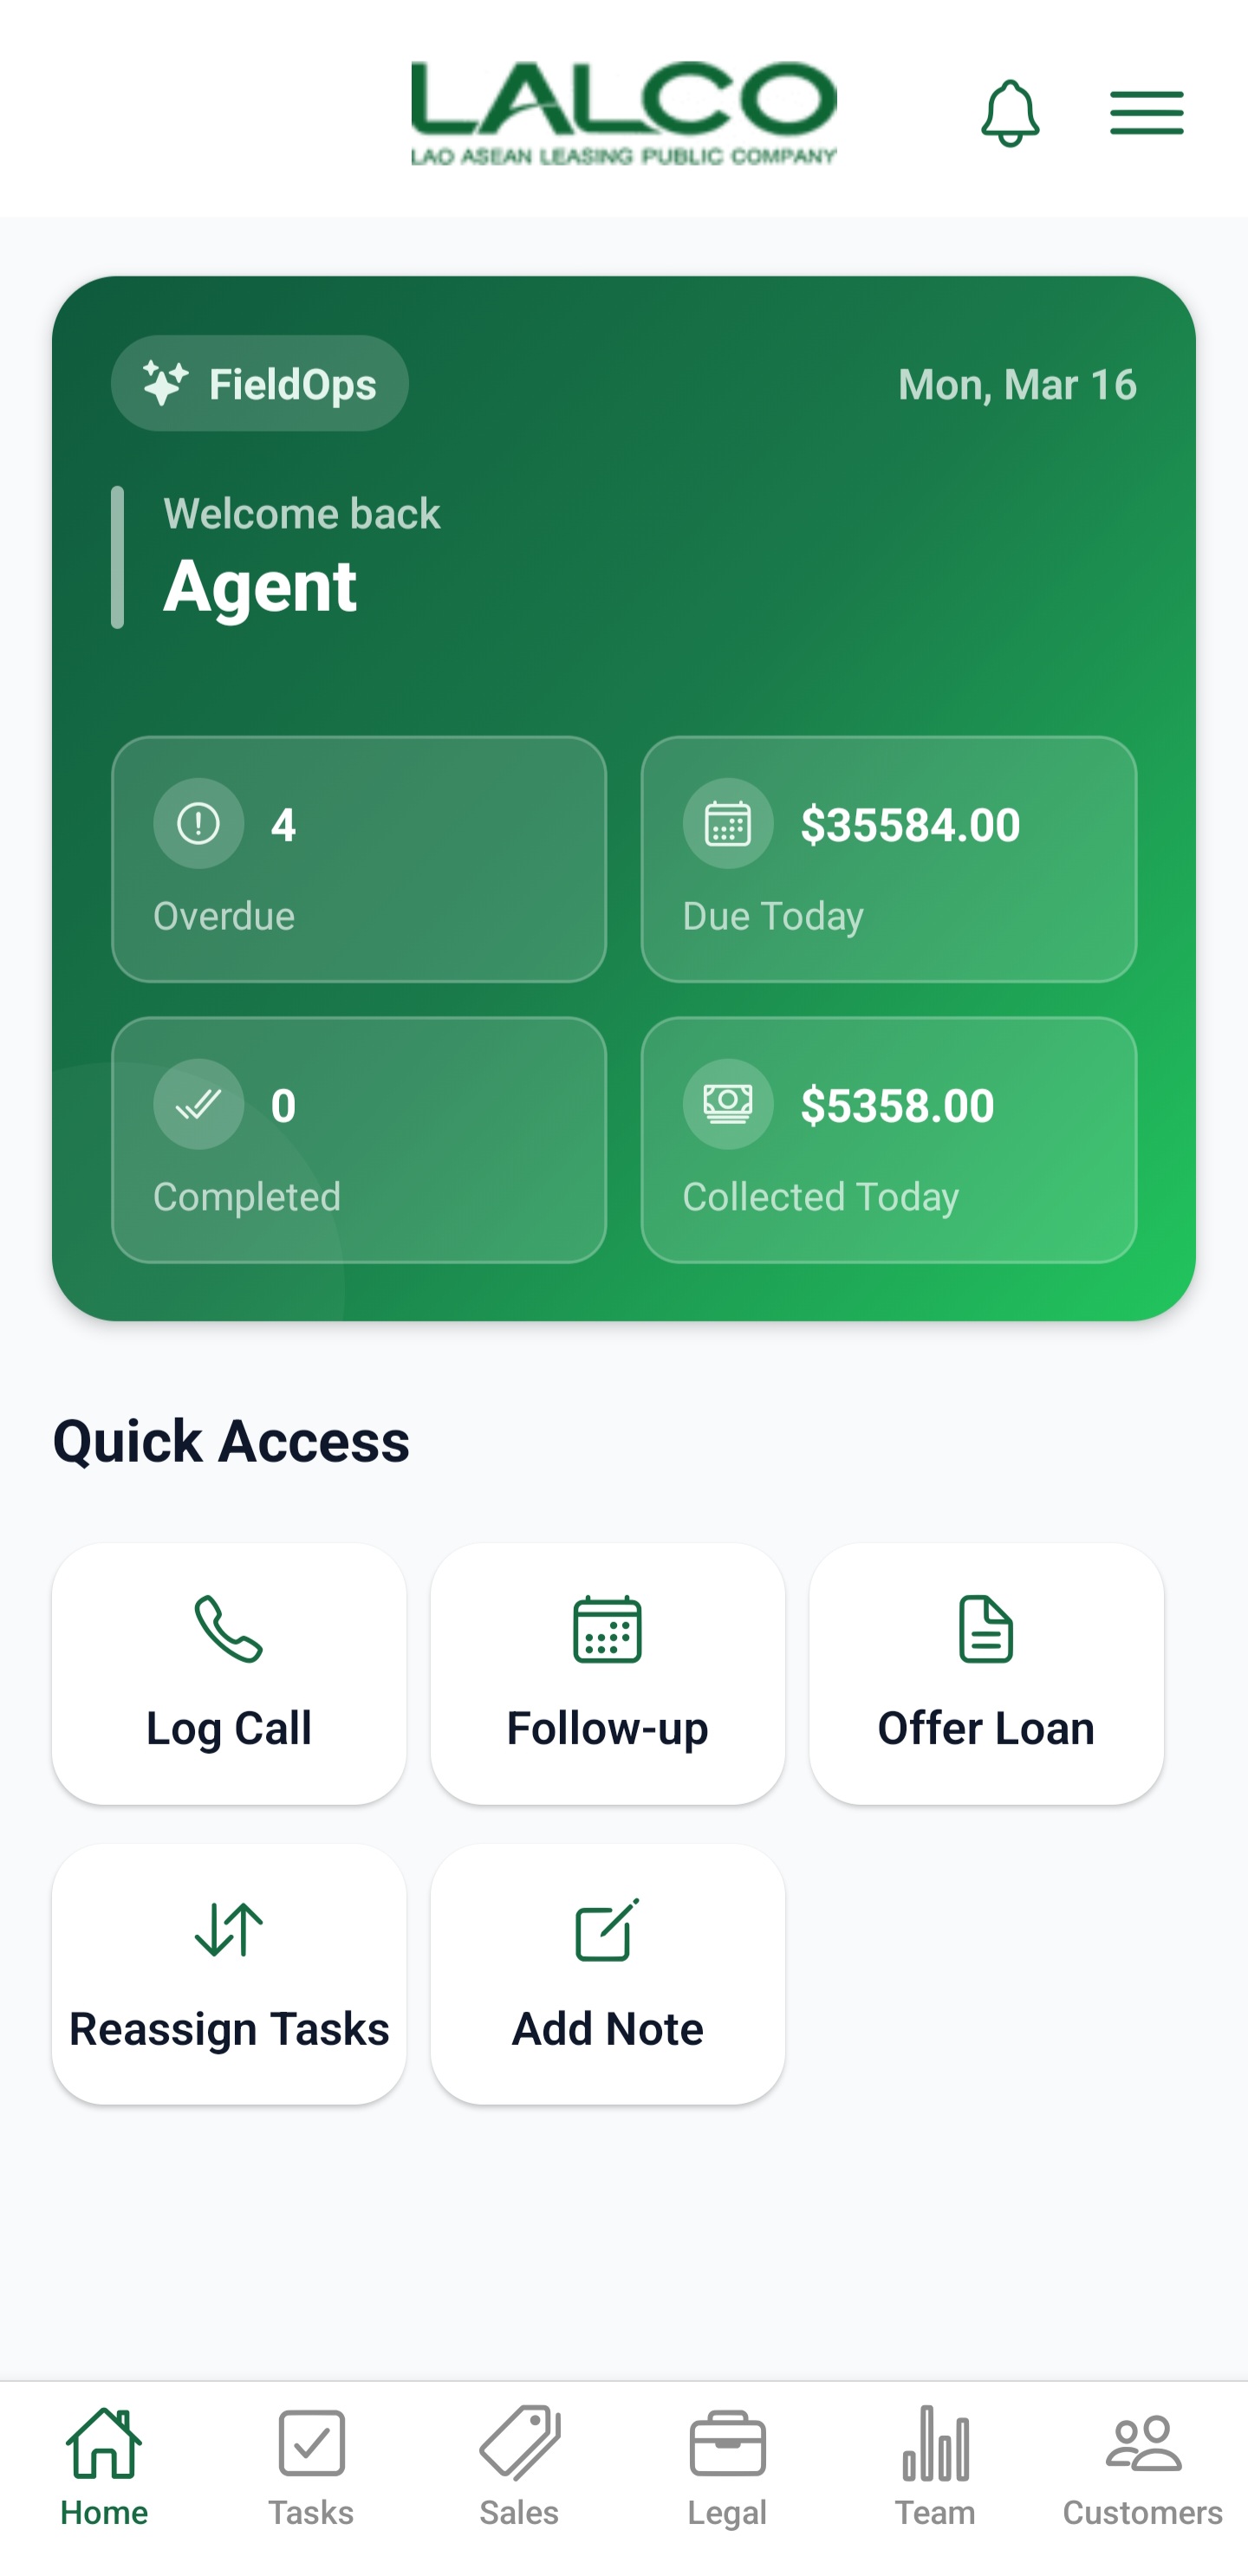
The Home Screen is the main screen of the LALCO Staff application. It provides agents with a quick overview of their daily tasks, collections, and customer activities.
From this screen, staff members can quickly access important features such as logging calls, scheduling follow-ups, offering loans, and managing tasks.
Header Section
1.Company Logo
The LALCO logo at the top represents the company and confirms that the user is logged into the official staff application.
![]()
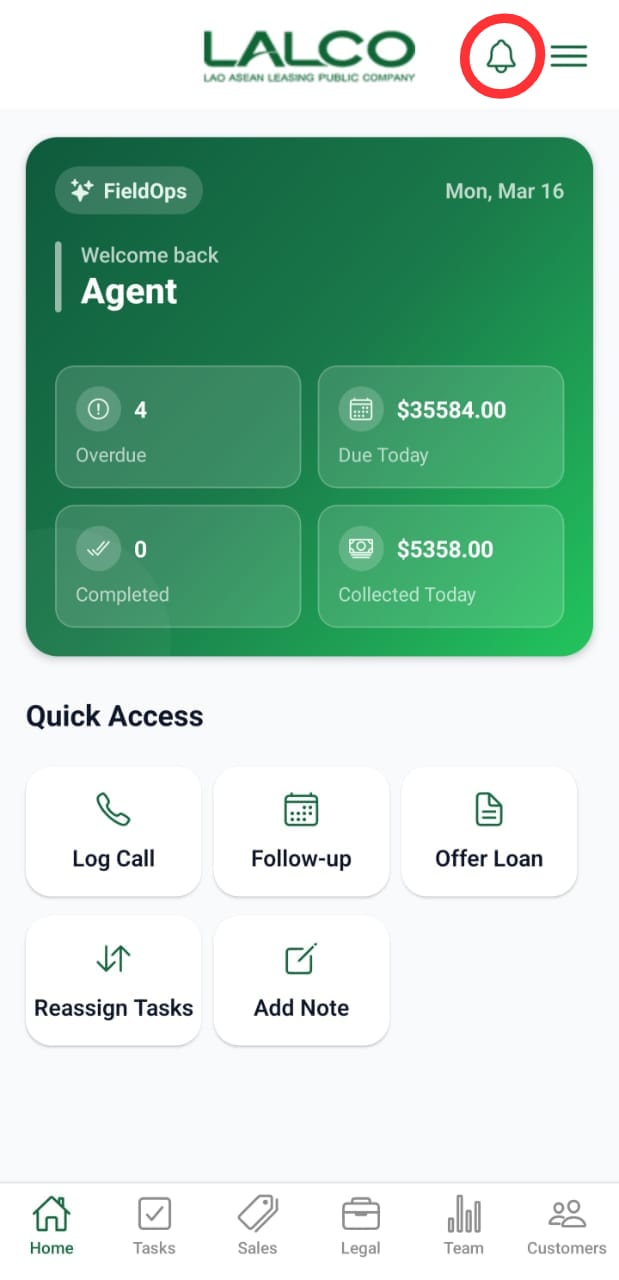
2.Notification Icon 🔔
The bell icon shows notifications such as:
-
New assigned tasks
-
Follow-up reminders
-
Customer updates
-
System alerts
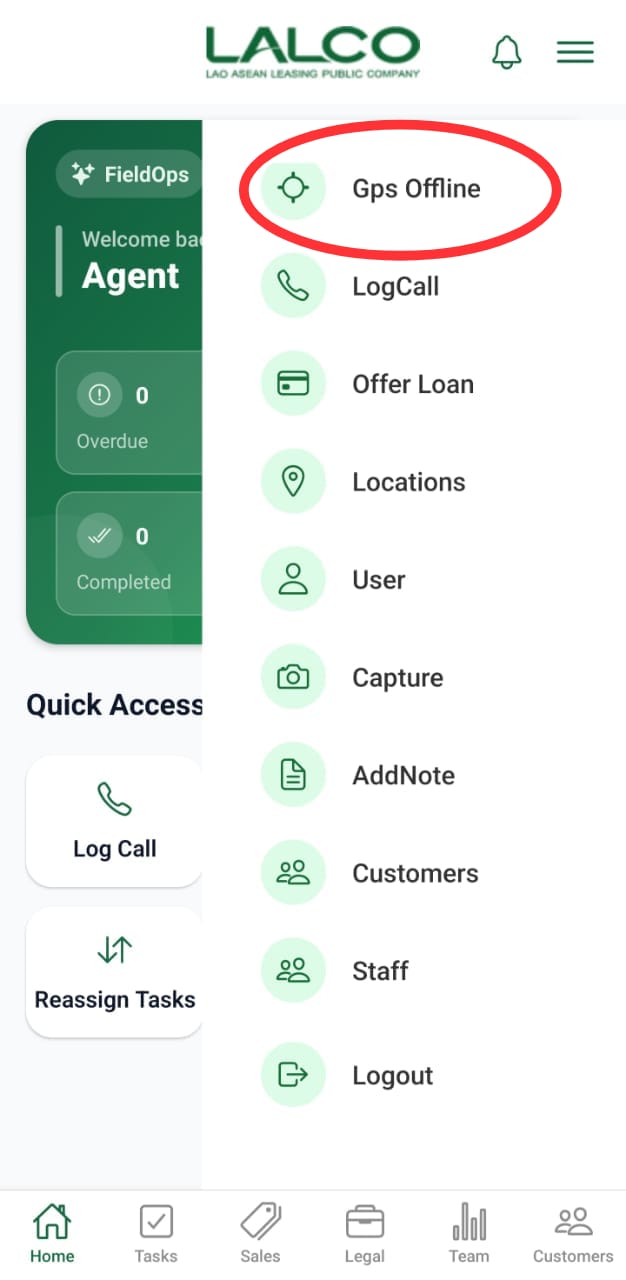
3.Menu Icon ☰
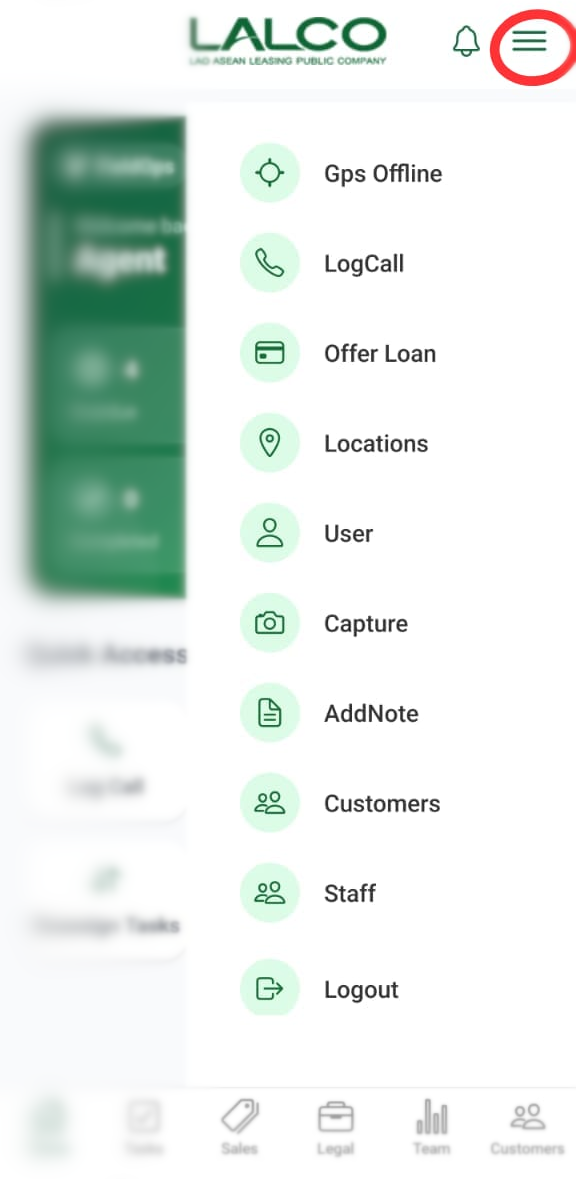
When tapped, a sidebar appears with the following options:
Menu Options
-
GPS Offline
Indicates the current GPS status. This helps agents know whether location tracking is active or not. -
Log Call
Quickly navigate to the call logging screen to record customer interactions. -
Offer Loan
Access the loan offering feature to create or manage loan proposals. -
Locations
View or manage location-related data (useful for field agents). -
User
Access user profile information and settings. -
Capture
Open the camera or capture feature to upload images or documents. -
Add Note
Create and save notes related to customers or tasks. -
Customers
Navigate to the customer management section. -
Staff
View or manage staff-related information. -
Logout
Securely log out of the application.
Agent Overview Panel
![]()
This section shows a quick summary of the agent's daily activity.
4.FieldOps Badge
Indicates the user is operating in Field Operations mode.
5.Welcome Message
Displays the logged-in staff member’s role or name.
Example:
6.Current Date
Shows the current working date for reference.
Example:
Activity Summary Cards
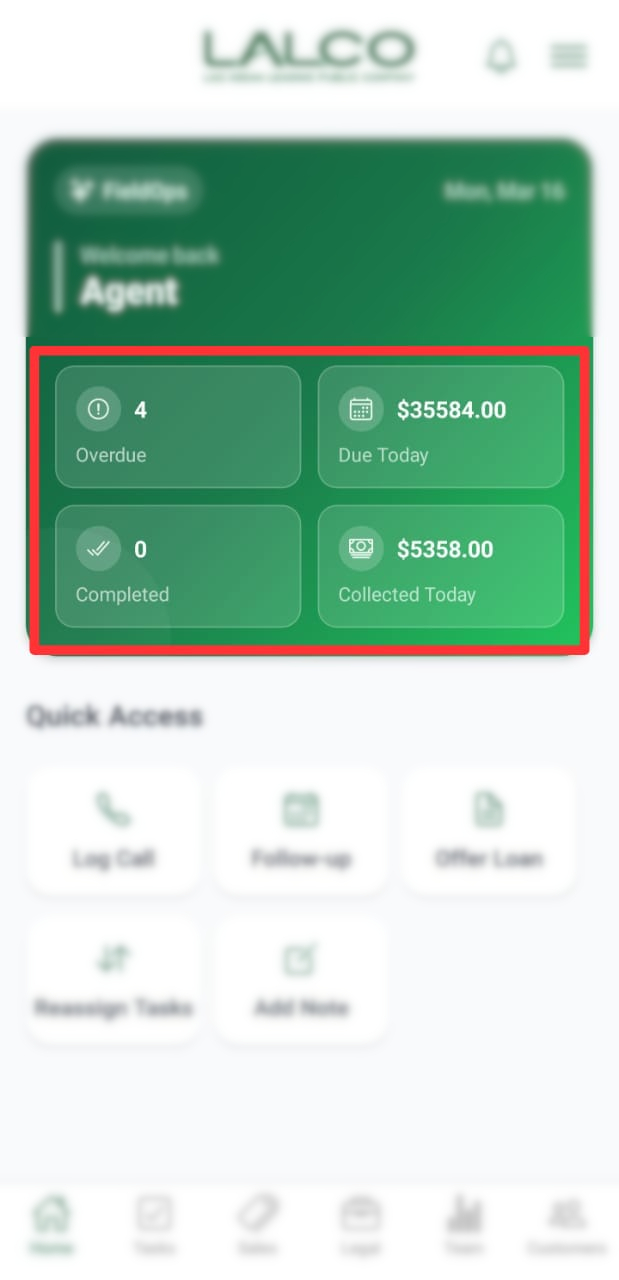
These cards show important performance indicators for the day.
7.Overdue
Displays the number of customers with overdue payments.
Example:
This helps agents prioritize collections.
8.Due Today
Shows the total amount that needs to be collected today.
Example:
9.Completed
Displays the number of completed tasks or collections for the day.
Example:
10.Collected Today
Shows the total amount successfully collected today.
Example:
Quick Access Section
The Quick Access panel provides shortcuts to frequently used actions.
11.Log Call
Allows agents to record details after contacting a customer.
Information that can be logged:
-
Call result
-
Customer response
-
Payment commitment
12.Follow-up
Used to schedule a future reminder to contact a customer again.
Agents can set:
-
Follow-up date
-
Follow-up notes
13.Offer Loan
Allows staff to create or propose new loan offers to customers.
This is typically used when:
-
A customer requests a loan
-
A new sales opportunity is identified
14.Reassign Tasks
Allows agents or supervisors to transfer tasks to another staff member.
Used when:
-
The assigned agent is unavailable
-
Tasks need redistribution
15.Add Note
Agents can record internal notes about customers or cases.
Notes may include:
-
Customer discussions
-
Payment promises
-
Special instructions
Bottom Navigation Menu
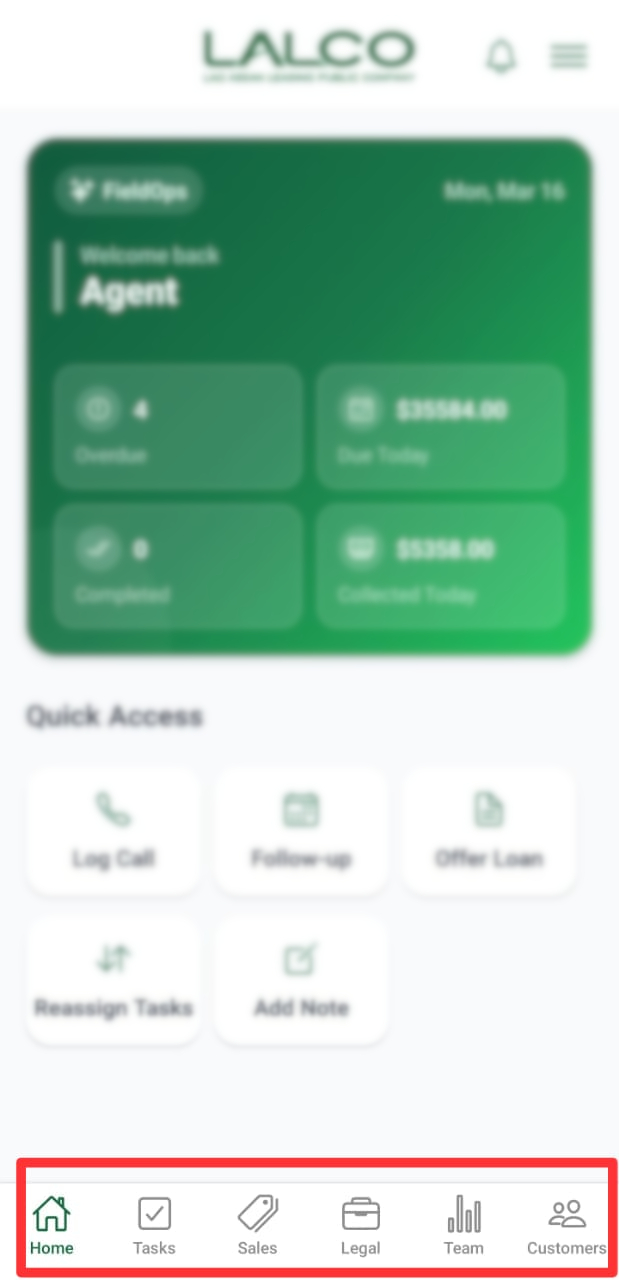
16.Home
Returns to the Dashboard screen.
17.Tasks
Shows all assigned tasks and pending activities.
18.Sales
Used to manage loan sales and offers.
19.Legal
Displays cases that require legal action or documentation.
20.Team
Shows team members and allows team coordination.
21.Customers
Provides access to the customer database.
Agents can:
-
Search customers
-
View loan details
-
Update records
Sales Screen
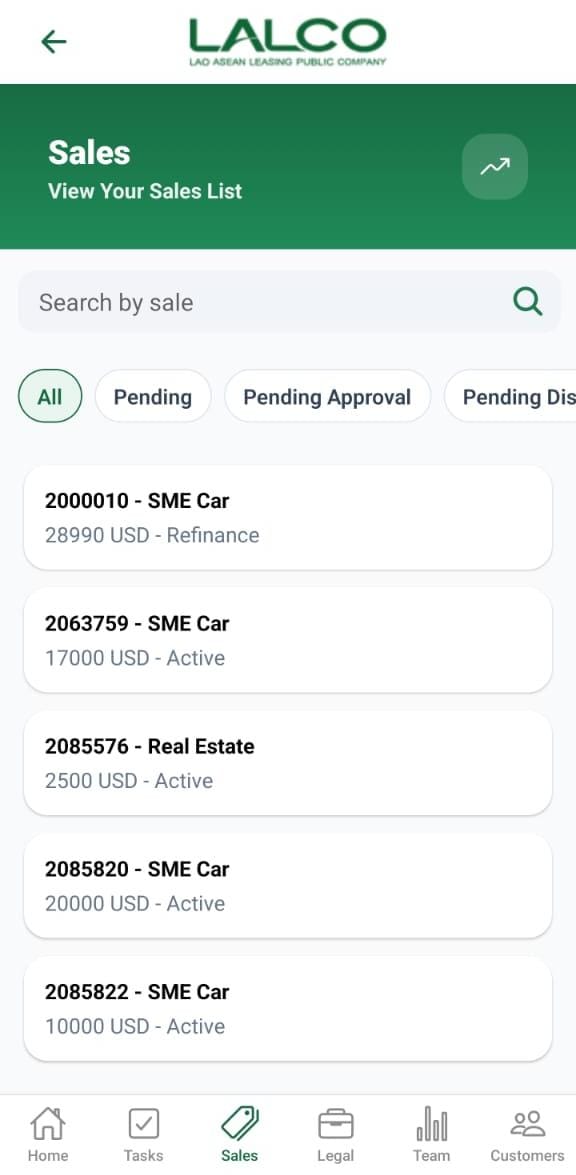
The Sales Screen allows staff to view and manage all loan sales within the system. It provides a searchable and filterable list of sales records, helping agents track loan statuses and customer applications efficiently.
Header Section
Page Title
Sales
Indicates that the user is viewing the list of all sales records.
Description
Provides a quick explanation of the screen’s purpose.
Action Icon 📈
The icon on the right may be used to:
Search Function
Search Bar
Allows users to search sales by:
Filter Options
Users can filter sales based on their status:
💡 Helps users quickly find specific types of sales.
Sales List
Each item in the list represents a sale record.
Example:
Information Displayed
Each sales item shows:
Status Types
Common statuses include:
How to Use
View a Sale
Search for a Sale
Filter Sales
💡 Tip:
Use filters + search together to quickly find specific sales records.
Sales Details Screen

The Sales Details Screen provides detailed information about a selected sale or loan contract. It allows staff to review contract details and take actions such as progressing the sale or logging customer interactions.
Header Section
Page Title
Sales
Indicates the user is viewing detailed information of a specific sale.
Description
Explains the purpose of this screen.
Back Button ←
Allows users to return to the Sales List Screen.
Action Icon 📈
May be used to view:
-
Sales performance
-
Reports or analytics related to the selected contract
Contact Information Section
This section displays key details of the selected sale/contract.
Contract Type
Example:
Indicates the type of loan or product.
Contract Number
Example:
A unique identifier for the sale.
Loan Amount
Example:
Displays the total loan value.
Contract Status
Example:
Shows the current state of the contract.
Common statuses:
-
Active
-
Refinance
-
Pending
-
Closed
Disbursement Date
Example:
Indicates when the loan amount was released.
Action Buttons
Advance Stage
Allows staff to move the sale to the next stage in the workflow.
Used when:
-
Processing the loan forward
-
Updating the contract status
Log Call
Opens the call logging feature to record communication with the customer.
Useful for:
-
Tracking follow-ups
-
Recording customer discussions
-
Logging payment commitments
How to Use
View Sale Details
-
Open the Sales tab.
-
Select a sale from the list.
-
Review all contract details.
Advance a Sale
-
Tap Advance Stage.
-
Confirm or update the next stage.
-
Save changes.
Log a Call
-
Tap Log Call.
-
Enter call details.
-
Save the record.
Bottom Navigation
The Sales tab remains highlighted, indicating the current section.
Other tabs:
-
Home
-
Tasks
-
Legal
-
Team
-
Customers
💡 Tip:
Always review contract details before advancing stages to avoid errors.
Legal Screen
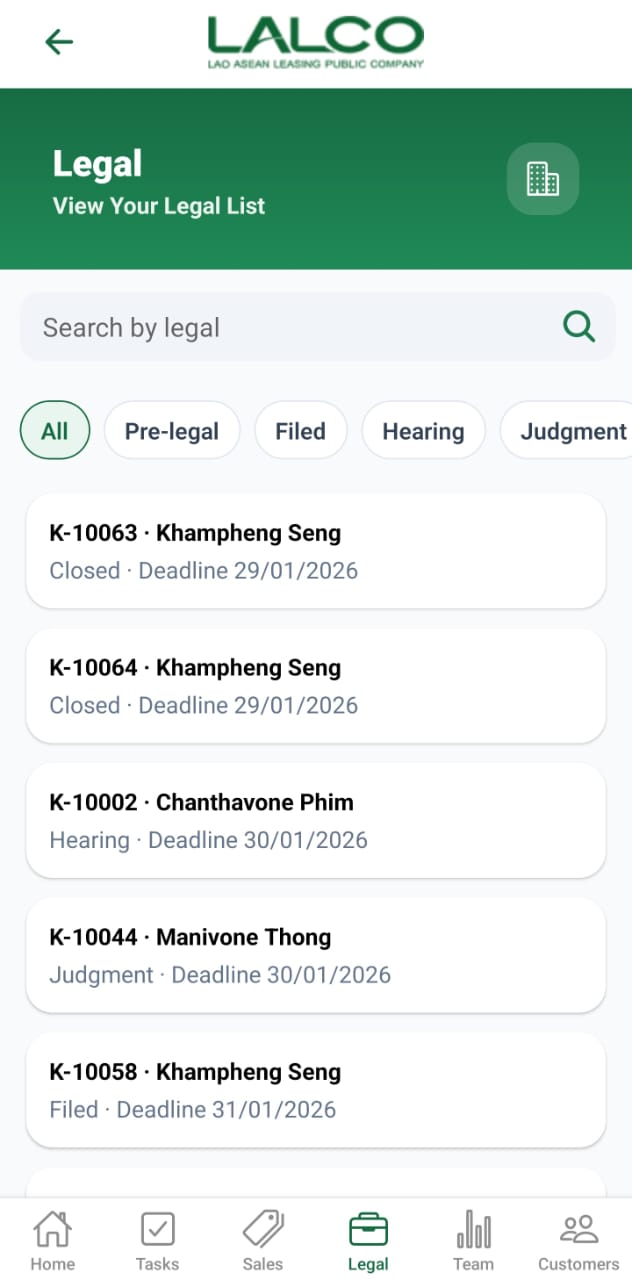
The Legal Screen allows staff to view and manage all legal cases related to customers and contracts. It provides a searchable and filterable list of legal records.
Header Section
Page Title
Legal
Description
Search Function
Search Bar
Allows users to search by:
-
Contract number
-
Customer name
Filter Options
Users can filter legal cases by stage:
-
All → Shows all cases
-
Pre-legal → Before legal action starts
-
Filed → Case has been filed
-
Hearing → Under court hearing
-
Judgment → Final decision stage
- Closed → Finished cases
Legal List
Each item represents a legal case.
Example:
Closed · Deadline 29/01/2026
Information Displayed
Each record shows:
-
Contract Number
-
Customer Name
-
Stage
-
Deadline
How to Use
View a Case
-
Open the Legal tab
-
Browse or search cases
-
Tap a case to view details
LALCO Staff App – Legal Details Screen

The Legal Details Screen shows detailed information about a selected legal case and allows staff to take actions.
Legal Details Section
Displays key information:
-
Name → Customer name
-
Contract Number → Unique ID
-
Stage → Current legal status
-
Deadline → Important due date
Actions
Start Visit
Used to begin a field visit related to the case.
Used for:
-
Customer visits
-
Legal follow-ups
-
Field verification
How to Use
View Details
-
Select a case from the list
-
Review all details
Start Visit
-
Tap Start Visit
-
Proceed with visit
-
Update status if needed
Navigation
Customers Screen
The Customers Screen allows staff to view and manage all customers in the system. It provides a searchable list, filter options, and quick access to customer details.
Header Section
Page Title
Customers
Description
View your customer list and manage customer records.
Action Icon ☰
May be used to:
-
Access settings
-
Open additional options
Search Function
Search Bar
Search by customer
Allows users to search by:
-
Customer Name
-
Phone Number
-
Contract Number
Filter Options
Users can filter customers by status:
-
All → Shows all customers
-
Active → Currently active customers
-
Pending → New or pending approval
-
Closed → Completed or closed accounts
Customer List
Each item represents a customer.
Example:
-
user – 02056087740 · Closed
Information Displayed
Each record shows:
-
Customer Name
-
Phone Number
-
Status
How to Use
View a Customer
-
Open the Customers tab
-
Browse or search the list
-
Tap a customer to view details
Add a Customer
-
Tap + Add Customer
-
Fill in required fields: Name, Phone, Address, Province → City → Village, NIC/Family Book, Birth Date
-
Tap Save
Customer Details Screen
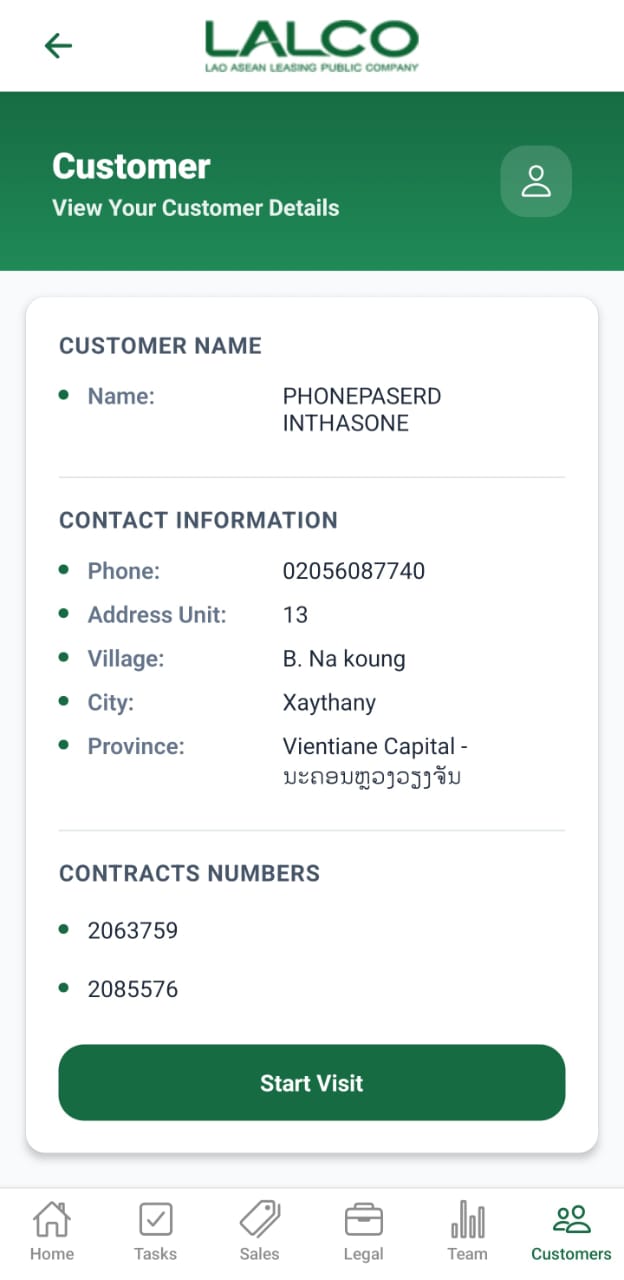
The Customer Details Screen shows detailed information about a selected customer and allows staff to start visits or update records.
Customer Details Section
Displays key information:
-
Name → Customer Name
-
Phone Number → Contact number
-
Address → Unit, Village, City, Province
-
Contract Numbers → Linked contracts
Actions
Start Visit
Used to begin a field visit related to the customer.
Used for:
-
Customer visits
-
Payment follow-ups
-
Field verification
How to Use
View Details
-
Select a customer from the list
-
Review all details
Start Visit
-
Tap Start Visit
-
Proceed with visit
-
Update visit remarks, GPS location, payment status if needed
Navigation
Customers Screen → Select Customer → Customer Details Screen → Start Visit
Add Visit Result Screen
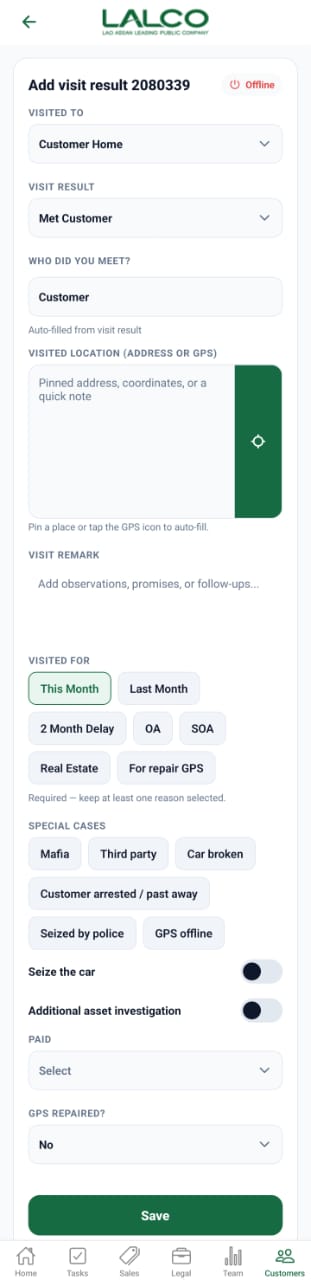
The Visit Result Screen allows staff to record the outcome of a customer visit, including visit details, GPS location, remarks, and status updates.
Visit Details Section
Visited To
-
Select where the visit occurred (e.g., Customer Home)
Visit Result
-
Choose the result of the visit (e.g., Met Customer, Not Available)
Who Did You Meet
-
Auto-filled or manually selected
Location Section
Visited Location
-
Enter address manually OR
-
Tap GPS icon to auto-fill current location
Tip: Always use GPS if possible for accurate tracking
Remarks Section
Visit Remark
-
Free text notes about the visit
(Example: “Customer promised to pay next week”)
Visit Reason Section
Select at least one reason for the visit:
-
This Month
-
Last Month
-
2 Month Delay
-
OA / SOA
-
Real Estate
-
GPS Repair
Special Cases Section (Optional)
Select only if applicable:
-
Third Party
-
Car Broken
-
Customer Arrested / Passed Away
-
Seized by Police
-
GPS Offline
Additional Options
-
Seize the Car → Toggle ON if the vehicle was seized
-
Additional Asset Investigation → Toggle ON if required
Payment & GPS Status
-
Paid → Select payment status
-
GPS Repaired → Yes / No
How to Use
Record Visit
-
Tap Start Visit from Customer Details Screen
-
Fill all required fields
-
Add GPS location and remarks
-
Select reasons for visit
-
Update special cases and additional options if needed
-
Tap Save
Navigation
Customer Details Screen → Start Visit → Visit Result Screen → Save
Add New Customer Screen
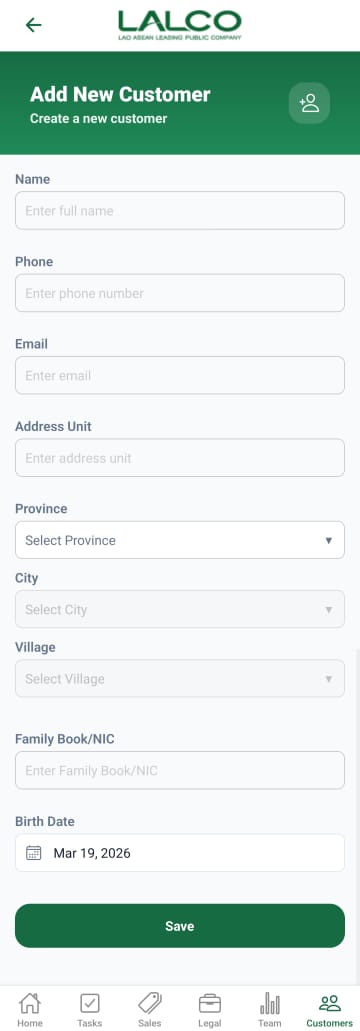
The Add New Customer Screen allows staff to create and register a new customer in the system. This information is used for managing customer records, loans, and follow-up activities.
Header Section
Page Title
Add New Customer
Description
Customer Information Form
Users must fill in the following details:
Name
Enter the customer’s full name.
Example:
Phone
Enter the customer’s contact number.
Example:
Enter the customer’s email address (optional if not available).
Example:
Address Unit
Enter the customer’s address or house/unit details.
Province
Select the province from the dropdown list.
City
Select the city based on the chosen province.
Village
Select the village or local area.
Family Book / NIC
Enter the customer’s identification number.
Example:
Birth Date
Select the customer’s date of birth using the date picker.
Example:
Action Button
Save
Tap Save to create the new customer.
-
If all required fields are filled correctly, the customer will be added successfully.
-
If there are missing or invalid details, the system may show an error.
How to Use
Add a New Customer
-
Open the Customers tab
-
Tap Add New Customer
-
Fill in all required details
-
Tap Save
-
Customer will be added to the system
Navigation
Team Dashboard Screen
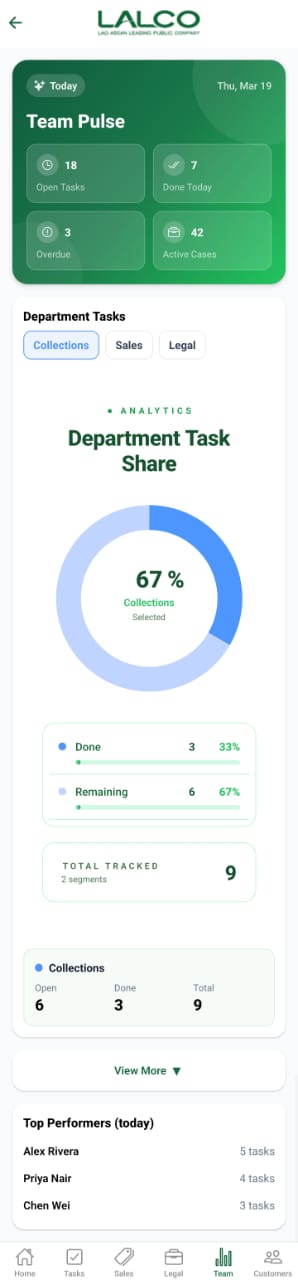
The Team Dashboard Screen provides a quick overview of team performance, task distribution, and case analytics. It helps staff monitor daily progress, track workloads, and identify top performers.
Header Section
Date Indicator
Displays the current working day.
Example:
Page Title
Team Pulse
Shows that this section focuses on team activity and performance.
Team Summary Cards
This section provides a quick snapshot of team activity:
-
Open Tasks → Total number of tasks not yet completed
-
Done Today → Tasks completed on the current day
-
Overdue → Tasks that have passed their deadline
-
Active Cases → Total ongoing cases handled by the team
Department Tasks
Tabs
Users can switch between departments:
-
Collections
-
Sales
-
Legal
This allows viewing performance data for each department separately.
Analytics Section
Department Task Share
Displays a visual chart showing task distribution.
Example:
Task Breakdown
-
Done → Completed tasks
-
Remaining → Pending tasks
Each includes:
-
Task count
-
Percentage progress
Total Tracked
Shows the total number of tasks being monitored.
Example:
Department Summary
Displays task details for the selected department.
Example (Collections):
-
Open → 6
-
Done → 3
-
Total → 9
View More Option
View More Button
Expands the dashboard to show additional analytics and detailed data.
Top Performers Section
Top Performers (Today)
Displays staff members with the highest task completion.
Example:
-
Alex Rivera → 5 tasks
-
Priya Nair → 4 tasks
-
Chen Wei → 3 tasks
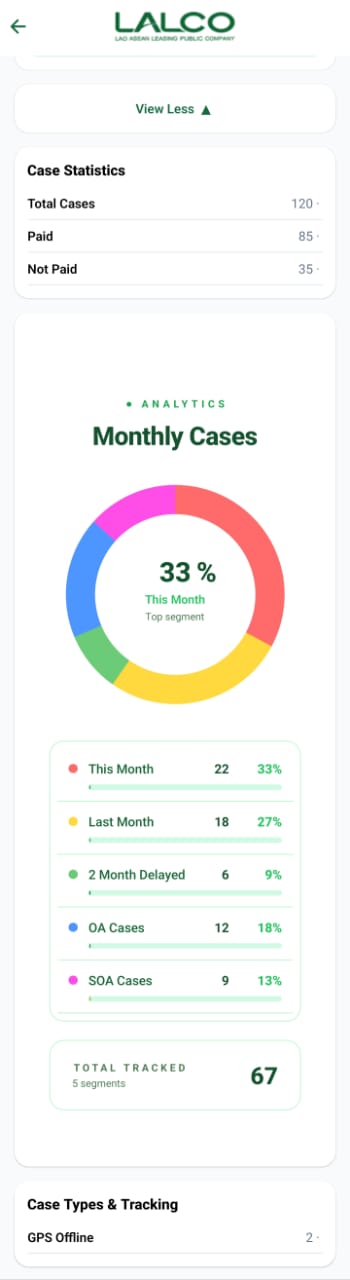
Additional Analytics (Expanded View)
When expanded, the dashboard shows deeper insights:
Case Statistics
-
Total Cases → Overall number of cases
-
Paid → Successfully completed/paid cases
-
Not Paid → Pending or unpaid cases
Monthly Cases
Displays a visual breakdown of case categories.
Includes:
-
This Month
-
Last Month
-
2 Month Delayed
-
OA Cases
-
SOA Cases
Each shows:
-
Number of cases
-
Percentage contribution
Total Tracked (Analytics)
Shows total number of tracked segments.
Example:
Case Types & Tracking
Displays system-related tracking information.
Example:
-
GPS Offline → Indicates location tracking issues
How to Use
View Team Performance
-
Open the Team tab
-
Review summary cards
-
Analyze department performance
Switch Department
-
Tap Collections / Sales / Legal
-
View updated analytics
Expand Analytics
-
Tap View More
-
Review detailed reports
💡 Tip:
Use this screen daily to monitor team productivity, overdue tasks, and performance trends.
GPS Offline Screen
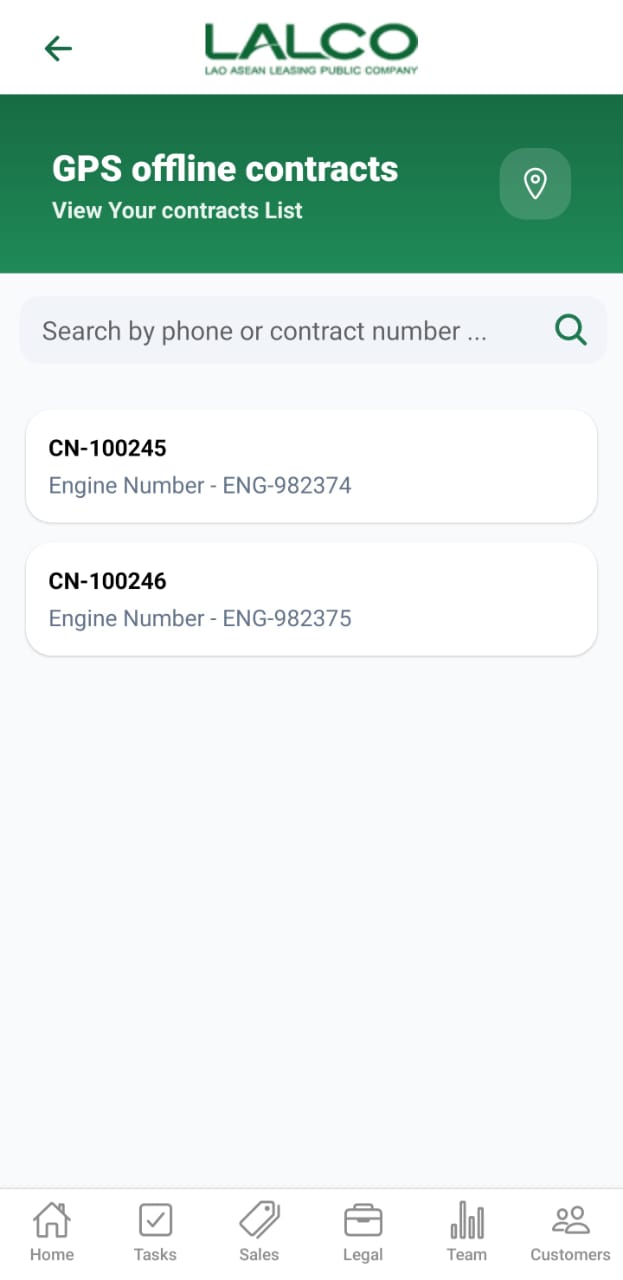
The GPS Offline Screen allows staff to view and manage contracts where GPS tracking is unavailable. It helps agents identify and review affected vehicles and customer details.
Access Path
Location Icon 📍
May be used to:
Search Function
Search Bar
Allows users to search using:
-
Phone number
-
Contract number
Contract List
Each item represents a GPS offline contract.
Example
Engine Number – ENG-982374
Information Displayed
-
Contract Number
-
Engine Number
How to Use
View Contracts
-
Open GPS Offline from menu
-
Browse the list
-
Use search if needed
Open Contract Details
-
Tap on a contract
-
View full information
GPS Offline Details Screen
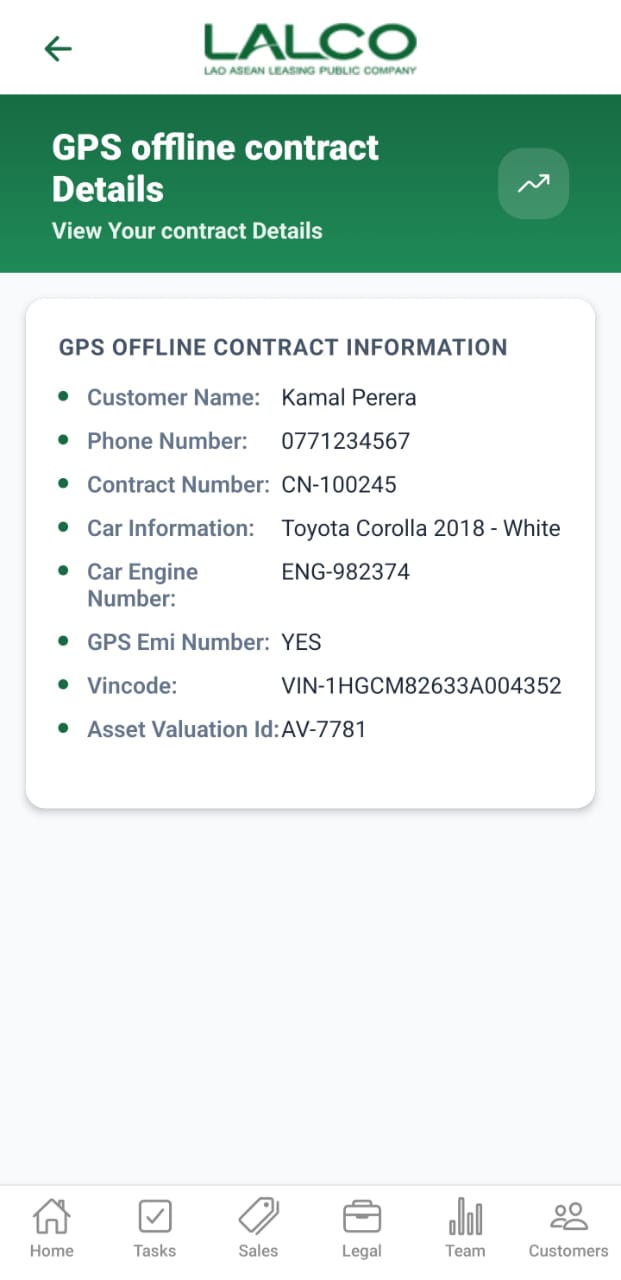
Displays detailed information about a selected GPS offline contract.
Header Section
Page Title
GPS offline contract Details
Description
Contract Information
Displays complete details of the selected contract:
-
Customer Name → Name of the customer
-
Phone Number → Contact number
-
Contract Number → Unique ID
-
Car Information → Vehicle model and details
-
Car Engine Number → Engine ID
-
GPS EMI Number → GPS installment/availability status
-
Vin Code → Vehicle identification number
-
Asset Valuation ID → Internal tracking ID
Example
Contract Number: CN-100245
Car: Toyota Corolla 2018
How to Use
View Details
-
Select a contract from the list
-
Review all customer and vehicle details
💡 Tip:
Use this screen to quickly identify vehicles with GPS issues and take necessary follow-up actions.
Call History Screen
The Call History Screen allows staff to view and track all logged customer calls, including call duration and date. This helps monitor communication history and follow-ups.
Access Path
Call History List Screen
Overview
Displays a list of all recorded calls made by the user.
Header Section
Page Title
Call History
Description
Call Icon 📞
-
Used to initiate or access calling features
Call List
Each card represents a logged call.
Information Displayed
-
Customer Name
-
Phone Number
-
Call Date
-
Call Duration
Example
+1-555-0106
Date: 2026-02-03
Duration: 6 min
Pagination
Located at the bottom of the screen.
Controls
Example
How to Use
View Call History
-
Open Call History from menu
-
Scroll through the list
-
Use pagination to navigate
Analyze Calls
-
Check call duration
-
Review recent interactions
-
Identify follow-up needs
Bottom Navigation Bar
Provides quick access to main modules:
-
Home
-
Tasks
-
Sales
-
Legal
-
Team
-
Customers
Empty State (Optional)
Notes
-
Calls are listed in descending order (latest first)
-
Data helps track staff communication performance
💡 Tip:
Use this screen daily to ensure no customer follow-up is missed.
Note Details Screen
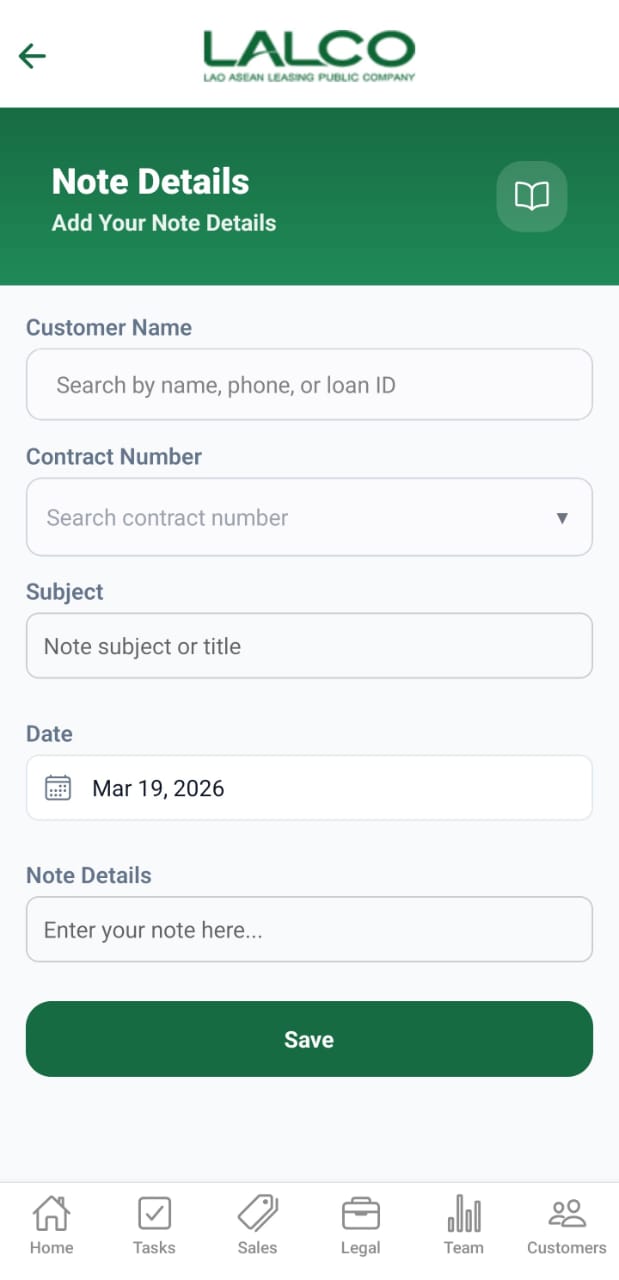
Overview
The Note Details Screen allows staff to create and save notes related to customers, contracts, and follow-ups. It helps track important interactions and maintain proper records.
Access Path
Note Details Form
Overview
Provides input fields to create a new note linked to a customer and contract.
Header Section
Page Title
Note Details
Description
Book Icon 📖
-
Represents note/document management
Input Fields
1. Customer Name
-
Search and select a customer
-
Supports:
-
Customer name
-
Phone number
-
Loan ID
-
2. Contract Number
-
Dropdown or searchable field
-
Links note to a specific contract
3. Subject
-
Short title describing the note
4. Date
-
Default is current date
-
May be editable
5. Note Details
-
Main content of the note
-
Used for:
-
Call summaries
-
Customer updates
-
Follow-up actions
-
Action Button
Save Button
-
Label: Save
-
Function:
-
Stores the note
-
Links it to selected customer and contract
-
How to Use
Create a Note
-
Open Note Details
-
Search and select a Customer
-
Select Contract Number
-
Enter a Subject
-
Verify or update the Date
-
Enter detailed information in Note Details
-
Tap Save
Validation Rules (Recommended)
-
Customer selection is required
-
Contract number is required
-
Subject should not be empty
-
Note details must contain meaningful content
Success State
Error States
💡 Tip:
Use notes immediately after calls or customer visits to ensure accurate tracking and better follow-up management.
Staff Screen
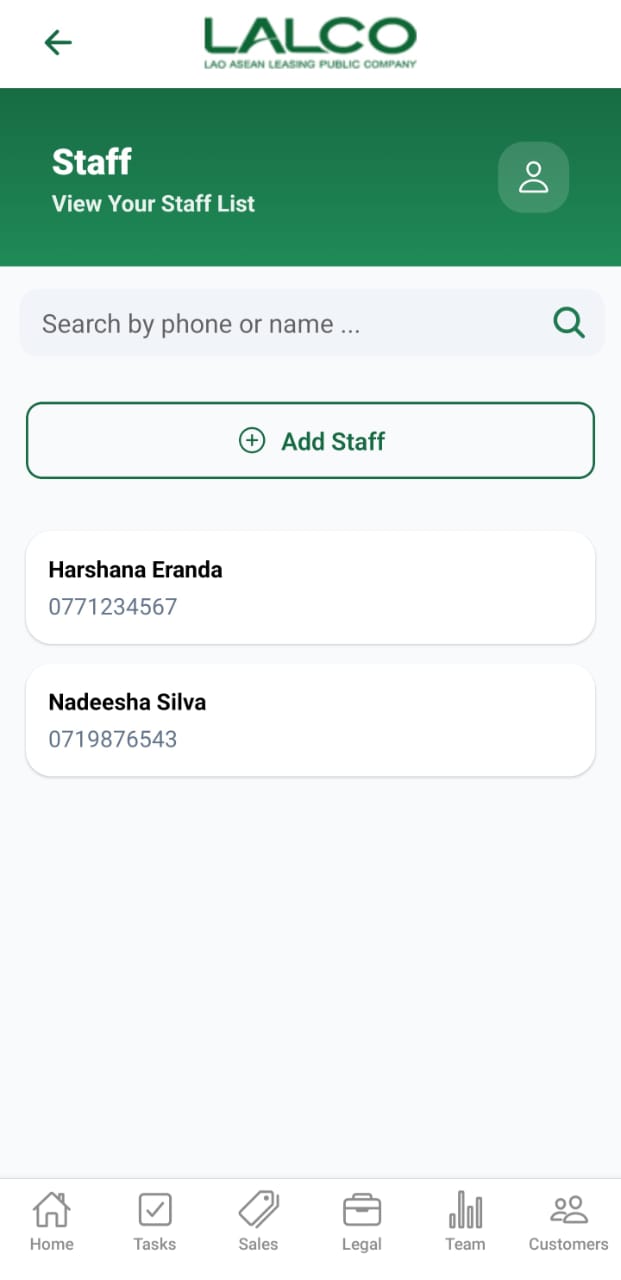
The Staff Screen allows users to view and manage all staff members in the system. It provides a searchable list of staff and an option to add new users.
Header Section
Page Title
Staff
Description
Search Function
Search Bar
Allows users to search staff by:
-
Name
-
Phone number
Add Staff
Add Staff Button
Allows users to create a new staff account.
Staff List
Each item represents a staff member.
Example:
0771234567
Information Displayed
Each record shows:
-
Staff Name
-
Phone Number
How to Use
View Staff
-
Open the Staff section
-
Browse or search staff members
Add New Staff
-
Tap Add Staff
-
Fill in required details
-
Tap Save User
Add New User Screen
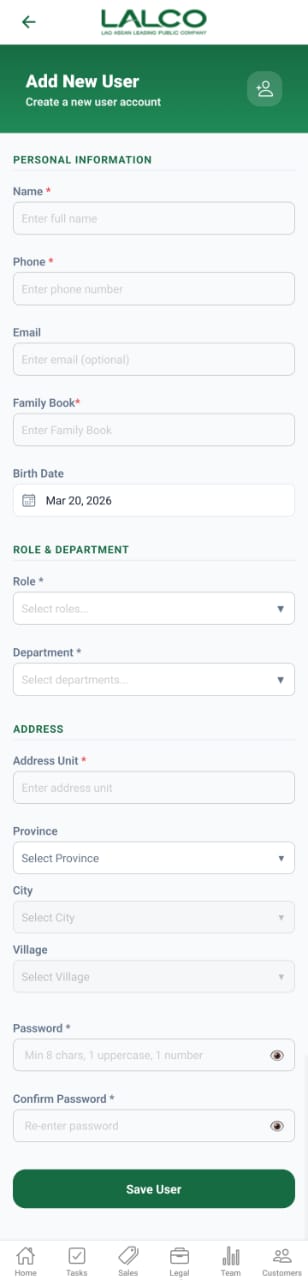 The Add New User Screen allows administrators to create new staff accounts by entering personal, role, and address details.
Personal Information
-
Name → Full name of staff
-
Phone → Contact number
-
Email → Optional email address
-
Family Book → Additional identification
-
Birth Date → Date of birth
Role & Department
-
Role → Select user role
-
Department → Select department
Address
-
Address Unit → Street or unit
-
Province → Select province
-
City → Select city
-
Village → Select village
Security
-
Password → Minimum 8 characters (with uppercase & number)
-
Confirm Password → Re-enter password
Actions
Save User
Creates the new staff account after validation.
Navigation
Staff Details Screen

Header Section
Page Title
Staff
Description
View Staff Details
Basic Information
Displays personal details of the staff member:
-
Name → Full name of the staff member
-
Gender → Male or Female
-
Date of Birth → Staff member’s birth date
-
Family Book → Official identification/reference number
Contact Information
-
Phone → Contact number
-
Email → Email address
Roles
Shows the role assigned to the staff member.
Example:
-
Manager
Departments
Displays the department the staff belongs to.
Example:
-
Legal
Address
-
House No → House number
-
Village → Village name
-
City → City name
-
Province → Province
Actions
Edit Staff
Allows users to update or modify staff information.
How to Use
View Staff Details
-
Open the Staff section
-
Select a staff member
-
View all details
Edit Staff
-
Tap Edit Staff
-
Update required fields
-
Save changes
Edit User Screen
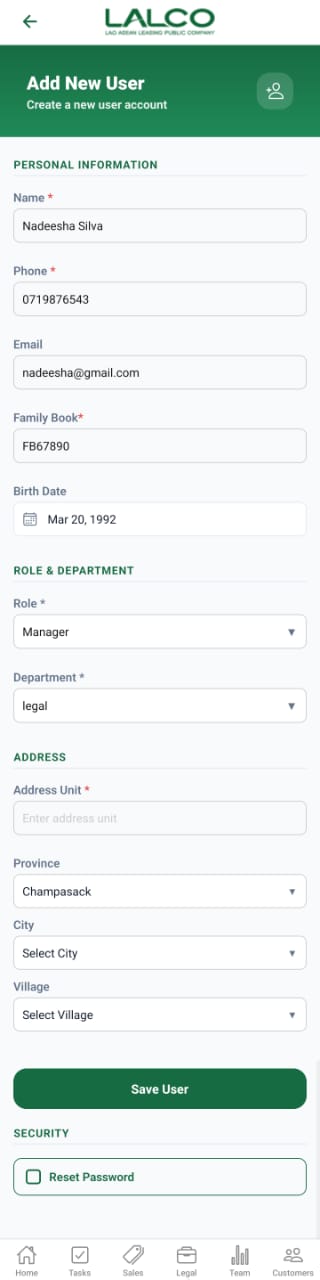
The Edit New User Screen allows administrators to create a new staff account by entering personal, role, and address details.
Personal Information
-
Name → Staff full name
-
Phone → Contact number
-
Email → Email address
-
Family Book → Identification number
-
Birth Date → Date of birth
Role & Department
-
Role → Select staff role (e.g., Manager)
-
Department → Select department (e.g., Legal)
Address
-
Address Unit → House or unit number
-
Province → Select province
-
City → Select city
-
Village → Select village
Actions
Save User
Creates the new staff account after entering all required details.
Security
Reset Password
Option to reset or assign a password for the user.
How to Use
Add New User
-
Open Edit Staff
-
Enter all required information
-
Select role and department
-
Fill address details
-
Tap Save User
Reassigned Tasks Screen
Reassigned Tasks Screen
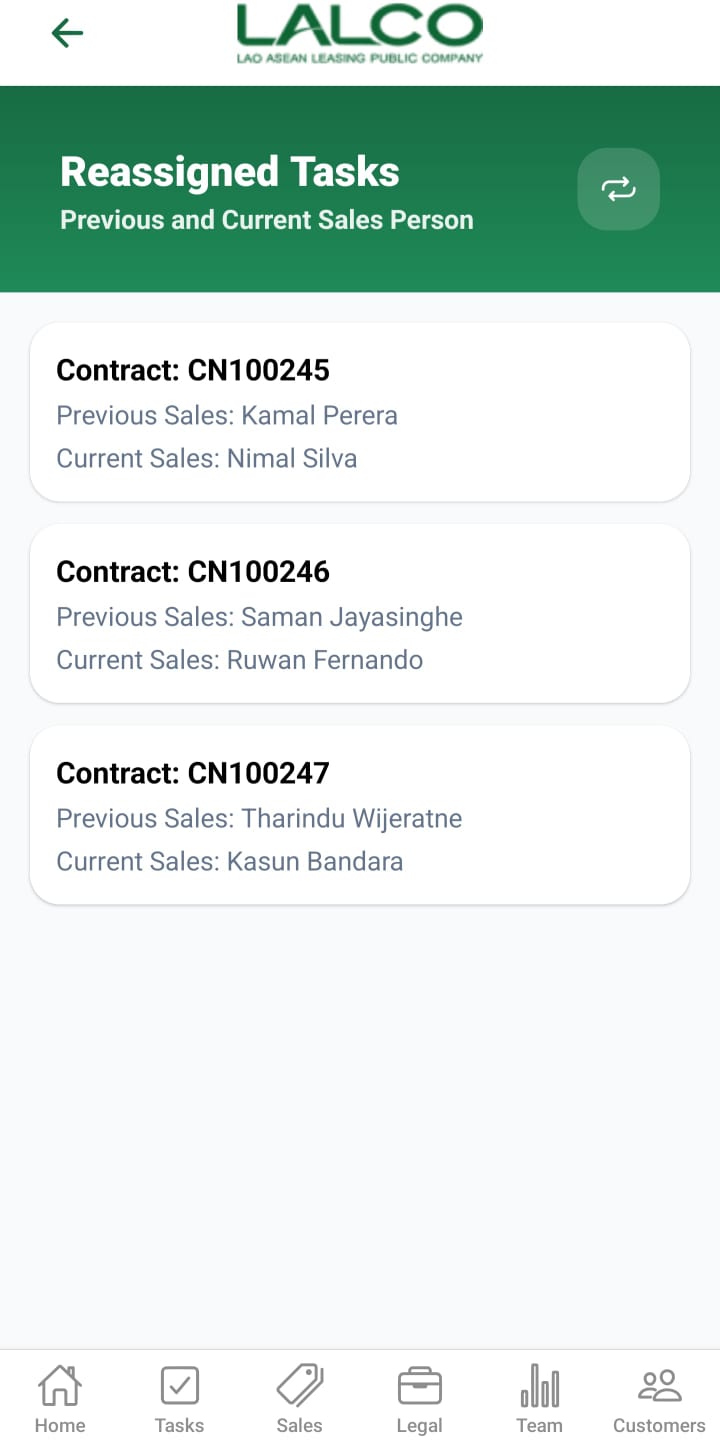
The Reassigned Tasks Screen allows users to view tasks that have been reassigned between sales staff. It shows both previous and current sales persons for each contract.
Task List
Each item represents a reassigned task.
Example:
Previous Sales: Kamal Perera
Current Sales: Nimal Silva
Information Displayed
Each record shows:
- Contract Number
- Previous Sales Person
- Current Sales Person
How to Use
View Reassigned Tasks
- Open the Reassigned Tasks section
- Browse the list of tasks
- Tap a task to view more details
Reassign Task Details Screen
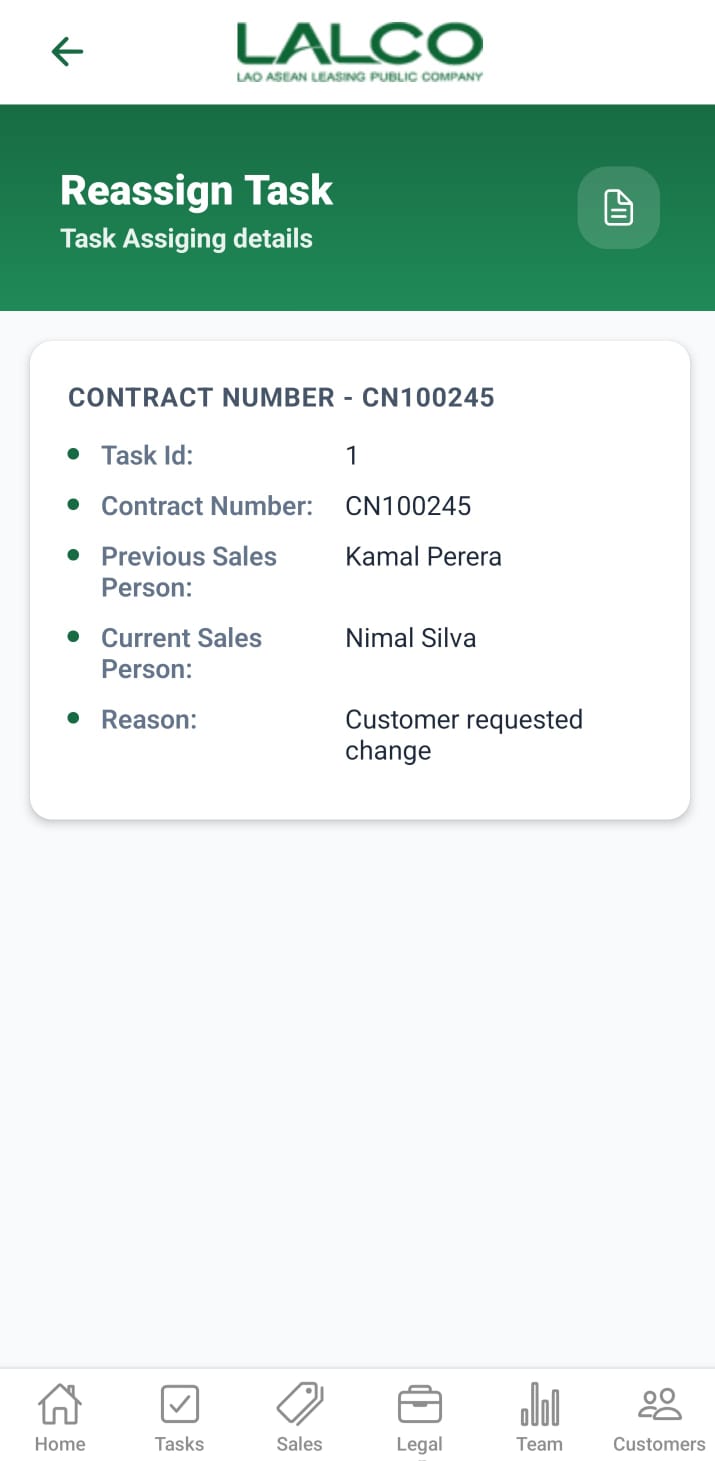
The Reassign Task Details Screen shows detailed information about a specific reassigned task, including the reason for reassignment.
Task Details Section
Displays key information:
- Task ID → Unique task identifier
- Contract Number → Related contract
- Previous Sales Person
- Current Sales Person
- Reason → Explanation for reassignment
Example:
Contract Number: CN100245
Previous Sales Person: Kamal Perera
Current Sales Person: Nimal Silva
Reason: Customer requested change
How to Use
View Task Details
- Select a task from the list
- Review all reassignment details
Navigation
Offer Loan Screen
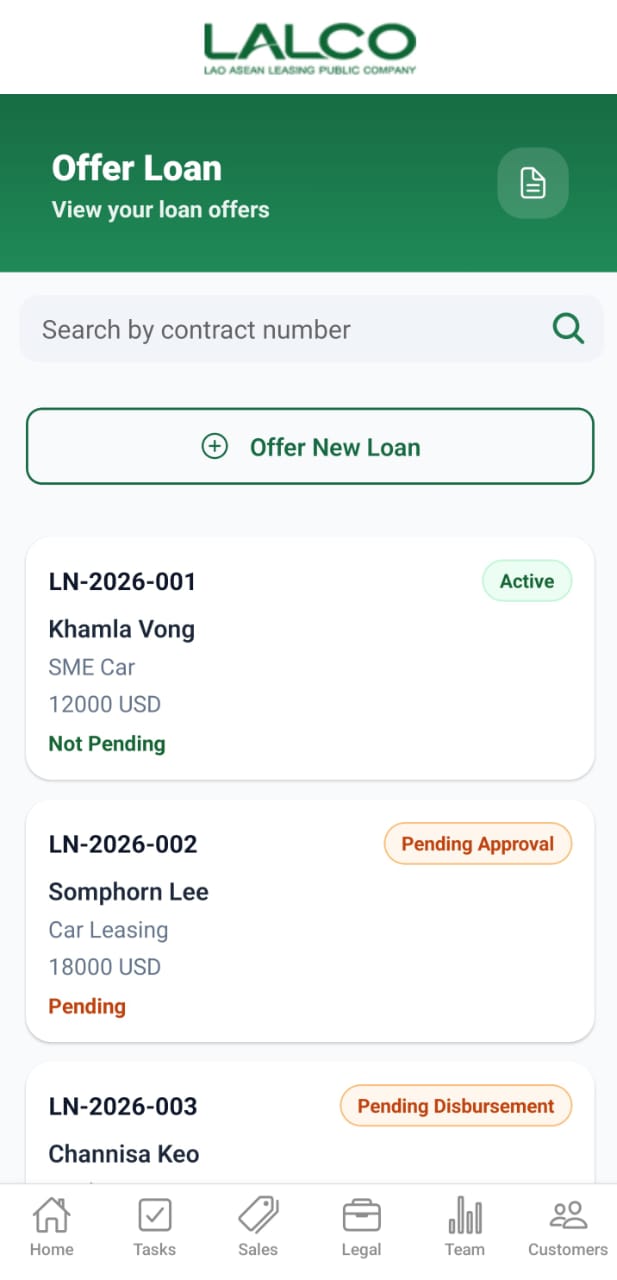
The Offer Loan Screen allows staff to view existing loan offers and create new loan applications for customers.
Search Function
Search Bar
Allows users to search by:
- Contract number
- Loan ID
Main Action
Offer New Loan
Loan List
Each item represents a loan offer.
Example:
Khamla Vong
SME Car
12000 USD
Active
Information Displayed
Each record shows:
- Loan Number
- Customer Name
- Loan Type
- Loan Amount
- Status
Status Types
Common statuses include:
- Active → Loan is currently active
- Pending Approval → Waiting for approval
- Pending Disbursement → Approved but funds not released
- Pending → Still in process
- Not Pending → No pending actions
How to Use
View Loan
- Open the Offer Loan tab
- Browse or search records
- Tap a loan to view details
Offer Loan Screen
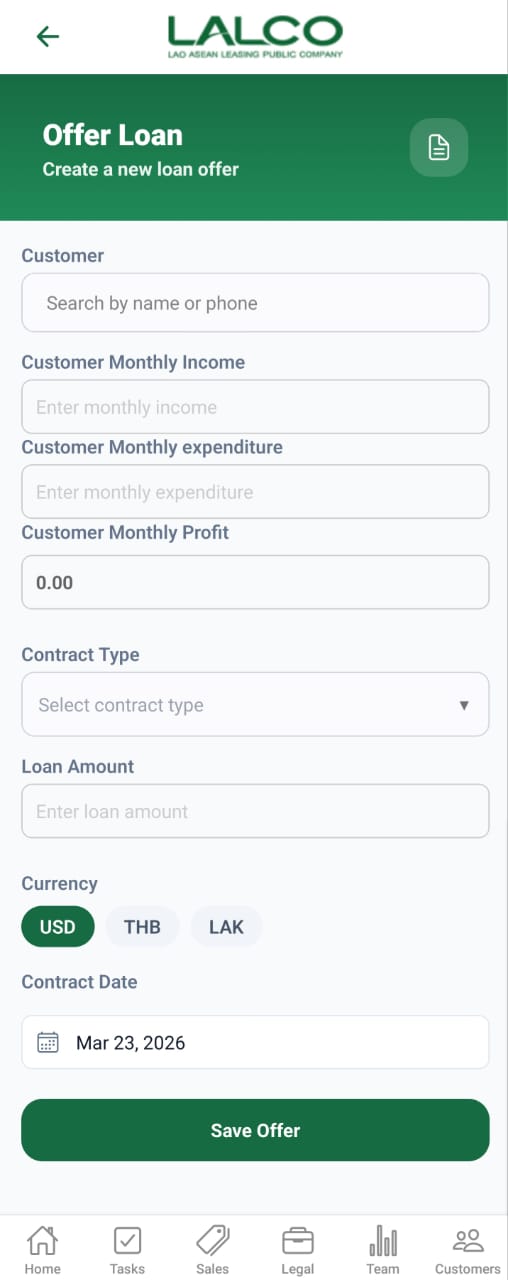
The Create Offer Loan Screen allows staff to create a new loan offer by entering customer and financial details.
Form Fields
Customer
Search customer by name or phone number
Customer Monthly Income
Enter total monthly income
Customer Monthly Expenditure
Enter monthly expenses
Customer Monthly Profit
Automatically calculated
Contract Type
Select loan type (e.g., SME Car)
Loan Amount
Enter loan value
Currency
Select currency:
- USD
- THB
- LAK
Contract Date
Select the loan start date
Action
Save Offer
Saves the new loan application
How to Use
Create Loan Offer
- Tap Offer New Loan
- Fill in all required fields
- Tap Save Offer
- Loan will be added to the list
Offer Loan Details Screen
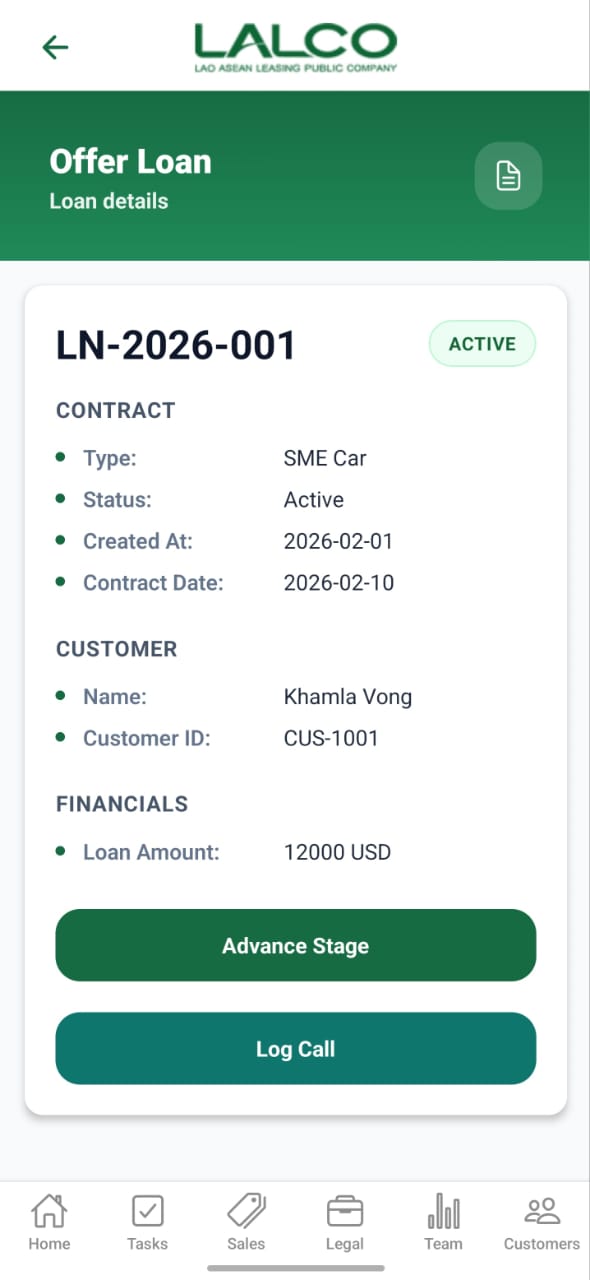
The Offer Loan Details Screen shows full information about a selected loan and allows staff to take actions.
Loan Details
Displays:
- Loan Number
- Contract Type
- Status
- Created Date
- Contract Date
Customer Information
- Customer Name
- Customer ID
Financial Information
- Loan Amount
Actions
Advance Stage
Moves the loan to the next stage
Log Call
Records customer communication
How to Use
View Details
- Select a loan from the list
- Review all information
Update Loan
- Tap Advance Stage
- Update progress
- Save changes
Log Call
- Tap Log Call
- Enter details
- Save
Navigation
Location Screen
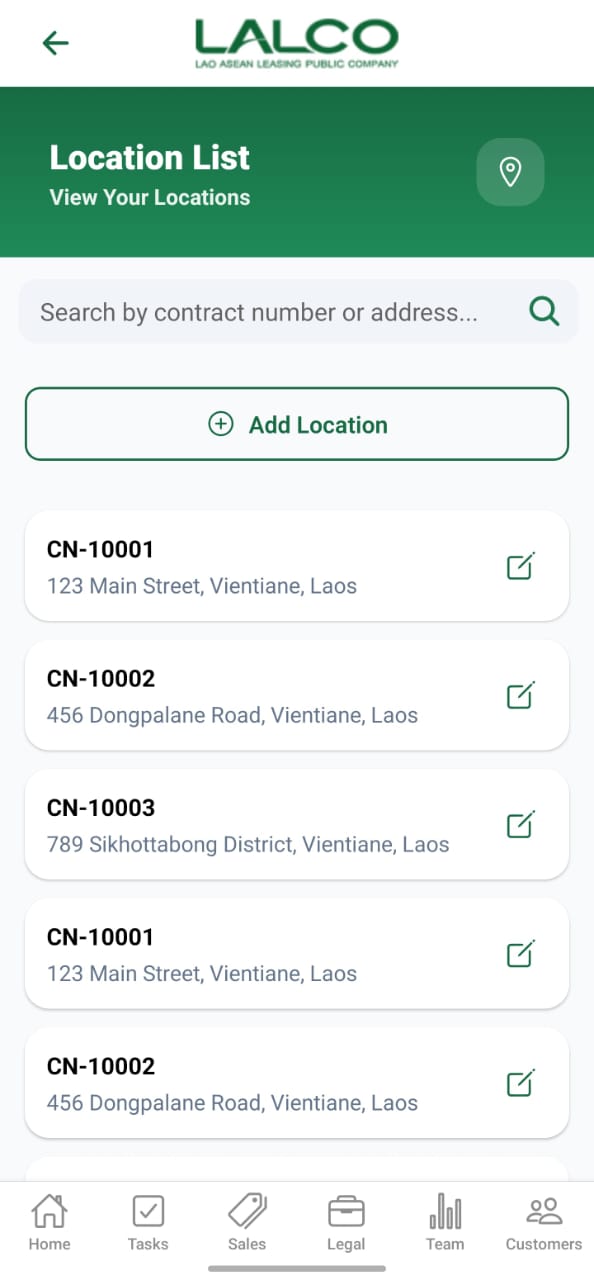
The Location Screen allows staff to view and manage collection locations linked to contracts. Users can search, add, and update location details.
Search Function
Search Bar
Allows users to search by:
- Contract number
- Address
Main Action
Add Location
Location List
Each item represents a saved location.
Example:
123 Main Street, Vientiane, Laos
Information Displayed
Each record shows:
- Contract Number
- Address
How to Use
View Locations
- Open the Location screen
- Browse or search locations
- Tap edit icon to modify
Add Location Screen
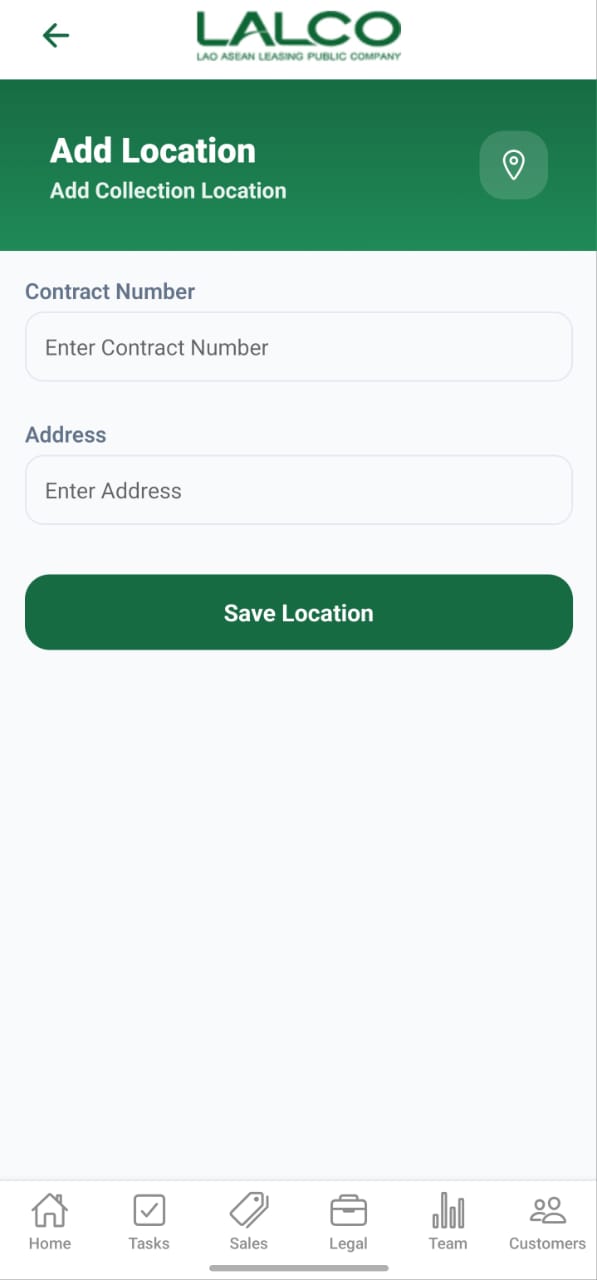
The Add Location Screen allows staff to create or update a collection location for a contract.
Form Fields
Contract Number
Enter or select the contract number
Example:
Address
Enter the full collection address
Example:
Action
Save Location
Saves the location details to the system
How to Use
Add Location
- Tap Add Location
- Enter contract number
- Enter address
- Tap Save Location
Edit Location
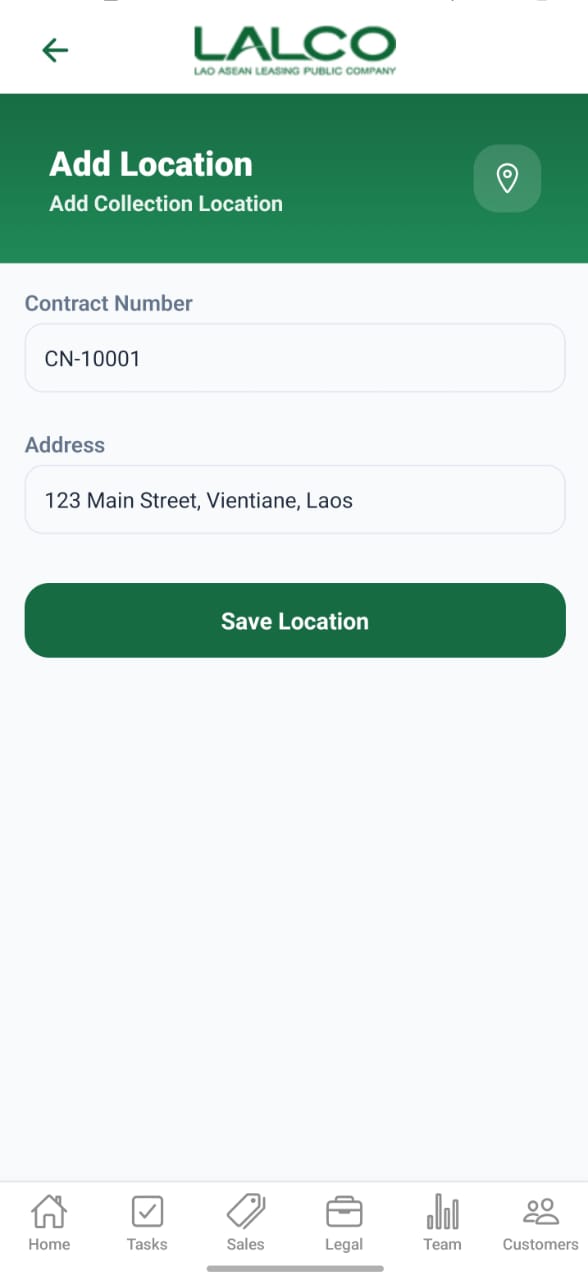
- Tap edit icon from list
- Update details
- Tap Save Location
Navigation
Profile Screen
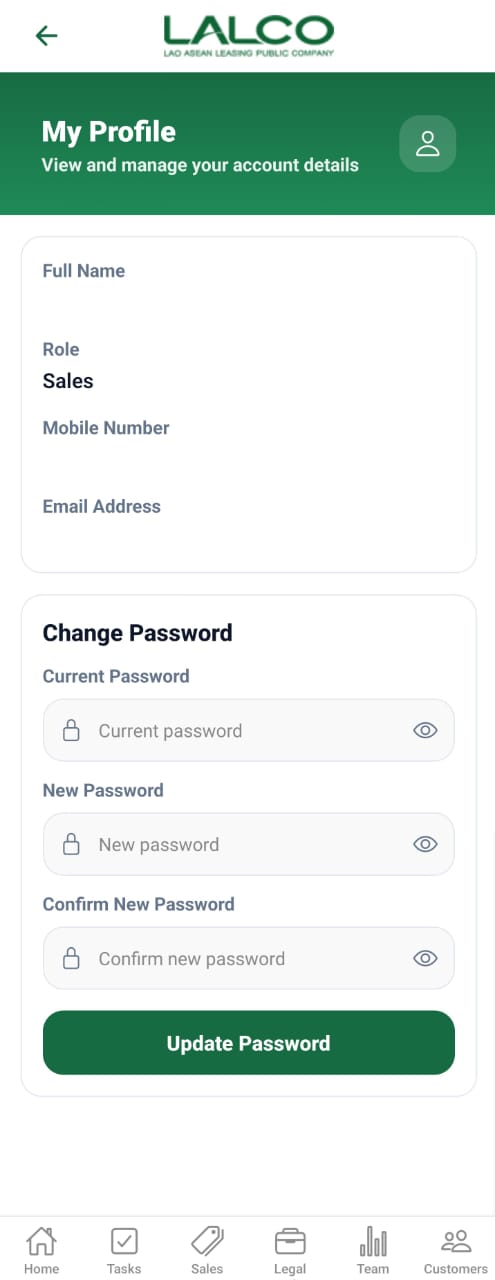
The Profile Screen allows users to view their personal account details and manage their login credentials, including updating their password.
Profile Information
Displays user account details:
- Full Name → User’s registered name
- Role → User role in the system (e.g., Sales)
- Mobile Number → Registered phone number
- Email Address → User’s email
Change Password Section
Allows users to update their account password.
Form Fields
Current Password
Enter your existing password
New Password
Enter a new password
Confirm New Password
Re-enter the new password for confirmation
Visibility Icon
Allows users to:
- Show password
- Hide password
Action
Update Password
Saves and updates the new password
How to Use
View Profile
- Open the Profile screen
- Review your account details
Change Password
- Enter Current Password
- Enter New Password
- Confirm the new password
- Tap Update Password
Security Tips
- Use a strong password
- Do not share your credentials
- Change your password regularly
Navigation
Capture Screen
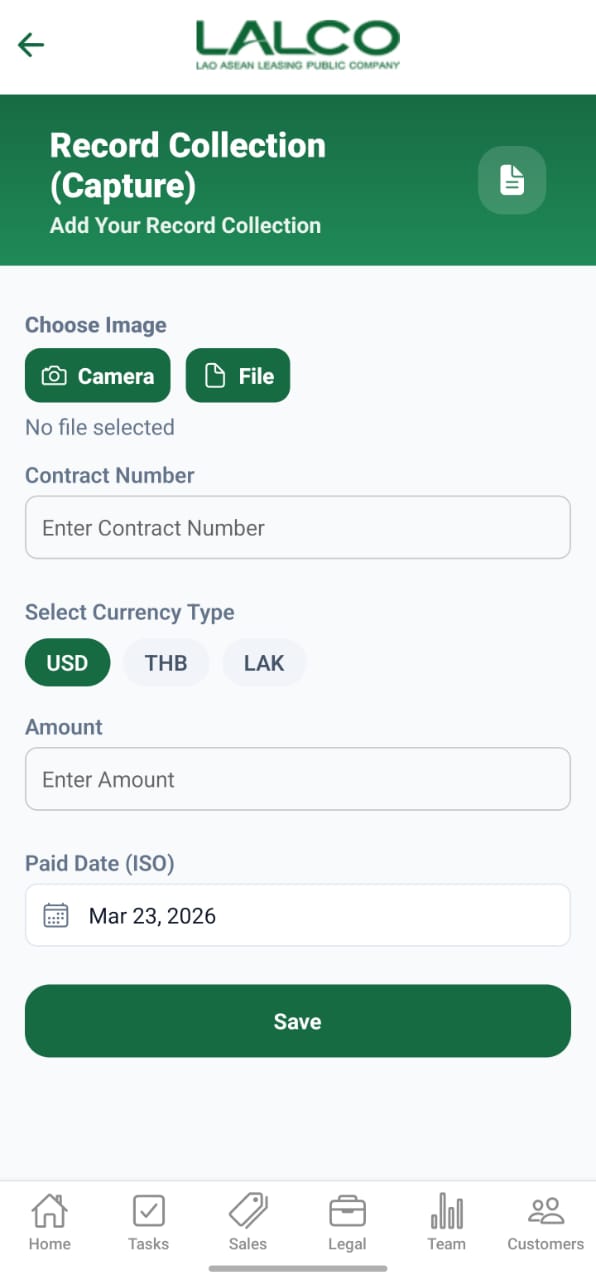
The Record Collection (Capture) Screen allows staff to record payment collections by capturing proof (image/file) and entering transaction details such as contract number, amount, and payment date.
Image Upload Section
Choose Image
Users can attach proof of collection using:
- Camera → Capture image directly
- File → Upload from device
File Status
Displays whether a file has been attached.
Form Fields
Contract Number
Enter the contract number related to the payment
Select Currency Type
Choose one:
- USD
- THB
- LAK
Amount
Enter the collected amount
Paid Date (ISO)
Select the payment date
Example:
Action
Save
Saves the collection record to the system
How to Use
Record Collection
- Upload image using Camera or File
- Enter Contract Number
- Select Currency Type
- Enter Amount
- Select Paid Date
- Tap Save
Notes
- Always attach proof of payment
- Ensure contract number is correct
- Verify amount before saving
Navigation
Task Screen
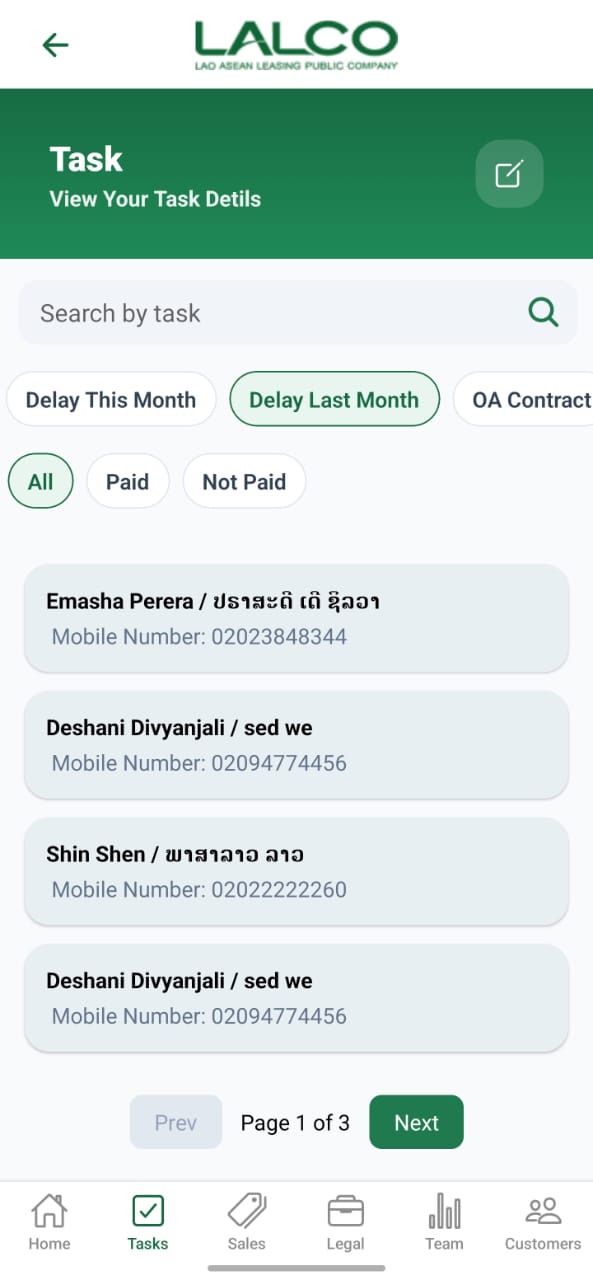
The Task Screen allows staff to view, filter, and manage assigned customer tasks related to payments and follow-ups.
Search Function
Search Bar
Allows users to search tasks by:
- Customer name
- Task-related details
Filters
Time Filters
- Delay This Month → Tasks delayed in current month
- Delay Last Month → Tasks delayed in previous month
- OA Contract → Tasks related to OA contracts
Payment Filters
- All → Show all tasks
- Paid → Completed payments
- Not Paid → Pending payments
Task List
Each item represents a customer task.
Example:
Mobile Number: 02023848344
Information Displayed
Each record shows:
- Customer Name
- Mobile Number
Pagination
- Prev → Go to previous page
- Next → Go to next page
- Displays current page (e.g., Page 1 of 3)
How to Use
View Tasks
- Open the Task screen
- Use filters to narrow results
- Search if needed
- Select a task to view details
Task Details Screen
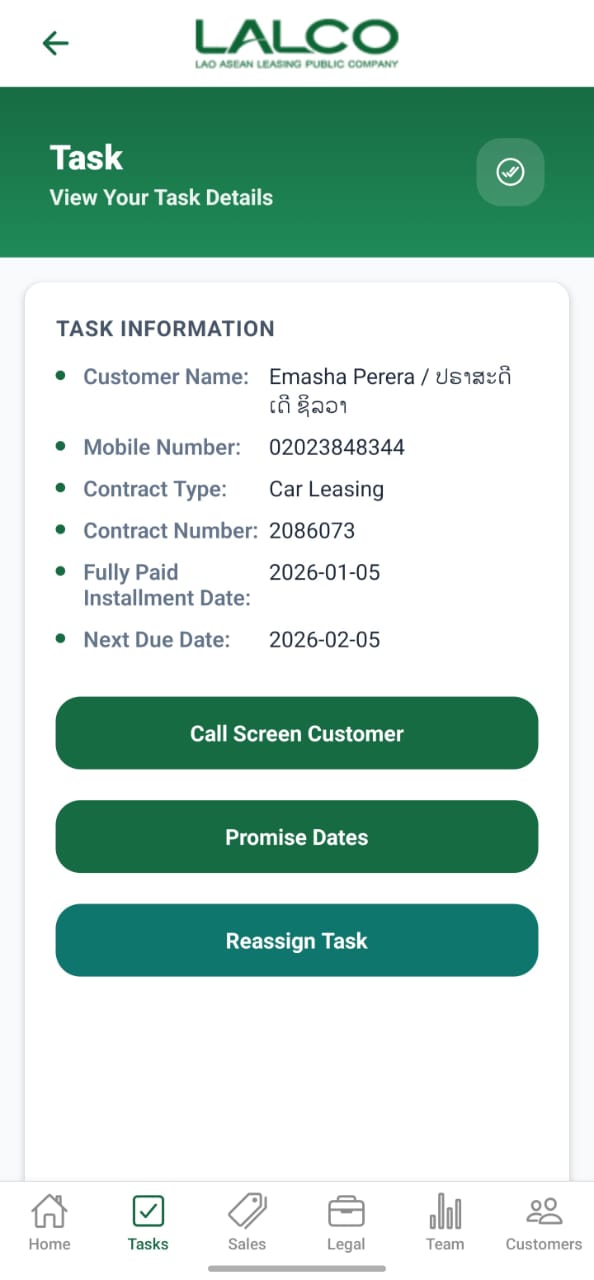
The Task Details Screen provides complete information about a selected task and allows staff to take follow-up actions.
Task Information
Displays:
- Customer Name
- Mobile Number
- Contract Type
- Contract Number
- Fully Paid Installment Date
- Next Due Date
Actions
Call Screen Customer
Initiates customer follow-up or call process
Promise Dates
Set or update customer promised payment dates
Reassign Task
Assign task to another staff member
How to Use
Manage Task
- Select a task from the list
- Review task information
- Choose an action:
- Call customer
- Set promise date
- Reassign task