LMS Version 1
This system we use for helps automate every stage of the loan lifecycle, from application to closing.
- Staff
- Customer
- Currency Rate
- Holidays
- Asset Valuation
- Broker
- Asset Transfer
- Guarantor
- Loan Prospect
- Recordings
- Loan Contract
- Collection
- Bank Statement
- Collection Adjustment
- Car Dealer Shop
- No.1 Auto
Staff

The staff page in a loan management system is primarily used for creating new staff accounts within the system. This allows you to grant access to authorized personnel who will be involved in managing loans.
Here's a breakdown of its purpose:
-
New Staff Accounts: The staff page provides a central location to add new staff members to the system. This ensures they have the necessary permissions to perform their loan management tasks.
-
Security and Access Control: By creating individual accounts, the system can restrict access to sensitive loan data based on user roles and permissions. This helps maintain data security and compliance.
Functionalities
- List All Staff
- Edit existed staff details
- Import/Export staff data
- Set Access to individual staff
Add Staff Page
There are few fields to create a staff/user.
- Staff No
- First Name
- Last Name
- First Name (Lao)
- Last Name (Lao)
- Nickname
- Date of Birth - date field
- Gender - dropdown
- Marital Status - dropdown
- Country
- Province
- City
- Village
- Contact Info
- Profile Image
- Payment Team
- Password
- Role
- There are 3 roles, fields are change according to the role
- Staff - Mentor, Manager, Department
- Manager - Mentor, Department
- Admin - Mentor
- User Bank Details - Bank Account Number, Bank Account Name, Currency
- User Status Details - User Status, Date
- There are 3 roles, fields are change according to the role
Staff List Page
- Here, user can see the existing user details.
- There is a options to Import and export bulk staffs.
- Can be able to edit existing user details.
- Can be able to activate and deactivate the users.
Customer

Creating new customers is a key function of the customer page in a loan management system (LMS). But it actually offers a wider range of benefits for both borrowers and lenders. the customer page allows you to easily create new customer profiles within the LMS.
The information in the customer page feeds into various other functionalities of the LMS. For instance, customer details are used during:
- Asset Valuation: When appraising an asset for a loan, the customer's financial situation and creditworthiness might be considered.
- Loan Prospect: The LMS might use customer data to identify potential borrowers who fit specific loan criteria.
Functionalities
- Add New Customer
- List All Customer
- Edit Exist Customer
Add New Customer
- Customer Types- Individual and Corporate
- According to the customer type , the fields changed.
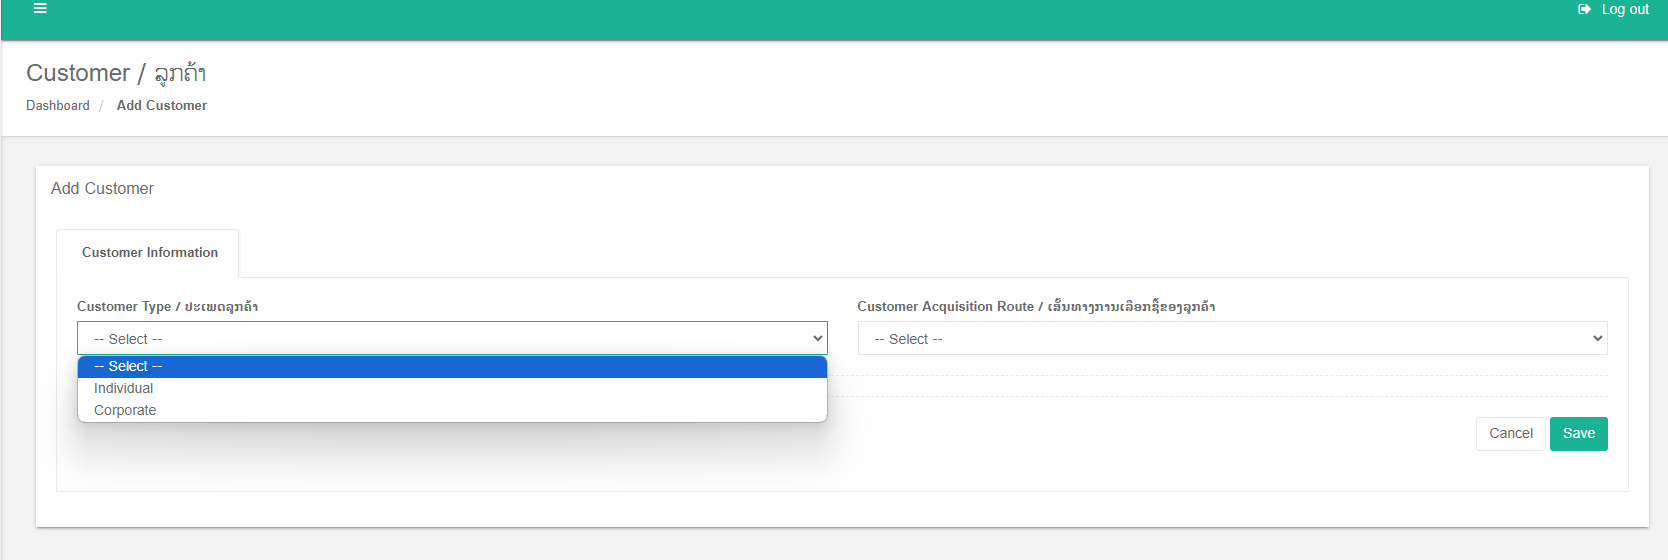
- Sections according to the add new customer.
- Agent of Customer Information
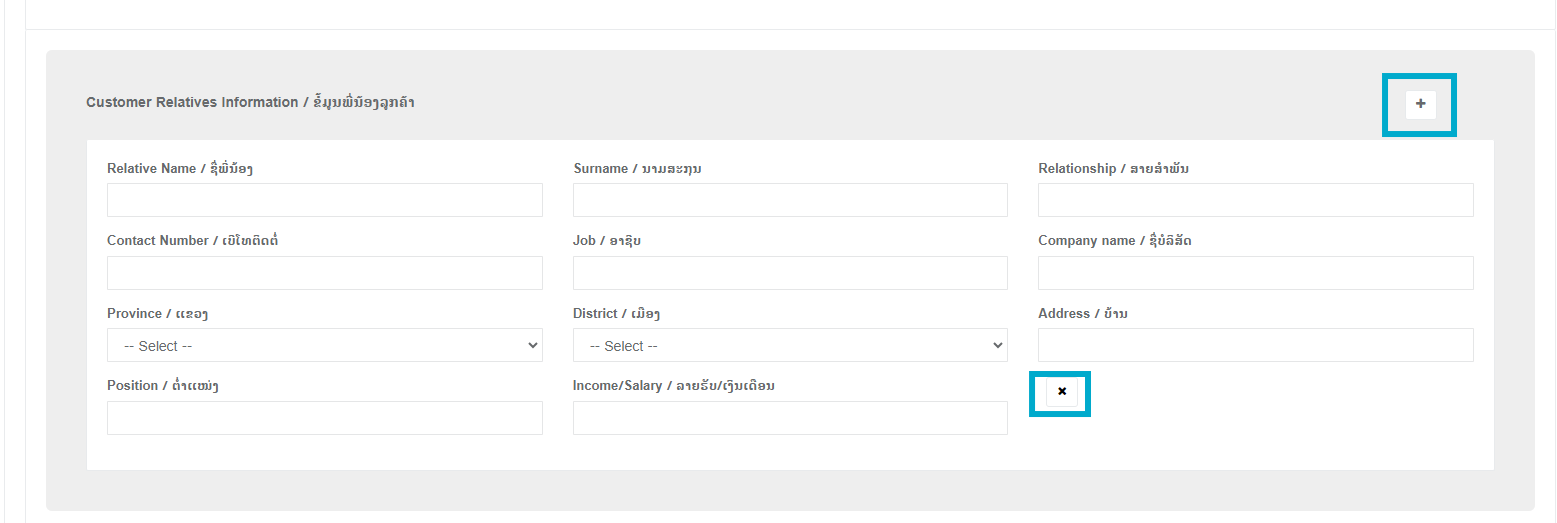
- Customer Relatives Information
- Vehicles Information
- Real Estate Information
- User able to add and remove sections by using + and x Buttons.
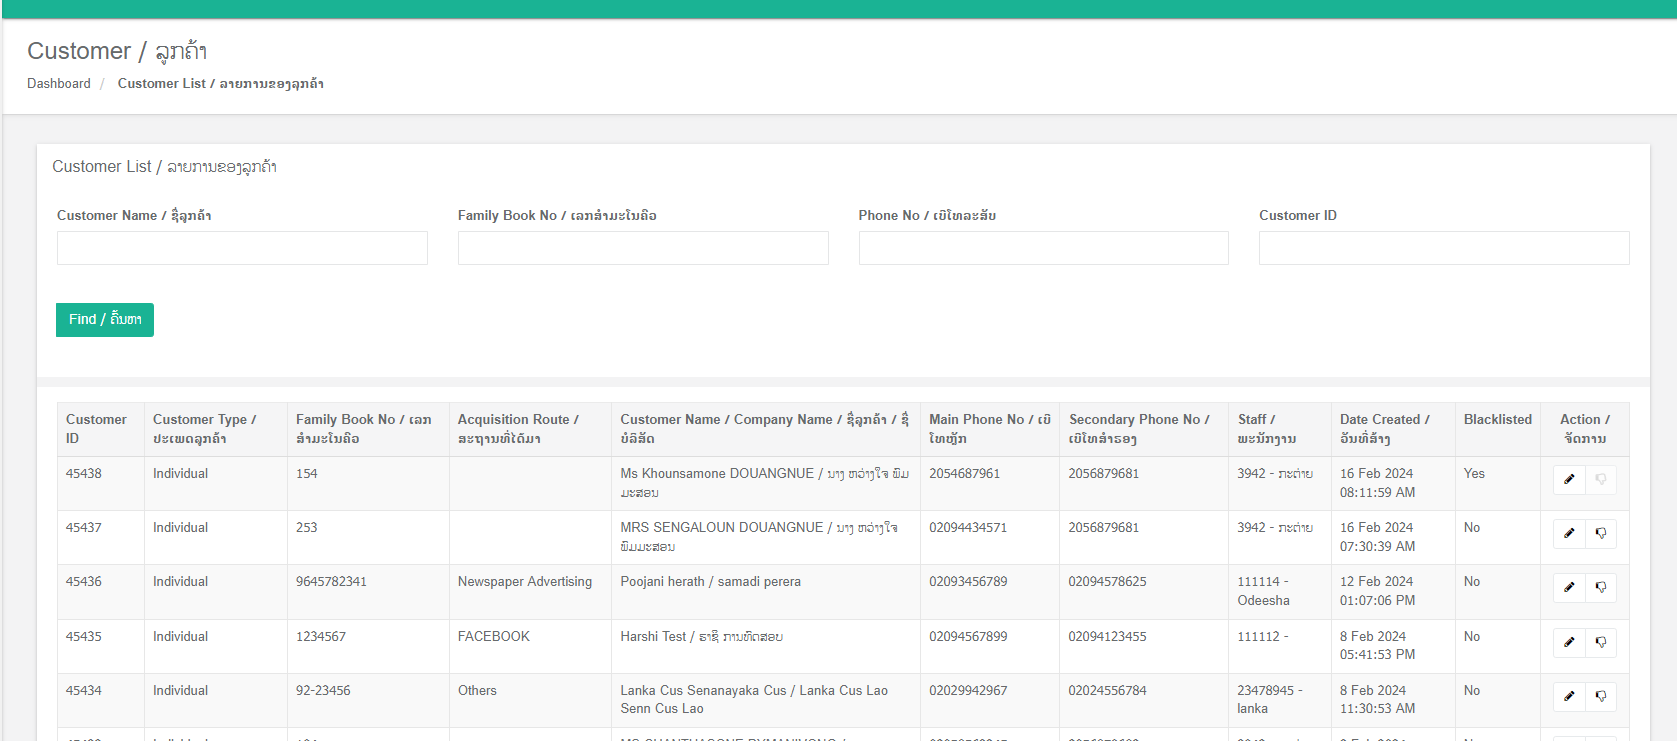
List All Customer
- User able to filter customer using,
- Customer Name
- ID Card/ Corporate No
- Phone No
- Customer ID
- In Actions user able to Edit and Add to Blacklist the customer.
Merge Customer
- In the Merge Customer section is use for merge same customers under one mobile number.
- The Added Requests able to Approve , Reject and Show the details by using Action column in the Merge Customer list.
Currency Rate

- The currency rate page in a loan management system is like a foreign exchange translator for your loans. It helps you deal with loans in different currencies (like USD, LAK, THB)
- Example: Imagine you have a loan in Thai Baht (THB) but your system tracks things in US Dollars (USD). The currency rate tells the system how much 1 USD is worth in THB (e.g., 1 USD = 35 THB). This allows the system to:
- Calculate Loan Amounts: When a loan is issued in THB, you can enter the amount and use the exchange rate to convert it to USD for internal tracking.
- Record Payments: If someone repays part of a THB loan in USD, the exchange rate helps convert it to the correct THB amount for your records.
- Track Interest: Interest earned on the loan (in THB) can be converted to USD using the rate for accurate reporting.
- Two Ways to Set Rates:
- Manual: You can enter the exchange rate yourself on Currency Rate Page, useful for specific situations or currencies not offered by BCEL.
- BCEL Automatic: This will daily update automatically
Currency Rate page
- These rates are used when converting the collection in the collection receipt module and Loan disbursement process, also some journal entries.
Functionalities
- User can see all the Currency Exchange Rates on the Currency Rate List page.
- User can add all the Currency Exchange Rates on the Add Currency Rate page.
- User can edit all the Currency Exchange Rates on the Edit Currency Rate page.
- Note : Edit Action available only for Today rates.
BCEL Currency Rate Page
- BCEL is a bank in laos. Here the exchange rates are fill according to the BCEL.
- Exchange rates are fill automatically through the system for each day. after that, staff member can check these values and approve the rates.
-
-
- From USD to LAK
- From USD to THB
- From THB to LAK
- From THB to USD
- From LAK to THB
- From LAK to USD
-
-
NOTE: In our system, BCEL Rates are used for Journal entries.
Holidays
- User can Manage holidays data on this module. These holidays are used when calculating the penalty of a loan.
Functionalities
- User can see all the holidays on the Holiday List page.
- User can add/edit holiday details.
- Holiday Date
- Event
Asset Valuation

This asset valuation page is designed to estimate the value of assets associated with specific customers. To begin the valuation process, you'll need to select a customer from the customer list. In other words, customer selection is the starting point for all asset valuations. features available for searching for existing customers:
- Customer ID
- Family Book No
- Phone No
- Customer Name / Company Name
Additionally, the system allows users to create new customer profiles. This is helpful for onboarding new customers who haven't been previously registered in the system.
Collecting detailed information about the assets before proceeding. It highlights that two specific asset types are considered in this valuation process:
- vehicles
- land.
Vehicle: This refers to any motorized conveyance, such as a car, truck, motorcycle, that the borrower owns. The system likely requires details about the vehicle's make, model, year, condition, and any relevant features that might affect its value.
Land: This refers to a specific piece of real estate owned by the borrower. The system might require information about the property's location, size, type (residential, commercial, etc.), and any improvements or structures on the land that contribute to its value.
By collecting detailed information about these two asset types, the system can get a better understanding of the borrower's overall financial picture and their ability to repay the loan. The value of these assets can be used as collateral for the loan, meaning they could be used to recoup some of the loan amount if the borrower defaults.
Asset Valuation Process
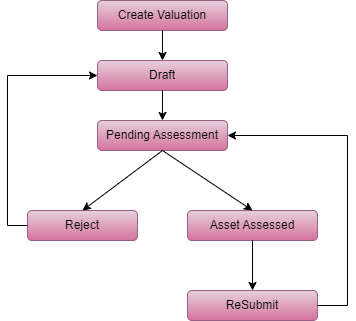
Add Asset Valuation form
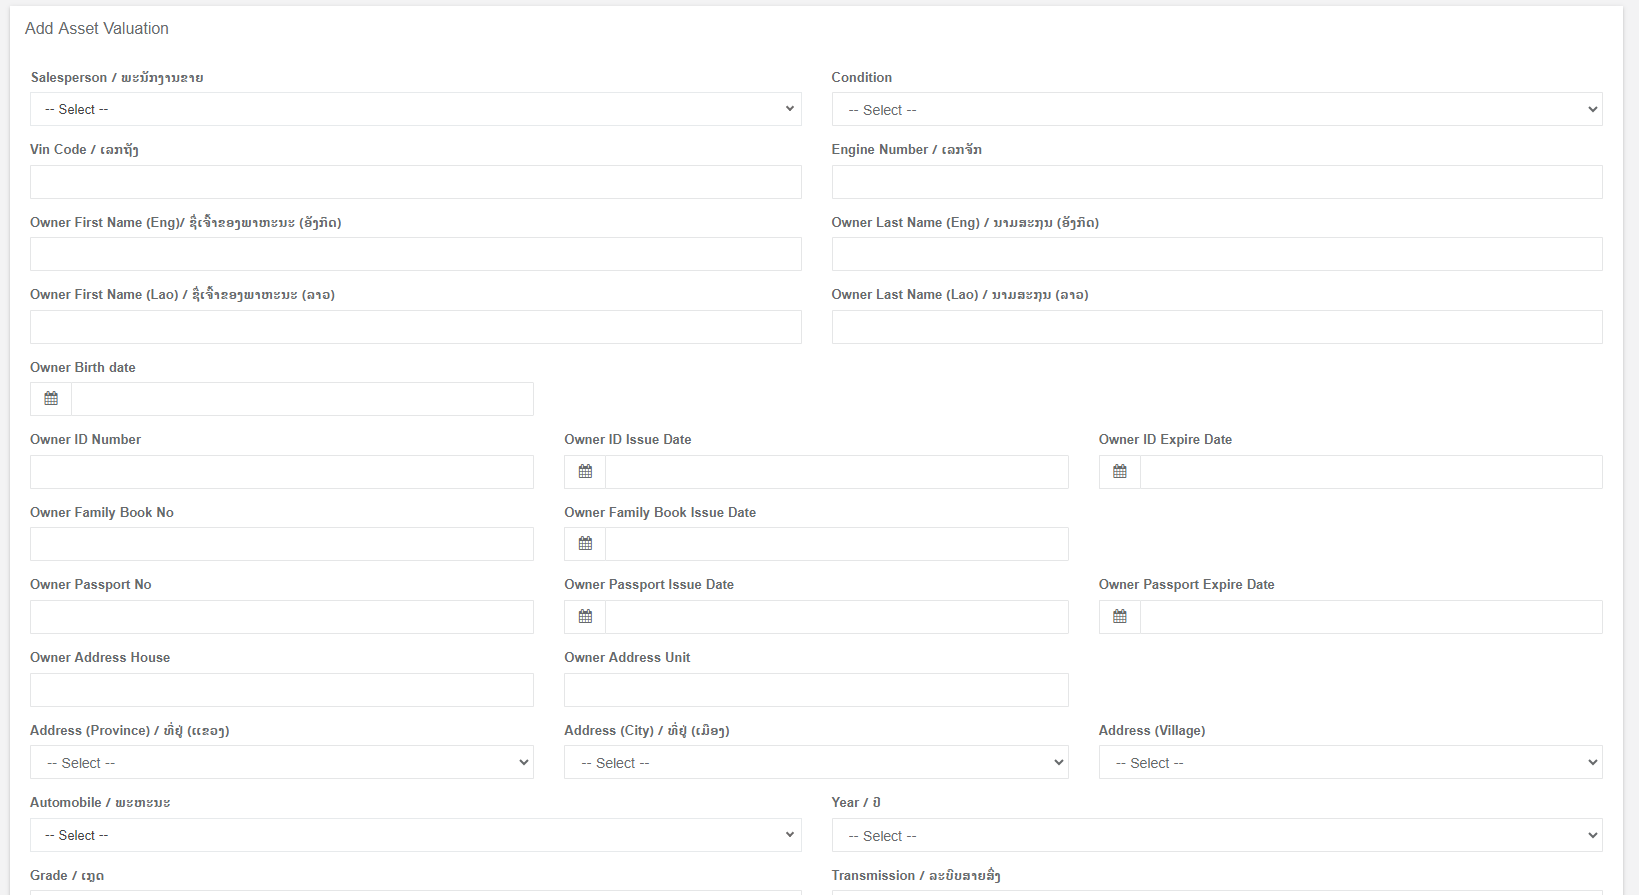
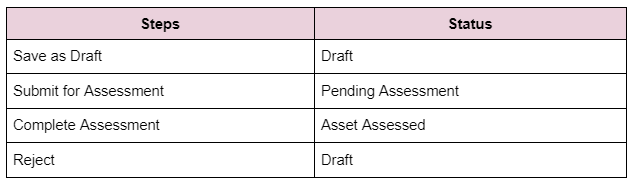
After fill the details, there are few steps to approve it.
- Before complete the assessment, there are few new section to fill.
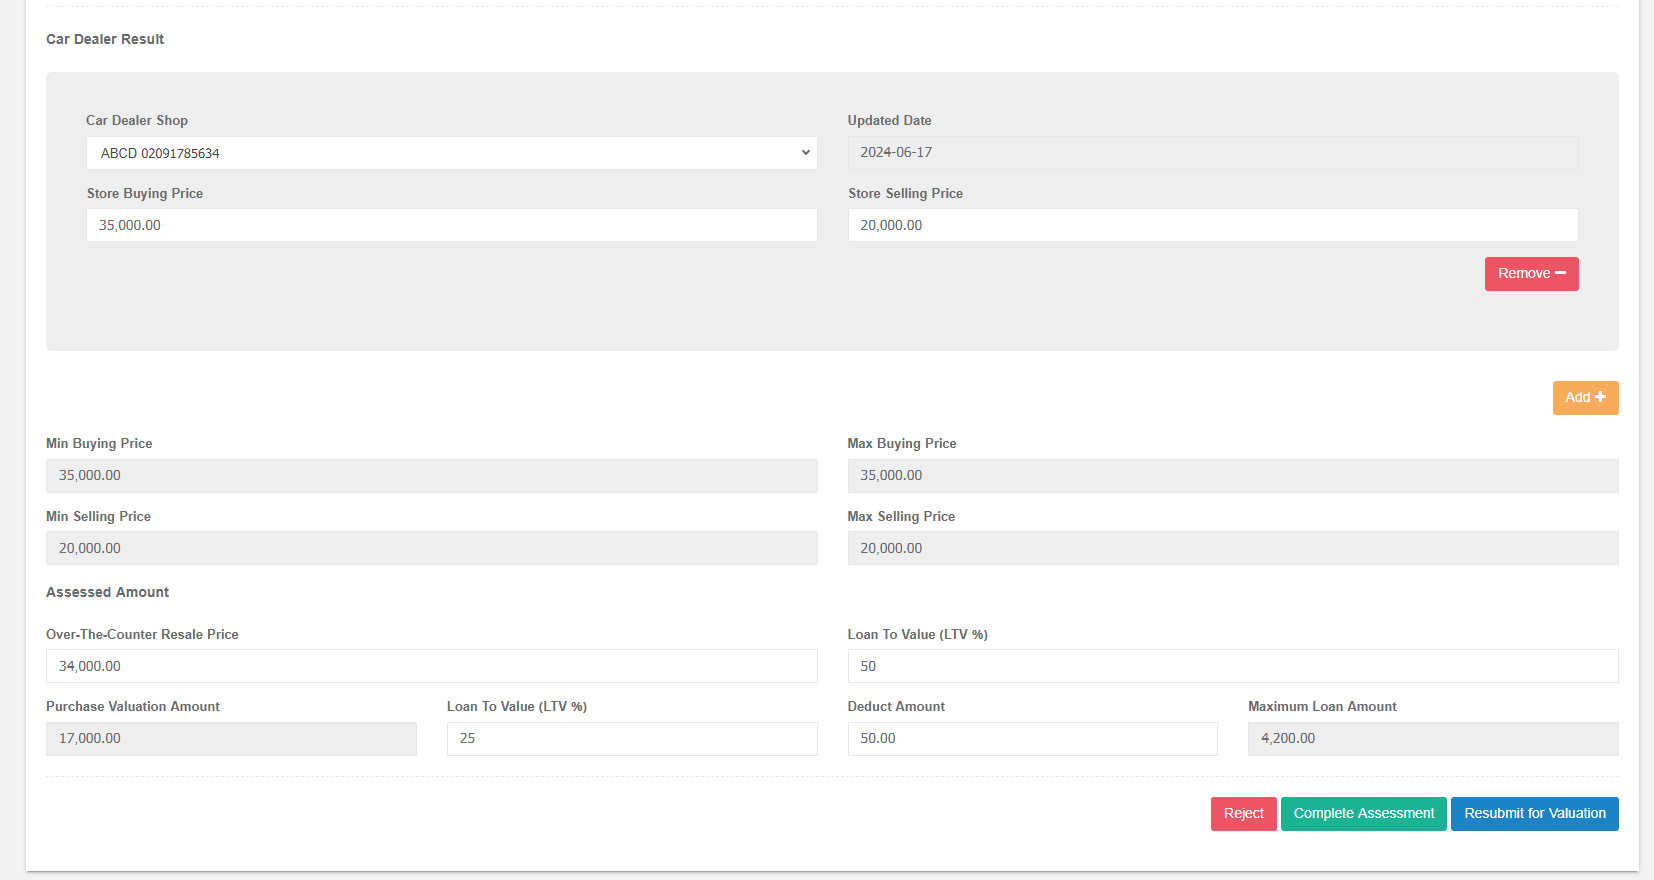
Car Dealer Result Section
This section focuses on collecting data from various car dealers about a specific vehicle you're considering for valuation. It allows you to enter information from multiple car dealers for comparison.
- Car Dealer Shop: This field allows you to enter the name of the car dealership you received the quote from.
- Updated Date: This field lets you specify the date the car dealer's quote was provided. This helps ensure you're considering up-to-date pricing information.
- Store Buying Price: This field is where you enter the buying price offered by the car dealer for the vehicle.
- Store Selling Price: This field is where you enter the selling price listed by the car dealer for the vehicle.
The system automatically calculates the following fields once you've entered data for car dealers:
- Min Buying Price: This field displays the lowest buying price offered by any car dealer you entered information for.
- Max Buying Price: This field displays the highest buying price offered by any car dealer you entered information for.
- Min Selling Price: This field displays the lowest selling price listed by any car dealer you entered information for.
- Max Selling Price: This field displays the highest selling price listed by any car dealer you entered information for.
By having these minimum and maximum values automatically populated, you can easily see the range of buying and selling prices offered by different dealers. This helps you get a better sense of the overall market value of the vehicle.
Assessed Amount

Purchase Valuation Amount Calculation
Over-The-Counter Resale Price: This refers to the estimated resale price of the asset (likely the vehicle).
Loan To Value (LTV) [1]: This represents the ratio of the loan amount a borrower can qualify for compared to the appraised value of the asset. It's expressed as a percentage (e.g., 80% LTV).
The system uses the following formula to calculate the "Purchase Valuation Amount":
Purchase Valuation Amount = Over-The-Counter Resale Price * (Loan To Value (LTV)[1])
Maximum Loan Amount Calculation
Loan To Value (LTV) Ratio [1]: As mentioned previously, this represents the percentage of the asset's value that a lender is willing to finance through a loan.
Deduct Amount: This introduces a new variable that represents a specific amount to be subtracted from the initial loan amount calculation.
Maximum Loan Amount = (Purchase Valuation Amount * (Loan To Value (LTV))%)[2] - Deduct Amount
Maximum Loan Amount as a Limit: The "Maximum Loan Amount" calculated by the system serves as a ceiling for the loan amount a borrower can be approved for. This ensures the loan stays within a reasonable range based on the asset's value and the lender's LTV policy.
Loan Approval Criteria: When considering a loan application, the system will verify that the borrower's requested loan amount is less than or equal to the calculated "Maximum Loan Amount." This helps ensure the loan stays within the limits established by the asset's value and the lender's risk tolerance.
Broker

In your loan management system, the broker acts as a bridge between borrowers and lenders. They don't directly issue loans themselves, but rather work to match borrowers with the most suitable loan options based on their financial profile and needs. Brokers typically have relationships with multiple lenders, allowing them to shop around for the best rates and terms on behalf of the borrower.
There are three key sections to streamline broker management and facilitate their involvement in the loan origination process:
-
Add New: This section allows authorized users to create new broker profiles within the LMS. Here, you can likely enter details like the broker's name, contact information, licensing details (if applicable), and any relevant notes.
-
List All: This section provides a comprehensive list of all brokers currently registered in the LMS. This allows for easy searching, filtering, and selection of brokers based on specific criteria.
- Call Information: This section might be dedicated to managing communication and interaction with brokers. It could potentially offer features for logging phone calls, recording notes from conversations, or storing communication history related to each broker.
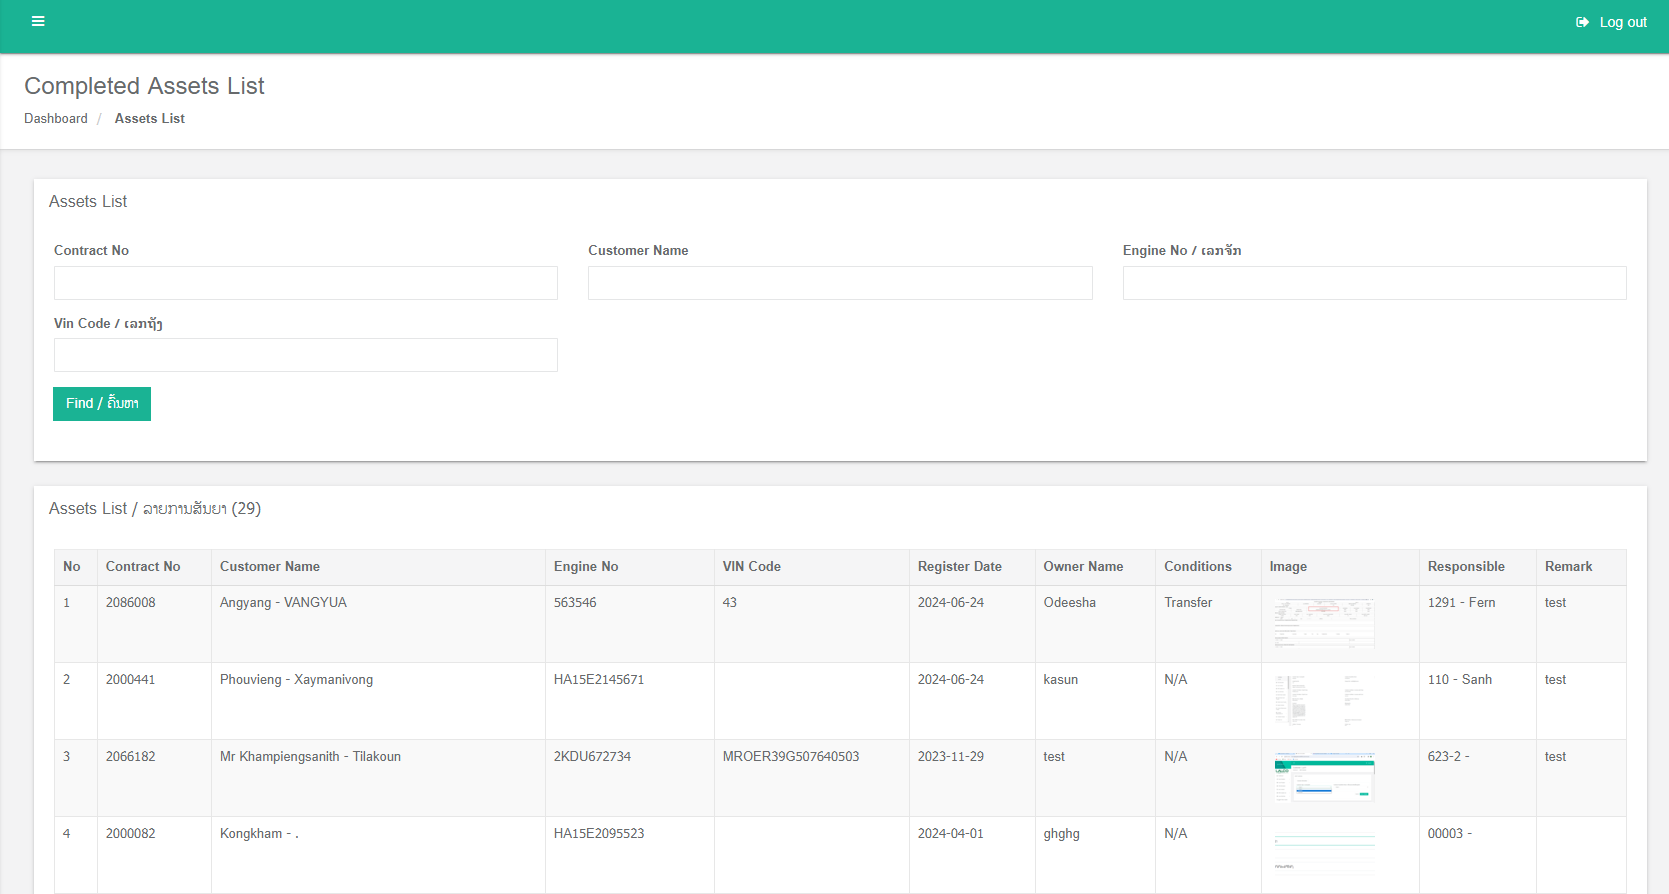
Asset Transfer

This module allows users to modify the details of assets in a contract after the contract has been created. This is likely targeted at situations where there might be errors or missing information in the initial contract.
The module seems to be divided into two main parts based on asset types:
-
Vehicles Asset Transfer: This section likely handles changes to vehicle-related assets specified in the contract.
- Real Estate Asset Transfer: This section focuses on editing details pertaining to real estate assets mentioned in the contract.
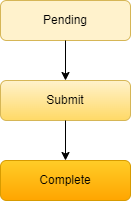
The transfer process is completed in two steps:
- Pending.
- Submit.
Pending Page
To provide a list of assets eligible for transfer and allow users to initiate the transfer process for specific assets.
- Displays a list of asset records that are eligible for transfer.
- Users can select individual asset records to initiate the transfer process.
- Upon selection, the asset record moves to the "Submit" page.
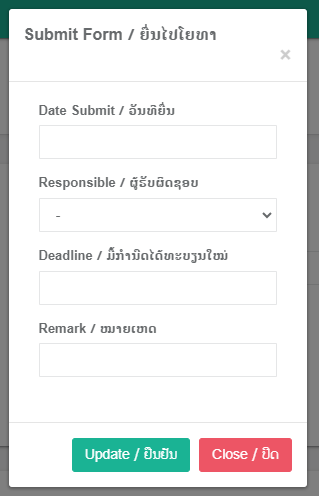
Submit Page
The Submit page is the second step in the asset transfer process. It presents a detailed view of the asset selected for transfer from the Pending page. Here, users can verify asset information before proceeding to the final step.
- Displays detailed information about the selected asset.
- Users can review and confirm asset details before proceeding.
- A "Complete" button is available to move the asset record to the next step.
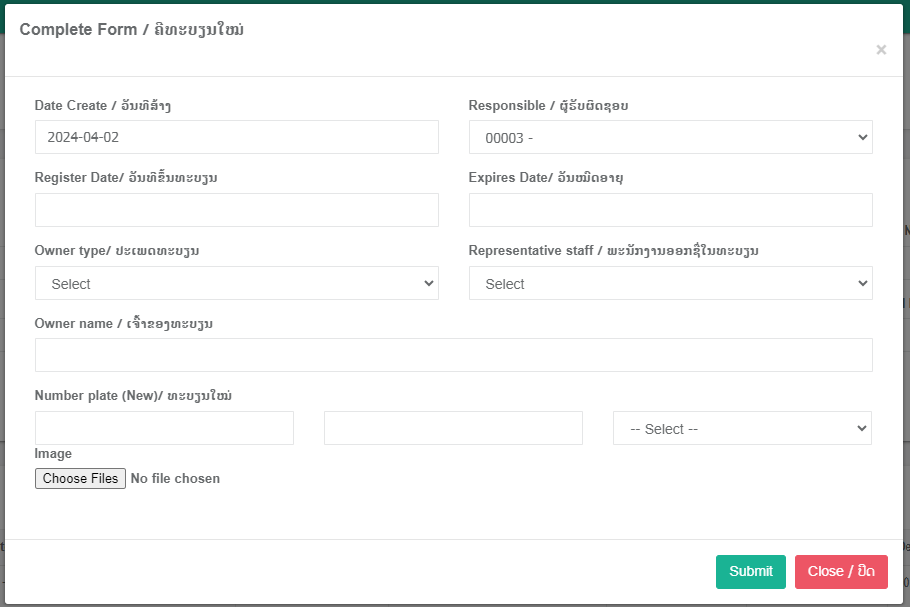
Complete Page
The Complete Page is the final step in the asset transfer process. It serves as the point where users input the necessary details to finalize the transfer.
- Presents a completion form for the asset transfer.
- Users input required information to finalize the transfer.
- Upon successful completion, the asset record is marked as "Complete" and removed from the pending list.
Guarantor

This feature implies that when a user is adding a new prospect to the system, the system should automatically attempt to create a guarantor profile based on the provided mobile number.
The user enters the guarantor's mobile number in the "Add Prospect" section. the system performs a real-time check for an existing guarantor record associated with the entered mobile number.
The system checks if the entered mobile number matches an existing guarantor record.
- Existing Guarantor: If a match is found, the system displays the existing guarantor's details for user confirmation.
- New Guarantor: If no match is found, the system presents a form to collect new guarantor information.
Guarantor Information: The required information for new guarantor creation typically includes:
-
- Name
- Address
- Identification details (e.g., ID number, passport number)
- Contact information (phone, email)
- Relationship to the prospect
The Guarantor List page provides a comprehensive overview of all registered guarantors. The primary function of this page is to display essential information about each guarantor, allowing users to easily identify and access specific details when needed.
Sections:
- Agent of Guarantor Information: Details about the agent associated with the guarantor.
- Guarantor Relatives Information: Information about the guarantor's relatives.
- Vehicles Information: Details of vehicles owned by the guarantor.
- Real Estate Information: Information about real estate properties owned by the guarantor.
Filtering:
Users can efficiently search and locate specific guarantors using the following filters:
- Guarantor Name: Filter guarantors by their full name or parts of their name.
- Contract No: Filter guarantors based on associated contract numbers.
- Phone No: Filter guarantors by their phone number.
- Guarantor ID: Filter guarantors by their unique identification number.
Update Contact Number Process
- user can initiate a contact number update by searching for a guarantor based on their existing contact number.
- Once the guarantor is found, the user can input the new contact number and submit an "Update Request".
- Upon submission, the request is added to the "Update Contact Number Request List".
- In Update Contact Number Request List user able to Approve or Reject the request.
- The Approved or Rejected records added to the Merge Guarantor list.
Loan Prospect

A loan prospect is essentially a potential borrower who has been identified as a suitable candidate for a loan. The loan prospect process involves identifying, assessing, and nurturing these potential customers to convert them into actual borrowers.
Loan Process

- The "Add New" feature under the "Loan Prospect" module allows users to create a new loan prospect record within the system.
- To facilitate the creation of a loan prospect, the system provides search functionalities based on the following customer identifiers.
-
-
- Customer ID: A unique numerical or alphanumeric code assigned to each customer.
- Family book No: The identification number of an individual or a corporate entity.
- Phone No: The customer's contact phone number.
- Customer Name: The name of the customer.
-
-
- The "Add Prospect Form" functionality appears to be a digital form within your system used to capture information about potential loan customers (prospects). The form is designed to be adaptable based on the type of loan or contract being considered.
- There are Six(6) Contract types.
-
- SME Car - Add Penalty Method field(Old Formula or New Formula)
- SME Bike
- Car Leasing - Add Shop Name field
- Bike Leasing - Add Shop Name field
- Real Estate
- Trade Finance
-
- The fields displayed on the form will change based on the selected contract type. This ensures that only relevant information is collected for each loan type.
- Specific Field Requirements: Certain contract types have additional field requirements:
- SME Car: Includes a "Penalty Method" field with options for "Old Formula" or "New Formula".
- Car Leasing and Bike Leasing: Requires a "Shop Name" field.
- The form is divided into eleven sections, likely covering details such as:
-
- Case
- Loan
- Document
- Collection Schedule
- CIB
- History
- Loan Form
- Location
- Black List
- Relationship History
- Document List
-
- Basic Customer Information - Common fields for all contract types (e.g., name, address, contact details, ID number)
-
Contract Type - Dropdown menu with the six contract types
-
Contract Specific Details - Fields displayed based on the selected contract type (e.g., car model, loan amount, shop name, property details)
1. Case Section
The Case Section appears to be a critical component of the "Add Prospect Form" where detailed information about the potential customer and their financial situation is collected. It also involves capturing information about the sales process and any guarantors involved.
1.1 Sales and Customer Information
- Sales Team: Fields to capture details about the sales personnel involved (Contract Salesperson, Sales Assistant, Call Center Salesperson, Double Count Person, Customer Introduction).
- Call Approach: Depending on whether the customer was approached through a call or a broker, specific fields are displayed.
- Call Approach: If selected, an "Approach List" field is added for detailing the approach method.
- Broker Approach: If selected, "From which Broker" and "Approach List" fields are added.
- Financial Assessment: Fields to capture customer's monthly income, expenditure, and automatically calculate the monthly profit.
1.2 Guarantor Information
- Flexibility: Allows for adding multiple guarantors.
- Two Methods: Offers two ways to add guarantor information:
- Add New Guarantor: Manually input guarantor details, starting with the phone number.
- Add Existing Guarantor: Select a guarantor from an existing list based on their phone number.
1.3 Asset Valuation
- Shows the latest asset valuation record for the current month.
- Allows for selecting one or more valuation records for the prospect process.
2. Loan Details Section
The Loan Details section appears to be a crucial part of the prospect form, providing comprehensive information about the proposed loan. It includes details about the Loan Amount, fees, and other financial terms.
- Payment Schedule Type: Defines the repayment structure (e.g., upfront, installment).
- Initial Date: Automatically set as the prospect creation date.
- Trading Currency: Allows selecting the loan currency (USD, THB, LAK).
- First Payment Date: Typically set for the 5th of the month.
- Number of Payments: Defines the total number of repayments.
- Monthly Interest: Specifies the interest rate.
- Last Payment Date: Calculated based on the First Payment Date and Number of Payments.
Loan Amount and Fees:
- Loan Amount: The total amount to be borrowed.
- Approval Fee Amount: A fixed or percentage-based fee for loan approval.
- Approval Fee: Calculated based on Loan Amount and a predefined percentage.
- Other Cost: Additional charges (e.g., processing fees).
- Advance: Any advance payments made by the customer.
- Net Amount Customer Receives: Calculated as Loan Amount minus Approval Fee Amount.
-
Early Repayment:
- Allows selecting whether early repayment is allowed.
- If selected, a "Min Repayment Period" field is displayed.
- If this is yes, the only "Advance closure report" display
-
Broker Information:
- Details about the broker involved in the loan process.
3. Document Section
The Document Section appears to be a critical part of the loan application process, where required documentation is listed and likely tracked for completion.
Mandatory Documents:
- Customer Family Book
- Guarantor Family Book
- Village Head File
- Questionnaire Form
- Real Estate Documents of Customer
Optional Documents:
- Customer ID Card
- Guarantor ID Card
- Accounts Receivable Documents For Customer
- Accounts Receivable Documents For Guarantor
- Real Estate Documents Of Guarantor
- Other (Picture of appearance of home or shop)
- Other (Bank passbook copy etc.)
- CIB Document
4. Collection Schedule Section
The Collection Schedule section appears to outline the calculation methodology for loan repayments, including principal, interest, and balance updates.
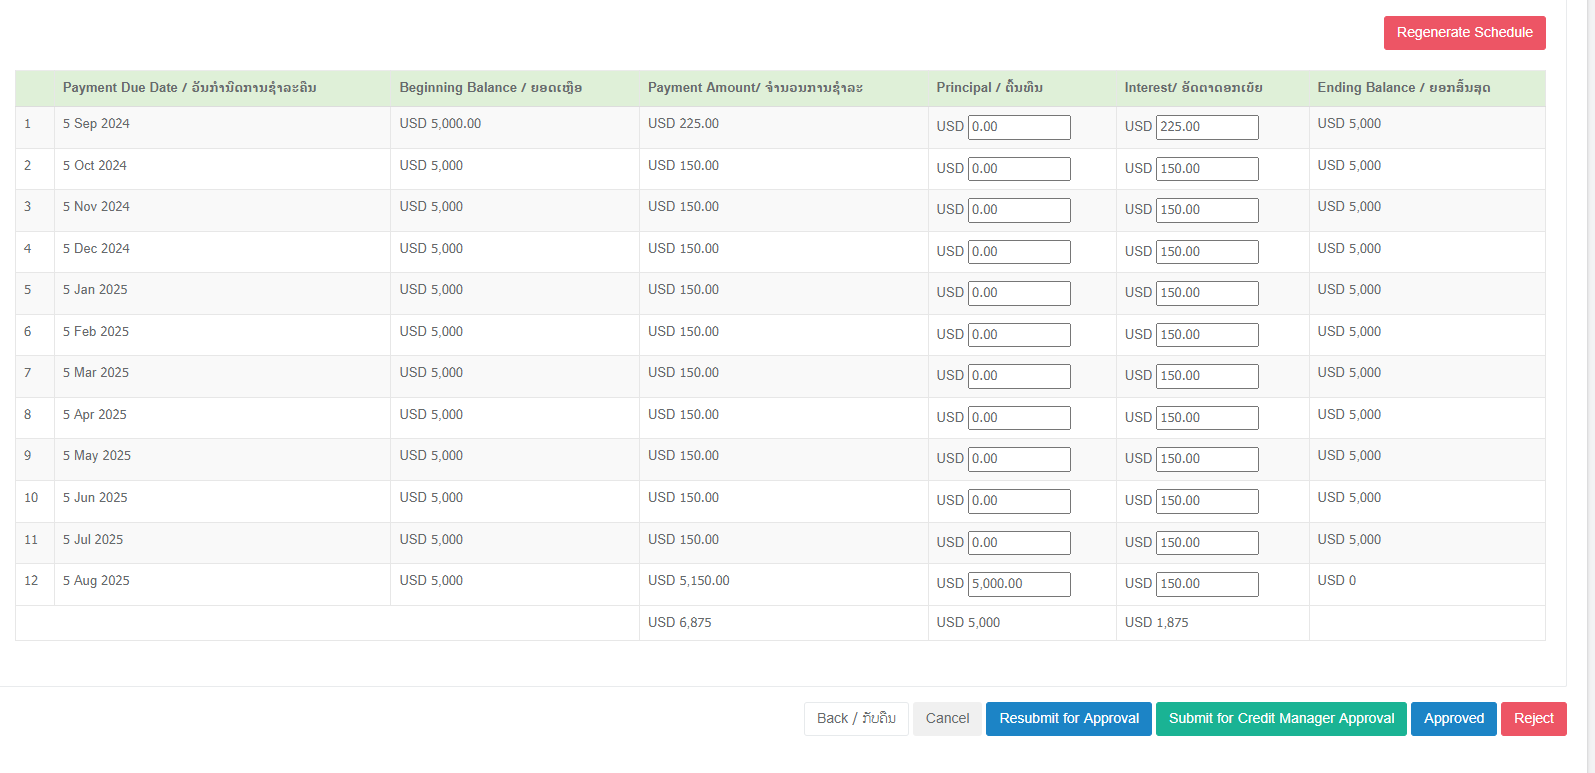
- Payment Amount: The total amount to be paid on each installment, comprising both principal and interest.
- First Interest: Calculates the interest accrued from the Initial Date (loan disbursement date) to the First Payment Date. It's based on a daily interest rate applied to the loan amount.
-
- First Interest - ((Loan Amount * interest)/30) * (First Payment Date - Initial Date)
-
- Other Interest: Calculates the interest for subsequent payments, typically based on the remaining principal balance multiplied by the monthly interest rate.
-
- Other interest - Loan Amount * Interest
-
- Ending Balance: The remaining principal amount after each payment, calculated by subtracting the principal portion of the payment from the beginning balance.
-
- Ending Balance = Beginning Amount - principal Amount
-
- The Collection Schedule provides a basic framework for calculating loan repayments. However, it could be enhanced with more complex interest calculations, detailed amortization schedules, and flexibility to handle various loan scenarios.
5. CIB Section
The CIB (Credit Information Bureau) section is designed to capture and record a customer's credit history information. It appears to be a crucial component in assessing the creditworthiness of a loan applicant.
- Customer CIB Details: This section is dedicated to inputting specific details about the customer's credit history.
- CIB of Customers: A dropdown field likely populated with existing customer CIB records.
- CIB Result: A binary field indicating whether a CIB report exists for the customer.
- Financial Institute: The name of the financial institution that provided the credit information.
- Contract Date: The date of the credit contract.
- Due Date: The original due date for the credit obligation.
- Amount: The original loan amount or credit limit.
- Currency: The currency of the loan or credit.
- Remaining Amount: The outstanding balance on the credit account.
- Delay Days: The number of days the customer is overdue on the payment.
- Rank: A classification of the credit risk, possibly based on the delay days or other factors.
- Collateral Type: The type of collateral associated with the credit, if any.
Note: Corporate & Investment Banking (CIB or BBVA CIB) includes the Group's wholesale businesses, i.e. investment banking, global markets, global loans and transactional services for international corporate customers and institutional investors across its global footprint.
6. History Section
The History section appears to tracking customer interactions, activities, and status changes over time. By capturing detailed information about each interaction, it provides valuable insights for decision-making and analysis.
- History Popup: A modal window that displays a form for recording new history entries and a table for viewing historical records.
-
- Required Fields:
- Person in Charge
- Status
- Rank
- Date
- Amount
- Person Meet
- Dropdown Fields:
- Person in Charge
- Status
- Rank
- History Type
- Date Field: A calendar dropdown for selecting the interaction date.
- Amount Field: A numerical field for recording any associated monetary value.
- Person Meet Field: A text field for recording the name of the person met during the interaction.
- History Type Field: A dropdown to categorize the type of interaction (visit, call, legal, etc.).
- Current Location Field: A field that automatically populates with the customer's location (if available).
- Message Field: A text field for adding additional notes or comments about the interaction.
- History Log Table: Displays a chronological list of previous history entries for the customer.
- Required Fields:
-
7. Loan Form
The loan form is a digital document used within a customer department's customer unit. It appears to be a part of the loan approval process.
Basic Information:
- Department: Customer department
- Unit: Customer unit
Loan Details:
- Bargaining result of department heads: This field likely captures the outcome of negotiations between department heads regarding the loan.
- Things to discuss: A dropdown menu allowing for selection of topics related to the loan.
- First Approval Summary: A dropdown menu to indicate the approval status (Pass, Pass with conditions, or Reject).
- Credit Approval Summary: A dropdown menu to indicate the credit approval status (Pass, Pass with conditions, or Reject).
Form Actions:
- Print: Generates a "Proposal form for credits department report".
- Approval of Leasing Print: Generates "Documents for Approval of Leasing Contract report".
- Approval of Leasing Print view: Displays "Approval Documents".
8. Location Section
Location Section is aim to capture precise geographical information about the customer and guarantor. This section is designed to improve the accuracy of risk assessment, fraud prevention, and overall loan processing efficiency.
Components
- Customer Home Location: This field will capture the geographical coordinates of the customer's primary residence using a map interface. The user can either manually input the address or pinpoint the location directly on the map.
- Customer Work Location: Similar to the home location, this field captures the geographical coordinates of the customer's workplace.
- Guarantor Home Location: This field captures the geographical coordinates of the guarantor's primary residence using a map interface.
- Guarantor Work Location: Similar to the other location fields, this captures the guarantor's workplace location
9. Blacklist Section
The Blacklist Section is a crucial component of the loan form that acts as a real-time check for potential risks. This section is designed to identify if the applicant or guarantor has a history of defaulting on loans or exhibiting other credit-related issues.
10. Relationship History Section
The Relationship History Section provides a comprehensive overview of existing relationships between the loan applicant (customer or guarantor) and the lending institution.
11. Document List Section
The Document List section is a repository for essential documents related to the loan process. It contains a total of 19 different document types, each serving a specific purpose in the loan cycle.
-
Core Loan Documentation
- Loan Contract: The primary agreement between the lender and borrower outlining terms and conditions.
- Table Payment Schedule: Detailed payment plan for the loan.
- MOU of LALCO contract: Memorandum of Understanding related to a LALCO contract (specific details about LALCO contract required for better understanding).
- Payment Guaranty: Guarantee of loan repayment by a third party.
- Advance closure: Document related to early loan repayment (potential fees, terms).
-
Vehicle Related Documents
- Car Re-registration to customer: Documentation for transferring car ownership to the customer.
- Car certificate of customer use: Proof of the customer's right to use the car.
- Save storing Car-Bike Key: Procedure or agreement for storing vehicle keys (likely related to loan security).
- Manual Checklist: Inspection report of the vehicle (condition, mileage, etc.).
- No.1 Auto buy the car: Documentation related to the purchase of the car by a third party (potential intermediary).
- No.1 Auto sell the car: Documentation related to the sale of the car by a third party (potential intermediary).
- GPS Installation: Record of GPS device installation (for tracking purposes).
- Close certificate: Document confirming the end of the loan term and vehicle ownership transfer.
- Sales Certificate: Proof of vehicle ownership.
-
Financial Documentation
- Payment voucher (Loan): Proof of loan payment.
- Payment (Loan): Record of loan payment.
- Receipt (Document fee): Proof of payment for loan-related documentation fees.
- Payment voucher (Broker commission): Proof of payment to a loan broker.
- Payment (Broker commission): Record of payment to a loan broker.
Buttons
Navigation Buttons
- Back: Returns the user to the previous page, specifically the "select customer" page.
- Cancel:
- If no data is entered, returns the user to the "select customer" page.
- If data is entered, changes the loan application status to "canceled".
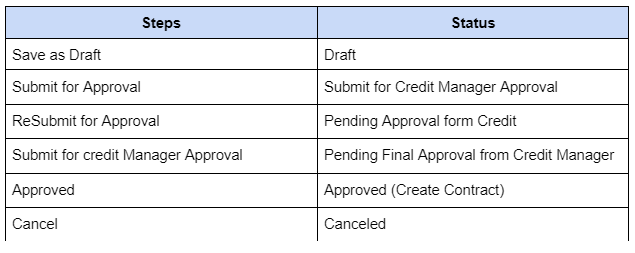
Approval Process Buttons
- Submit for Approval: Sends the loan application for approval to the Credit Manager.
- Resubmit for Approval: Resubmits a previously submitted loan application for reconsideration by the Credit Manager.
- Submit for Credit Manager Approval: (Seems redundant with "Submit for Approval")
- Approved: Finalizes the loan approval process and generates a contract.
Status Checking Button
- Submit for Credit Manager Approval: (This button appears to have dual functionality)
- Initiates the approval process.
- Opens a "Checklist Result" popup to display the evaluation status of different sections of the loan application.
- Updates the loan application status to "Pending Final Approval from Credit Manager".
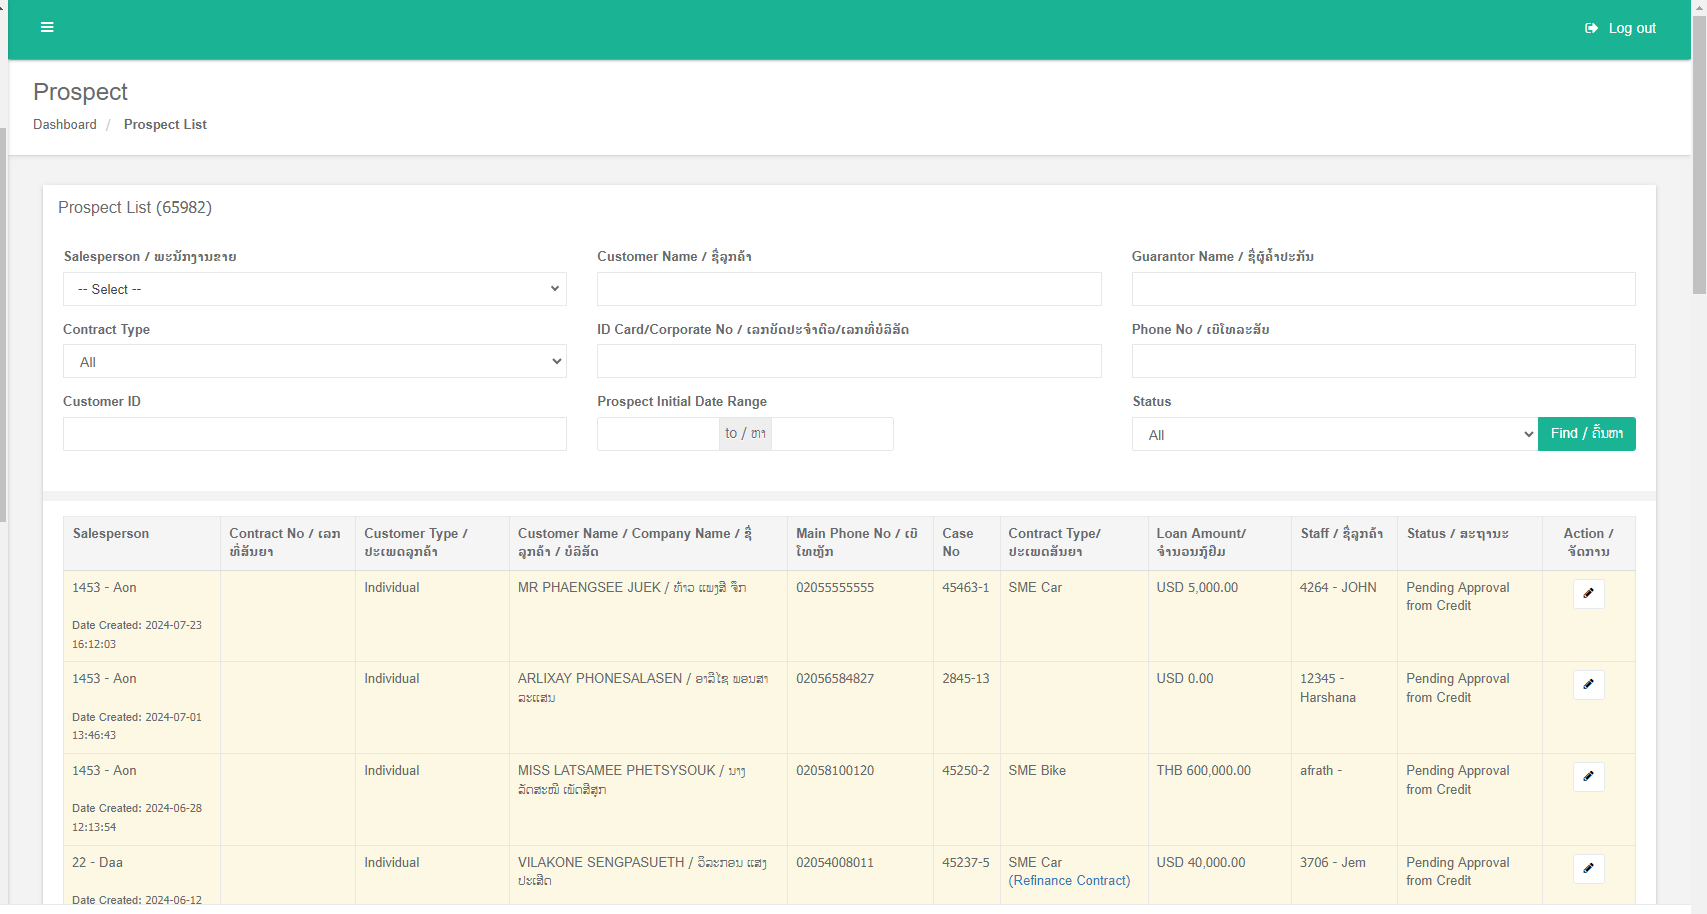
- There are nine(9) search filters.
- Salesperson - This is drop down field
- Customer Name - This is text field
- Guarantor Name - This is text field
- Contract Type - There are five contract types.
-
-
- SME Car
- SME Bike
- Car Leasing
- Bike Leasing
- Real Estate
- Trade Finance
-
- ID Card/Corporate No - This is text field
- Phone No - This is text field
- Customer ID - This is text field
- Prospect Initial Date range - Using this, can search date range
- Status - there are six(6) status
-
-
- All
- Draft
- Pending Approval form Credit
- Pending Final Approval from Credit Manager
- Approved
- Canceled
-
- There are 11 column in the Project List table
-
-
- Salespersons
- Contract No
- Customer Type
- Customer name/ Company Name
- Main Phone No
- Case No
- Contract Type
- Loan Amount
- Staff
- Status
- Action - This options will be change according to the status
-
-
-
-
-
- Draft - edit option
- Pending Approval form Credit - edit option
- Pending Final Approval from Credit Manager - edit option
- Approved - view option
- Canceled - edit option
-
-
-
Recordings
Day 1 Session: 10/06/2024
Modules
- Holiday
- Currency Rate
- BCEL Currency Rate
- Staff
Passcode: t1!G4cZw
Day 2 Session: 11/06/2024
Modules
- Province/City/Village
- Organization
- Oracle Transaction List
Link:https://us02web.zoom.us/rec/share/1M9_-kbO4fSAJTiLN6VKlJ_VFN3ZZssKygLBcw3gmheRpno3YpkhCXui6gCV7S2I.fJnj3ogWpNJgUqn9
Passcode:Ww2^G&CP
Day 3 Session: 13/06/2024
Modules
- Car
- Car Dealer Shop
- Broker
- Void Request
Passcode:qb60E*!z
Day 4 Session: 14/06/2024
Modules
- Customer
- Merge Customer
Passcode:TZZfR@w1
Day 5 Session: 18/06/2024
Modules
- Assert Valuation
Passcode: vt*G1=t6
Day 6 Session: 19/06/2024
Modules
- Guarantor
- Guarantor List
- Update Contact No
- Update Contact No Request List
Passcode: 9e!?4g9^
Day 7 Session: 20/06/2024
Modules
- Loan Prospect
Passcode:J4*bNUuM
Day 8 Session: 24/06/2024
Modules
- Real Estate Assert Transfer
- Vehicle Assert Transfer
Passcode: Ndx5t=3G
Day 9 Session: 25/06/2024
Modules
- Loan Contract
Passcode: B+.H4PS^
Day 10 Session: 10/07/2024
Modules
- Project List
Passcode:GHiU?5v.
Day 11 Session: 11/07/2024
Modules
- Update Schedule
Passcode: p@7=UB9a
Day 12 Session: 12/07/2024
Modules
- No.1 Auto
- Update List
Passcode:e9!qMkD+
Day 13 Session: 15/07/2024
Modules
- Month Status Update
Passcode:$s%GwmS0
Day 14 Session: 16/07/2024
Modules
- Expense
Passcode:d5F2^yCu
Day 15 Session: 17/07/2024
Modules
- Collection
Passcode:2*vXU^24
Day 16 Session: 18/07/2024
Modules
- Collection Adjustment
Passcode:L?avEc3G
Loan Contract

The document creation process begins with the approval of a loan prospect and culminates in the activation of the loan contract upon disbursement approval. This process involves multiple stages of review, approval, and verification.
Contract Approval Process

Loan Prospect Approval:
- A loan prospect is evaluated and approved.
- Upon approval, a loan contract is automatically generated.
Contract Review and Approval:
- The generated contract is subjected to a review process.
- There are three potential outcomes:
-
Resend:
- The contract is returned to the loan prospect draft stage.
- This action typically occurs when significant modifications or corrections are required.
- The process starts again from the initial loan prospecting phase.
-
Request for Contract Check:
- The contract enters a pending approval status.
- This step indicates that the contract requires further evaluation or verification before final approval.
-
Reject:
- The contract is returned to a pending status.
- This decision implies that the contract does not meet the necessary criteria and needs to be revised.
- The approval process restarts from the beginning.
-
Contract Approval:
- Once the contract passes the review, it's approved and moves to the pending disbursement status.
Disburse Payment:
- The contract enters the disbursement approval status.
- This step involves the authorization of the loan amount for disbursement.
Approve Payment:
- The final approval is granted, activating the loan contract.
- The contract becomes legally binding, and the repayment schedule commences.
- Upon successful disbursement, the loan contract becomes active. The borrower is now obligated to make regular repayments according to the outlined collection schedule.
Loan Contract Page
- Contract: This section likely contains the primary terms and conditions of the loan agreement. It may include details such as loan amount, interest rate, collateral information, and other contractual obligations.
- Disbursement: This section probably handles the disbursement of the loan amount. It might include details about the disbursement date, amount, method, and any related approvals or documentation.
- Collection Schedule: This section outlines the repayment schedule for the loan. It could include installment amounts, due dates, payment methods, and any late payment penalties.
- Case: This section might reference a specific case or file associated with the loan, such as a customer complaint or legal issue.
- Loan: This section likely provides summary information about the loan, including the loan type, purpose, and borrower details.
- Documentation: This section probably stores and manages all relevant documents related to the loan, such as borrower identification, income verification, and property appraisal.
- View CIB: This likely refers to a Credit Information Bureau check, providing a credit history report on the borrower.
- Checklist: This section might contain a checklist of required documents or tasks related to the loan processing.
- View Prospect: This link redirects to the original loan prospect page, allowing for reference or updates.
- History: This section probably maintains a record of all activities and changes related to the loan contract.
- Visit Note: This section might allow for recording notes or observations from site visits or customer interactions.
- Loan Summary: This section provides a concise overview of the loan's key details, potentially acting as a summary page.
- Document List: This section likely displays a list of all uploaded documents related to the loan, serving as a quick reference.
- Close(Ringi & Follow): This section might involve closing the loan or initiating follow-up actions, potentially related to loan recovery or customer relationship management.
Refinancing Process
Refinancing is a process where an existing loan is replaced with a new loan, often to secure better terms such as a lower interest rate, extended repayment period, or to consolidate debt. In the context of your system, this involves closing the current loan contract and creating a new one.
-
Refinance Request:
- The customer initiates a refinance request.
- The customer initiates a refinance request.
-
Contract Evaluation:
- The system calculates the outstanding balance of the current loan.
- A new loan contract is generated with updated terms (interest rate, tenure, etc.) based on the customer eligibility and the system's lending policies.
-
Approval Process:
- The new loan contract goes through the standard approval process, similar to a new loan application. This includes credit checks, document verification, and management approval.
-
Disbursement:
- If approved, the new loan amount is disbursed.
- The disbursed amount is typically used to settle the outstanding balance of the old loan.
-
Closure of Old Contract:
- The system automatically closes the old loan contract upon successful disbursement of the new loan.
- Any remaining balance is adjusted, and the contract status is updated to "closed".
-
Activation of New Contract:
- The newly created loan contract becomes active, initiating the repayment schedule for the new loan terms.
Collection
- Our system all collection details are maintain with this module.
- Collection Add page displays only Active contracts.
- There are 5 collection method
1 . Cash
The cash collection method is a fundamental process for recording payments made in physical currency. It involves the receipt of cash, generation of a receipt, and updating the corresponding loan contract.
Process
- Customer Payment: A customer presents a cash payment for their loan installment.
- Cash Verification: The cashier or collection agent verifies the amount tendered by the customer.
- Receipt Generation: The system generates a cash receipt detailing the following:
-
- Unique receipt number
- Date of payment
- Amount received
- Customer name and account number
- Payment description (e.g., installment, arrears, etc.)
- Cash Handling: The collected cash is securely stored or deposited into the designated cash register or bank account.
- System Update: The system records the cash payment against the customer's loan contract, updating the balance accordingly.
2 . Bank Wire
The Bank Wire collection method is used to record payments made by customers through electronic bank transfers. This method typically offers two approaches for data input: linking existing bank statements or manually entering payment details.
Method 1: Linking Bank Statements
- Purpose: To automate the process of identifying and recording bank wire payments by directly importing data from bank statements.
- Process:
- The system allows users to upload or import bank statements in a specific format (e.g., CSV, PDF).
- The system analyzes the bank statement data to identify transactions related to loan repayments.
- Identified transactions are matched with corresponding loan accounts based on account numbers or other reference information.
- The system creates collection records for the matched transactions.
- Benefits: Increased efficiency, reduced manual data entry, and improved accuracy.
Method 2: Manual Entry
- Users manually input payment details into the collection form.
- Information typically includes:
- Payment date
- Amount received
- Bank transfer reference number
- Customer account number
- Any relevant remarks or notes
- The system creates a collection record based on the entered information.
3. Collateral Disposal
The Collateral Disposal collection method involves processing the proceeds from the sale of seized collateral to offset the outstanding loan balance. The outcome of the process depends on the relationship between the sale amount and the outstanding balance.
- The seized collateral is sold through appropriate channels.
- The system records the collateral sale as a collection under the "Collateral Disposal" method.
- The system calculates the remaining outstanding balance after deducting the sale proceeds from the original loan amount.
Contract Status Update:
- Scenario 1: Sale Proceeds Equal Outstanding Balance
- If the sale proceeds exactly match the outstanding balance, the loan is considered fully repaid.
- The system closes the loan contract and updates the status accordingly.
- Scenario 2: Sale Proceeds Less Than Outstanding Balance
- If the sale proceeds are less than the outstanding balance, the loan remains active.
- The system updates the loan balance to reflect the reduced amount.
- The customer is responsible for paying the remaining balance according to the original repayment schedule or revised terms, if applicable.
4. Litigation recovery
The Recovery collection method is designed to account for lump sum payments made by customers to settle outstanding debts. These debts typically arise from missed or delayed payments on the original loan contract.
- Over time, due to missed or delayed payments, a customer accumulates a balance of unpaid installments.
- The customer decides to make a one-time payment to clear the accumulated debt.
- The system calculates the total amount of arrears and deducts the recovery payment from it.
Contract Status Update:
- If the recovery payment fully covers the outstanding arrears, the loan account is updated to reflect the zero balance. Depending on the system's configuration, the contract might be closed or marked as recovered.
- If the recovery payment is partial, the loan account balance is reduced accordingly, and the customer is responsible for paying the remaining balance as per the original or revised repayment schedule.
5. Early/Late Closure
The Early/Late Closure collection method is used to finalize a loan contract before its scheduled term. This typically occurs when a borrower decides to pay off the entire loan balance in either ahead of schedule (early closure) or after the contract's end date (late closure).
Process
- Closure Request: The customer initiates a request to close the loan account.
- Balance Calculation: The system calculates the outstanding loan balance, including any accrued interest and penalties.
- Final Payment: The customer makes a final payment to cover the entire outstanding balance.
- Collection Entry: The system records the final payment under the "Early/Late Closure" collection method.
- Contract Closure: The loan contract is marked as "closed."
- Interest and Penalty Calculations:
- Early Closure: Some loan contracts may include prepayment penalties. If applicable, the system calculates and deducts the penalty from the final payment.
- Late Closure: Interest continues to accrue on the outstanding balance until the final payment is made. The system calculates and adds the accrued interest to the final payment.
- Account Closure: The loan contract is closed, and any remaining balance (surplus or deficit) is adjusted accordingly.
Loan Penalty
A loan penalty is a financial charge imposed on a customer for breaching the terms of a loan agreement. This typically occurs when a customer fails to adhere to the repayment schedule, such as missing a payment or making a late payment. Penalties can vary widely depending on the lender and the specific terms of the loan agreement.
Loan Accrual
Loan accrual in this context refers to the calculation of interest that accumulates between the last scheduled payment date and the actual date of early loan closure. Since the borrower is paying off the loan ahead of schedule, they avoid paying interest for the remaining term of the loan. However, they are still liable for the interest accrued during the period between the last payment and the early closure date.
The accrual is added automatically when the contract is refinanced.
Example:
-
- Loan payment due date: 5th July
- Early loan closure date: 10th July
- Accrual period: 5 days (6th to 10th July)
The lender calculates the interest for those five days and adds it to the final payment amount. This ensures that the lender receives interest for the actual usage of the funds.
Bank Statement
1. Introduction
This document outlines the process of uploading and processing bank statements within our system. The primary goal is to automate the linking of bank statements to existing collections and create new auto-collections as needed.
2. Adding Bank Statements
There are two methods to Add bank statements:
2.1 Manual Add
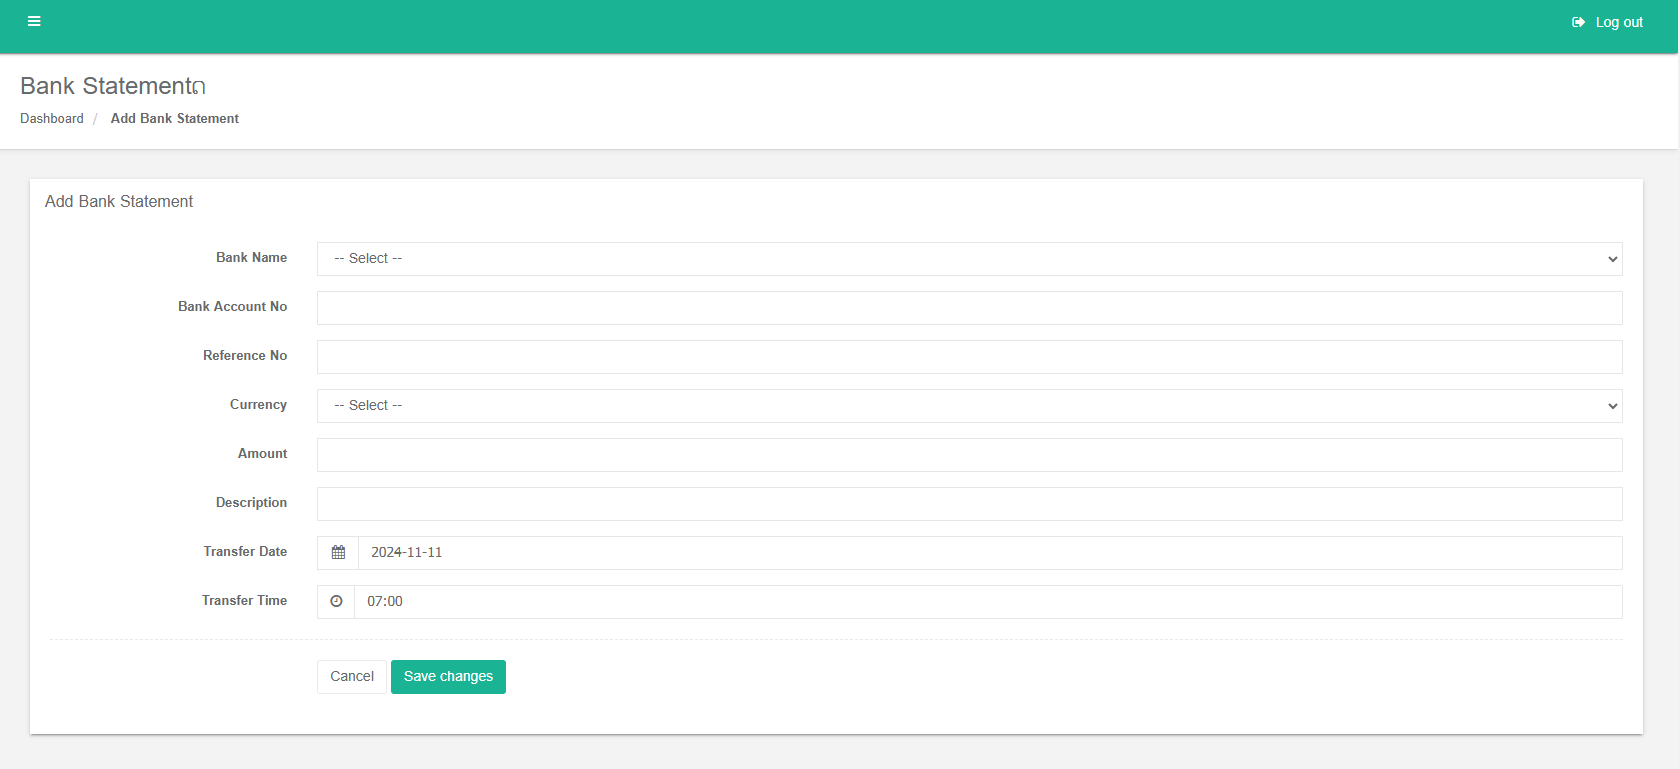
2.2 Upload Bank Statement
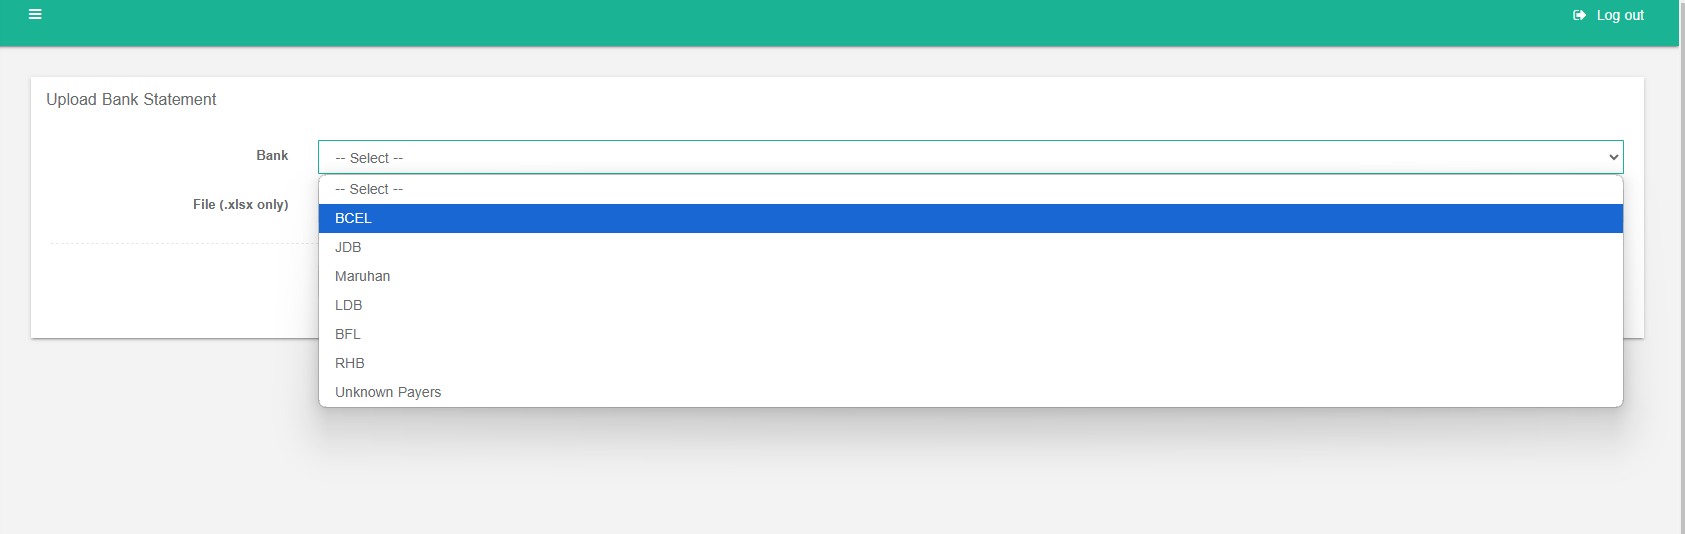
Once a bank statement is uploaded, the system automatically performs a series of checks to identify and link transactions to existing collection receipts. The following criteria are used to match transactions:
- Contract Number: The transaction must match an existing contract number.
- Date: The transaction date must match the date on the contract or collection receipt.
- Currency: The transaction currency must match the contract or collection receipt currency.
If a transaction meets all three criteria, it is successfully linked to the matching collection receipt.
- No Matching Collection:
- If no matching collection is found, an auto-collection will be created for the statement.
- The auto-collection will be automatically approved and it is successfully linked to the matching collection receipt.
3. Bank Statement Page(Credit/ Debit)
The Bank Statement page provides a comprehensive overview of all bank statements uploaded or manually entered into the system. It offers several search filters to help users locate specific statements efficiently:
Search Filters:
- Date Range (Transfer)
- Date Range (Statement)
- Date Range (Date Created)
- Account Number
- Bank(BCEL, JDB, Maruhan, LDB, BFL, RHB)
- Bank Statement ID
- Reference Number
- Description
- Contract Number.
- NCN
- Currency(USD, THB, LAK)
- Amount
- Status: Filters statements by their current status, which can be one of the following:
- Pending: The statement is awaiting processing.
- Pending Approval: The statement requires approval before processing.
- Allocated: The statement has been allocated to a specific contract or account.
- Removed: The statement has been removed from the system.
- Oracle Reversed: The statement has been reversed by the Oracle system.

Total Amounts
The page displays the total amount of all filtered statements in the following currencies:
-
-
- LAK
- USD
- THB
-

Bank Statement Table
The main table on the page lists all bank statements, providing detailed information about each transaction. Users can perform various actions on these statements:
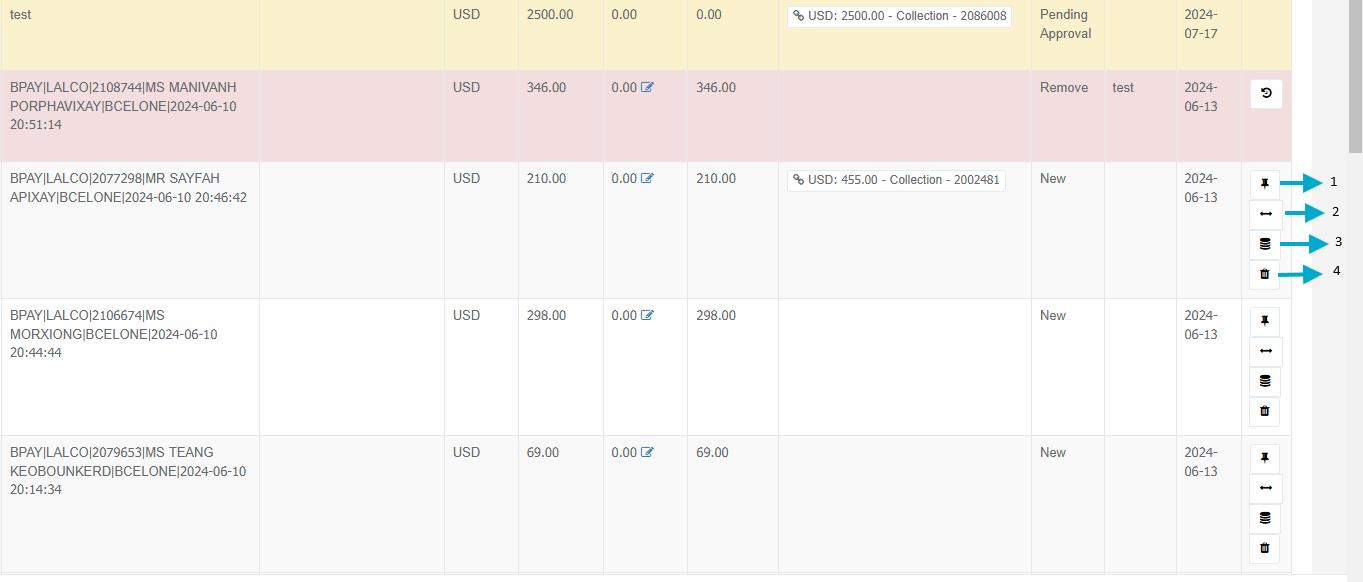
- Assign: Redirects to the Collection Receipt page to assign the statement to a specific collection receipt.
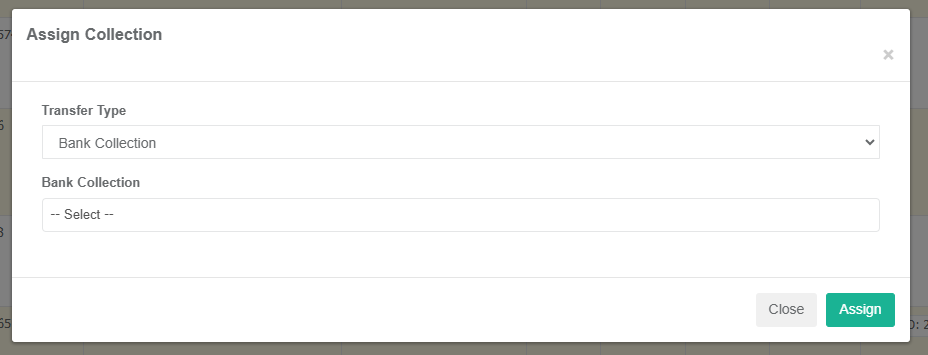
- Assign Collection: Opens a popup window to assign the statement to a bank collection.
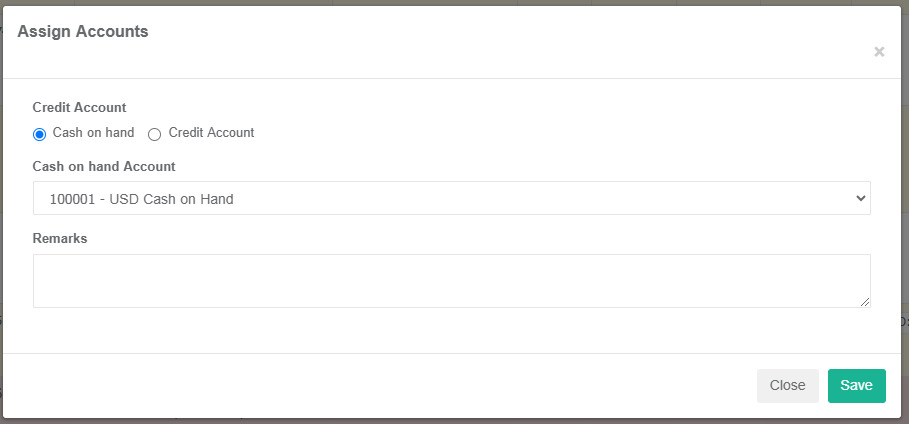
- Assign Account: Opens a popup window to assign the statement to a specific account.
- Delete: Removes the statement from the database.
Exporting Bank Statements
By utilizing these features and filters, users can effectively manage and analyze bank statements, ensuring accurate financial records and efficient processing.
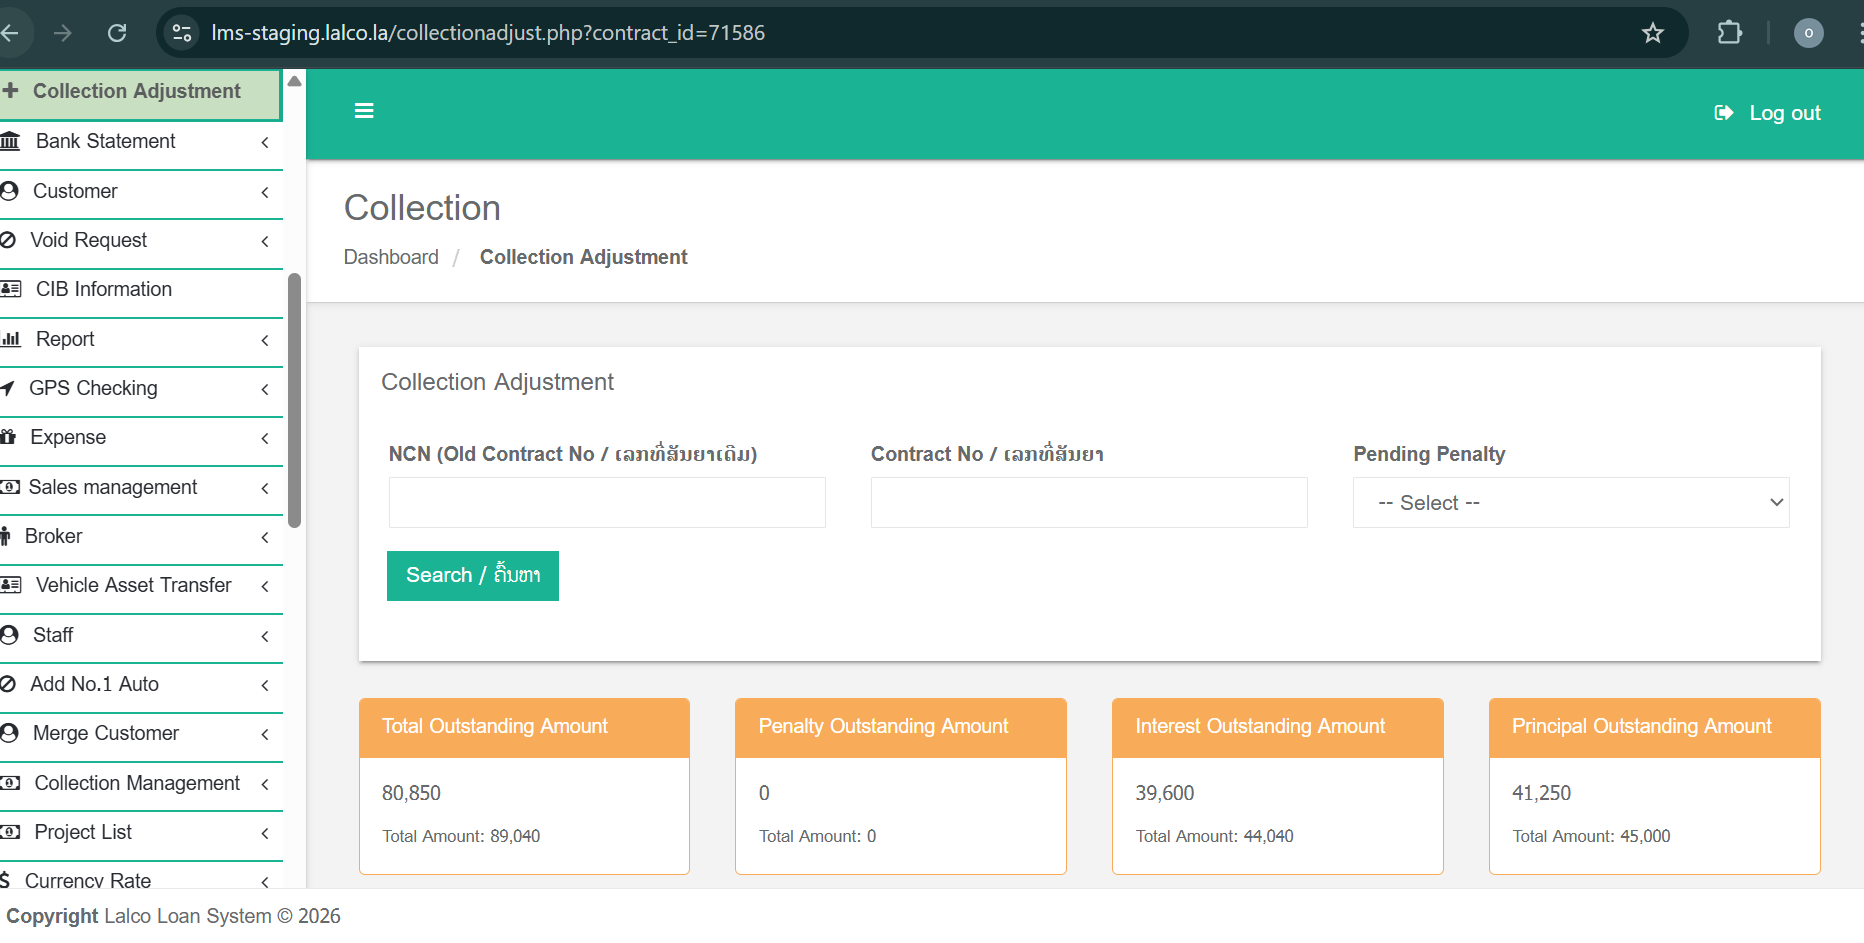
Collection Adjustment
The Collection Adjustment module is used to search for an existing contract, review its financial details, and manage collections, accruals, and rescheduling of payment schedules. This module helps users accurately track outstanding amounts and maintain proper collection records.
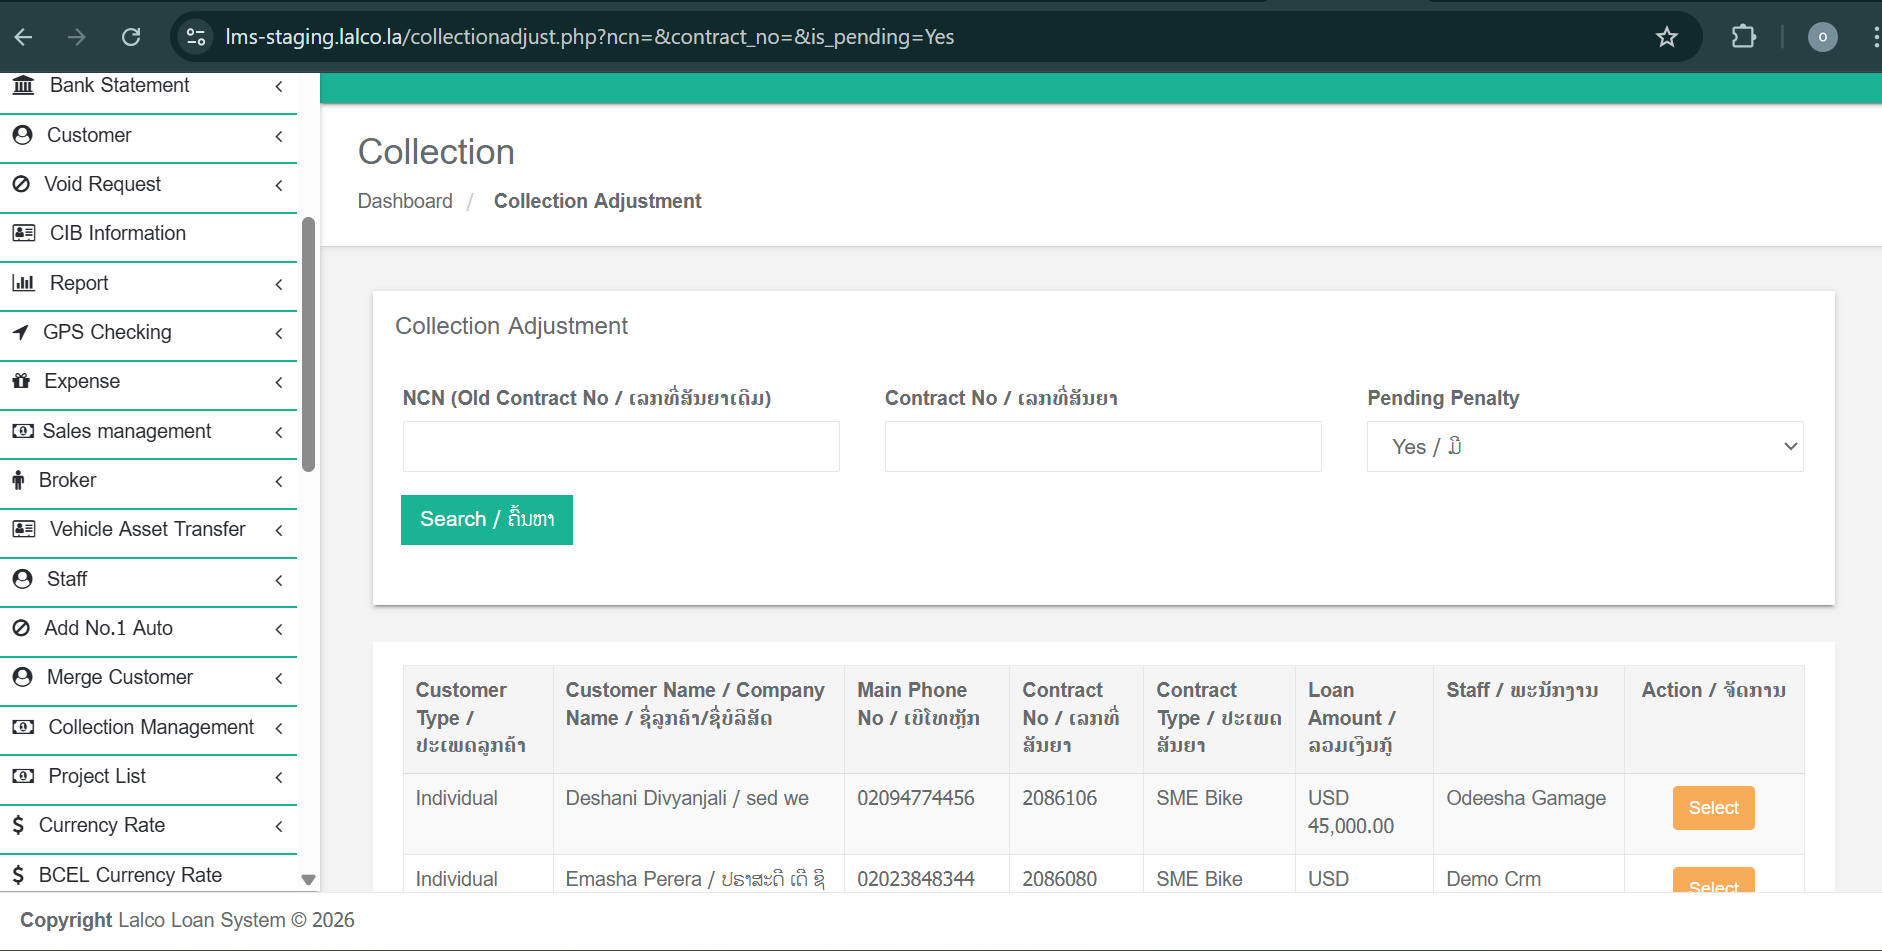
Accessing the Collection Adjustment Page
When the Collection Adjustment page is opened, the user must first search for a contract. Actions cannot be performed without selecting a contract.
Collection Adjustment page displays Active, Refinance, and Closed contracts.
Search Filters
The page provides three search filters to locate a contract:
-
NCN – Search using the NCN number
-
Contract Number – Search using the contract number
-
Pending Penalty – Filter contracts with pending penalties
After entering the required search criteria, click Search to view matching contracts.
Selecting a Contract
Once the contract list is displayed:
-
Select the required contract using the Select/Add button.
-
The system will navigate the user to the Collection Adjustment Details page for the selected contract.
Contract Summary Section
At the top of the details page, four summary boxes are displayed to provide a quick financial overview of the contract:
-
Total Outstanding Amount – Total amount currently outstanding
-
Penalty Outstanding Amount – Outstanding penalty amount
-
Interest Outstanding Amount – Outstanding interest amount
-
Principal Outstanding Amount – Outstanding principal amount
These values help users understand the current financial status before performing any actions.
Tabs in Collection Adjustment
1. Collection Record Tab
-
Displays all approved collection records in a table format.
-
Each record shows details of collections already made against the contract.
-
Newly created collections will also appear here once approved.
2. Payment Schedule Tab
-
Displays the payment schedule for the contract.
-
Shows accrual, principal, and interest details for each installment.
-
Both paid and pending payments are clearly visible in the table.
-
Any newly created accruals or rescheduled payments will be reflected here.
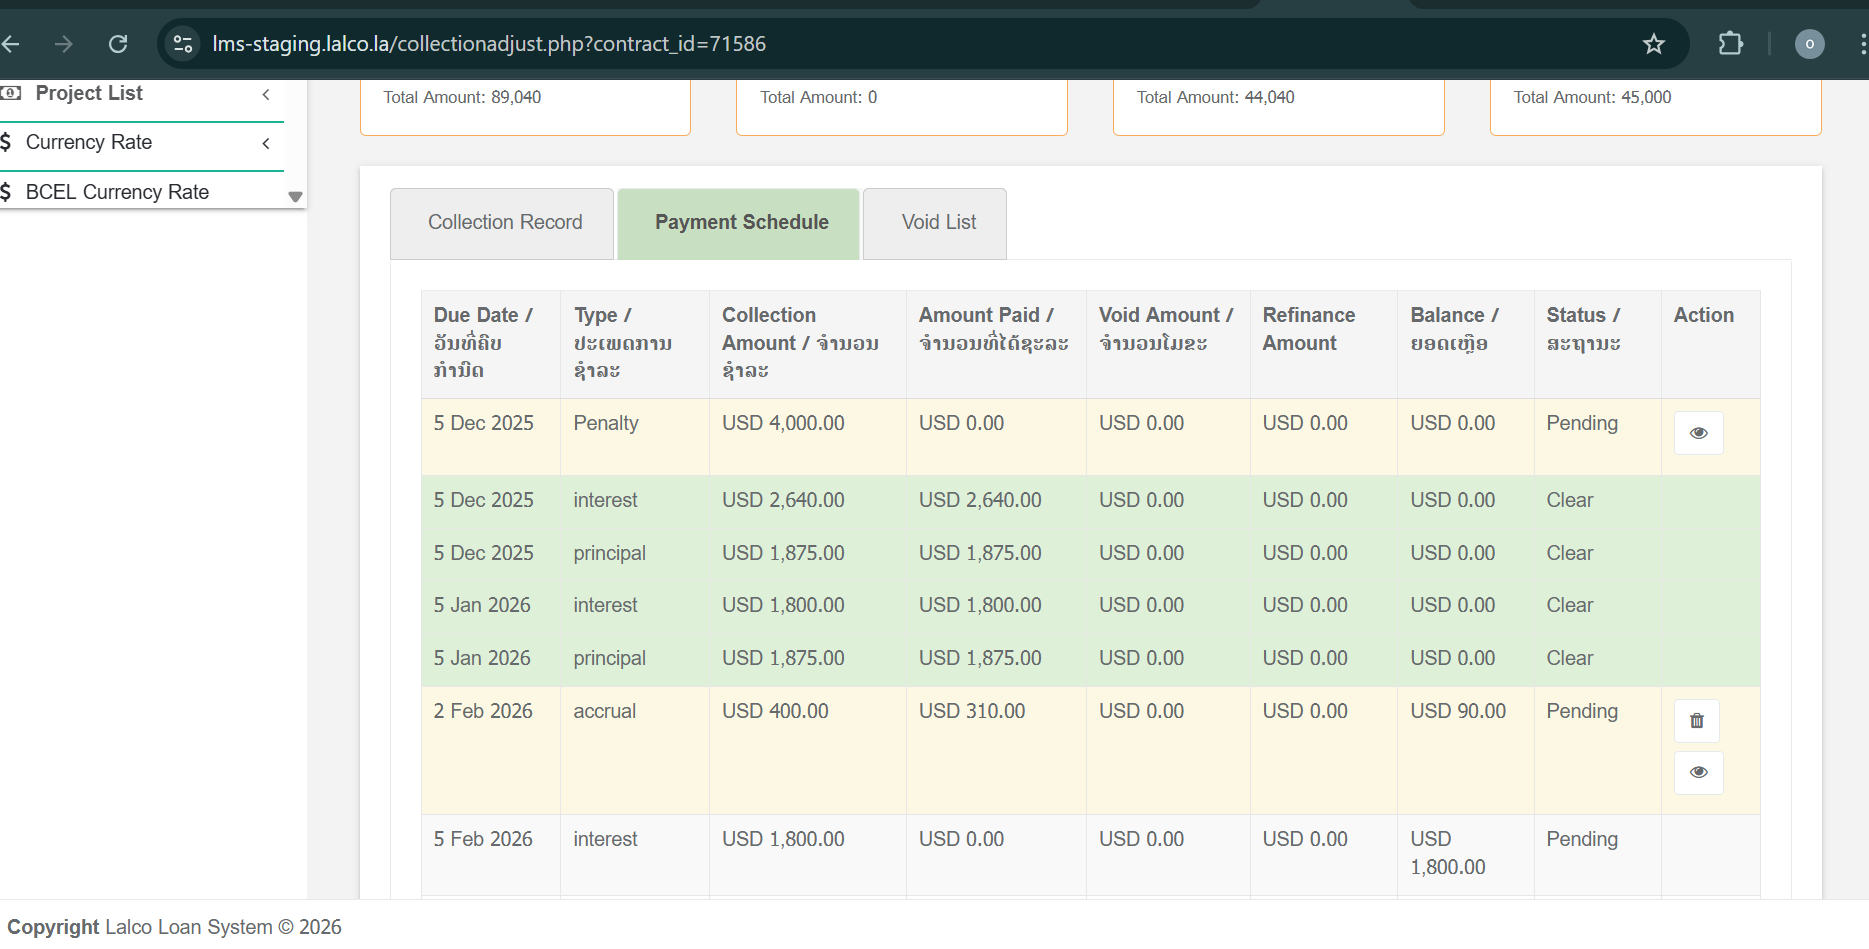
3. Void List Tab
-
Displays a list of voided payments, if any exist.
-
Helps track reversed or cancelled collection records for auditing and reference purposes.
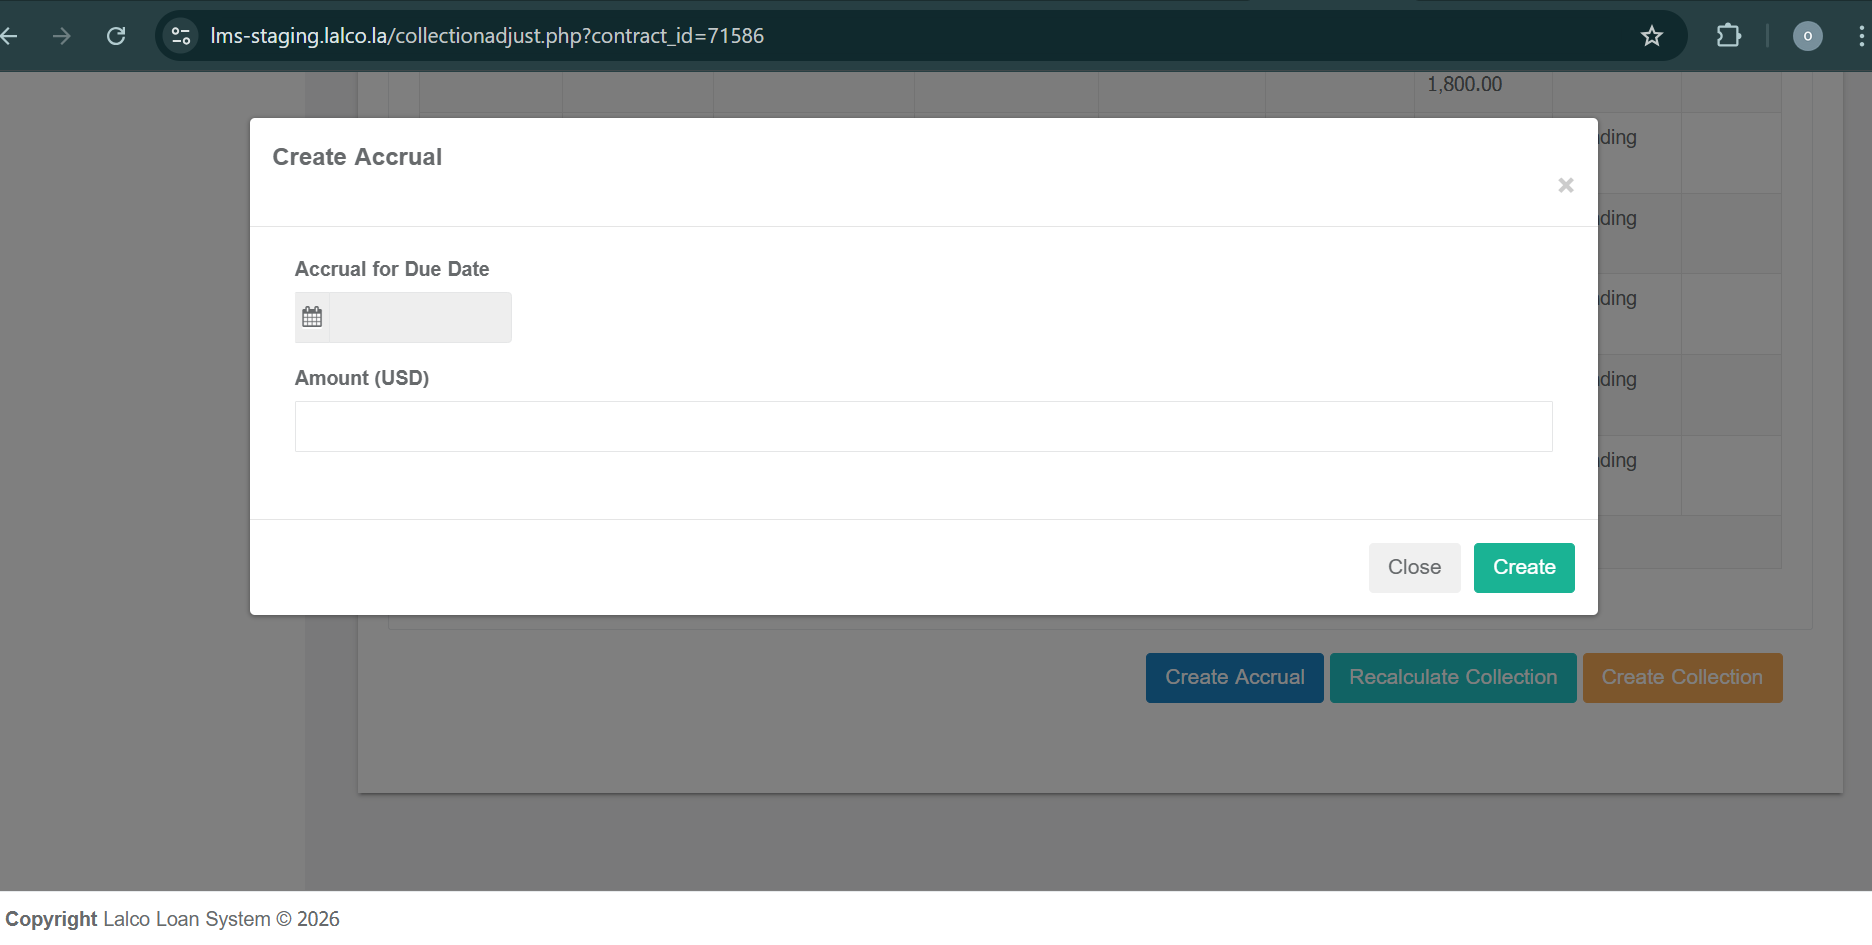
Available Actions (Buttons)
1. Create Accrual
-
Clicking Create Accrual opens a popup window.
-
The user can enter accrual payment details.
-
Once the accrual is created:
-
It is automatically added to the Payment Schedule table.
-
The schedule is updated to reflect the new accrual amount.
-
2. Reschedule Collection
-
Clicking Reschedule Collection recalculates the payment schedule.
-
This action adjusts installment details based on updated outstanding amounts.
-
The revised schedule is displayed in the Payment Schedule tab.
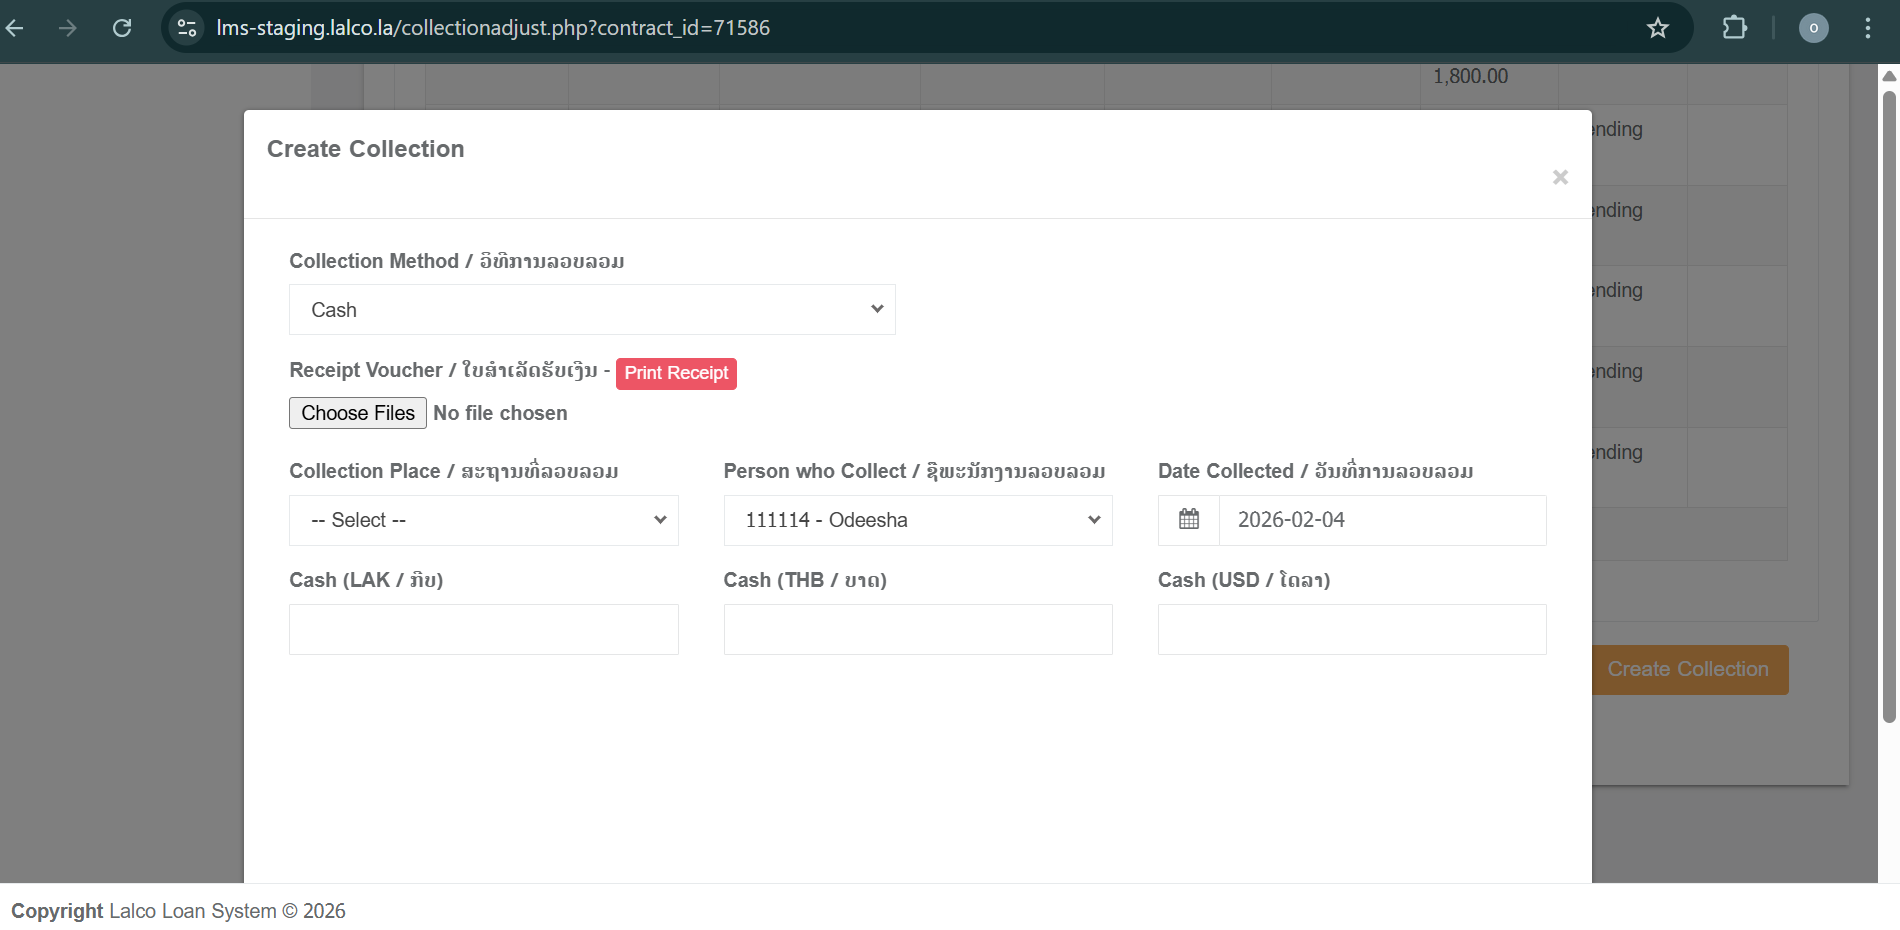
3. Create Collection
-
Used to record a new collection against the contract.
-
The user can select different collection types, such as:
-
Cash
-
Bank
-
Refinance of Collection
-
-
After saving:
-
The collection is recorded as an approved collection.
-
The new entry appears in the Collection Record tab.
-
Outstanding amounts are updated accordingly.
-
Car Dealer Shop
The Car Dealer Shop module is a dedicated management tool for registering and maintaining a database of external automotive partners. This module allows for the detailed tracking of shop locations, financial details, and specific contact personnel.
1. Adding a New Car Dealer Shop
To register a new partner, users must navigate to the Add New section under the Car Dealer Shop menu. The registration form is divided into shop identity and financial information:
-
Shop Identity: Record the official Shop Name, Shop Address, Shop Phone No, and Shop Email.
-
Financial Details: To ensure seamless transactions, provide the Bank Name, Branch, Bank Account No, and Bank Account Name associated with the shop.
2. Contact Person Management
This section provides a flexible way to manage the individuals working at each shop.
-
By clicking the Add Contact Person button, the system generates new fields for individual staff members.
-
Contact Details: For every person added, users can input their First Name, Last Name, Phone No, and Designation.
-
You can add any number of contact persons or remove them as needed using the Remove button next to each entry.
Key Actions
-
Save Changes: Finalizes the registration and saves all shop and contact person data to the system.
-
Cancel: Discards the current form and returns the user to the dashboard.
-
List All: Accessible from the sidebar menu to view and manage the full directory of registered shops.
No.1 Auto
The No.1 Auto module is designed to manage the end-to-end process of vehicle recovery (repossession), evaluation, auctioneer management, and final settlement or litigation for non-performing loan contracts.
1. Car to No.1 Auto Case Outline
Once a contract is flagged for recovery, a case outline is created. This section provides a comprehensive overview of the financial standing of the loan at the time of recovery.
-
Loan Detail: Displays the contract number, customer contact information, and occupation.
-
Financial Summary: Includes the total loan amount, interest rate, number of payments, and current outstanding balances (Principal, Interest, and Penalties).
- Got Car Information: Records the date the vehicle was recovered, the collection staff responsible, and the storage location.
-
Reporting: Users can generate printouts for the above details in documents.
2. Ringi Information
This stage records the physical recovery of the asset and the internal approval (Ringi) details.
-
Ringi Information: Tracks the internal approval workflow, including:
-
Staff In-charge: The officer managing the case.
-
Sale/Checker/Collection: Assignment of specific staff members for the resale process.
-
-
Contact & Asset Investigation: Evaluates if the customer or guarantor can still be contacted and identifies any other known assets (land or other property) for potential recovery.
3. The Auctioneer (Buyer Management)
To ensure the best recovery value, multiple bids are tracked in the Auctioneer section.
-
Top Buyers: A list of potential shops or individuals providing quotes.
-
Data Points: Tracks the shop/person name, contact info, buying/selling price, currency, and the deadline for the offer.
-
Ranking: The system allows ranking offers into five categories to determine the best outcome:
-
S: Sell for a profit.
-
A: Sell for the principal and interest.
-
B: Sell for the principal only.
-
C: Sell for 60% or more of the principal.
-
F: Sell for 40% or less of the principal.
-
4. Evaluation & Final Pricing
Before a sale is finalized, a price comparison is conducted.
-
Price Assessment: Compares the "Price should be" (internal valuation) against "Price from FB" (market value from social media/Facebook) to ensure competitive pricing.
-
Negotiation History: Records all communication with the customer regarding the remaining debt after the car is sold.
5. Repair Information
If the recovered vehicle requires maintenance to increase its resale value:
-
Repair Details: If it is a repair or not (Yes/No), Records whether repairs are needed, the total cost, currency, the staff in charge and, the details of repairable
-
Documentation: Allows for the upload of repair invoices or photos of the vehicle's condition.
6. Negotiation
-
This section manages direct communication with involved parties.
-
Negotiation Types: Includes Call, Visit, or Come to office.
-
Parties Involved: Negotiations can be held with the Customer, Guarantor, Family, or a 3rd party.
-
For 3rd parties, details such as relationship, name, and phone number are required.
-
-
Contact Met: Tracks whether the contact was successfully met (Yes/No).
-
Negotiation Results: Outcomes include "Will return," "Will sell by customer," "Agree to sell and will pay the remaining amount," "Agree to sell and not willing to pay the remaining," or "Not willing to pay & depend on LALCO".
-
History: Users can view and export the full negotiation history.
-
7. Credit Settlement
After the vehicle is sold, the system calculates the remaining financial gap.
-
Credit Information after Sold Out:
-
Calculates the deficit (sale price compared to remaining principal).
-
Tracks the percentage of loss against the total outstanding debt.
-
Determines the final recovery status ranking.
-
-
Status Updates: There are seven available statuses:
-
Pending, On sale, Return, Sold out, Broken, Lalco Office, and Litigation.
-
-
Information Sections (Broken / Lalco Office / Litigation): For these statuses, final comments and notes are recorded before clicking Approve to move the case forward or send it to the legal department.
Key Actions
-
Save: Commits the current information in a specific section.
-
Export: Allows downloading negotiation and case histories.
-
Approve/Cancel: Finalizes the litigation or settlement process.