Redmine
Redmine is a free and open-source, web-based project management and issue-tracking tool. It's designed to help teams of all sizes manage their projects effectively, track progress, collaborate efficiently, and handle issues in a structured manner. Built using the Ruby on Rails framework, Redmine is cross-platform and supports various databases, making it a versatile solution for diverse environments.
Redmine
Redmine provides a centralized platform for organizing and managing project-related activities. It moves beyond simple task lists by offering a comprehensive suite of features that address various aspects of project lifecycle management.
Key Features and Benefits:
Redmine boasts a rich set of features that contribute to its effectiveness as a project management tool. Here are some of the key highlights and their associated benefits:
Issue Tracking
Feature:
- Customizable issue types (e.g., bugs, features, support requests)
- statuses
- priorities
- workflows.
Benefit:
- Enables structured management of tasks
- defects and enhancements
- ensuring nothing falls through the cracks.
- Customizable workflows allow you to tailor the process to your team's needs.
Project Management
Feature:
- Tools for planning
- scheduling
- tracking project progress
- including Gantt charts and calendars.
Benefit:
- Provides visual representations of project timelines,
- dependencies
- milestones,
- facilitating better planning and monitoring of progress against deadlines.
Time Tracking
Feature:
- Allows users to log the time spent on specific issues.
Benefit:
- Offers insights into team effort, helps in resource allocation, and can be used for billing or cost analysis.
Collaboration
Feature:
- Includes wikis for knowledge sharing, forums for discussions, news sections for announcements, and document management.
Benefit:
- Fosters seamless communication and information sharing within the project team, reducing reliance on scattered emails and improving transparency.
Role-Based Access Control
Feature:
- A flexible permission system to define what different user roles can access and do within projects.
Benefit:
- Ensures data security and allows for tailored access based on team member responsibilities.
Customization
Feature:
- Extensive options for custom fields, issue statuses, user roles, and notifications.
Benefit:
- Allows you to adapt Redmine to the specific needs and processes of your organization and projects.
Version Control Integration
Feature:
- Supports integration with popular Source Code Management (SCM) systems like Git, SVN, and Mercurial.
Benefit:
- Enables developers to link code changes directly to issues, providing traceability and context.
Notifications
Feature:
- Email notifications and web feeds for updates on issues and project activities.
Benefit:
- Keeps team members informed about important changes and ensures timely responses.
Extensibility
Feature:
- A vibrant community contributes a wide array of plugins and themes to extend functionality and customize the user interface.
Benefit:
- Offers flexibility to add specific features or integrations not available in the core application.
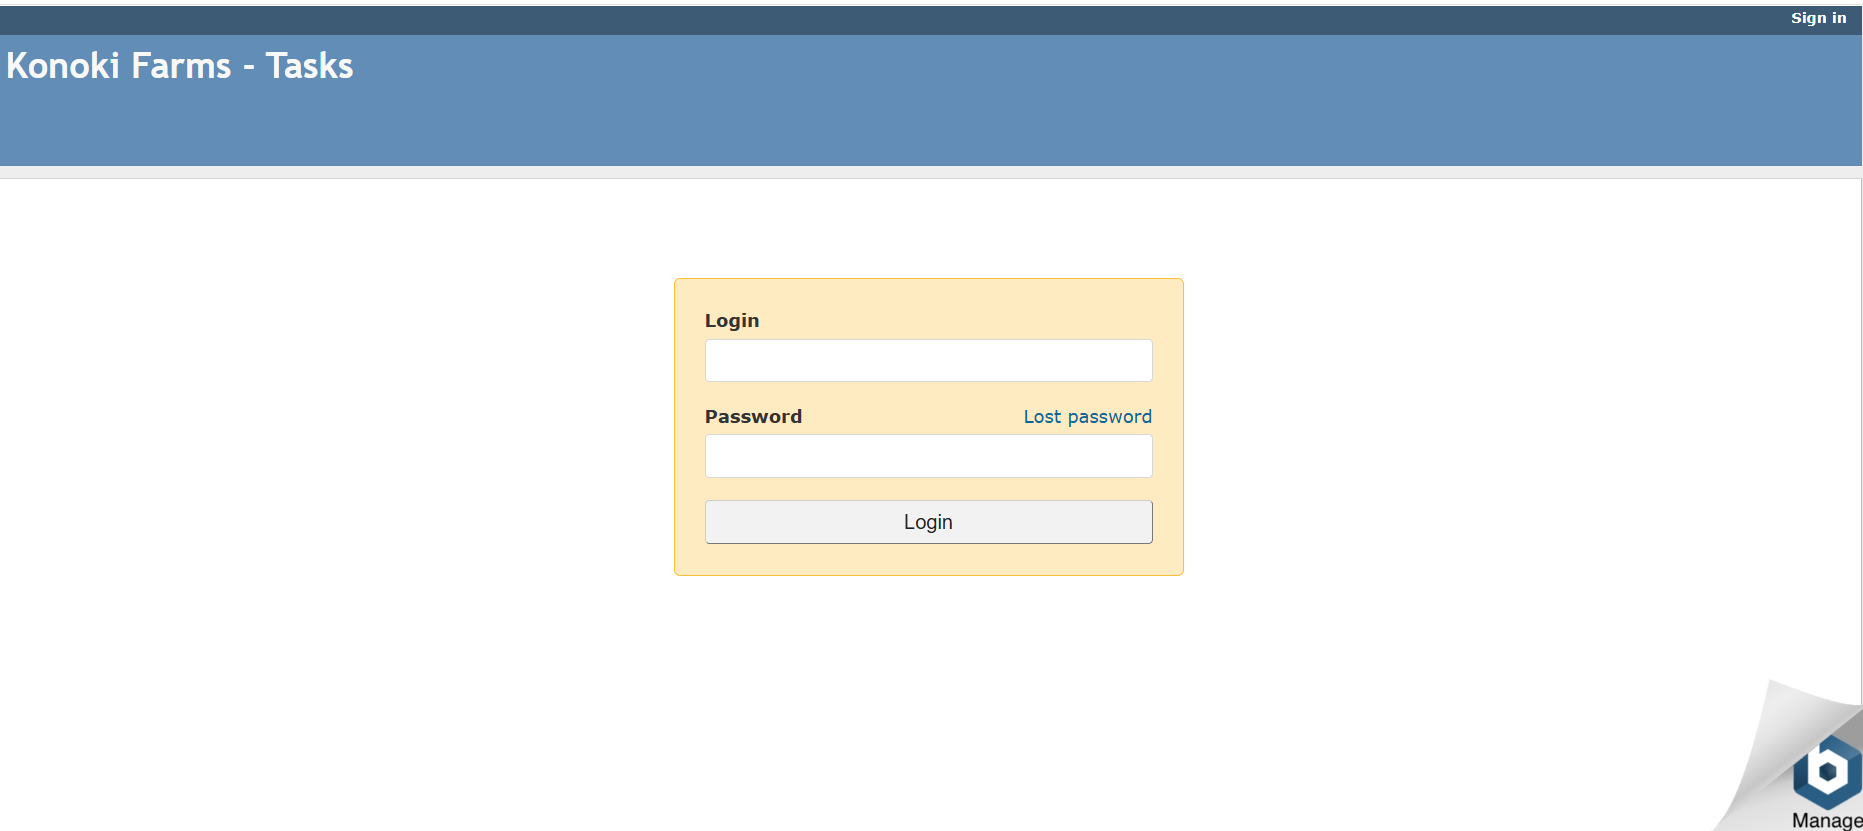
Accessing the Redmine Login Page
Accessing the Login Page
- Your organization's Redmine administrator will provide you with a specific web address (URL) for your Redmine instance.
- Open your preferred web browser (e.g., Chrome, Firefox, Safari, Edge) and enter the provided URL into the address bar.
- You should be directed to the Redmine login page.
URL : http://13.251.77.178/login
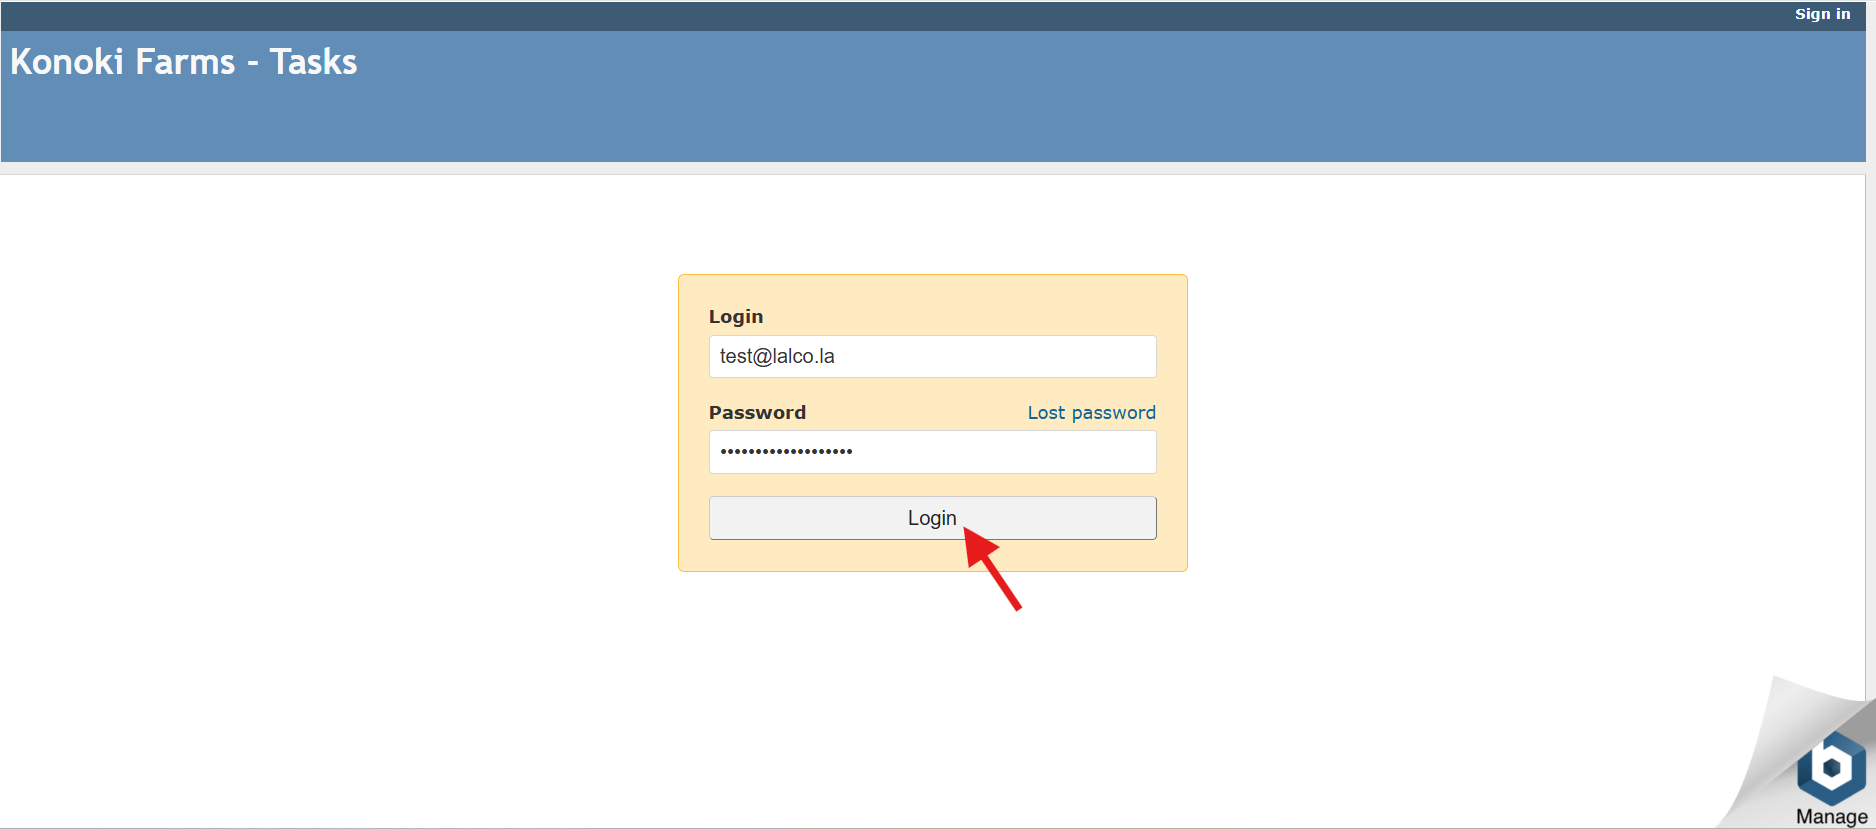
Logging In
- On the login page, you will usually find two primary fields
- Username: Enter the username provided to you by the administrator.
- Password: Enter your associated password.
- Click the "Login" or a similar button to access your Redmine account.
Initial Login and Changing Your Password
Upon your first login or when your password has expired, Redmine will typically redirect you to a "Change password" page, similar to what's shown in below image. This is an important step to secure your account.
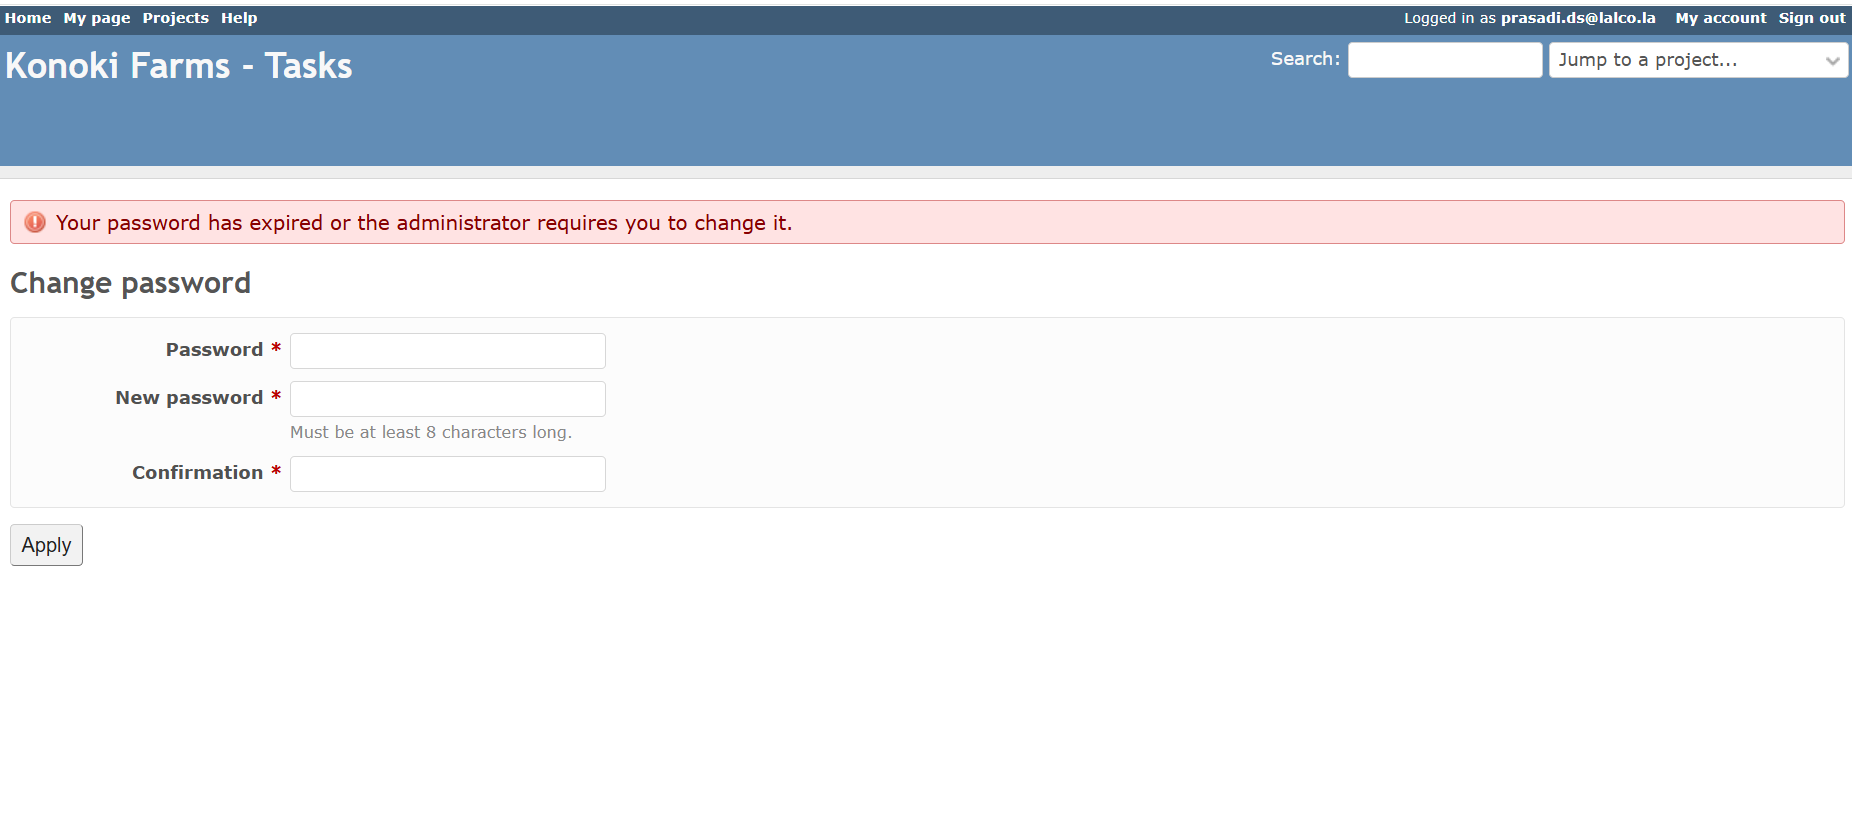
The page usually contains the following fields:
- Password (Current Password): In this field, you need to enter your current password. If this is your first login, this would be the default password provided to you by the Redmine administrator. If your password has expired, it's the password you were using before.
- New password: Here, you need to enter your desired new password. Pay attention to any password requirements mentioned on the page (e.g., minimum length, character types). In your image, it indicates "Must be at least 8 characters long." Choose a strong and unique password for security.
- Confirmation: To ensure you've typed your new password correctly, you'll need to re-enter it in the "Confirmation" field. This helps prevent types.
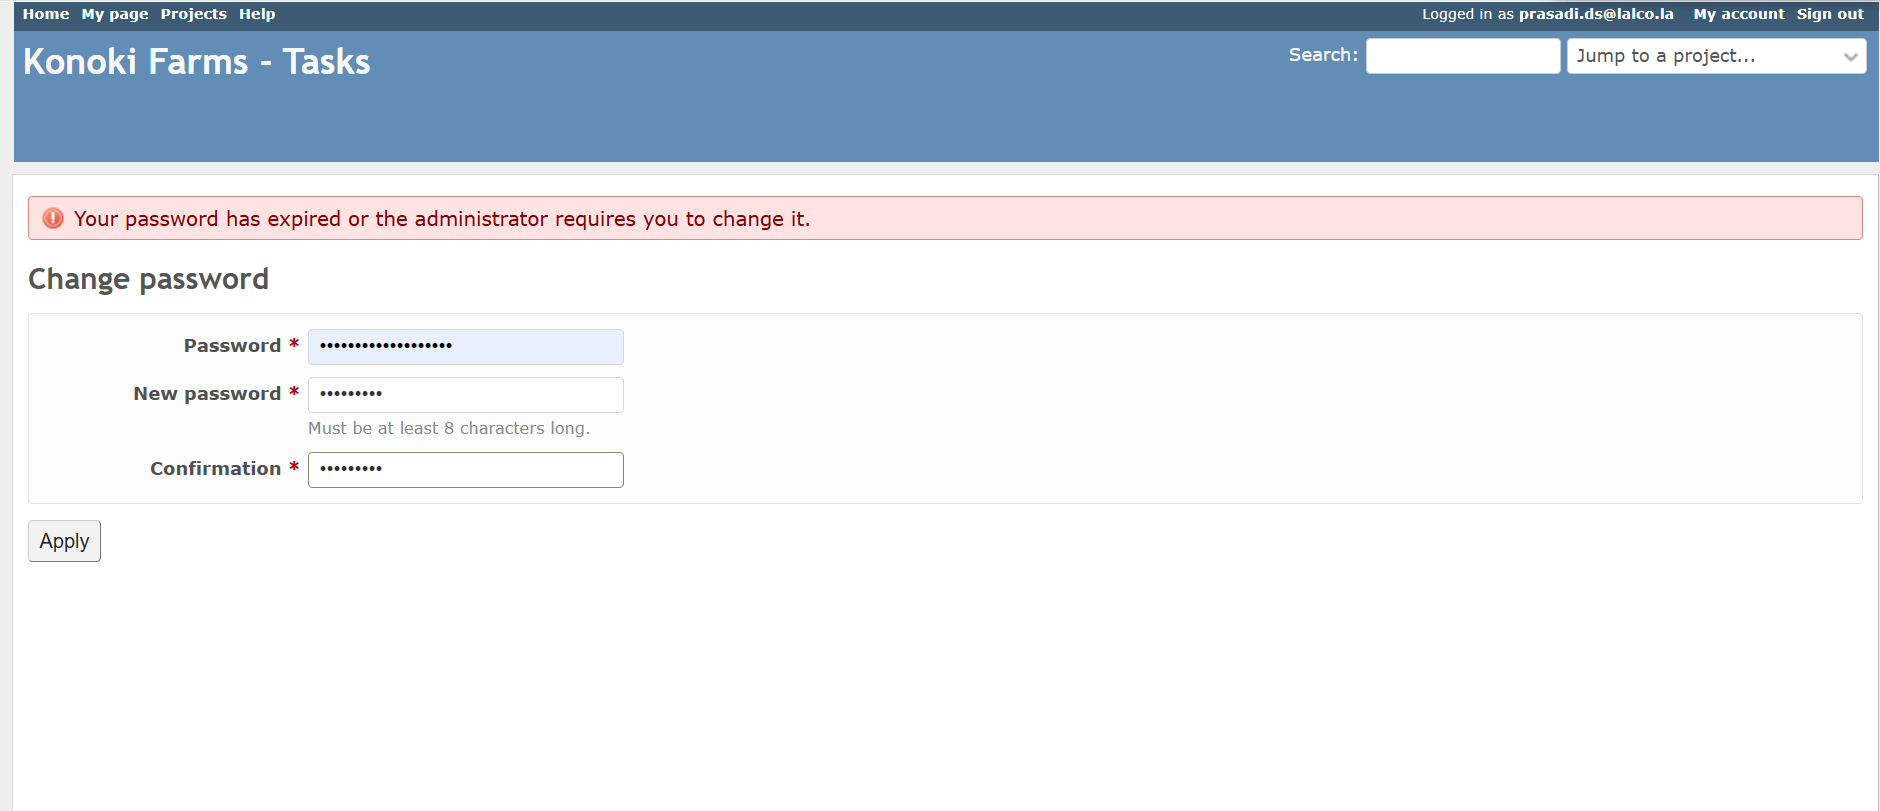
Steps to Change Your Password
- Locate the "Change password" page: After logging in with your initial or expired password, you should automatically be directed to this page. The message at the top, "Your password has expired or the administrator requires you to change it," confirms this.
- Enter your Current Password: In the "Password" field, type the password you just used to log in.
- Enter your New Password: In the "New password" field, type the new password you want to use. Make sure it meets any specified requirements (like the 8-character minimum shown in your image).
- Confirm your New Password: In the "Confirmation" field, carefully retype the exact same new password you entered in the previous step.
- Click "Apply": Once you've filled in all the fields correctly, click the "Apply" button (as seen in the bottom left of your image) to save your new password.
After Changing Your Password:
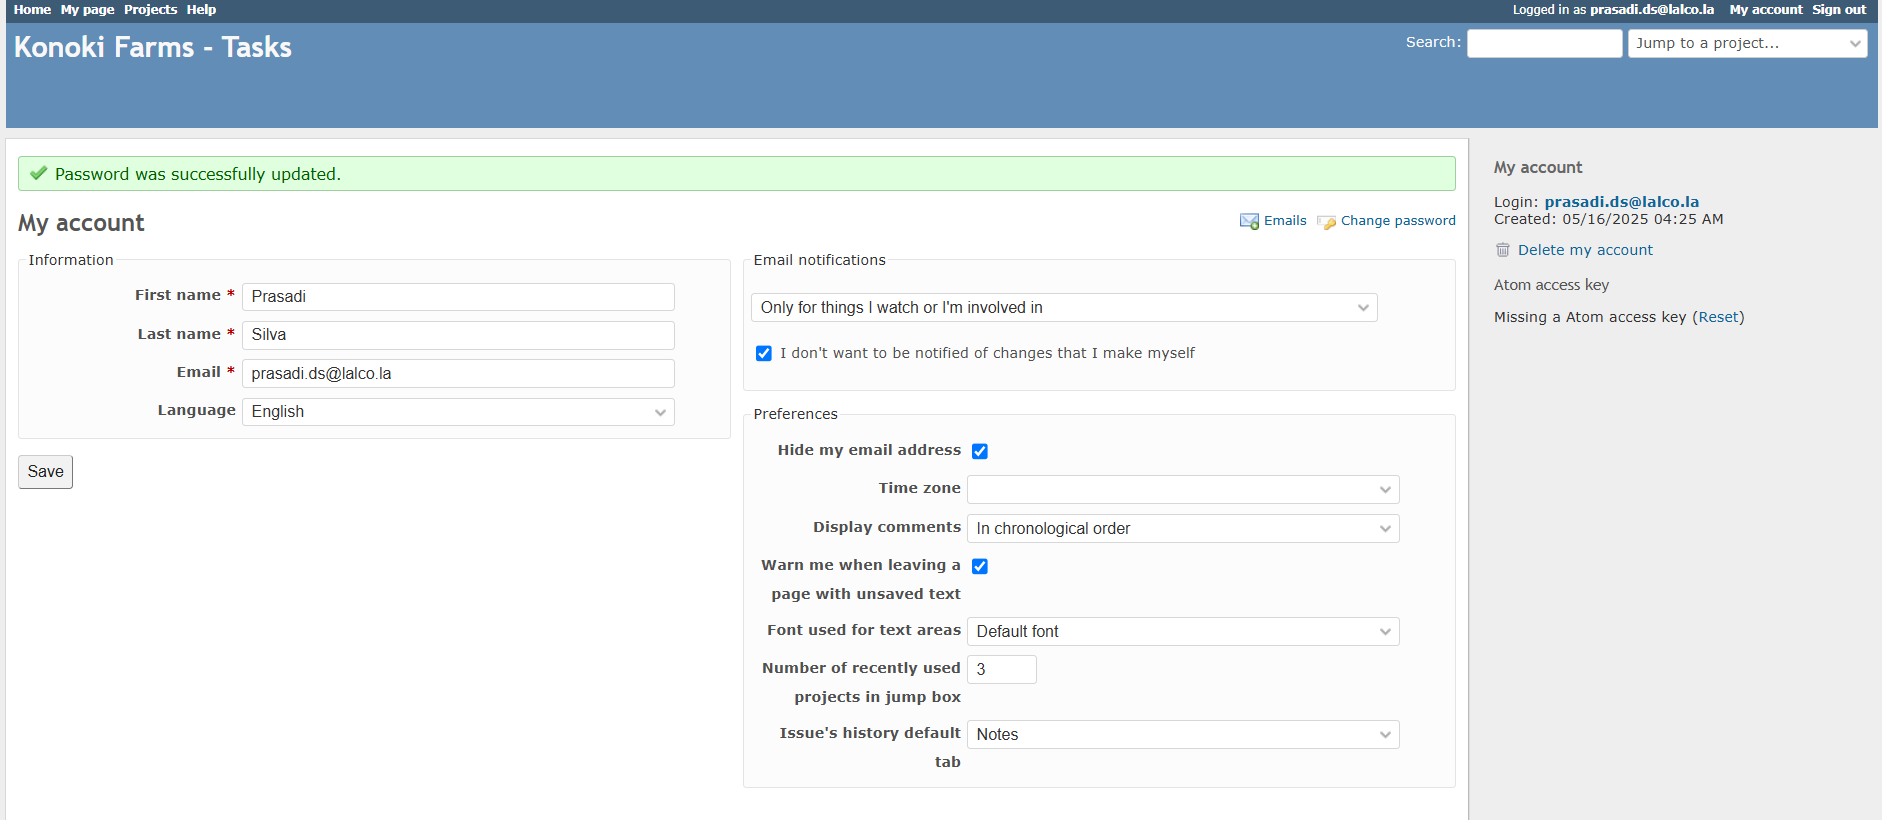
- Successful Change: If you've entered everything correctly, you should see a confirmation message indicating that your password has been successfully changed. You will then be redirected to your Redmine dashboard or the page you were trying to access.
- Password Mismatch: If the password you entered in the "New password" field doesn't match the one in the "Confirmation" field, you'll likely see an error message. In this case, re-enter your desired new password in both fields carefully.
- Password Too Short or Weak: If your new password doesn't meet the specified requirements (e.g., the 8-character minimum), you'll also see an error message. Choose a longer and more complex password.
Important Security Tips for Passwords:
- Choose a strong password: Use a combination of uppercase and lowercase letters, numbers, and symbols. Avoid using easily guessable information like your name, date of birth, or common words.
- Do not share your password: Your password is your personal key to your Redmine account. Keep it confidential.
- Consider using a password manager: Password managers can help you create and securely store complex passwords.
- Be cautious of phishing attempts: Never enter your Redmine password on unfamiliar websites or in response to unsolicited emails.
By following these steps, you can successfully change your password and secure your Redmine account. Once you've done this, you'll be able to navigate the Redmine interface as described in the previous part of the guide.

Interface Overview (General Layout):
- Once you've successfully logged in, you'll be presented with the main Redmine interface. The layout can have slight variations depending on your Redmine version and any installed themes or customizations, but generally, you'll find these key elements
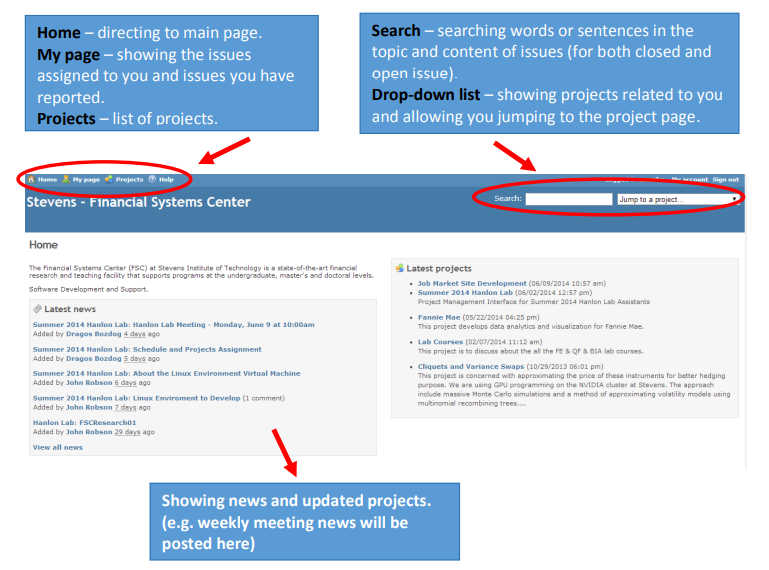
Top Navigation Menu:
- Home: You are currently here, on your personal dashboard.
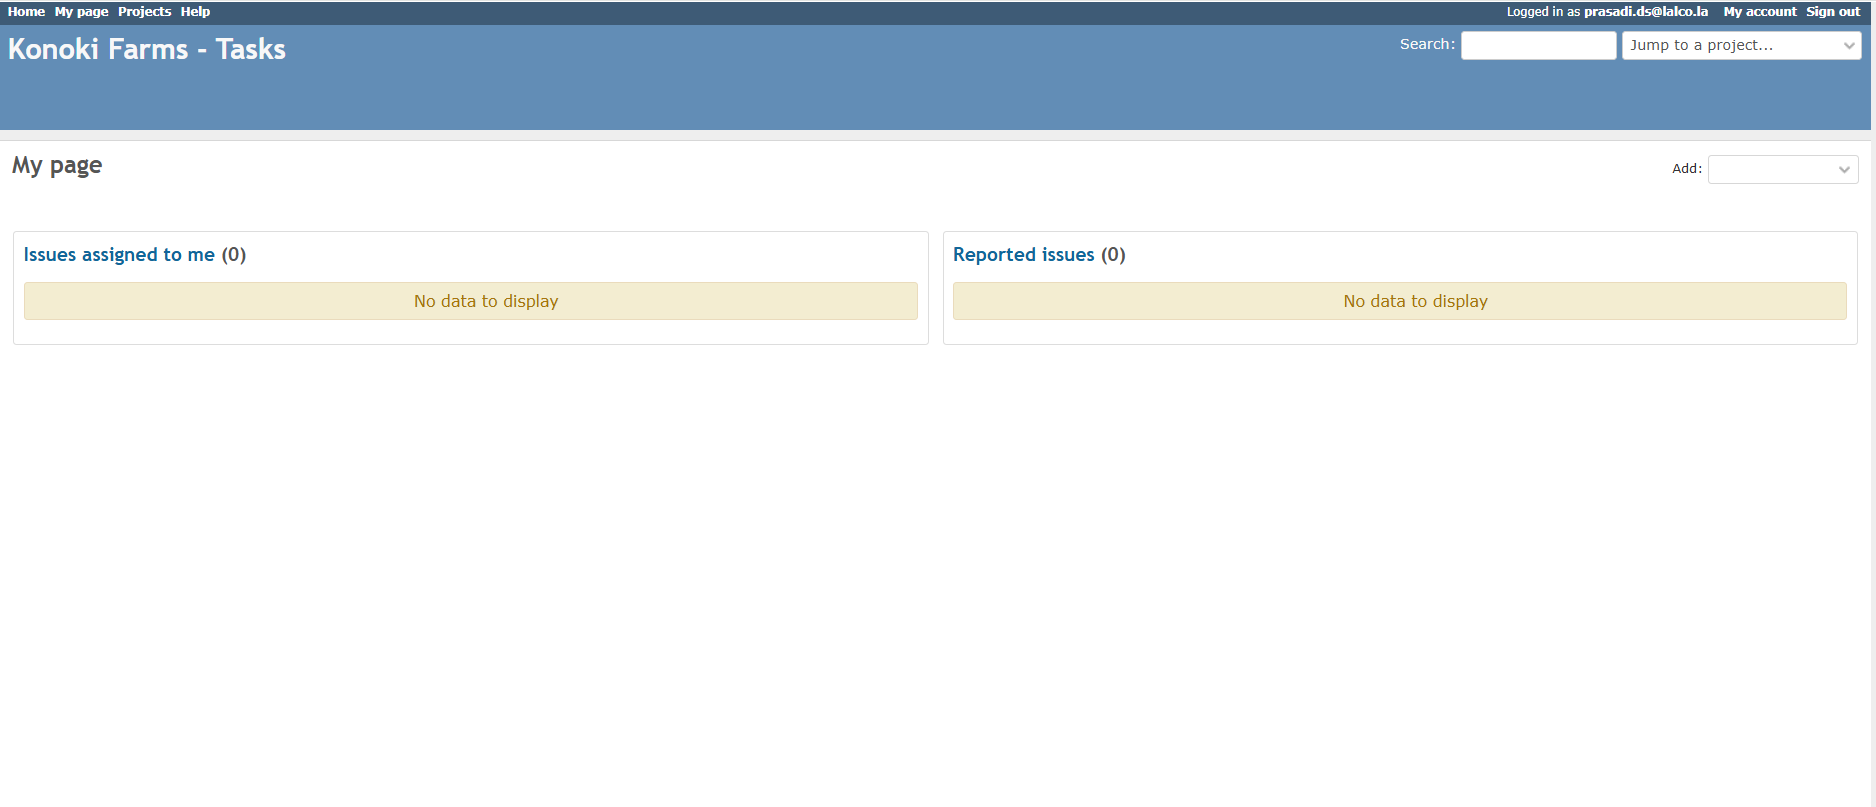
- My page: This might be a redundant link if "Home" already serves as your dashboard, or it could lead to a slightly different personalized view.
- Projects: Takes you to the list of all projects you can access.
- Help: Links to Redmine documentation or support resources.
- Search Bar, Logged in as, My account, Sign out, Jump to a project...:

-
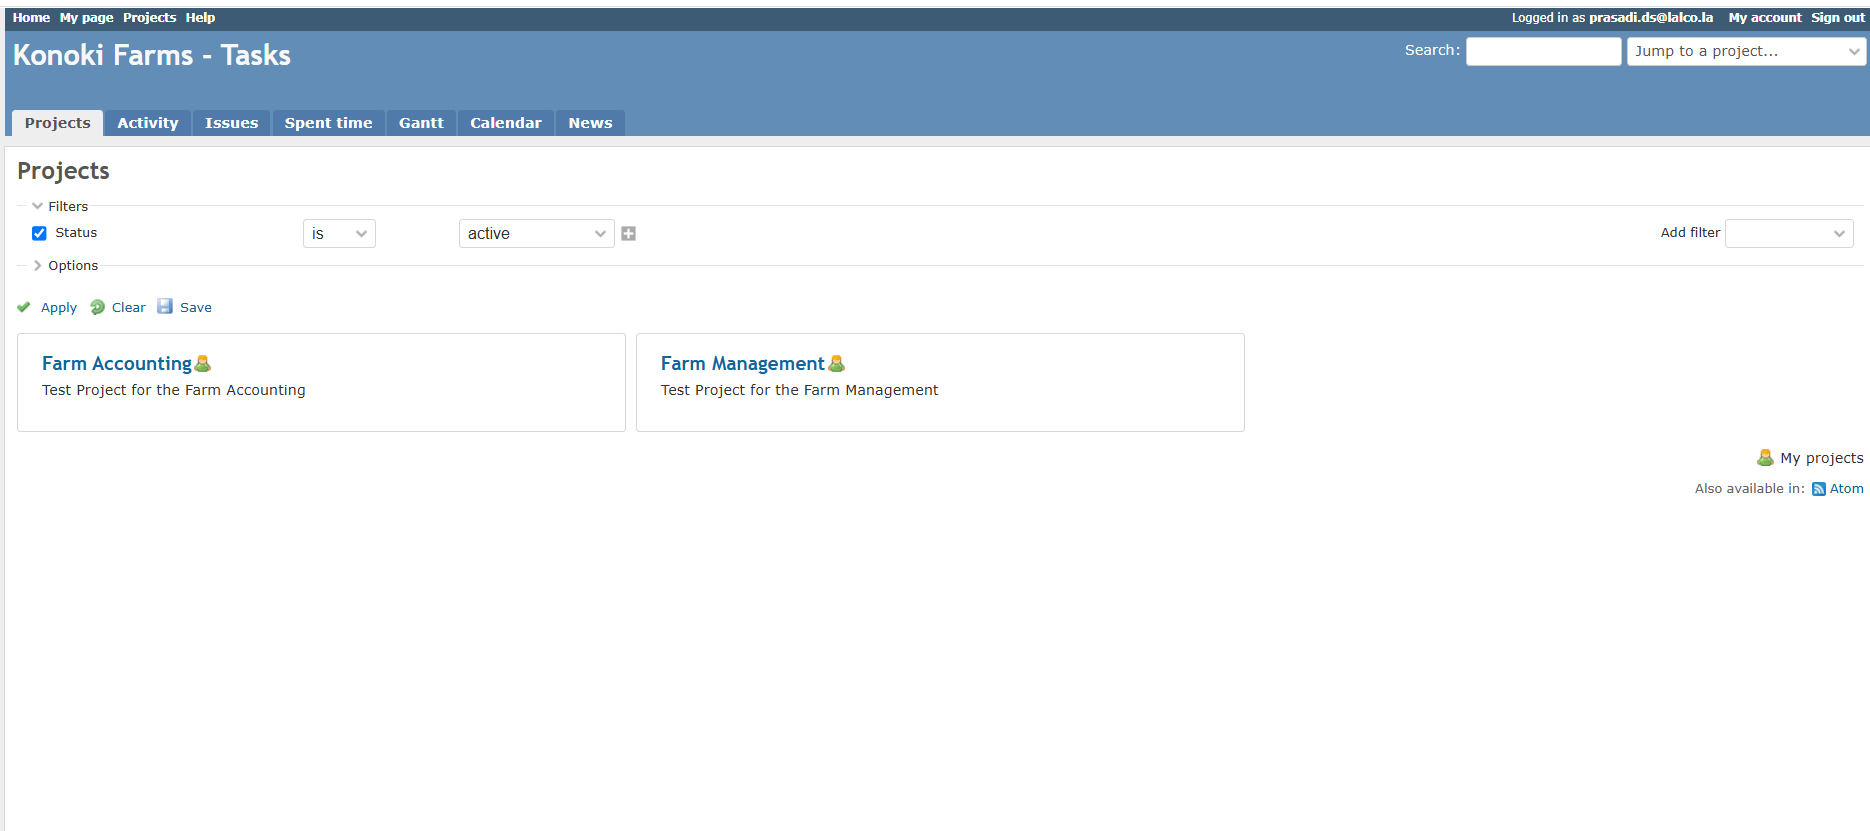
Project Listing: This is the main content area of the "Projects" page. It displays the projects you have access to. In your image, you can see two projects listed:
- Farm Accounting: With a brief description: "Test Project for the Farm Accounting." It also has a small icon next to the name (a green plant in a pot).
- Farm Management: With a brief description: "Test Project for the Farm Management." It also has a different small icon next to the name (a green leaf).
-
Filters: Located above the project listing, these allow you to filter the displayed projects based on various criteria. In your image, you can see a filter for "Status" set to "is active." You can add more filters using the "Add filter" dropdown.
- Status: Allows you to filter by the project's status (e.g., active, closed).
- Options: Provides additional filtering options.
- Apply, Clear, Save: Buttons to apply the selected filters, clear them, or save the current filter settings for future use.
-
"My projects" (Right Sidebar): This section provides a quick overview or links related to your projects. In your image, it simply says "My projects."
-
"Also available in:" (Right Sidebar): This might provide links to project feeds (like Atom) for staying updated on project activity.
Navigating and Interacting with the "Projects" Page:
- Accessing a Project: To enter a specific project and view its details, simply click on the name of the project (e.g., "Farm Accounting" or "Farm Management"). This will take you to the project's overview page, where you'll see the project-specific menu (Activity, Issues, etc.).
- Using the "Jump to a project..." dropdown: If you have many projects, this can be a faster way to navigate to a specific one. Click the dropdown and select the project you want to access.
- Filtering Projects: If you have a long list of projects, use the filters to narrow down the list. For example, you might want to see only "active" projects or projects you are specifically a member of (if that filter is available).
- To add a filter, select a criteria from the "Add filter" dropdown.
- Choose the desired value for the filter (e.g., "is" and then "active" for the "Status" filter).
- Click "Apply" to see the filtered list.
- Click "Clear" to remove all applied filters.
- Click "Save" to save the current filter settings as a custom query for future use.
-
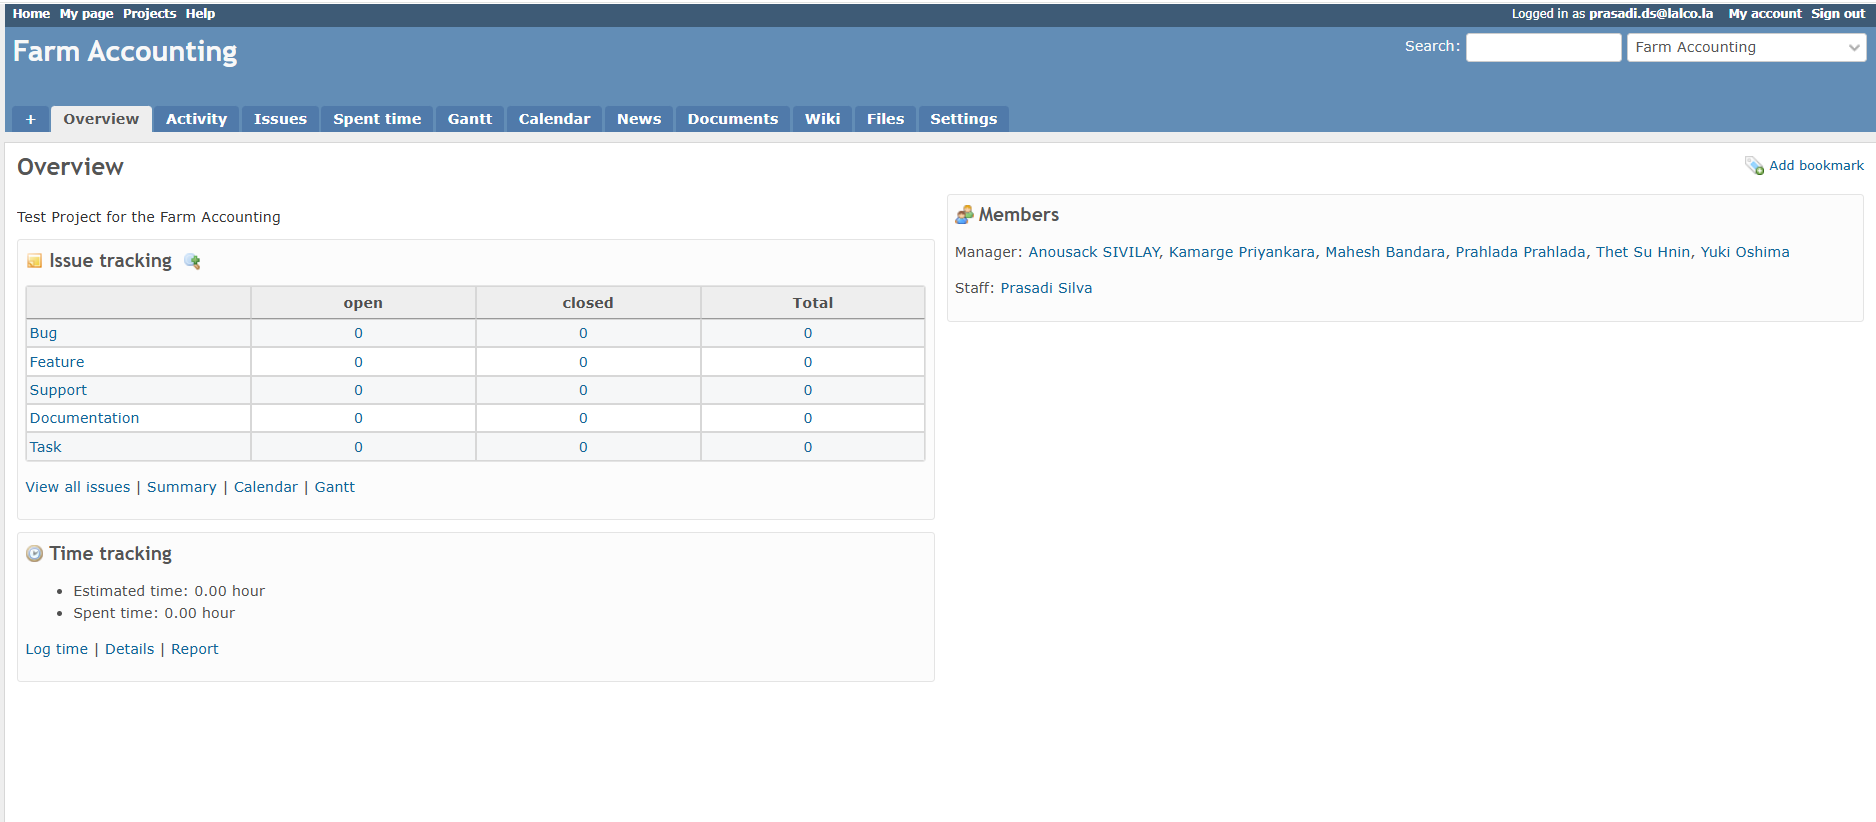
When you click on a project from the "Projects" list, you are typically taken to the Overview page of that project. This page provides a summary of the project and quick access to key information.
-
"Overview" Header: Clearly indicates that you are currently viewing the overview of the "Farm Accounting" project.
-
"Add bookmark" Link: Located on the right side, this allows you to bookmark this specific project for quicker access in the future.
-
Project Description: Below the "Overview" header, you might see a brief description of the project. In your image, it says: "Test Project for the Farm Accounting."
-
Issue tracking Block: This section provides a summary of the issues within the "Farm Accounting" project, categorized by their "Tracker" (Bug, Feature, Support, etc.) and their current status ("open," "closed," and "Total"). In your case, all counts are currently "0."
- View all issues: A link to see the full list of issues for the project.
- Summary: Might link to a more detailed issue summary or report.
- Calendar: Could link to a calendar view of issues with due dates.
- Gantt: Could link directly to the Gantt chart for the project.
-
Time tracking Block: This section displays information related to time tracking within the project. Currently, it shows:
- Estimated time: 0.00 hour (This would be the total estimated time for all issues in the project, if estimates have been entered).
- Spent time: 0.00 hour (This is the total time logged by all project members on issues within this project).
- Log time: A link to log your own time against an issue.
- Details: Might link to a more detailed breakdown of time tracking data.
- Report: Could link to time tracking reports for the project.
-
Members Block: Located on the right side, this section lists the members of the "Farm Accounting" project and their roles.
- Manager: Lists the users who have the "Manager" role in this project (Anousack Sivilay, Kamarge Priyankara, Mahesh Bandara, Prahlada Thiet, Su Hnin, Yuki Oshima).
- Staff: Lists the users with the "Staff" role
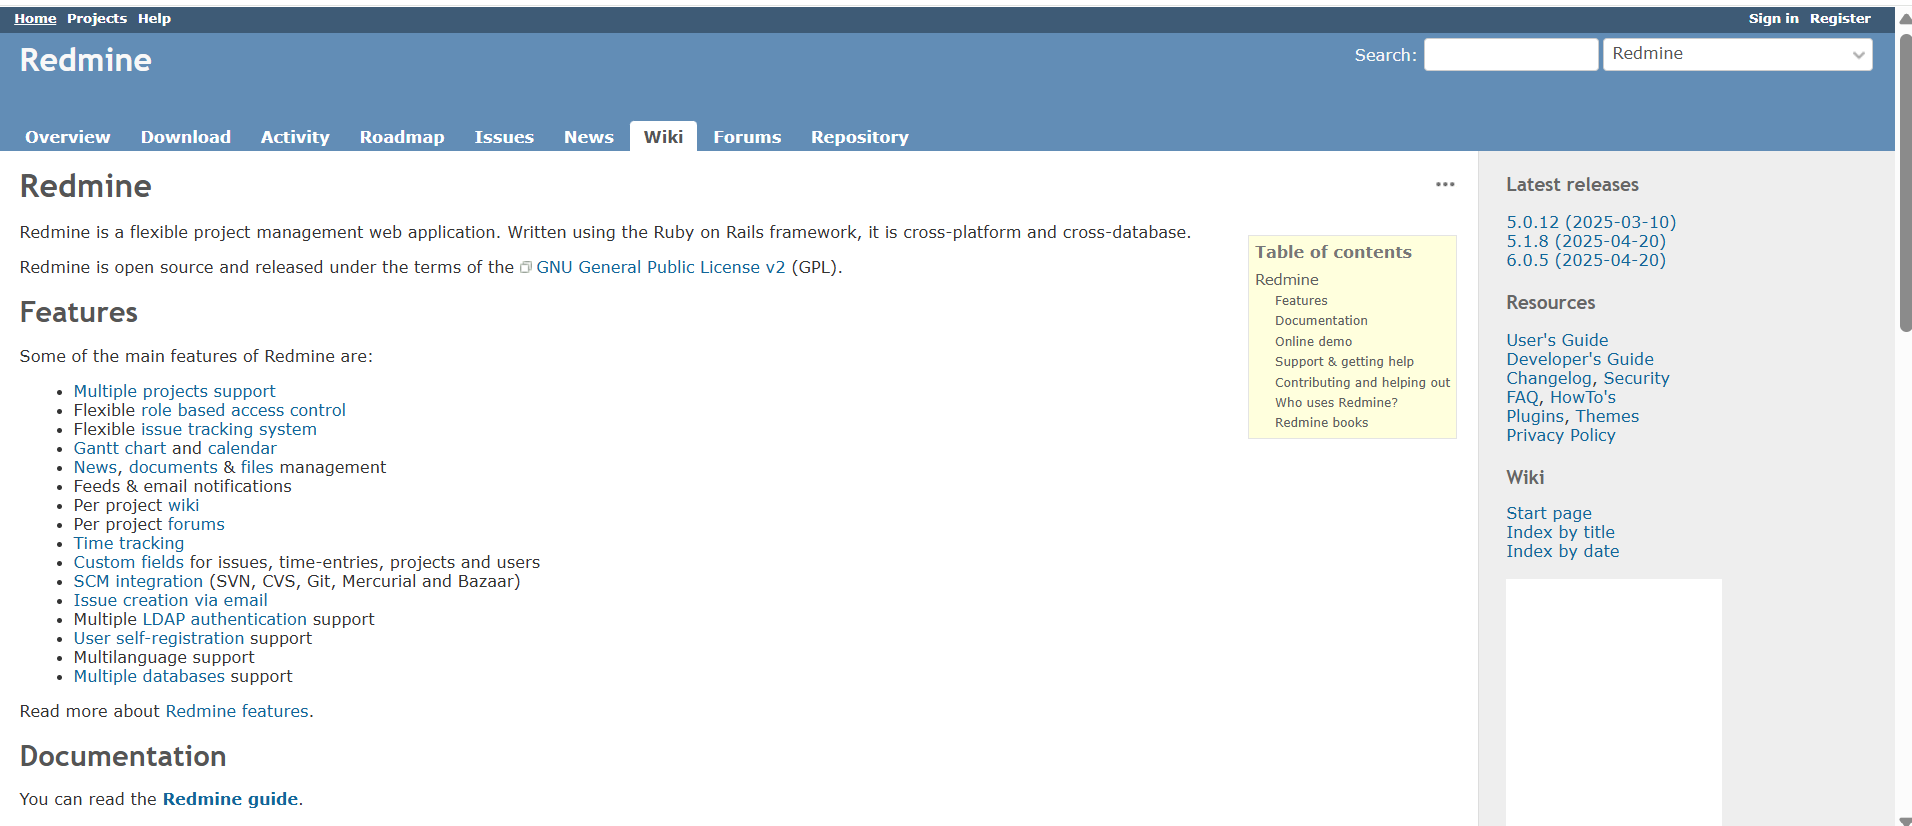
When you click "Help" and are directed to the Wiki, you can use it in several ways to find information:
-
In many Redmine installations, the "Help" menu item directly links to the project's or the global Redmine Wiki. The Wiki serves as a collaborative documentation space where users can create and share information. It's often used for:
- User Guides: Providing instructions on how to use different features of Redmine.
- Project Documentation: Detailing project-specific processes, requirements, and decisions.
- Meeting Notes: Recording outcomes and action items from meetings.
- Knowledge Bases: Storing useful information and FAQs.
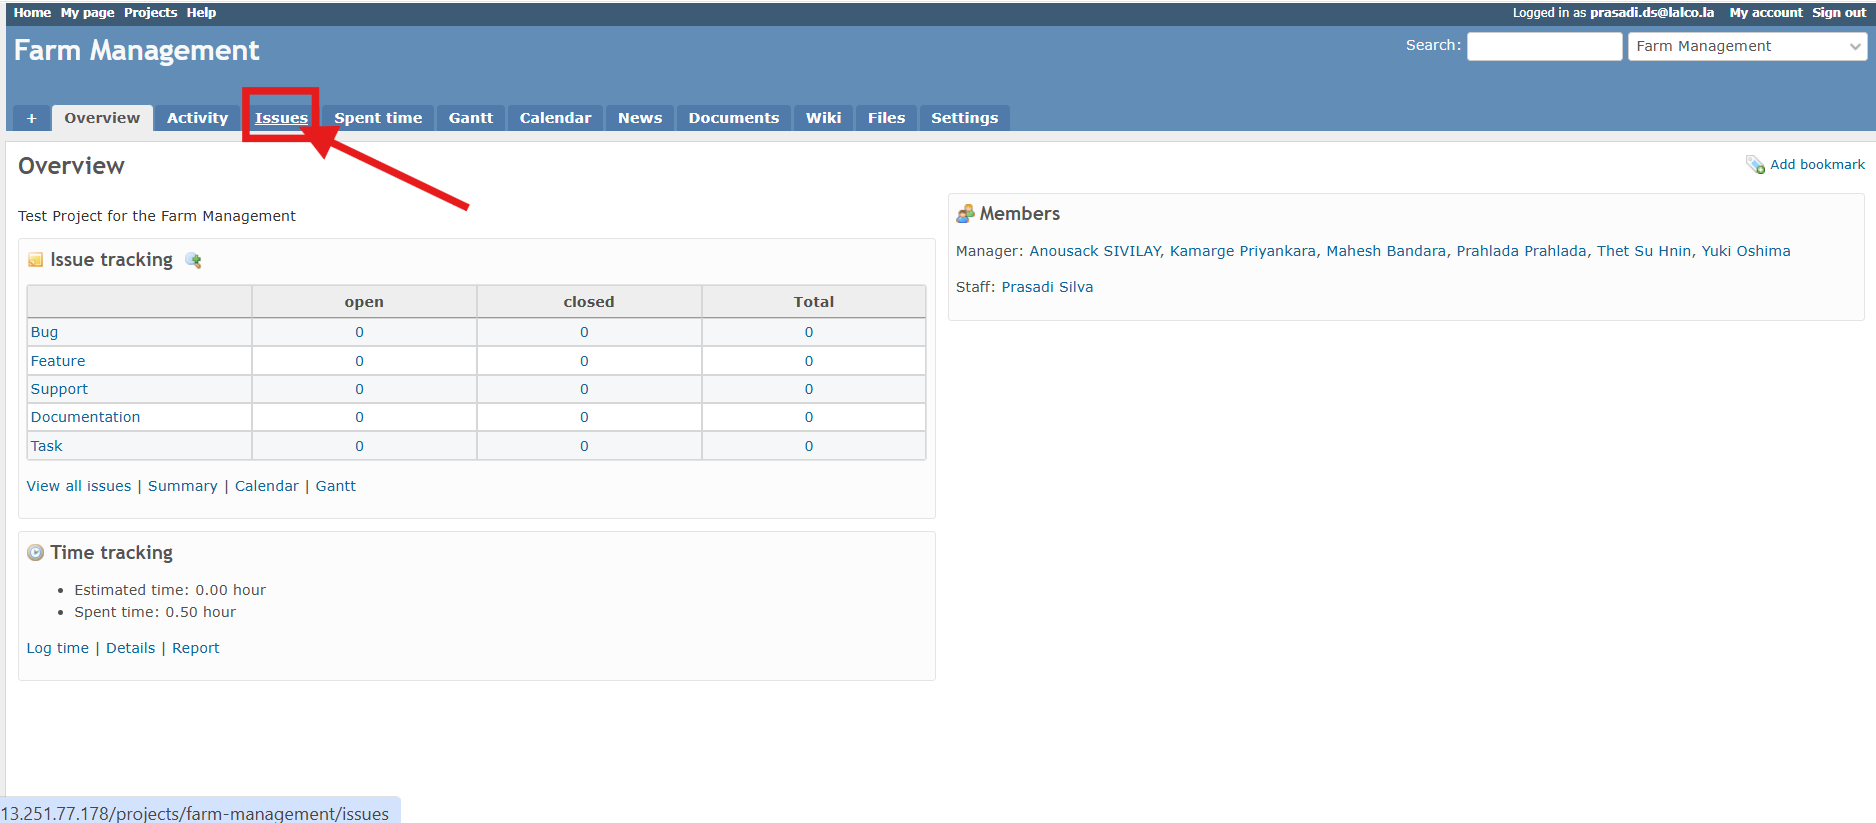
Adding a New Issue
If you are not already there, select your desired project (in this case, "Farm Management") from the "Projects" list or the "Jump to a project..." dropdown. Then, click on the "Issues" tab in the project level navigation menu.
Adding a new issue
People can create a new issue when they meet the roles and permissions configured by the Redmine Administrator
(Role: Issue Tracking > Add Issues).
When creating a new issue, one of the most important items is the tracker field, which defines the nature of the issue. By default, Redmine comes with three different trackers: bug, feature, and support.
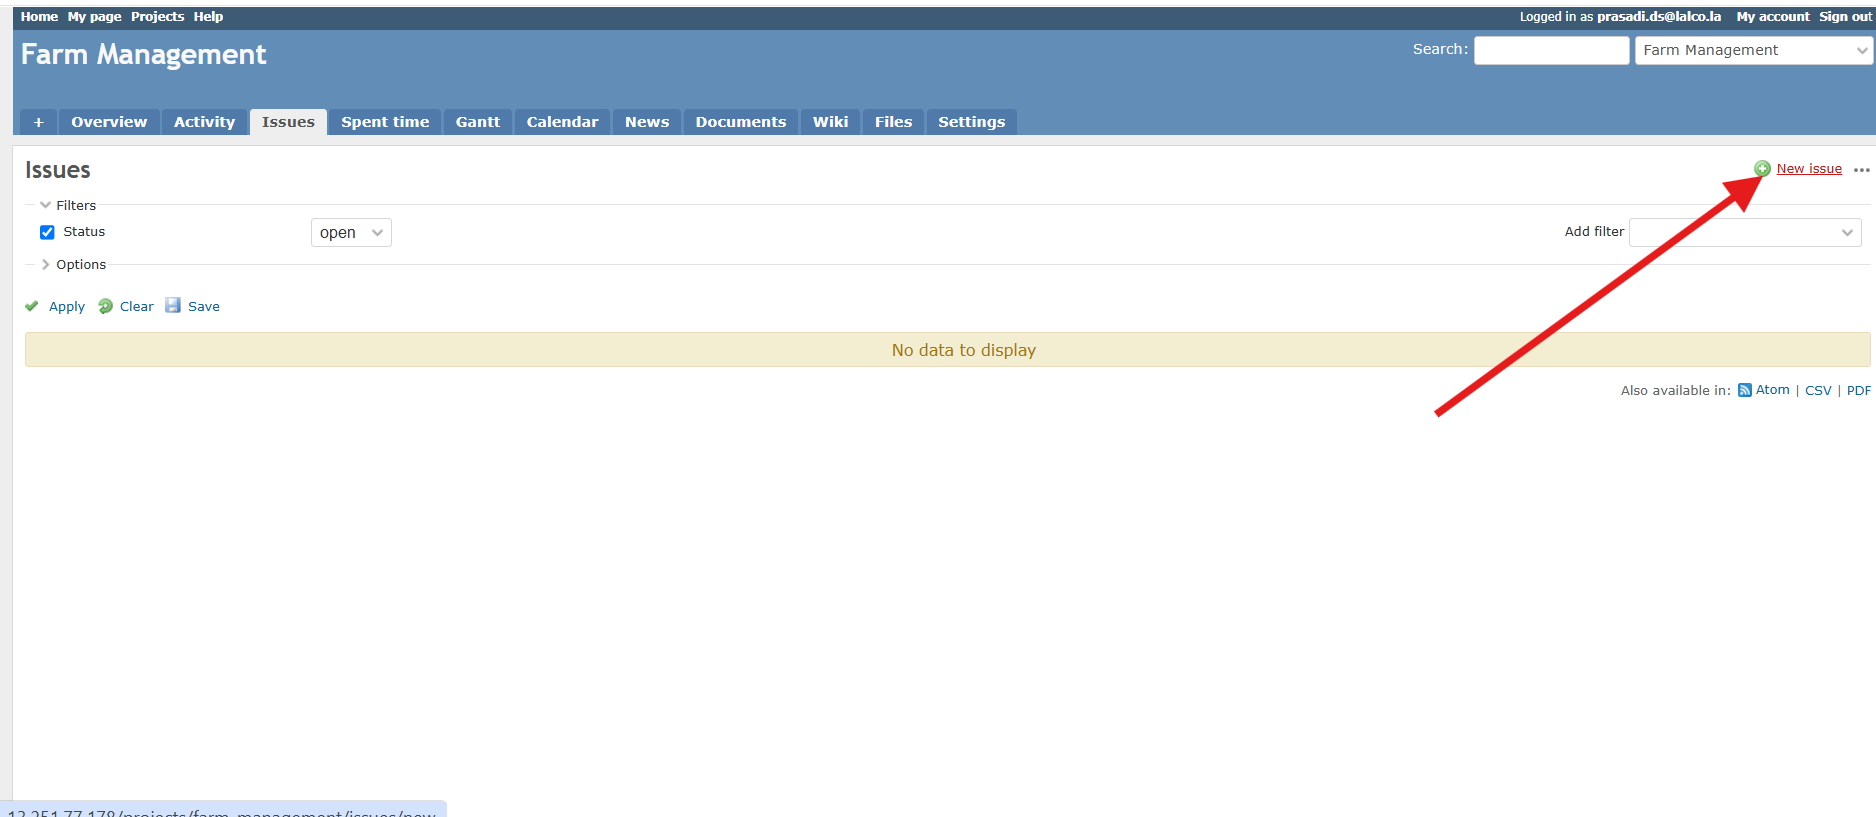
Click the "New issue" Button
On the "Issues" page, locate the "New issue" button. It's typically in the upper right corner of the issue list, as indicated by the red arrow in your image. Click this button.
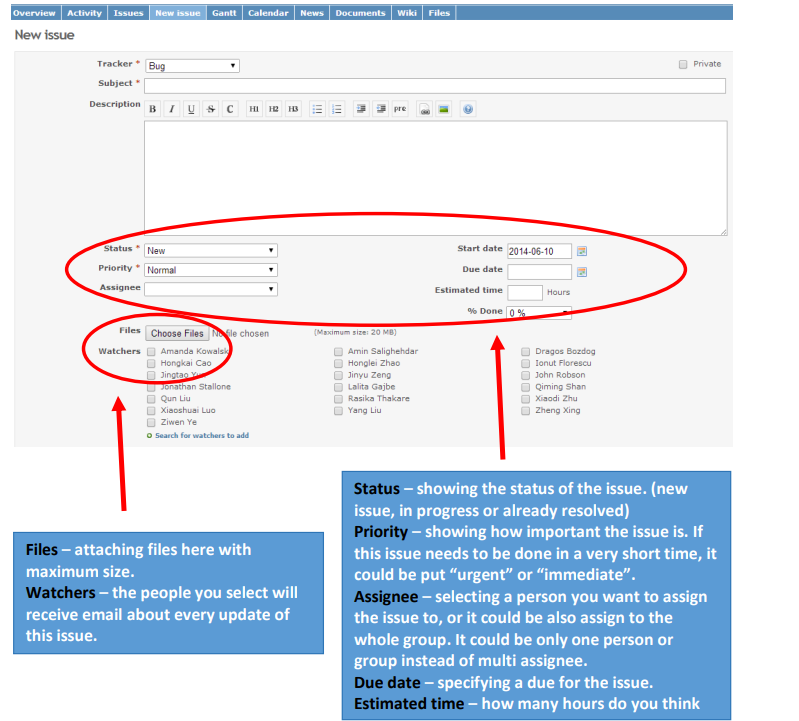
Fill out the "New issue" Form
-
Tracker (Pre-selected): The "Tracker" field is likely already selected as "Bug" based on your previous action or the default setting. If you need to change it, use the dropdown menu to choose a different issue type (e.g., Feature, Support, Task).
-
Subject ( Required):* In the "Subject" field, type a concise and descriptive title for this issue. This should briefly summarize the problem, request, or task.
For example, "Login button not working," or "Implement new report feature." -
Description: In the large "Description" text area, provide a detailed explanation of the issue. Include:
- Steps to reproduce: If it's a bug, clearly outline the steps someone can take to see the problem.
- Expected behavior: Describe what should happen.
- Actual behavior: Describe what is actually happening.
- Context: Any other relevant information that might help in understanding or resolving the issue.
-
Status (Pre-selected): The "Status" field is likely set to "New" by default. You usually don't need to change this when creating a new issue.
-
Priority ( Required):* Use the "Priority" dropdown menu to select the level of urgency or importance for this issue
(e.g., Low, Normal, High, Urgent). -
Assignee: If you know who should be responsible for this issue, select their name from the "Assignee" dropdown menu. If you're unsure, you can leave it blank.
-
Parent task: If this issue is a subtask of another existing issue, you can enter the ID number of the parent task here.
-
Start date: You can optionally set a "Start date" for when work on this issue should begin. The current date (05/16/2025 in your image) is pre-filled. You can change it using the calendar icon.
-
Due date: If this issue has a deadline, set the "Due date" using the calendar icon or by manually entering the date.
-
Estimated time: You can optionally enter an estimate of how many "Hours" you think it will take to resolve this issue.
-
% Done: This field is usually left at "0%" when creating a new issue. It will be updated as progress is made.
-
Additional Assignees: This section allows you to add other project members who are also working on or responsible for this issue. You can select names from the list and click the ">>" button to add them.
-
Files: If you have any relevant files (screenshots, documents, log files, etc.), click the "Choose Files" button to select them from your computer. Once selected, the file name will appear next to the button. Note the maximum file size limit mentioned.
- Choose an Action: At the bottom of the form, you have two main options
Create: Click this button to save the new issue and be redirected to the detailed view of the issue.
Create and add another: Click this button to save the current issue and immediately open a new, blank "New issue" form, pre-filled with the same project. This is useful if you have multiple related issues to create.
Once you have entered all the necessary details into the form, proceed by clicking the "Create" button to submit the new issue.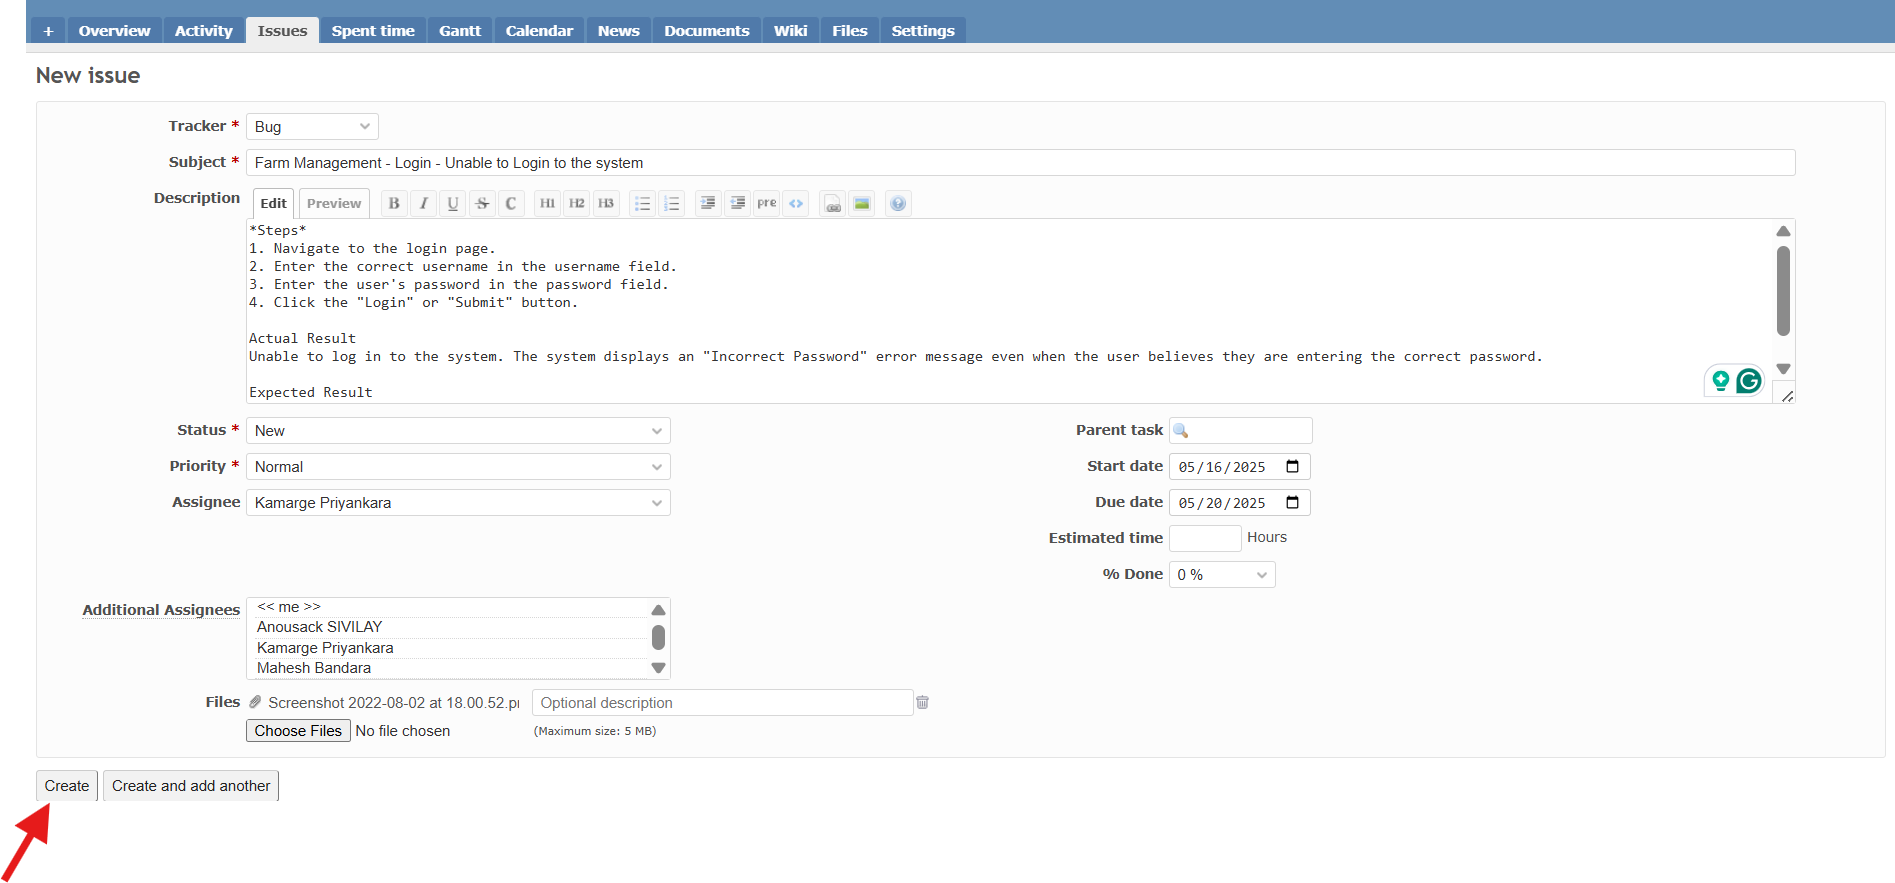
Created Bug
That you've created the bug report display as below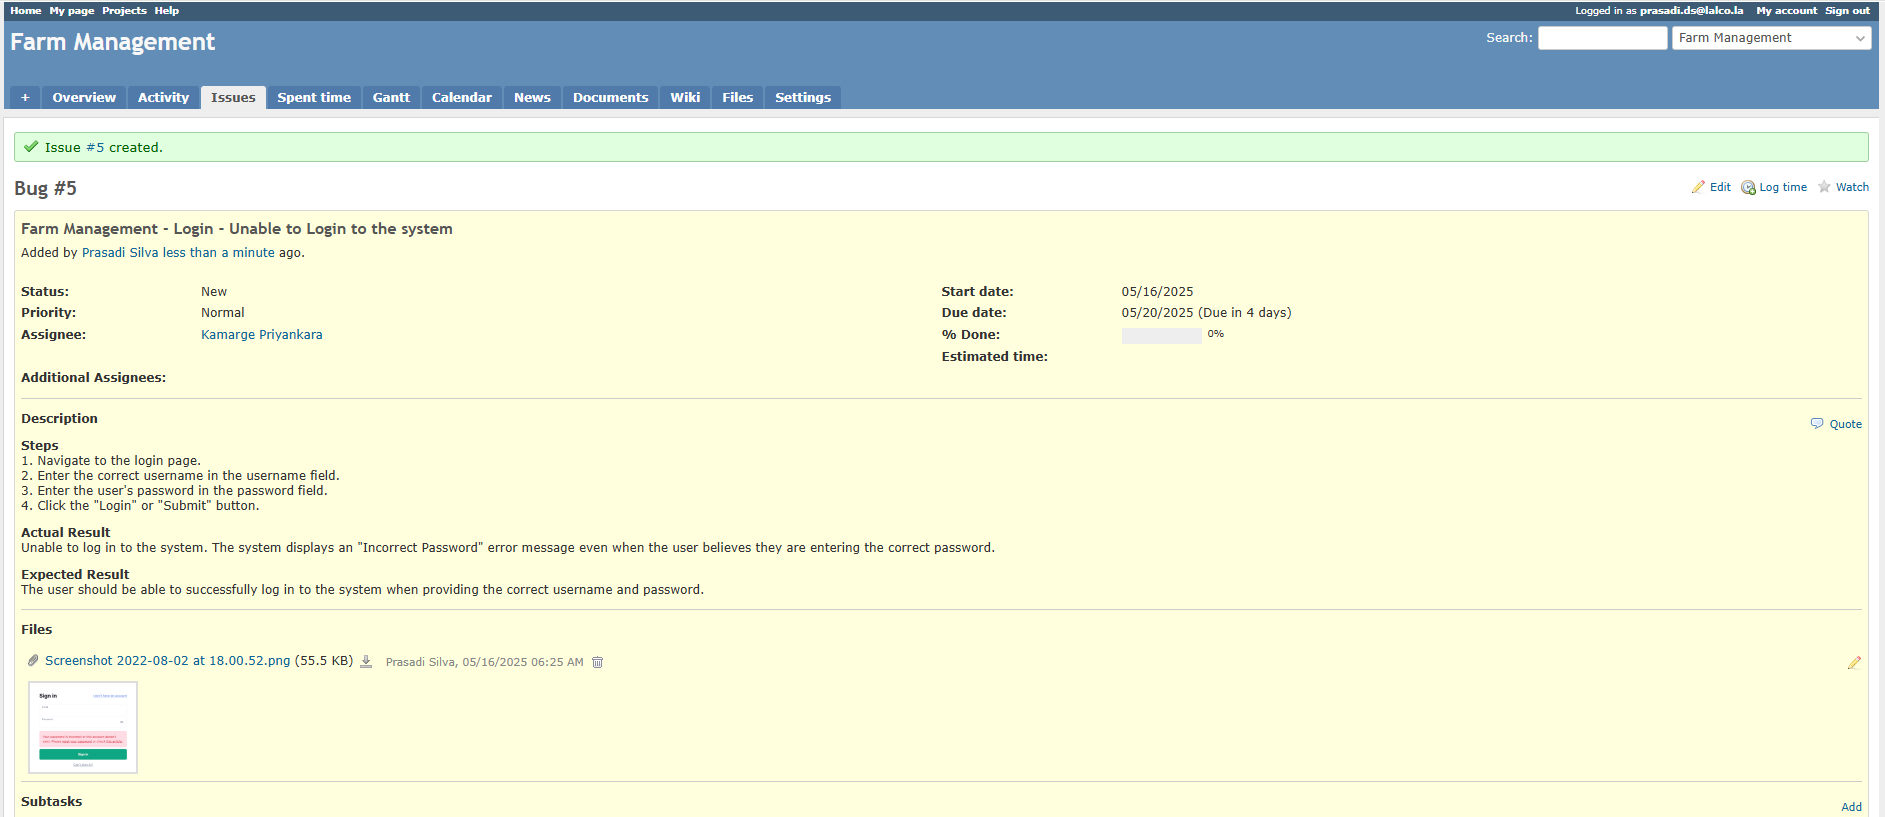
- At the top, you see a green banner confirming "Issue #5 created." This indicates that your bug report has been successfully saved.
- If you assigned the bug to someone, they will typically receive an email notification (depending on the project's notification settings). You might also want to verbally inform them of the new issue, especially if it's urgent.
- Use the comment box at the bottom of the page to provide updates, ask questions, or share new information related to the bug. Click "Add" to save your comment.
- After clicking “Issues”, a list of open issues will show up. In the list, there will be updated time, author &assignee, priority, status, and subject of each issue. By clicking the subject of the issue, you are able to enter the issue and see the description & update details.
Update Bug
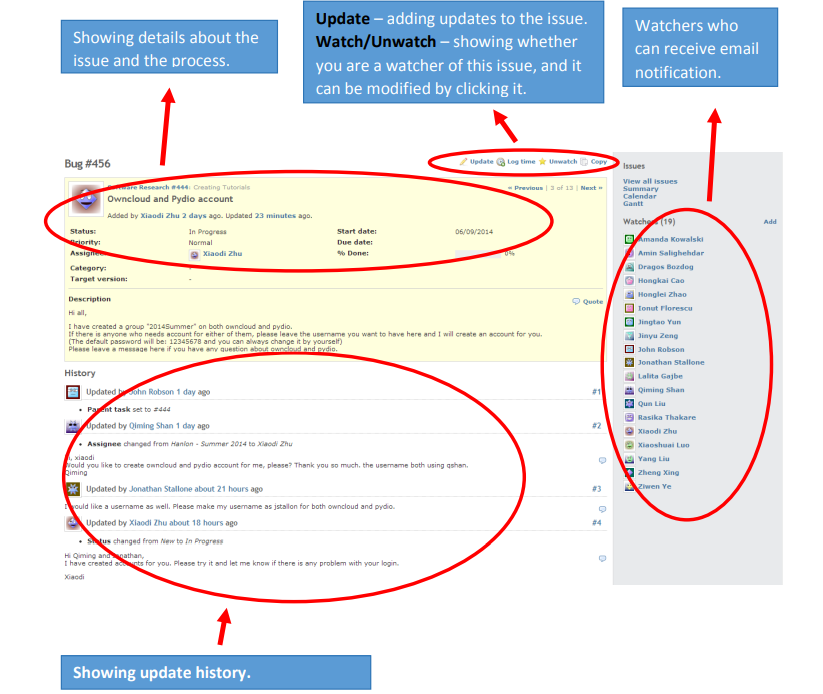
- In an issue, after clicking “Update”, a section will show up which allows the user to enter details.
- In this section, you are able to change the properties of the issue (e.g., how many percentage has been done, assignee changing, etc.).
- The “Log time” section lets users record how many hours have been spent on this issue. Uploading an attachment is also allowed.
- After you finish the update and submit it, watchers will receive an email about the updates, and people can always check the update history under this issue