Staff LMS – Admin User Manual
Introduction
Welcome to the Staff LMS (Loan Management System) Admin Dashboard. Designed for Lao Asean Leasing Public Company, this platform serves as the central hub for managing daily operations, financial collections, and customer relationships. The dashboard provides real-time visibility into critical organizational metrics, empowering administrators and staff to efficiently track daily workflow, monitor active and overdue accounts, and streamline the entire loan management lifecycle.
1. Admin Dashboard Overview
Upon logging in with administrator privileges, the Dashboard expands to include specialized Admin Statistics:
1. Main Dashboard Metrics The top section of the dashboard provides a high-level financial and operational summary at a glance:
-
Overdue: The total number of currently overdue cases.
-
Due Today: The total monetary value expected to be collected on the current day.
-
Completed: The number of tasks or cases successfully closed today.
-
Collected Total: The cumulative monetary amount successfully collected.
2. Task Overview This section tracks the daily and monthly performance metrics for the staff, divided into three key activities:
-
Tasks: Total number of assigned daily and monthly tasks.
-
Calls Done: Total number of customer contact calls completed.
-
Visits Done: Total number of physical customer visits completed.
3. Team Dashboard Overview This area provides visual charts to monitor team workload and case statuses. You can use the Department dropdown menu to filter these metrics for specific teams.
-
Task Status Breakdown: A chart displaying the ratio of Active Cases to Overdue Cases against the total case volume.
-
Task Aging Breakdown: A chart isolating OA (Overdue Aging) Cases to monitor severely delayed accounts.
-
User & Customer Management: Access profiles for Customers, Guarantors, Staff.
-
Loan & Contract Management: Manage Loans, Collaterals, Contract Assigning, Sales, and Special Cases.
-
Collections & Legal Operations: Navigate to the Collection and Legal Team overview, Legal actions, and logged Payments.
-
Daily Workflow & Tasks: Access individual Tasks, the Customer Visit List, Follow Ups, and general Notes.
-
System Settings: Access your personal Profile and system-level tools like the API Test.

2. Customers Module Overview
The Customers page is the central directory for viewing and managing all customer records within the Staff LMS. It allows staff to search for specific individuals, filter by organizational branches, and quickly access contact details and contract information.
1.Filtering and Searching
- Organizational Filters: Use the dropdown menus at the top of the screen (G Department, Department, Branch, Unit, and Mini Unit) to narrow the customer list to specific operational segments.
Organizational & Collection Filters: Use the dropdown menus at the top of the screen (G Department, Department, Collection Unit, Collection TL, and Collection) to narrow the customer list to specific operational and collection-focused segments. - Search Bar: Quickly locate a specific customer by typing their name or phone number into the Search customers by name or phone field. Use the Clear button to reset your search.
2. Customer Categories
-
Use the Sales and Collection toggle buttons located above the data table to switch between viewing customers actively in the sales pipeline versus those currently in the collections process.
3. Customer Data Table The main table displays key identifying and contractual information for each listed customer:
-
Customer LMS ID: The unique system identifier for the customer.
-
Name: The customer's full registered name (often displayed in multiple languages/scripts).
-
Phone: The primary contact number(s) for the customer.
-
Address: The customer's registered physical location.
-
Contracts: Displays the specific contract ID numbers and the total number of active contracts tied to the customer.
-
Actions: Click the view icon (eye symbol) in this column to open the customer's detailed profile records.
-
Use the Previous and Next buttons at the bottom of the table to navigate through multiple pages of customer records.

Actions: Click the view icon (eye symbol) in this column to open the customer's detailed profile records.


3.Guarantors Module Overview
The Guarantors page serves as the directory for viewing and managing individuals who act as guarantors on customer contracts within the Staff LMS. It allows staff to search for specific guarantors, filter by organizational units, and review their contact details and relationship to the primary customer.
1. Filtering and Searching
- Organizational Filters: Use the dropdown menus at the top of the screen (G Department, Department, Branch, Unit, and Mini Unit) to narrow the guarantor list to specific operational segments.
Organizational & Collection Filters: Use the dropdown menus at the top of the screen (G Department, Department, Collection Unit, Collection TL, and Collection) to narrow the guarantor list to specific operational and collection-focused segments. - Search Bar: Quickly locate a specific guarantor by typing their details into the Search contract, name, or phone field. Use the Clear button to reset your search.
2.Guarantor Categories
-
Use the Sales and Collection toggle buttons located above the data table to switch between viewing guarantors associated with contracts in the active sales pipeline versus those currently in the collections process.
3. Guarantor Data Table The main table displays key identifying and contractual information for each listed guarantor:
-
LMS Guarantor ID: The unique system identifier for the guarantor.
-
Contract No: The specific contract number the guarantor is associated with.
-
Guarantor Name & Lao Name: The guarantor's full registered name in English and Lao scripts.
-
Phone: The primary contact number for the guarantor.
-
Relationship: The guarantor's relation to the primary customer (e.g., Mother, Cousin, Father, Husband).
-
Address: The registered physical location of the guarantor.
-
Actions: Click the view icon (eye symbol) in this column to open the guarantor's detailed profile records.
Use the Previous and Next buttons at the bottom of the table to navigate through multiple pages of guarantor records.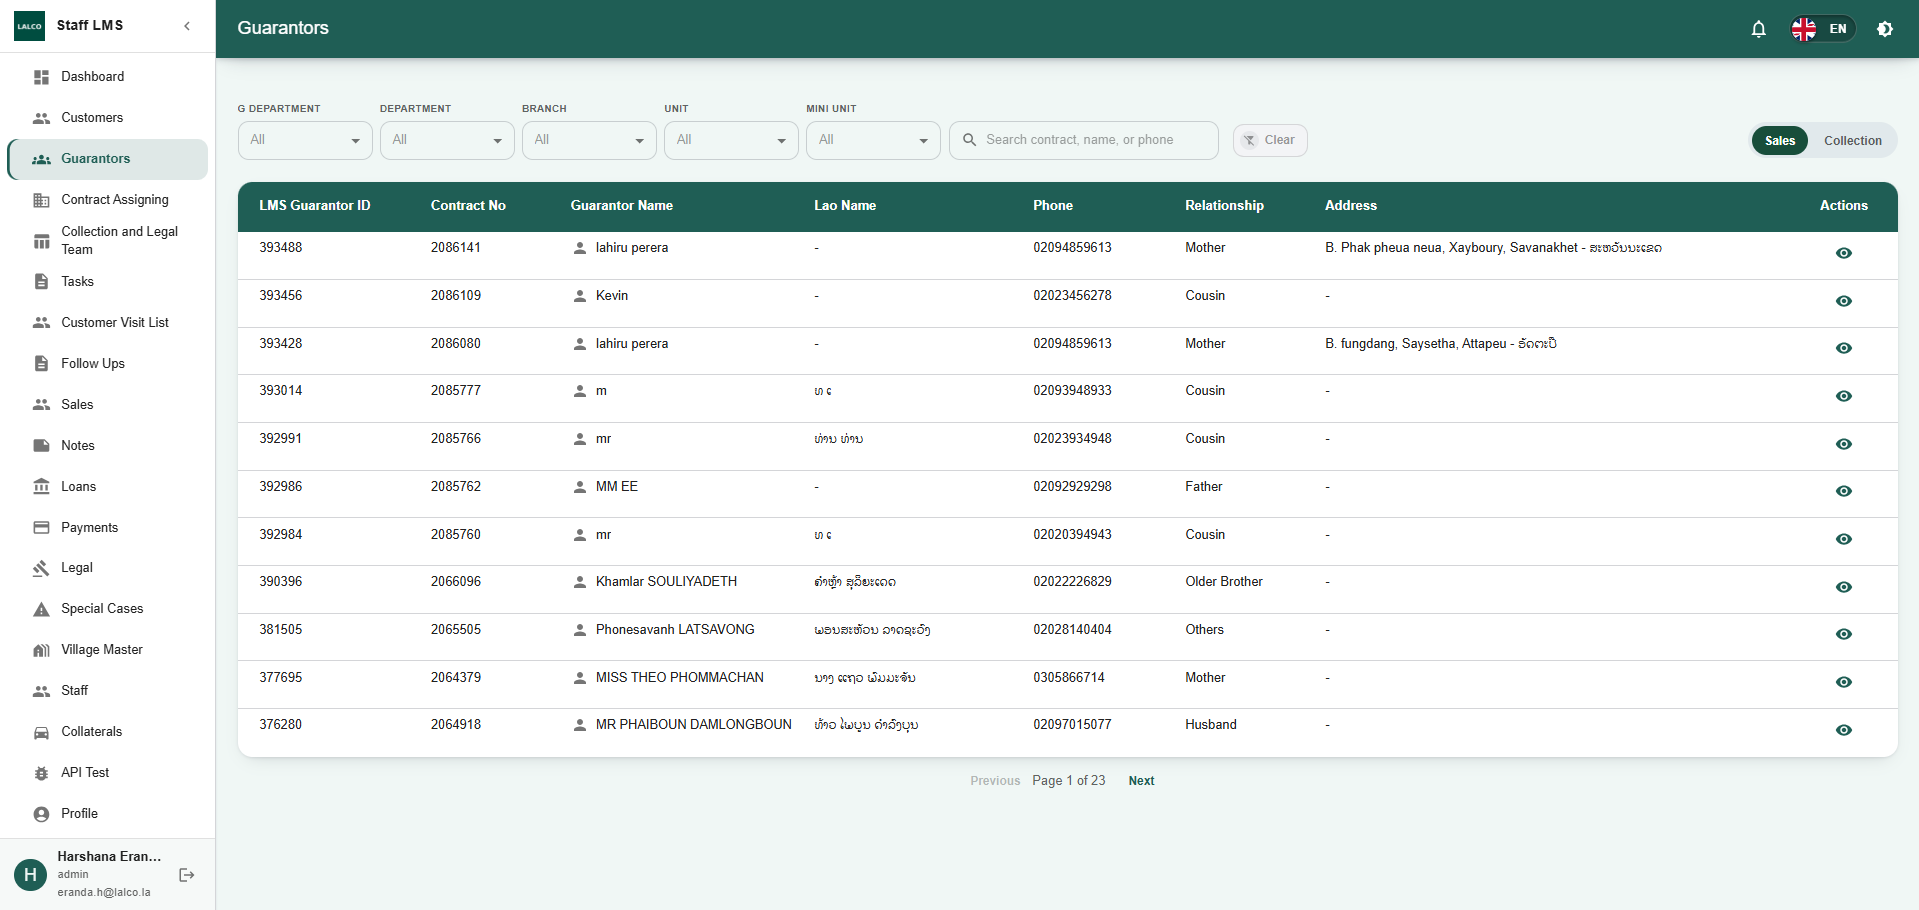
Actions: Click the view icon (eye symbol) in this column to open the guarantor's detailed profile records.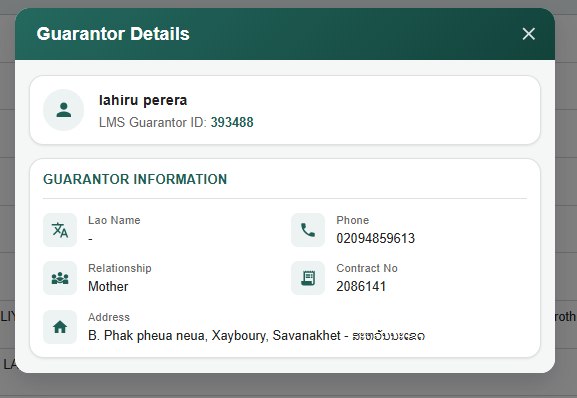
4.Contract Assigning Module Overview
The Contract Assigning page allows administrators and managers to view, track, and manage which contracts are assigned to specific staff members across different departments and branches.
1. Filtering and Searching
-
Organizational Filters: Use the dropdown menus at the top of the screen (G DEPT, DEPT, SEC BRANCH, UNIT, and MUNIT) to narrow down the contract assignments by specific organizational hierarchy levels.
-
Search Fields: Use the dedicated text fields to search for specific records by CONTRACT NO (Contract Number), STAFF NO (Staff Number), or STAFF NAME.
-
Clear Button: Click the Clear button to reset all search fields and filters to their default state.
2. Bulk Upload Operations
-
Download Sample File: Click this button to download a template file if you need to bulk-assign contracts.
-
Upload File: Use this button to upload a completed spreadsheet to assign multiple contracts to staff members at once.
3. Contract Assignment Data Table The main data table displays detailed information regarding contract assignments:
-
Contract & Staff Info: Displays the internal system ID, Contract No, Staff No, and Staff Name with their Title.
-
Location & Hierarchy: Shows whether the staff is located at Head Office (HO) or Branch (BR), along with detailed tracking of their organizational placement (HQ, G Dept, Dept, Sec Branch, Unit, Munit).
-
Collection Details: Displays associated Collection CC and Collection assignments.
-
Created At: Indicates the date and time the assignment was recorded in the system.
Use the Previous and Next buttons at the bottom of the table to navigate through multiple pages of assigned contracts.
5.Collection and Legal Team Module Overview
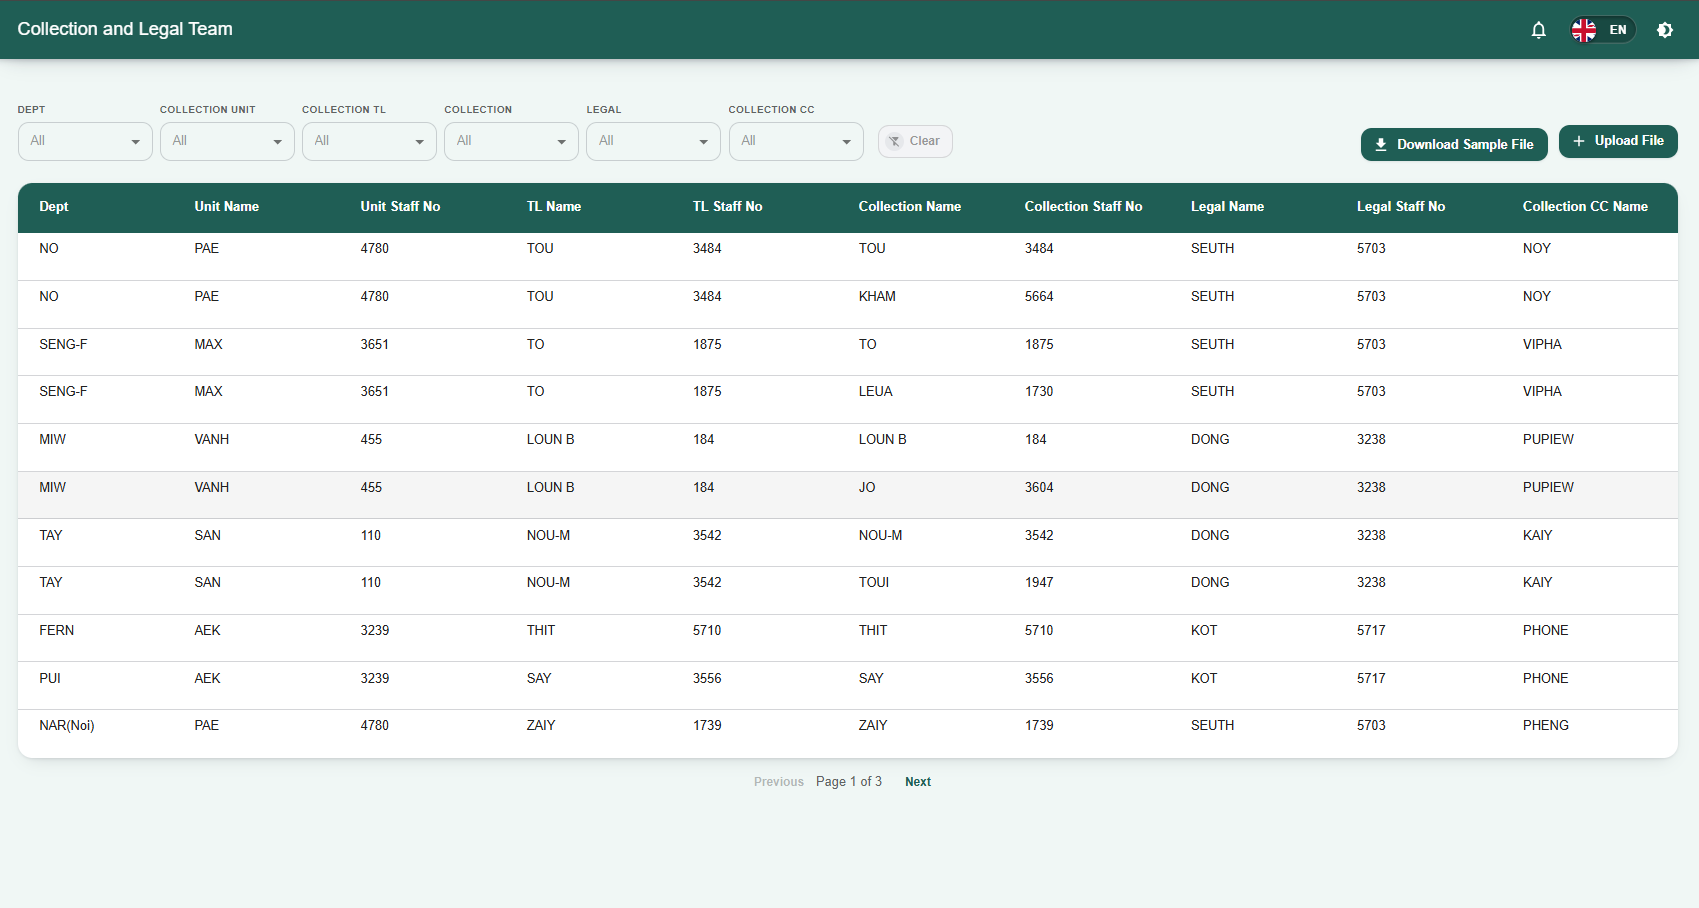
The Collection and Legal Team page allows administrators to view, organize, and manage the hierarchy and assignments of staff members within the collection and legal departments. It provides a structured view of how different units, team leaders, collection agents, and legal staff are linked together.
1. Filtering Team Assignments
-
Organizational Filters: Use the dropdown menus at the top of the screen to filter the data table by specific roles and departments:
-
DEPT: Filter by the broader department.
-
COLLECTION UNIT: Filter by specific collection units.
-
COLLECTION TL: Filter by Collection Team Leaders.
-
COLLECTION: Filter by specific collection agents.
-
LEGAL: Filter by specific legal staff members.
-
COLLECTION CC: Filter by Collection Call Center staff.
-
-
Clear Button: Click the Clear button to reset all filters and return to the default view of all team members.
2. Bulk Upload Operations
-
Download Sample File: Click this button to download a standard spreadsheet template required for bulk-assigning or updating team structures.
-
Upload File: Use this button to upload a completed template file, allowing you to update multiple team assignments and hierarchies simultaneously.
3. Team Data Table The main data table displays the detailed hierarchy and staffing for the collection and legal operations:
-
Dept: The department the staff belong to.
-
Unit Name & Unit Staff No: The name of the specific unit and its corresponding staff identifier.
-
TL Name & TL Staff No: The assigned Team Leader's name and staff number.
-
Collection Name & Collection Staff No: The assigned field/collection agent's name and staff number.
-
Legal Name & Legal Staff No: The assigned legal representative's name and staff number.
-
Collection CC Name: The assigned Collection Call Center representative.
-
Use the Previous and Next buttons at the bottom of the table to navigate through multiple pages of team records.
6.Tasks Module Overview
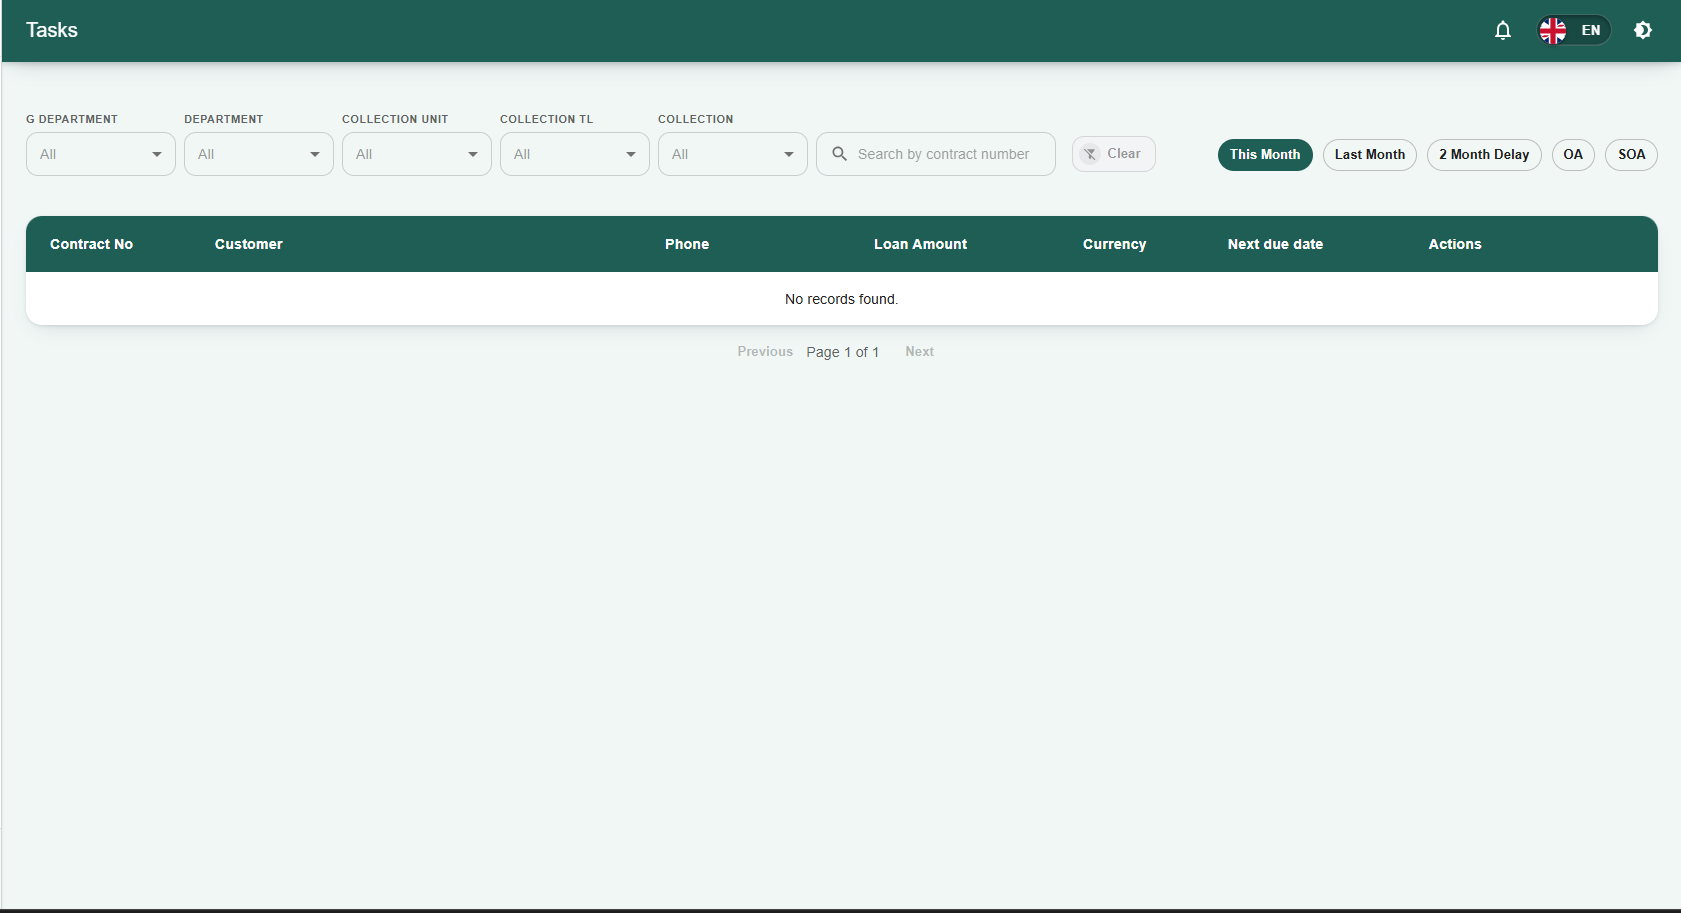
The Tasks page is the primary workspace for staff to view and manage their assigned collection and operational tasks within the Staff LMS. It provides a detailed list of contracts requiring attention, allowing users to track due dates, loan amounts, and customer contact information.
1. Filtering and Searching
-
Organizational & Collection Filters: Use the dropdown menus at the top of the screen (G DEPARTMENT, DEPARTMENT, COLLECTION UNIT, COLLECTION TL, and COLLECTION) to narrow the task list to specific operational segments or individual staff assignments.
-
Search Bar: Quickly locate a specific task by typing the contract number into the Search by contract number field.
-
Clear Button: Click Clear to reset all search fields and filters to their default state.
2. Task Aging Categories
-
Use the quick-filter buttons located above the data table to categorize tasks based on their delinquency status: This Month, Last Month, 2 Month Delay, OA (Overdue Aging), and SOA (Severe Overdue Aging).
3. Task Data Table The main table displays key information for each assigned task:
-
Contract No: The unique identifier for the customer's loan contract.
-
Customer: The name of the primary borrower.
-
Phone: The contact number for the customer.
-
Loan Amount & Currency: The financial value of the loan and its designated currency.
-
Next due date: The upcoming or past-due deadline for the expected payment.
Actions: In this column, you will find a Customer Visit List button (indicated by an eye icon) for each task. Clicking this link allows staff to view, log, or manage physical field visit details for that specific contract. This action is especially critical for managing highly delinquent accounts categorized under OA (Overdue Aging) and SOA (Severe Overdue Aging).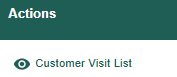
3.1 Customer Visit List Overview The Customer Visit List page provides a sequential log of all physical field visits associated with a specific contract or customer account. It allows staff to track historical interactions, visit outcomes, and agent locations for auditing and follow-up purposes.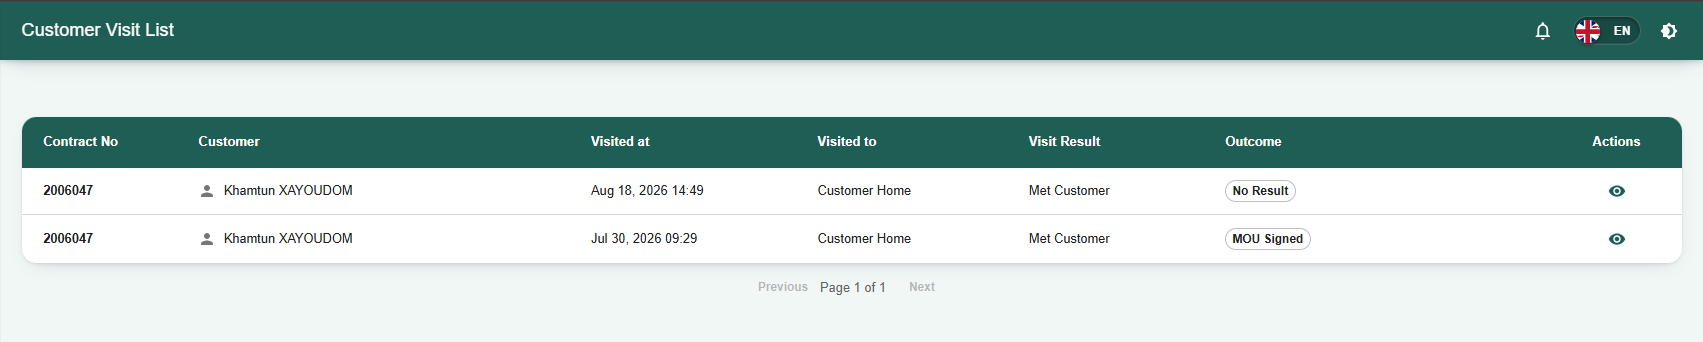
3.2 Visit Log Data Table The main data table provides a summary of each recorded visit:
-
Contract No: The unique loan contract identifier.
-
Customer: The registered name of the visited borrower.
-
Visited at: The specific date and time the field visit took place.
-
Visited to: The destination type (e.g., Customer Home).
-
Visit Result: The immediate status of the interaction (e.g., Met Customer).
-
Outcome: The negotiated or unresolved result of the visit (e.g., Negotiated, No Result).
Actions: Contains a view icon (eye symbol) used to open the full detailed report for that specific visit.
3.3Viewing Visit Details
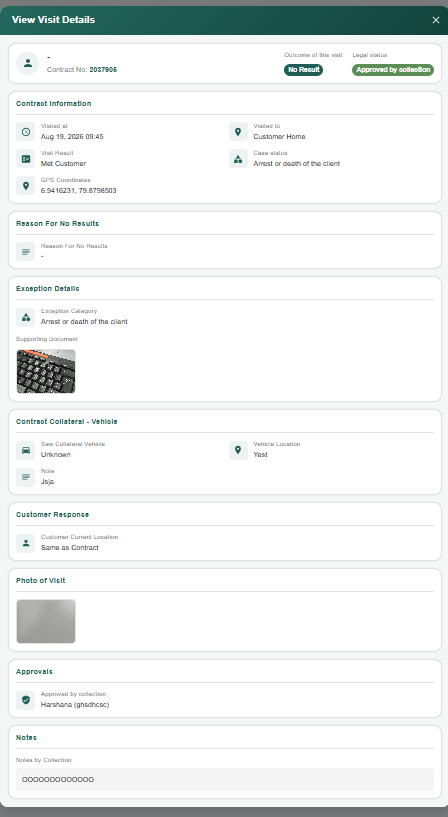
Clicking the action button (eye icon) from the Customer Visit List opens the View Visit Details window.
This modal displays the comprehensive record submitted by the field agent:
-
Header Information: Displays the customer's full name, Contract No, Outcome of this visit, and the current Legal status.
-
Contract Information: Provides precise tracking details including the Visited at timestamp, Visited to location, Visit Result, Case status, and the exact GPS Coordinates recorded during the visit.
-
Reason For No Results: Displays the specific explanation logged by the agent if the visit failed to produce a successful outcome or payment.
-
Exception Details: Notes any specific operational exceptions or irregularities flagged during the visit.
-
Contract Collateral - Vehicle: Confirms whether the field agent visually verified the vehicle acting as collateral, the recorded Vehicle Location, and any additional notes.
-
Customer Response: Displays any feedback, negotiations, or statements provided by the customer during the interaction.
- Use the Previous and Next buttons at the bottom of the table to navigate through multiple pages of tasks.
7.Customer Visit List Overview
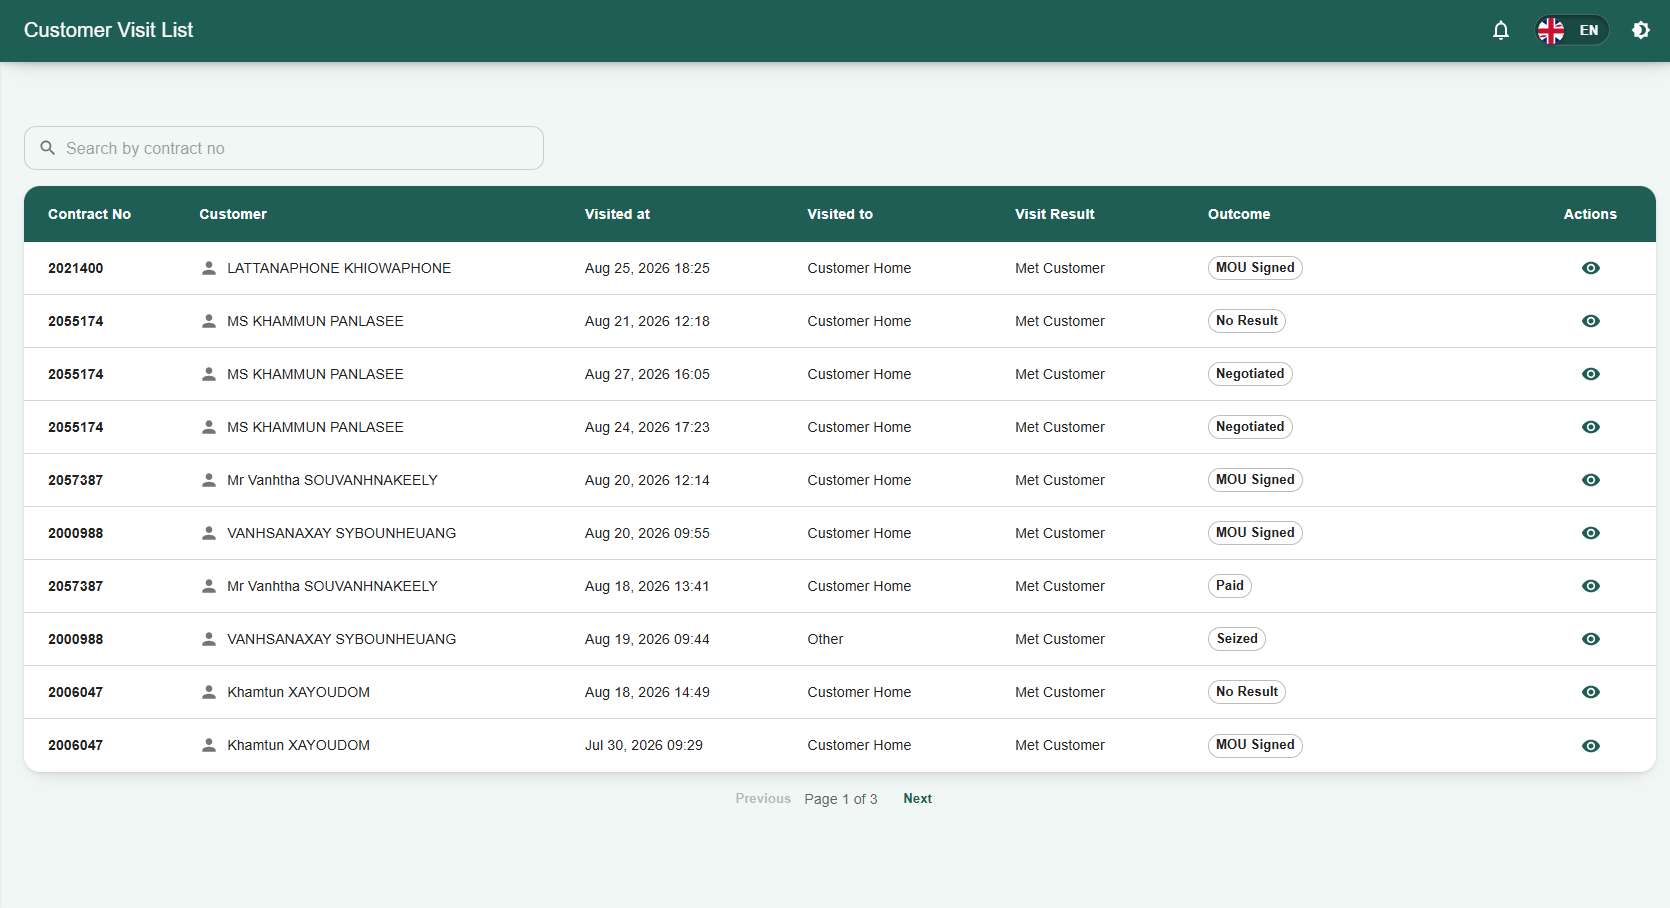
The Customer Visit List page serves as a centralized log of all physical field visits conducted by staff. It provides administrators and managers with a clear, sequential view of customer interactions, visit locations, and operational outcomes.
1. Searching Records
-
Search Bar: Quickly locate specific visit records by typing the exact contract number into the Search by contract no field located at the top of the page.
2. Visit Log Data Table The main data table provides a summary of each recorded field visit:
-
Contract No: The unique identifier for the associated loan contract.
-
Customer: The registered name of the borrower who was visited.
-
Visited at: The specific date and time the field visit took place.
-
Visited to: The destination type of the visit (e.g., Customer Home, Other).
-
Visit Result: The immediate status of the physical visit (e.g., Met Customer).
-
Outcome: The documented result or resolution of the interaction. Common outcomes include MOU Signed, No Result, Negotiated, Paid, or Seized.
-
Actions: Contains a view icon (eye symbol) used to open the full detailed report for that specific visit.
-
Use the Previous and Next buttons at the bottom of the table to navigate through multiple pages of visit logs.
8.Follow Ups Module Overview
The Follow Ups page allows staff and administrators to track, prioritize, and manage ongoing collection efforts for specific customer contracts. This module highlights accounts requiring immediate attention due to broken promises, overdue payments, or refused agreements.
1. Filtering and Searching
-
Organizational & Collection Filters: Use the dropdown menus at the top of the screen (G DEPARTMENT, DEPARTMENT, COLLECTION UNIT, COLLECTION TL, and COLLECTION) to narrow the follow-up list to specific operational segments or individual staff assignments.
-
Search Bar: Quickly locate a specific case by typing the details into the Search customer or contract no. field.
-
Clear Button: Click Clear to reset all search fields and filters to their default state.
2. Priority Categorization
-
Priority Filters: Use the quick-filter buttons located above the data table (All, Critical Priority, Major Priority, Minor Priority) to categorize tasks based on their assigned urgency.
-
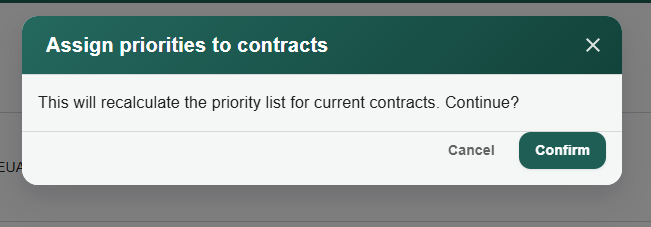
Assign Priorities: Click the Assign priorities to contracts button to manually update or designate the priority level for specific accounts.
3. Follow Ups Data Table The main table displays key information for each account requiring a follow-up:
-
Contract No: The unique identifier for the customer's loan contract.
-
Customer: The registered name of the borrower.
-
Phone: The primary contact number for the customer.
-
Currency & Contract type: The loan's currency (e.g., USD) and category (e.g., SME Car, SME Bike).
-
Priority: The numerical priority level assigned to the case.
-
Case Reason: The specific trigger requiring a follow-up (e.g., "Promise broken 3 times", "MOU refused by customer", "Payment due date passed").
-
Collection: The collection agent or unit assigned to the case.
4. Actions The Actions column provides specific tools for managing the follow-up:
-
Follow up priority change: Click this action to adjust the priority level of the specific contract.
-
Customer Visit List: Click this link (eye icon) to view, log, or manage physical field visit details related to this specific follow-up case.
-
Use the Previous and Next buttons at the bottom of the table to navigate through multiple pages of follow-up records.
9.Sales Module Overview
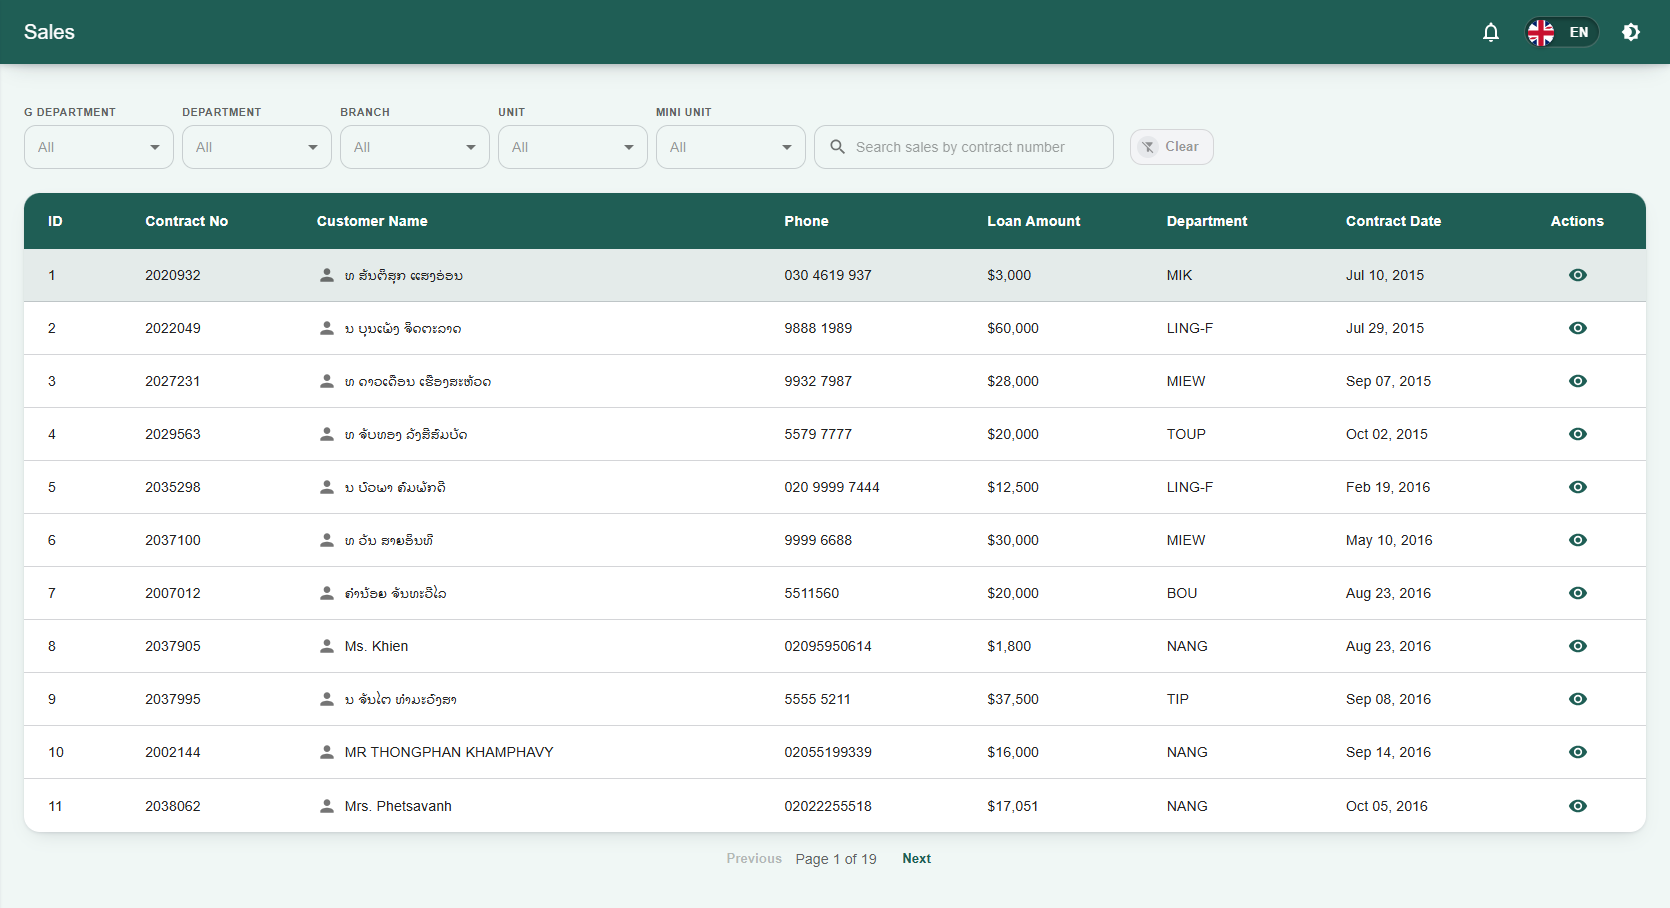
The Sales page allows staff and administrators to view and manage active sales contracts within the Staff LMS. It provides a comprehensive list of loan amounts, contract dates, and customer details associated with the sales pipeline.
1. Filtering and Searching
-
Organizational Filters: Use the dropdown menus at the top of the screen (G DEPARTMENT, DEPARTMENT, BRANCH, UNIT, and MINI UNIT) to narrow down the sales records to specific organizational branches or units.
-
Search Bar: Quickly locate a specific sales record by typing the contract number into the Search sales by contract number field.
-
Clear Button: Click Clear to reset all search fields and dropdown filters to their default state.
2. Sales Data Table The main table displays key information for each sales contract:
-
ID & Contract No: The internal system ID and the unique identifier for the customer's sales contract.
-
Customer Name: The registered name of the borrower.
-
Phone: The primary contact number for the customer.
-
Loan Amount: The total financial value of the issued loan.
-
Department: The specific department assigned to or managing the contract (e.g., MIK, LING-F, MIEW).
-
Contract Date: The date the sales contract was officially initiated.
-
Actions: Contains a view icon (eye symbol) to open detailed information for that specific sales record.
-
Use the Previous and Next buttons at the bottom of the table to navigate through multiple pages of sales records.
10.Notes Module Overview
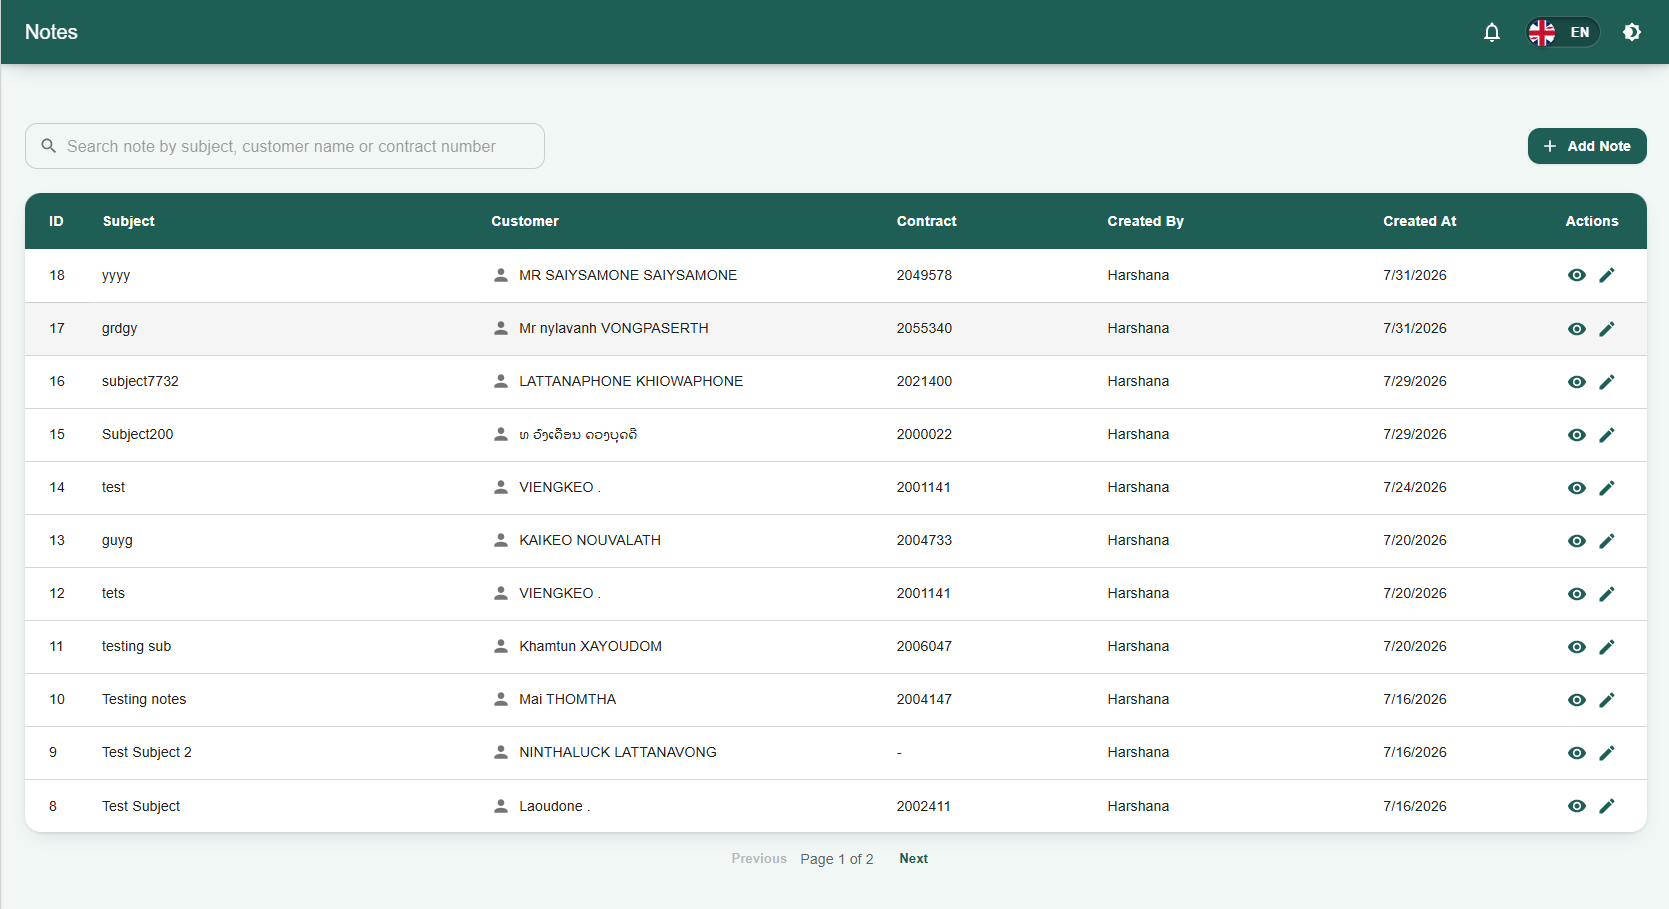
The Notes page serves as a centralized log for staff to view, search, and manage internal records and communications regarding specific customers and loan contracts.
1. Searching Notes
-
Search Bar: Quickly locate specific records by typing into the Search note by subject, customer name or contract number field located at the top of the page.
2. Creating a New Note
-
Add Note: Click the + Add Note button in the top right corner to create and log a new note into the system.
3. Notes Data Table The main data table provides a summary of all recorded notes, organized by the following columns:
-
ID: The internal system identifier for the note.
-
Subject: The main topic or title of the note.
-
Customer: The registered name of the associated customer.
-
Contract: The specific contract number tied to the note.
-
Created By: The name of the staff member who authored the note.
-
Created At: The date the note was logged into the system.
4. Actions The Actions column contains specific tools for managing individual notes:
-
View Note: Click the view icon (eye symbol) to read the full details of the note.
-
Edit Note: Click the edit icon (pencil symbol) to modify the existing note's contents.
-
Use the Previous and Next buttons at the bottom of the table to navigate through multiple pages of notes.
11.Loans Module Overview
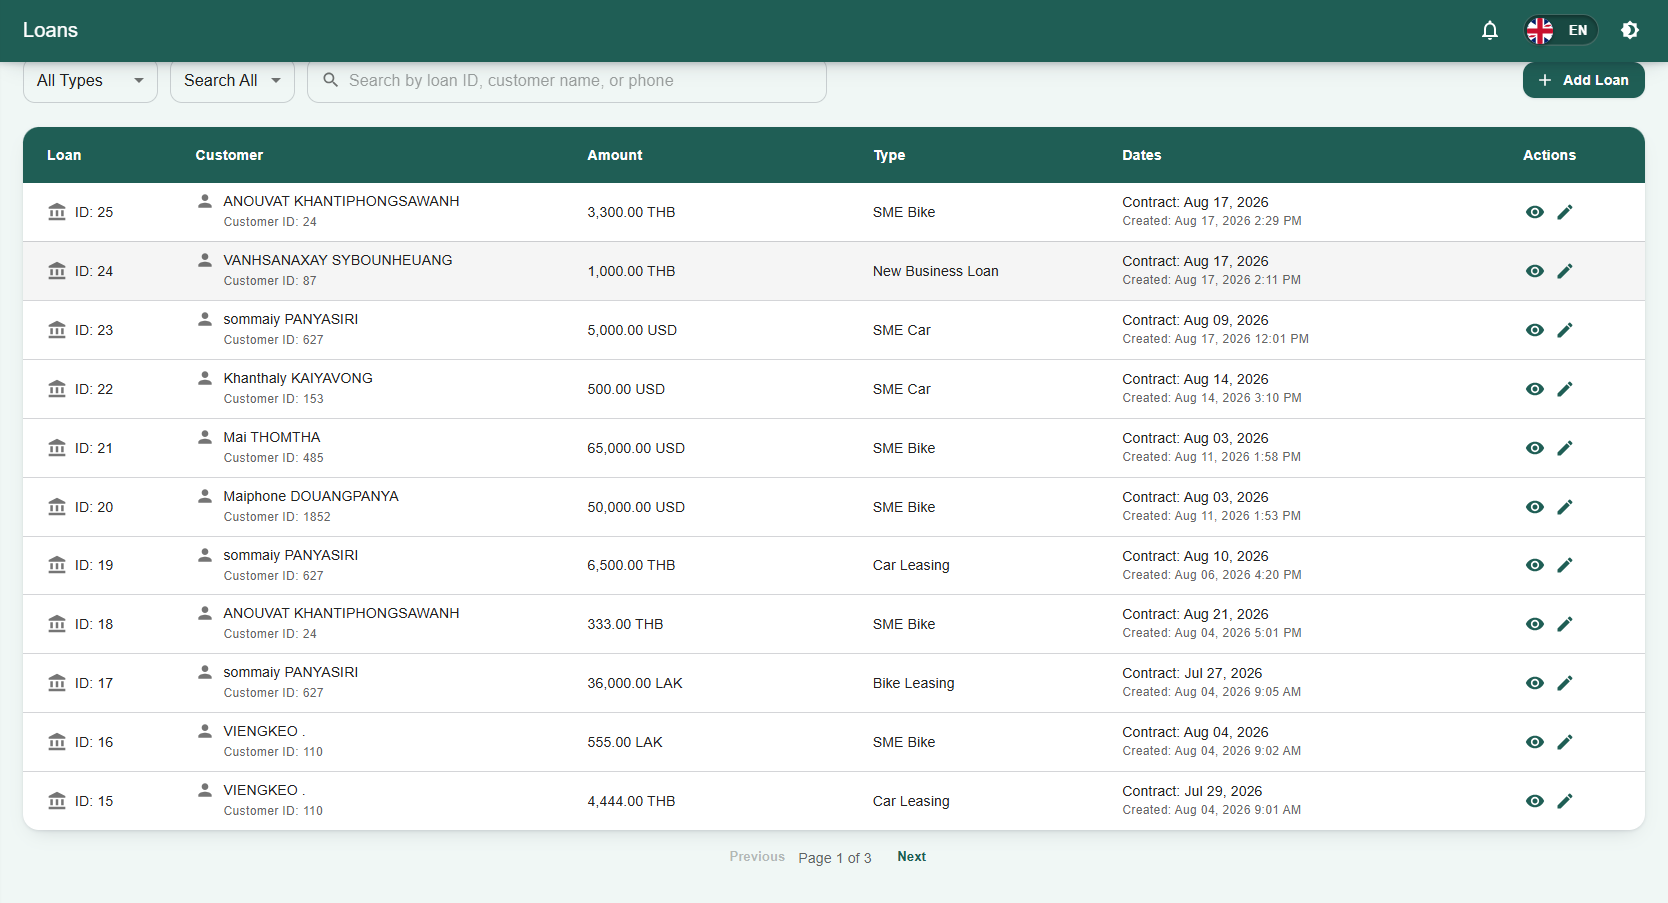
The Loans page is the central hub for viewing and managing all active and historical loan records within the Staff LMS. It provides staff and administrators with a comprehensive overview of loan amounts, types, contract dates, and associated customer details.
1. Filtering and Searching
-
Type & Category Filters: Use the dropdown menus at the top left of the screen (All Types and Search All) to filter the loan list by specific loan categories (e.g., SME Bike, New Business Loan, SME Car).
-
Search Bar: Quickly locate a specific loan record by typing into the Search by loan ID, customer name, or phone field.
2. Creating a New Loan
-
Add Loan: Click the + Add Loan button in the top right corner of the dashboard to initiate the process of entering a new loan contract into the system.
3. Loans Data Table The main data table provides a detailed breakdown of each loan record:
-
Loan: Displays the unique internal ID number for the loan contract.
-
Customer: Shows the registered name of the borrower along with their unique Customer ID.
-
Amount: The total financial value of the loan and its designated currency (e.g., THB, USD, LAK).
-
Type: The specific classification of the loan (e.g., SME Bike, Car Leasing, New Business Loan).
-
Dates: Displays both the official Contract date and the date/time the record was Created in the system.
-
Actions: Contains icons (such as view or edit symbols) to open detailed information or modify that specific loan record.
-
Use the Previous and Next buttons at the bottom of the table to navigate through multiple pages of loan records.
12.Payments Module Overview
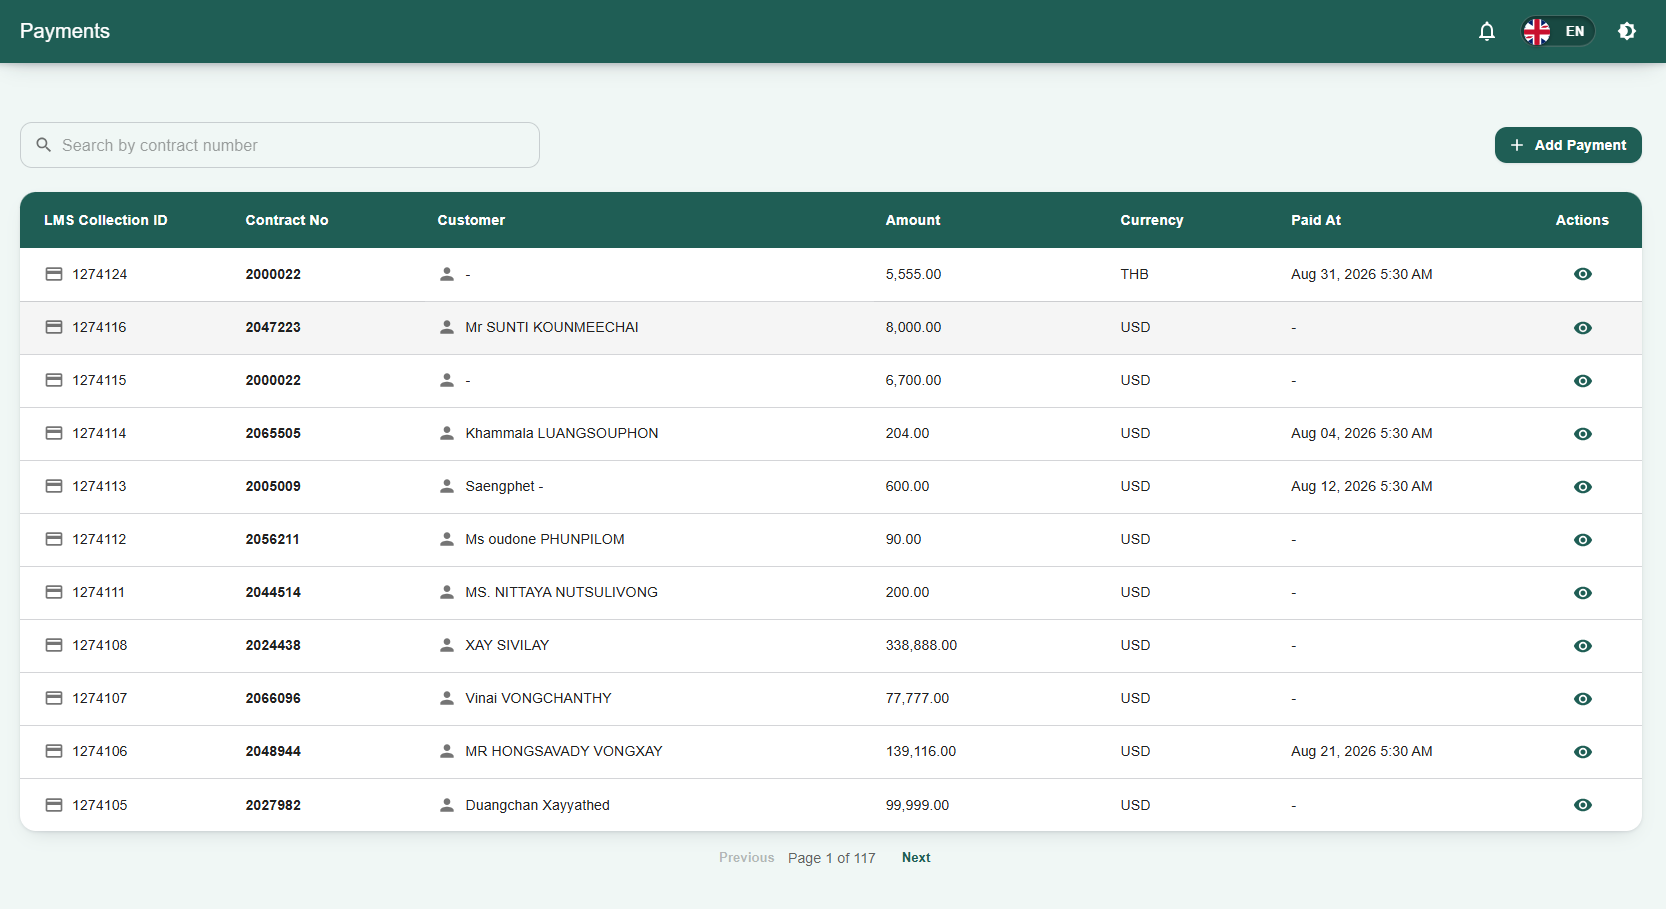
The Payments page serves as the centralized ledger for tracking and managing all financial transactions within the Staff LMS. It allows staff and administrators to view historical payment records, verify collected amounts, and log new payments against specific customer contracts.
1. Searching Records
-
Search Bar: Quickly locate specific payment records by typing the exact contract number into the Search by contract number field located at the top of the page.
2. Adding a New Payment
-
Add Payment: Click the + Add Payment button in the top right corner of the dashboard to manually record a new customer payment into the system.
3. Payments Data Table The main data table provides a detailed summary of each recorded transaction:
-
LMS Collection ID: The unique internal system identifier for the payment record.
-
Contract No: The specific loan contract number the payment is applied to.
-
Customer: The registered name of the borrower who made the payment.
-
Amount: The numerical value of the payment received.
-
Currency: The designated currency of the transaction (e.g., THB, USD).
-
Paid At: The recorded date and time the payment was successfully processed.
-
Actions: Contains a view icon (eye symbol) used to open the full detailed receipt or record for that specific payment.
-
Use the Previous and Next buttons at the bottom of the table to navigate through multiple pages of payment records.
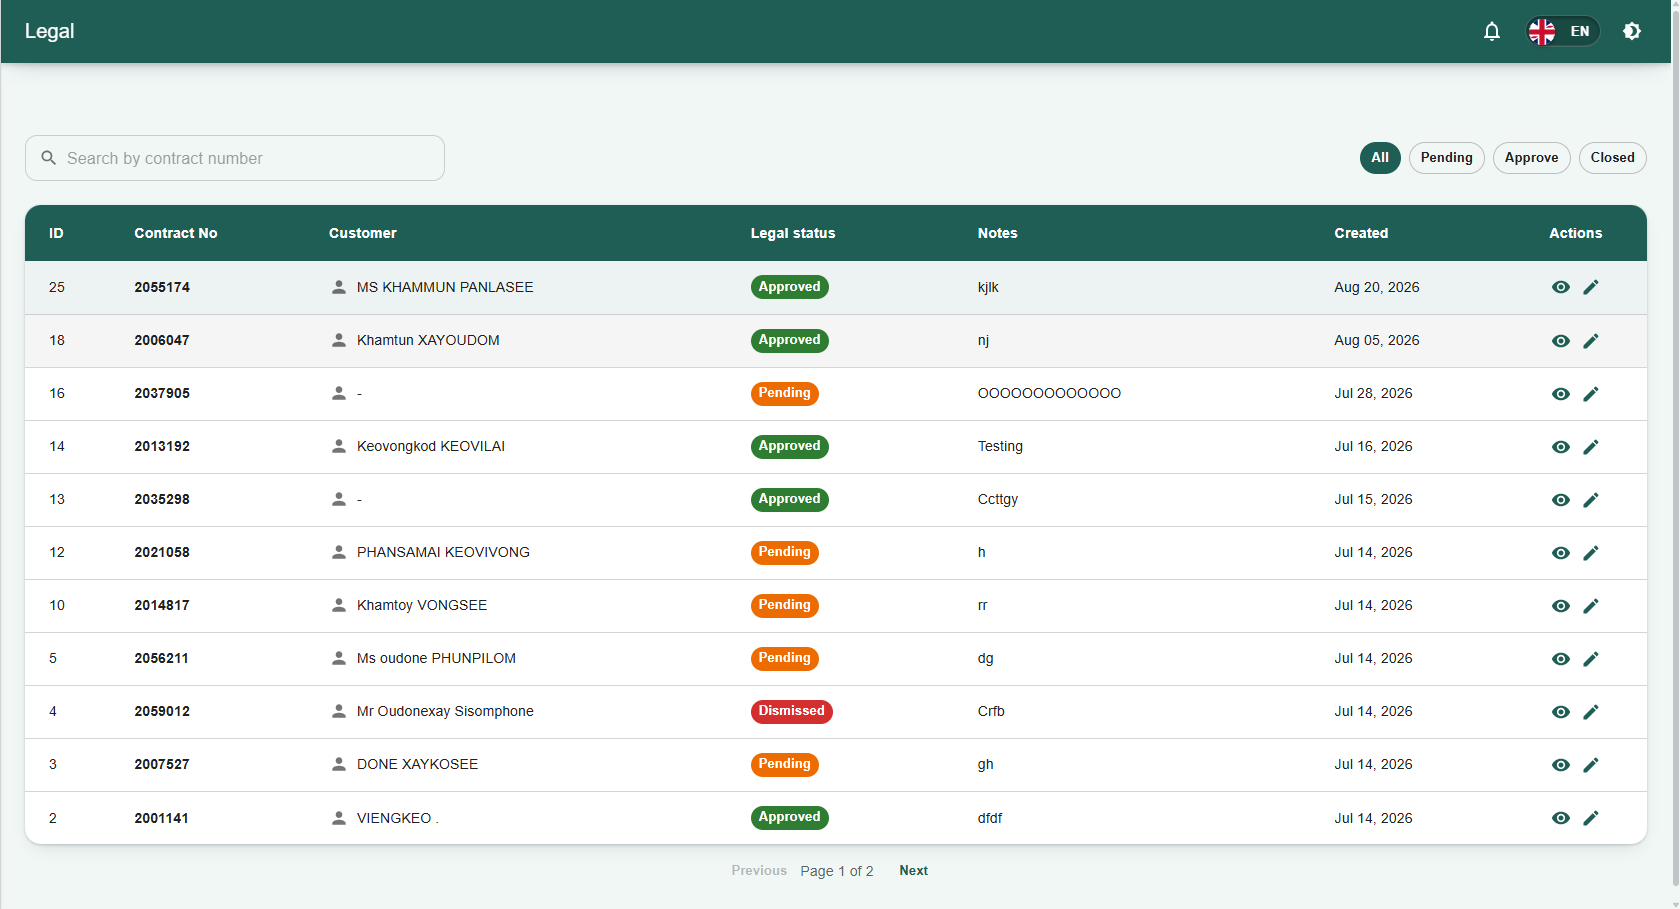
13.Legal Module Overview
The Legal page serves as the centralized hub for tracking and managing contracts that have entered legal proceedings within the Staff LMS. It allows staff and administrators to monitor case statuses, review legal notes, and update actions taken against specific accounts.
1. Filtering and Searching
-
Status Filters: Use the quick-filter buttons located at the top right of the dashboard (All, Pending, Approve, Closed) to categorize and view legal cases based on their current stage in the legal process.
-
Search Bar: Quickly locate a specific legal record by typing the exact contract number into the Search by contract number field.
2. Legal Data Table The main data table provides a detailed summary of each legal case:
-
ID: The internal system identifier for the legal record.
-
Contract No: The specific loan contract number associated with the legal action.
-
Customer: The registered name of the borrower involved in the case.
-
Legal status: The current standing of the case (e.g., Pending, Approved, Dismissed).
-
Notes: A brief summary or relevant remarks regarding the case's progress.
-
Created: The date the legal record was initiated in the system.
-
Actions: Contains interactive icons to manage the specific record.
3. Actions The Actions column contains specific tools for managing individual legal records:
-
View: Click the view icon (eye symbol) to review the full details of the legal case.
-
Edit: Click the edit icon (pencil symbol) to update the status, notes, or details of the legal record.
-
Use the Previous and Next buttons at the bottom of the table to navigate through multiple pages of legal records.
14.Special Cases Module Overview
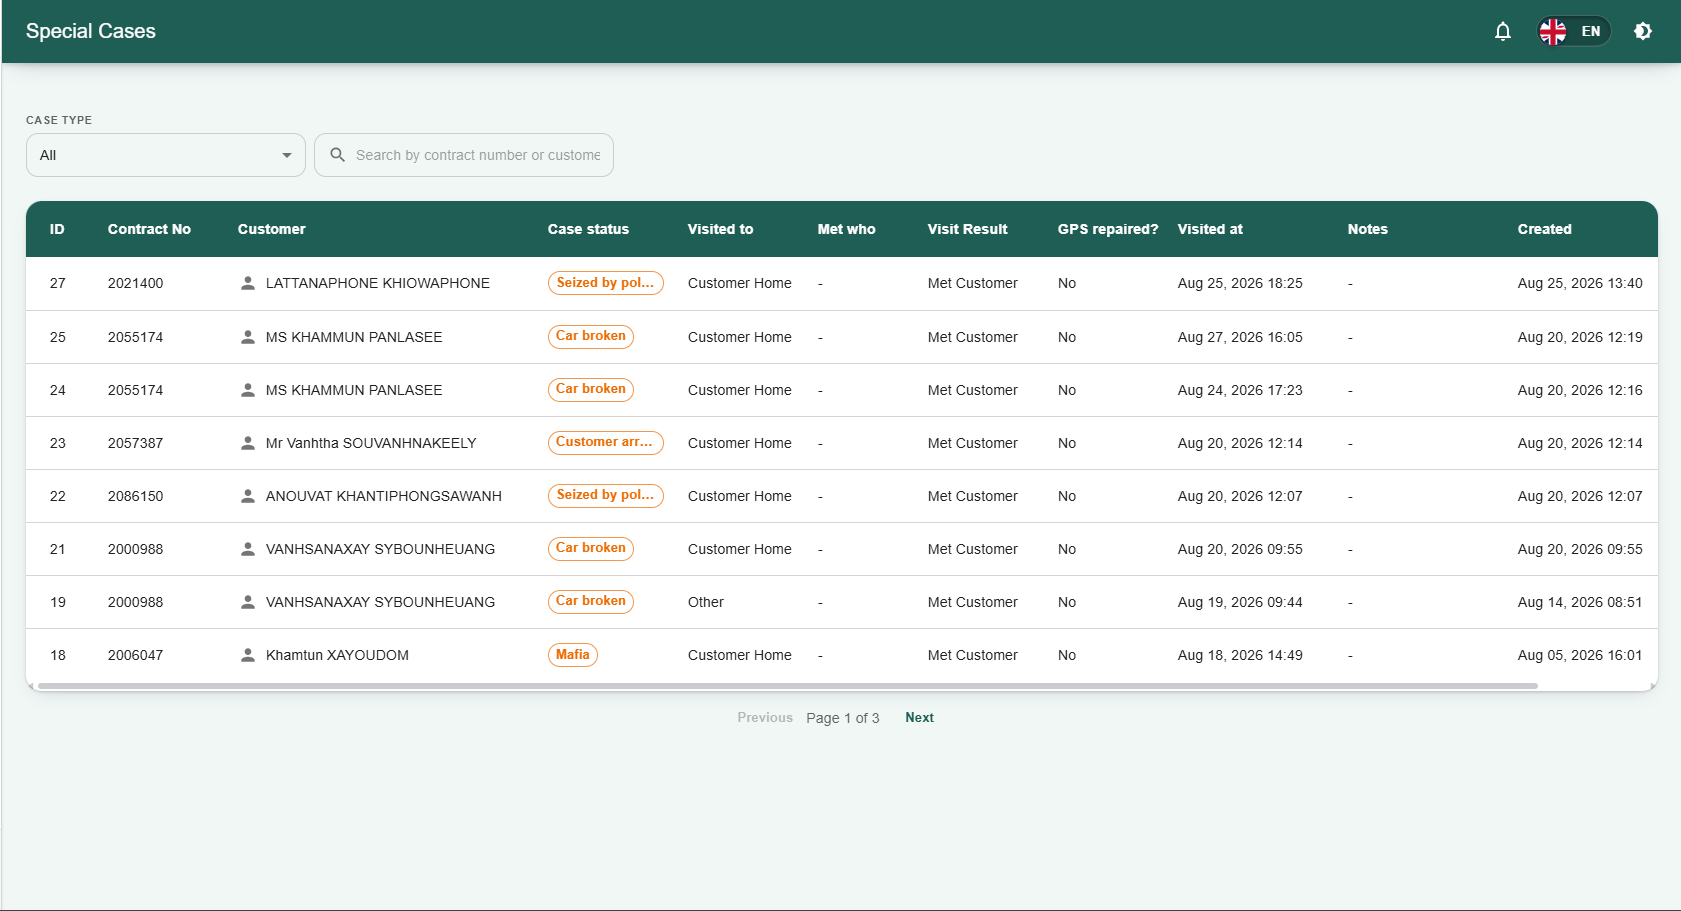
The Special Cases page serves as a dedicated log for tracking and managing loan contracts that have encountered severe, unusual, or highly delinquent circumstances. It allows staff to monitor high-risk accounts and the outcomes of field visits associated with them.
1. Filtering and Searching
-
Case Type Filter: Use the CASE TYPE dropdown menu (defaulted to "All") to filter the list by specific high-risk categories.
-
Search Bar: Quickly locate a specific special case by typing into the Search by contract number or customer name field.
2. Special Cases Data Table The main data table provides a detailed summary of each flagged case:
-
ID & Contract No: The internal system identifier and the specific loan contract number.
-
Customer: The registered name of the borrower.
-
Case status: The specific critical issue affecting the account, such as "Seized by police", "Car broken", "Customer arrested / passed away", or "Mafia".
-
Visit Details: Tracks field agent interactions, including Visited to (e.g., Customer Home, Other), Met who, the Visit Result (e.g., Met Customer), and the date/time the location was Visited at.
-
GPS repaired?: Indicates whether the GPS tracking unit on the collateral vehicle has been fixed (Yes/No).
-
Notes & Created: Displays any additional remarks and the date the case was logged into the system.
-
Actions: Contains interactive icons to view or manage the specific special case record.
-
Use the Previous and Next buttons at the bottom of the table to navigate through multiple pages of records.
15.Village Master Module Overview
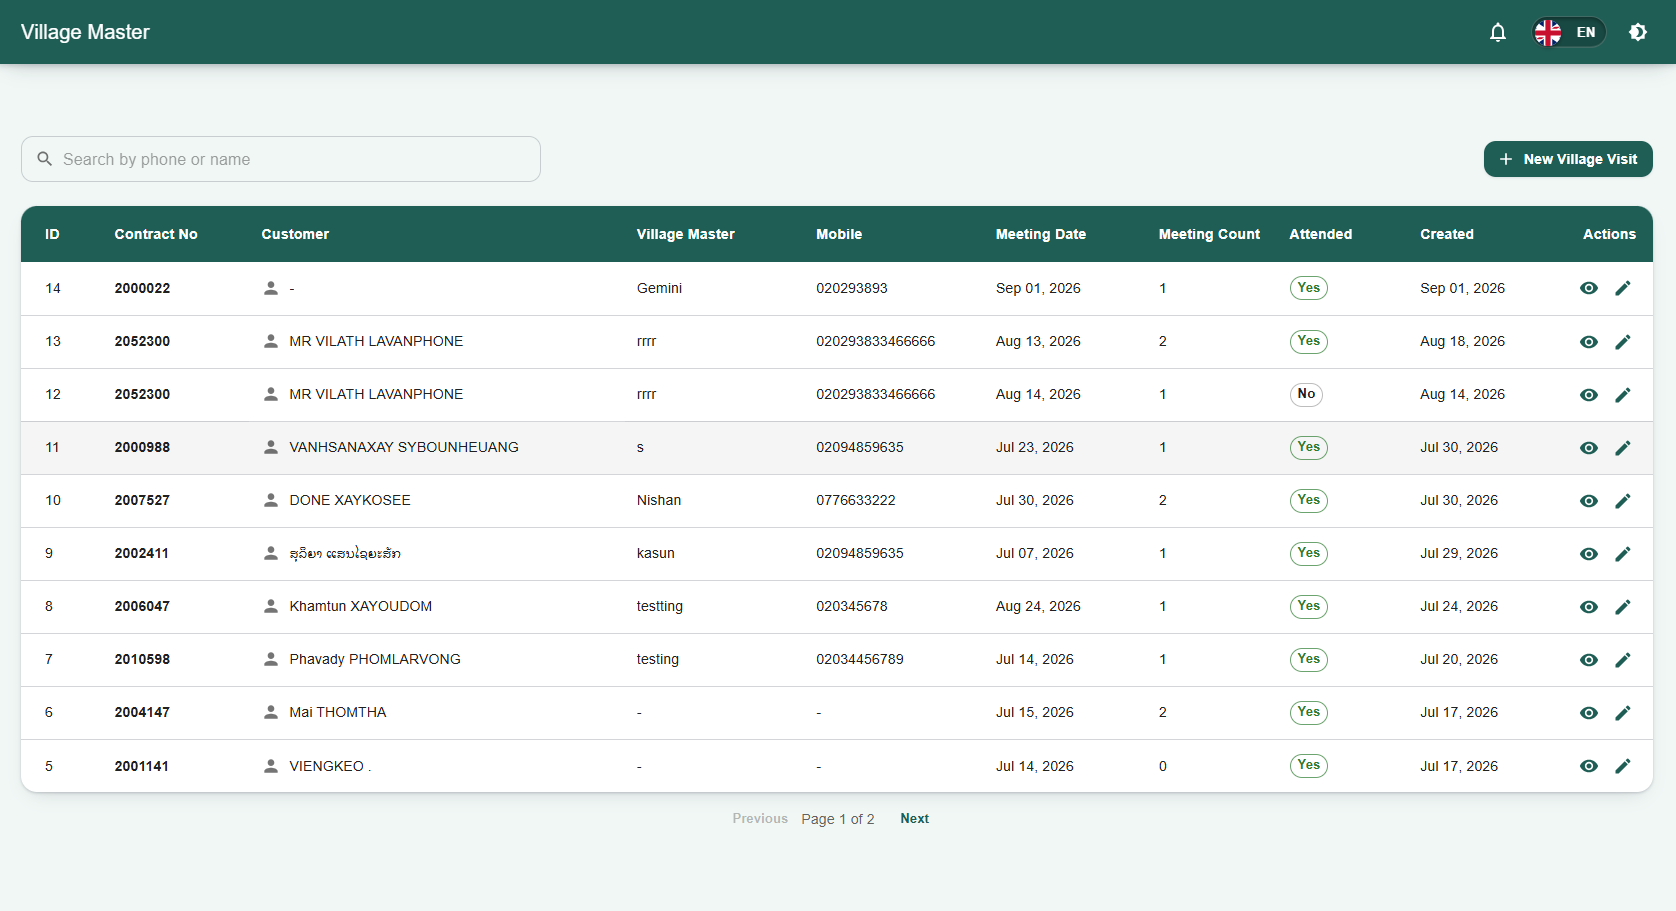
The Village Master page serves as a centralized log for tracking interactions and scheduled meetings with local village representatives or authorities. It allows staff to manage and review records of village-level interventions associated with specific customer contracts.
1. Searching Records
-
Search Bar: Quickly locate specific records by typing contact details or a name into the Search by phone or name field located at the top of the page.
2. Logging a New Visit
-
New Village Visit: Click the + New Village Visit button in the top right corner to manually schedule or record a new meeting with a Village Master into the system.
3. Village Master Data Table The main data table provides a detailed summary of each recorded village-level interaction:
-
ID & Contract No: The internal system identifier and the specific loan contract number associated with the visit.
-
Customer: The registered name of the borrower relevant to the village meeting.
-
Village Master: The name of the specific village authority or representative contacted.
-
Mobile: The contact phone number for the Village Master.
-
Meeting Date & Meeting Count: The scheduled date for the interaction and the total number of meetings held regarding the case.
-
Attended: A status badge indicating whether the scheduled meeting was successfully attended (Yes/No).
-
Created: The date the record was initially logged into the system.
-
Actions: Contains interactive icons (such as the view or edit symbols) to open detailed information or modify that specific record.
-
Use the Previous and Next buttons at the bottom of the table to navigate through multiple pages of records.
16.Staff Module Overview
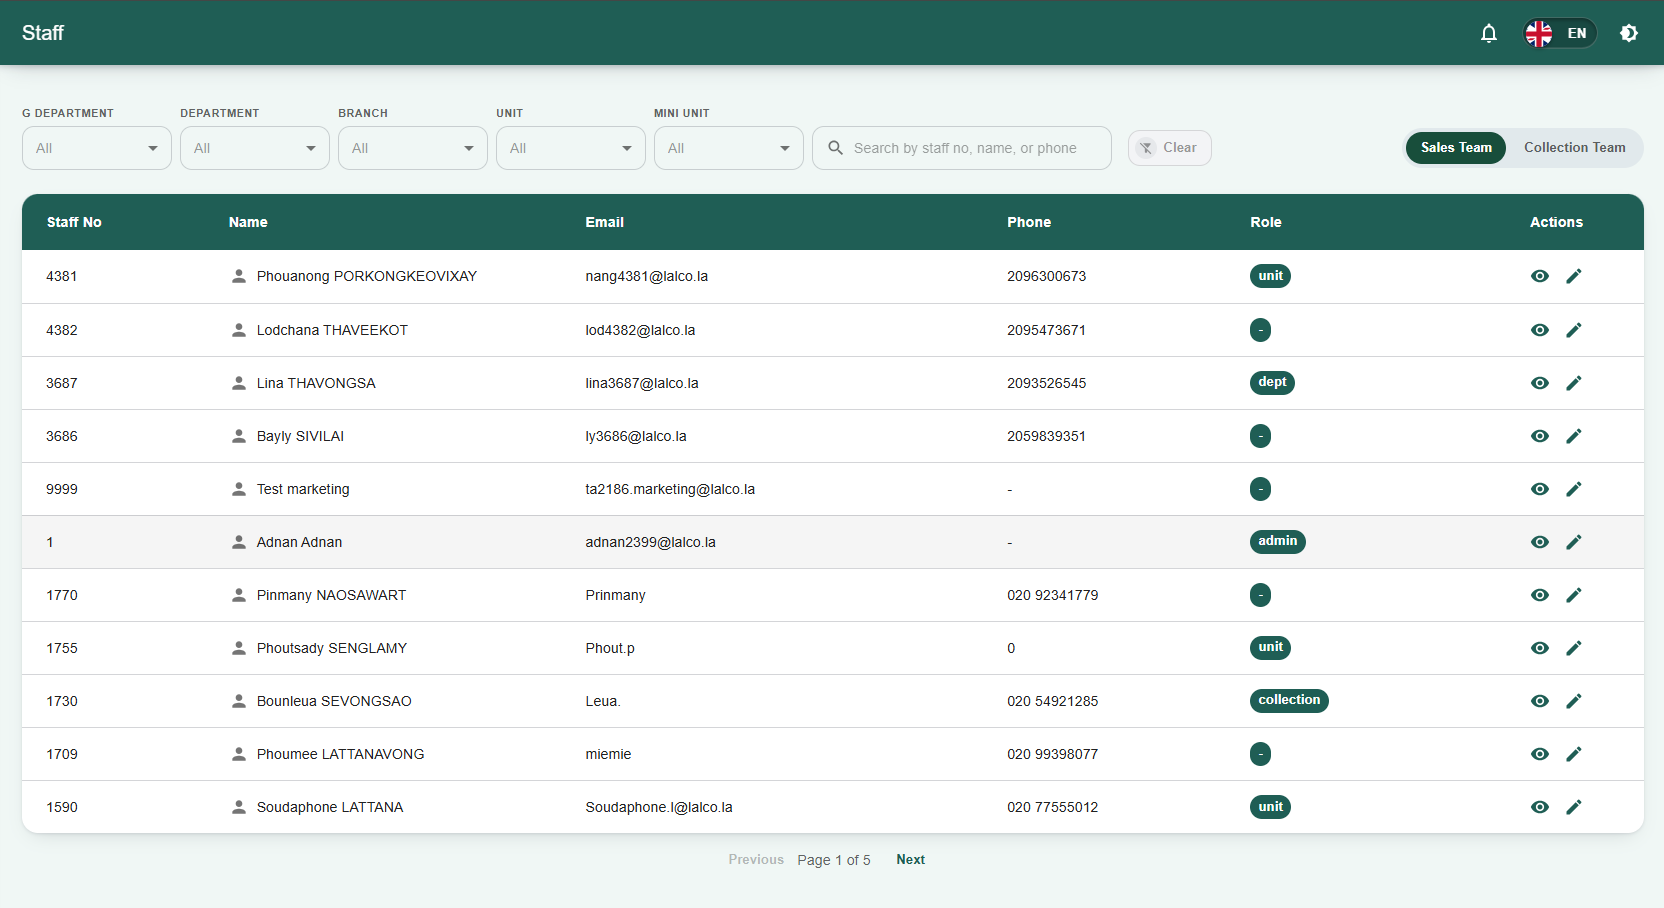
The Staff page serves as the centralized directory for viewing and managing employee records within the Staff LMS. It allows administrators to track staff roles, contact details, and team assignments across different departments and branches.
1. Filtering and Searching
-
Organizational Filters: Use the dropdown menus at the top of the screen (G DEPARTMENT, DEPARTMENT, BRANCH, UNIT, and MINI UNIT) to narrow down the staff list to specific organizational levels.
- Collection Team Filtering:When the Collection Team toggle is clicked, you can narrow down the staff list using specific organizational dropdown menus (G DEPARTMENT, DEPARTMENT, COLLECTION UNIT, COLLECTION TL, and COLLECTION).
-
Team Categories: Use the Sales Team and Collection Team toggle buttons located above the data table to switch between viewing staff members assigned to these respective divisions.
-
Search Bar: Quickly locate a specific employee by typing their details into the Search by staff no, name, or phone field. Use the Clear button to reset your search fields.
2. Staff Data Table The main data table provides a summary of each staff member's profile:
-
Staff No: The unique internal system identifier for the employee.
-
Name: The staff member's full registered name.
-
Email: The employee's official company email address.
-
Phone: The primary contact number for the staff member.
-
Role: The employee's designated system role or hierarchical level (e.g., admin, dept, unit, collection).
-
Actions: Contains interactive icons (the view and edit symbols) used to open detailed information or modify that specific staff member's system profile.
-
Use the Previous and Next buttons at the bottom of the table to navigate through multiple pages of staff records.
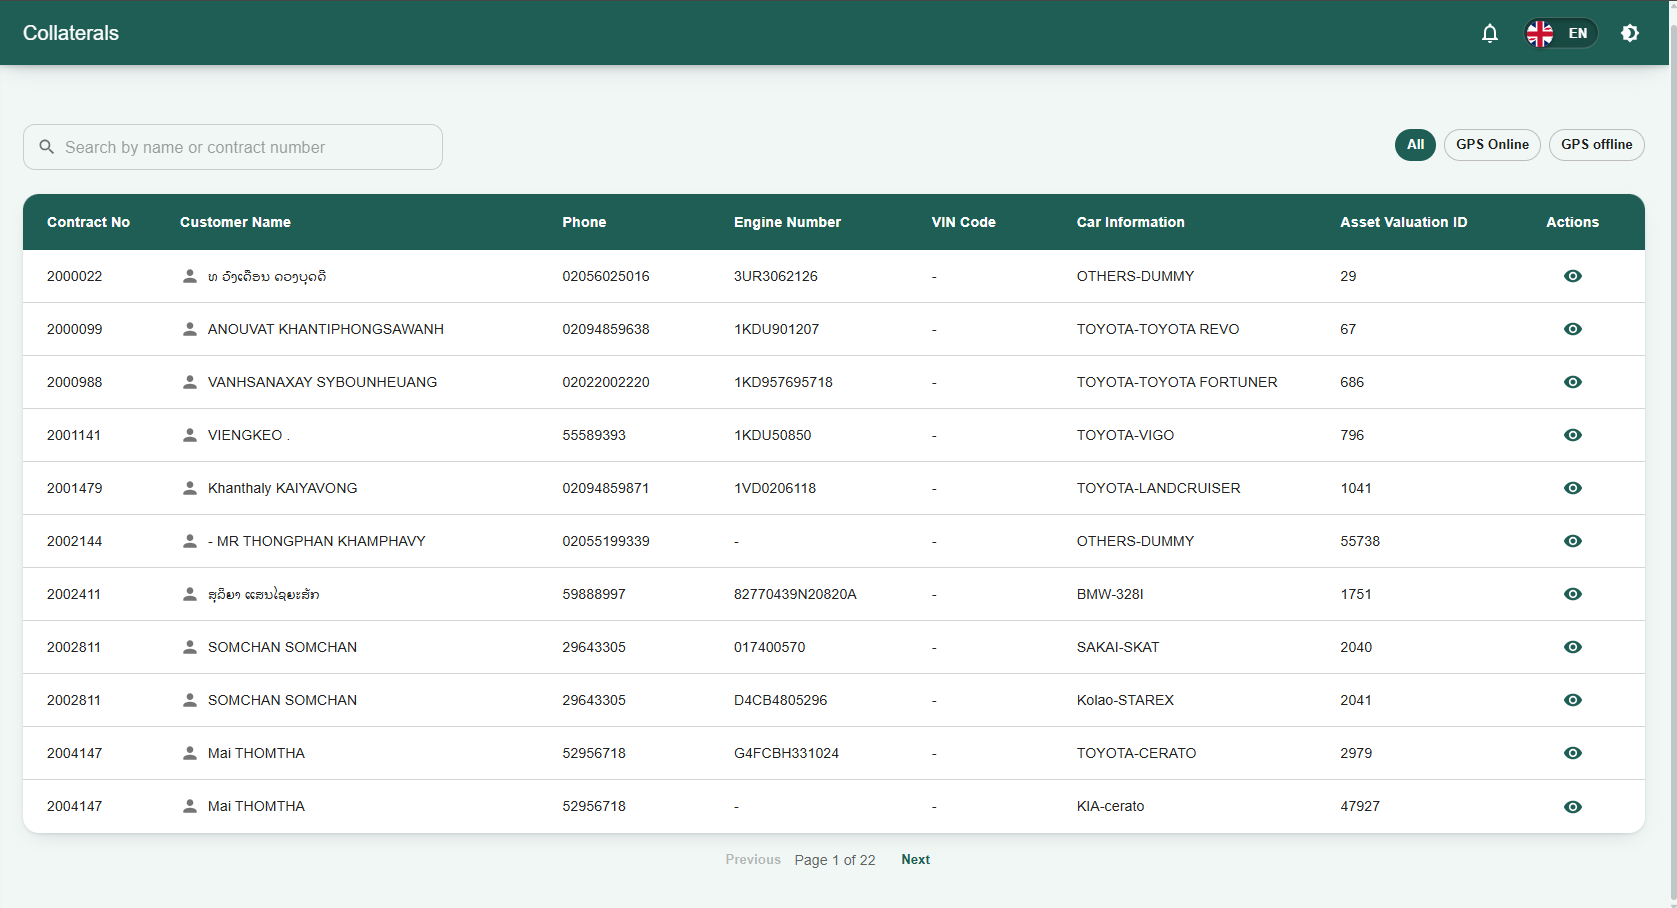
17.Collaterals Module Overview
The Collaterals page serves as a centralized directory for viewing and managing the physical assets (primarily vehicles) tied to customer loan contracts within the Staff LMS. It allows staff to track vehicle identification details, asset valuation records, and real-time GPS monitoring statuses.
1. Filtering and Searching
-
GPS Status Filters: Use the quick-filter toggle buttons located at the top right of the dashboard (All, GPS Online, GPS offline) to categorize and view vehicles based on their active tracking status.
-
Search Bar: Quickly locate a specific collateral asset by typing into the Search by name or contract number field.
2. Collaterals Data Table The main data table provides a detailed breakdown of each recorded asset:
-
Contract No: The specific loan contract number associated with the collateral.
-
Customer Name: The registered name of the borrower.
-
Phone: The primary contact number for the customer.
-
Engine Number & VIN Code: The unique manufacturer identification numbers for the vehicle.
-
Car Information: The make, model, or category of the vehicle (e.g., TOYOTA-VIGO, BMW-328I).
-
Asset Valuation ID: The internal system identifier linking to the vehicle's financial appraisal.
-
Actions: Contains an interactive view icon (eye symbol) used to open the full detailed record for that specific collateral asset.
-
Use the Previous and Next buttons at the bottom of the table to navigate through multiple pages of collateral records.
18.API Module Overview
19.Profile Module Overview
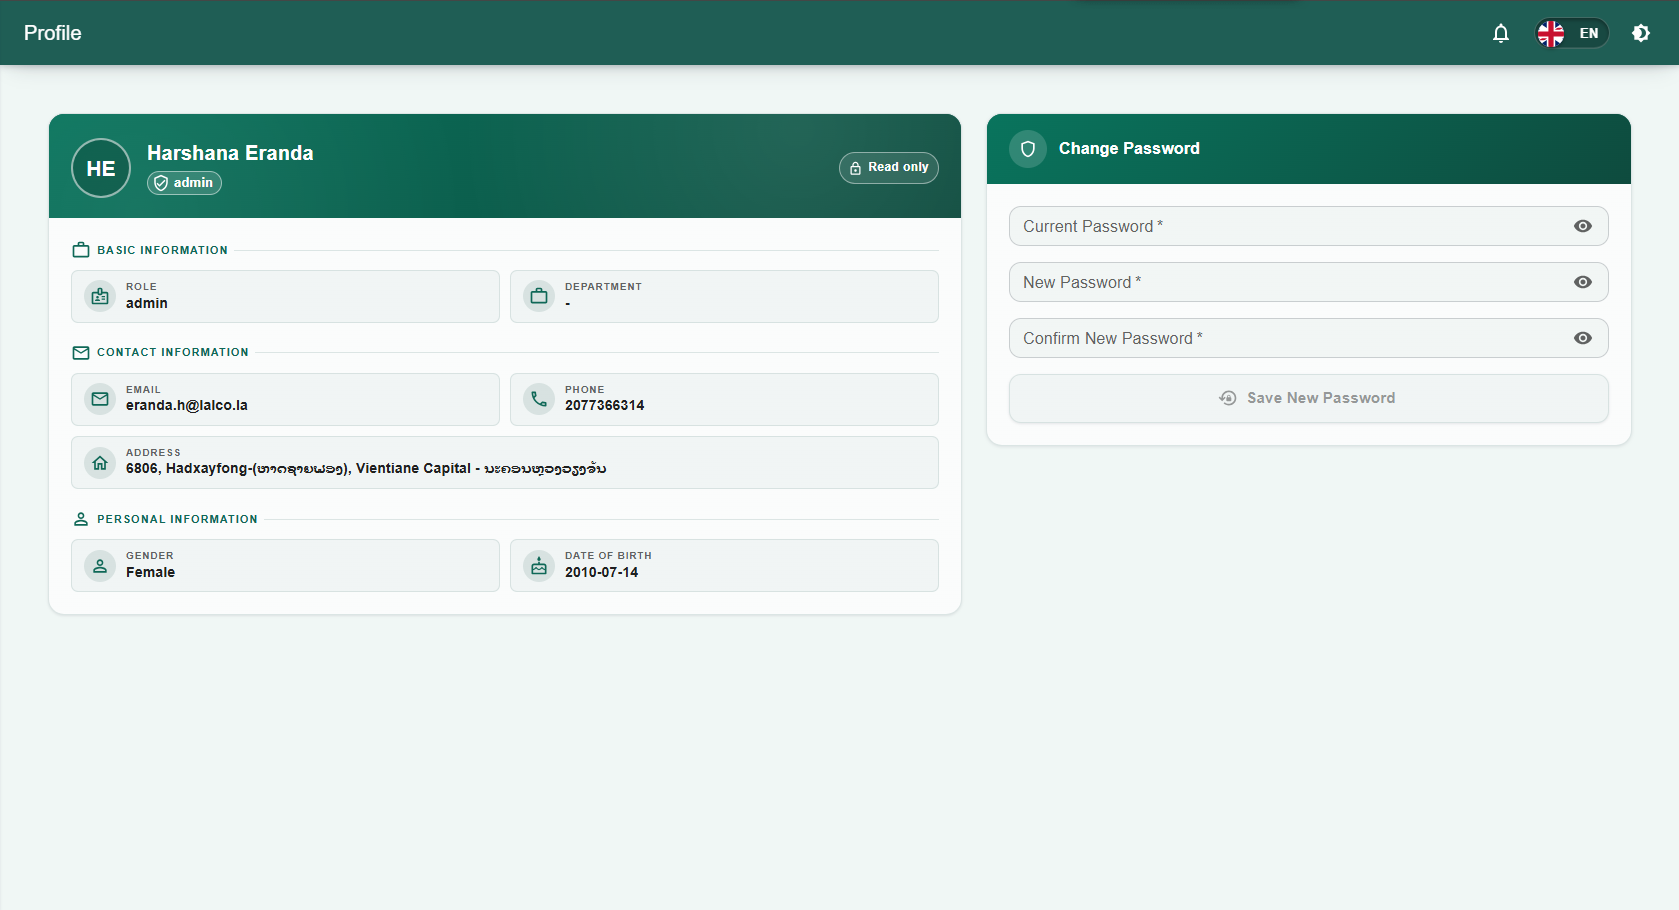
The Profile page is the personal account dashboard where staff and administrators can review their assigned system roles, contact details, and manage their security credentials.
1. Viewing Account Details The main profile screen is divided into specific informational sections:
-
Basic Information: Displays the user's current system Role (e.g., admin) and their assigned Department.
-
Contact Information: Shows the registered Email address, Phone number, and physical Address tied to the account.
-
Personal Information: Displays demographic details, including Gender and Date of Birth.
2. Changing Your Password A dedicated Change Password section is available on the page to update your login credentials. To securely change your password:
-
Enter your existing password into the Current Password field.
-
Type your new desired password into the New Password field.
-
Re-type the new password into the Confirm New Password field to verify it.
-
Click the Save New Password button to apply the changes to your account.