
2.Client
Overview
The Clients section is used to manage client and counterparty-related information within the CTRM system. It supports the handling of contacts, companies, onboarding, compliance, leads, pipeline activities, and overall client relationship management.
2.1 Contacts
Used to store and manage individual people associated with counterparty organizations. Maintains key information : Name, Email, Phone number
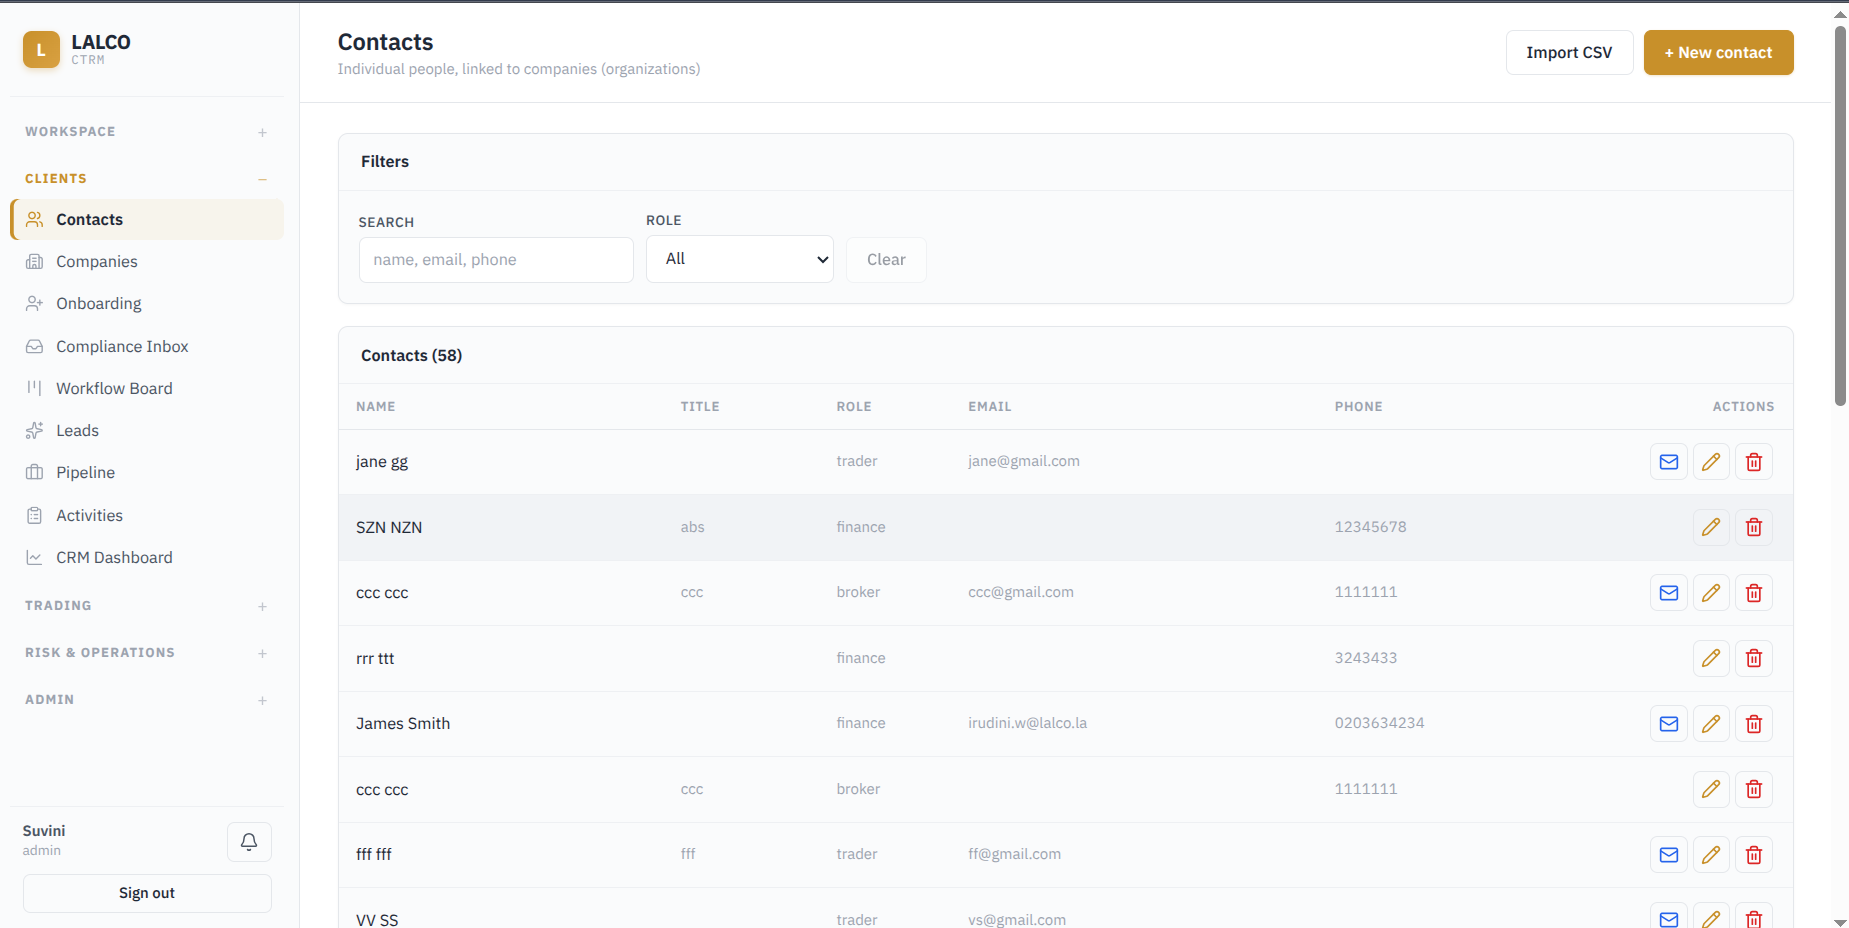
Filters
- Search: Find contacts using name, email, or phone number
- Role: Filters contacts according to their assigned roles
Main Functions
- Add a new contact
- Import contacts using a CSV file
- Edit or delete existing contacts
- Send an email directly when a email address is available
Methods to add a contact
1. Import Contacts from CSV
Allows multiple contacts to be added at once by uploading a CSV file up to 5 MB.
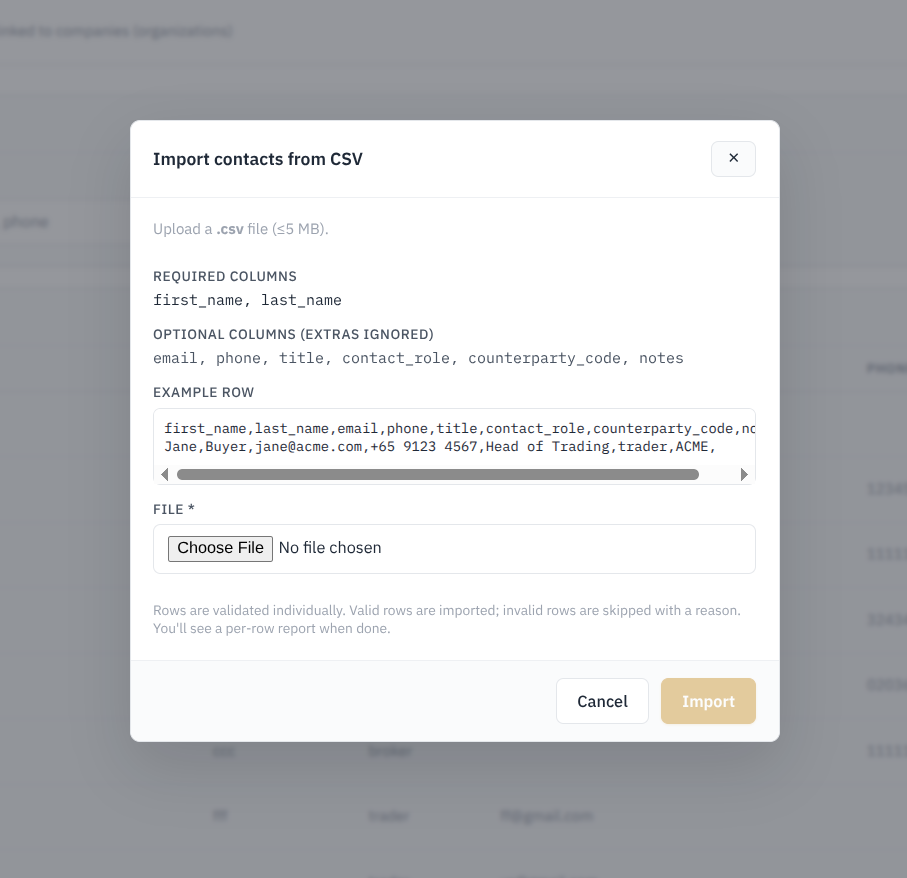
- Required Columns: first_name , last_name
- Optional columns: email, phone, title, contact_role, counterparty_code, notes
- Additional columns that are not required are ignored by the system
- Each row is validated indivually before being imported
- Valid rows are imported, while invalid rows are skipped with the reason provided
- A row-by-row import report is displayed after the process is completed.
Key Characterisitc
Counterparty Code – Identifies the counterparty organization that the contact belongs to. When contacts are imported through a CSV file, this code helps the system link each contact to the correct counterparty automatically.
2. Manual Entry of a company
Allows users to manually create an individual contact record within the system.
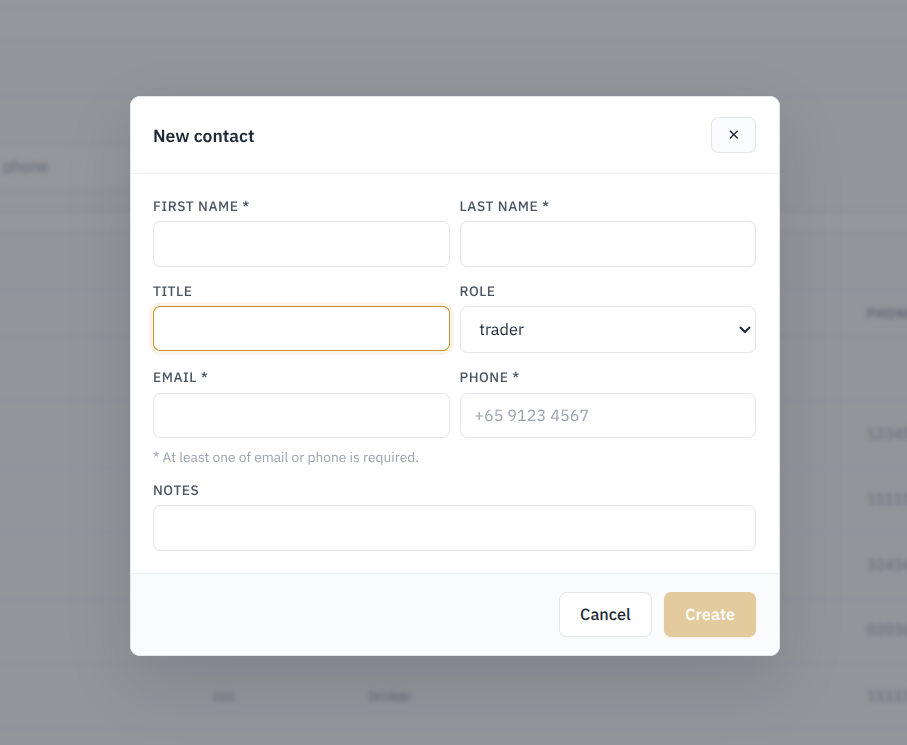
Fields:
- First name
- Last Name
- Title (Job title/position)
- Role (Business role)
- Phone
- Notes
Validations :
- First name and Last name are mandatory
- At least one contact method, either Email or Phone must be provided.
2.2 Companies
Used to manage the organizations that the business trades or works with. Each company is maintained as a counterparty record with its identifying details, type, country, limit, and current status.
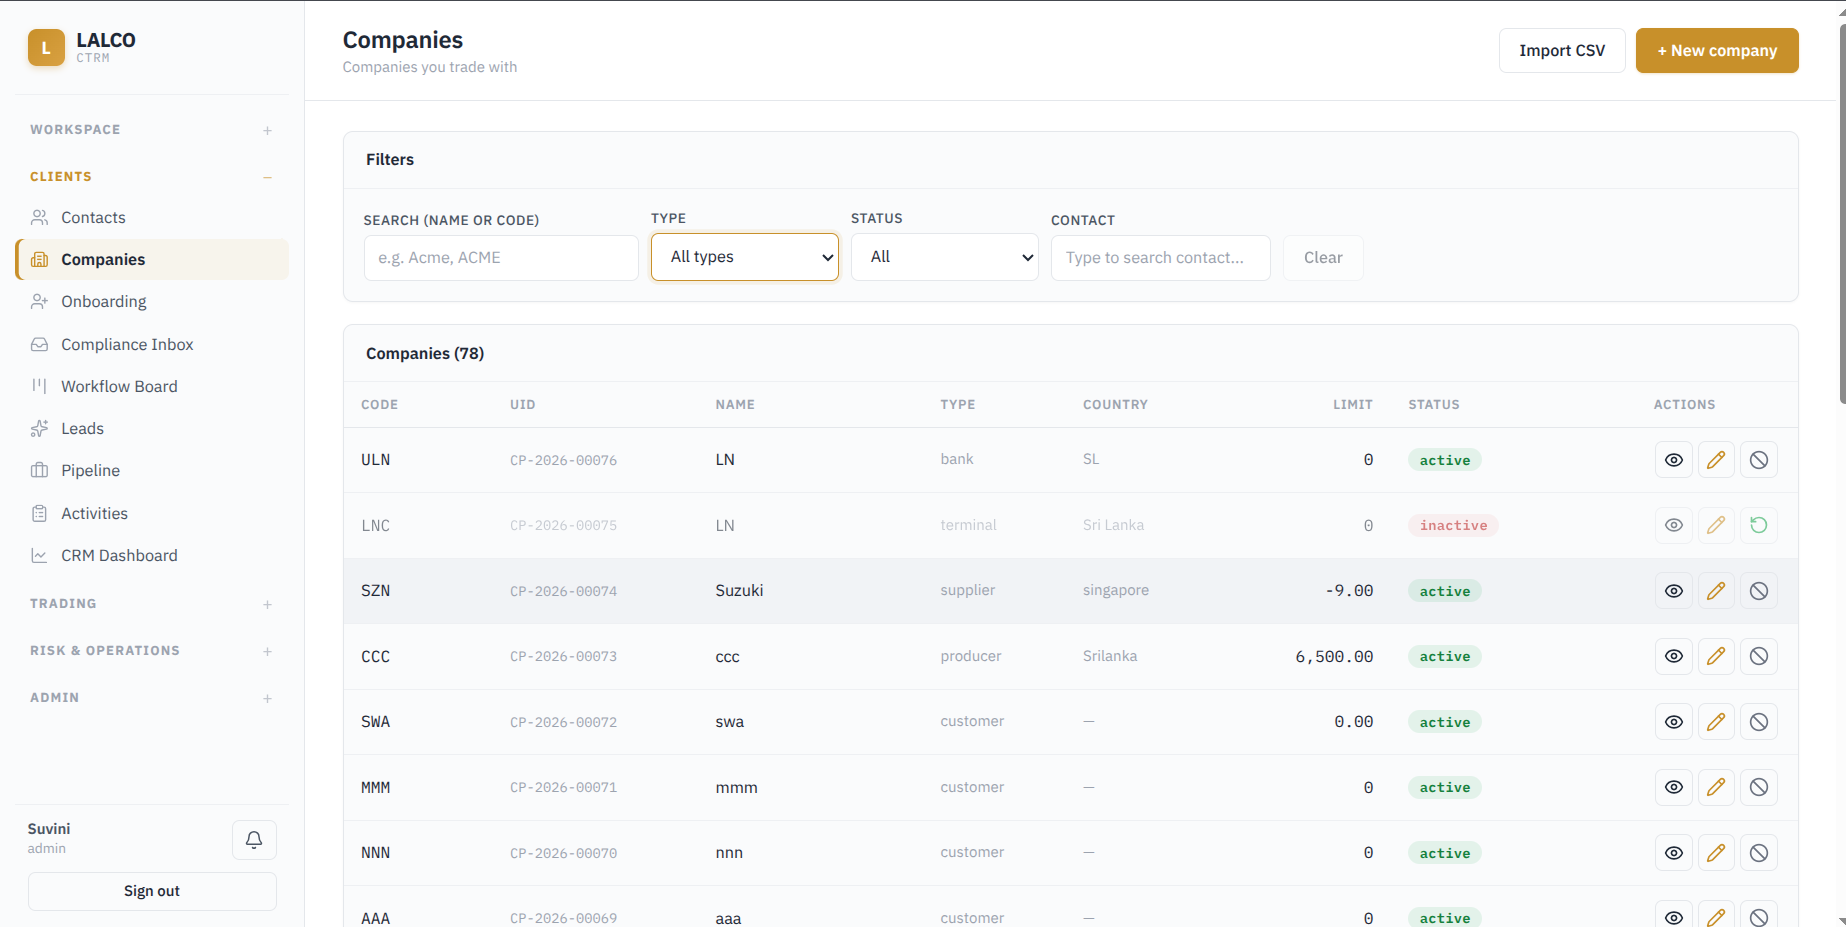
Filters
- Search by name or code - Find a company by company by it's name or company code.
- Type - Filter according to the company type (customer, supplier, producer etc)
- Status - Inactive or active
- Contact - Finds companies associated with a particular contact
Main Functions
- Add a new company.
- Import company records through CSV.
- View company details.
- Edit an existing company.
- Deactivate an active company or reactivate an inactive company.
Methods to add a companies
1. Import companies from csv
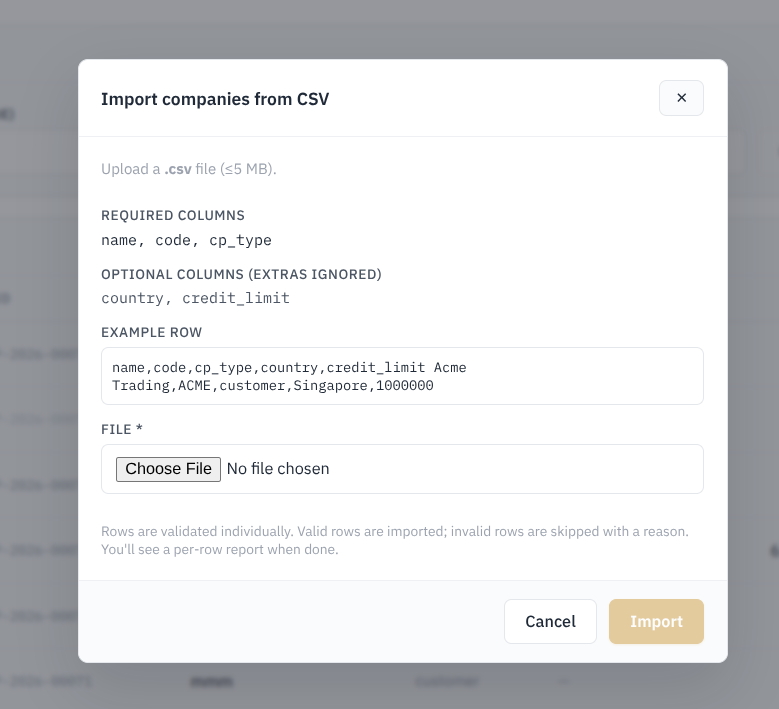
Required columns : Name , Code , CP Type (Counterparty type)
Optional columns: Country, Credit Limit
Validation
Each row in the CSV file is checked separately before import.
- Valid rows are imported successfully.
- Invalid rows are skipped.
- The system provides a reason for any rejected row.
- A row-by-row import report is shown after the import is completed.
2. Manual Entry of a company
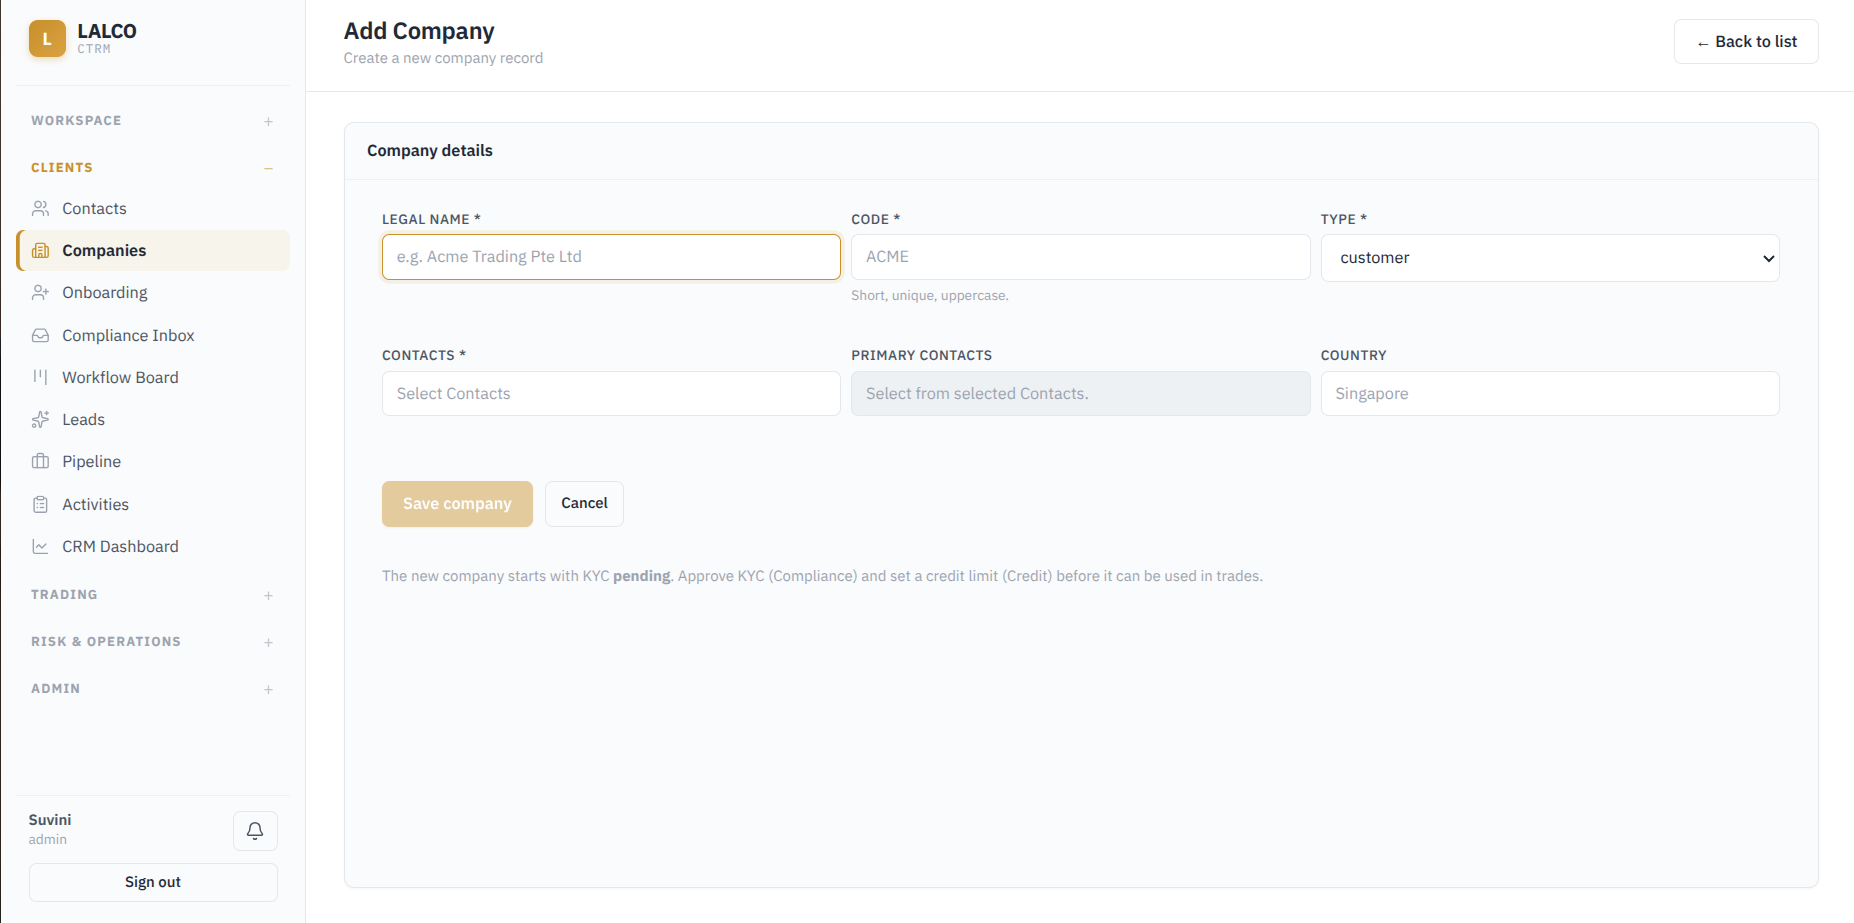
Fields to create a new company
- Legal Name – Official name of the company. Required.
- Code – Short, unique uppercase code used to identify the company. Required.
- Type – Defines the counterparty type, such as customer. Required.
- Contacts – Links existing contacts to the company. Required.
- Primary Contacts – Identifies the main contact person from the selected contacts.
- Country – Country associated with the company.
Key Requirement
A newly created company starts with KYC (Know Your Cusomter) Pending status. Before the company can be used in trades:
- KYC must be approved through the Compliance process.
- A credit limit must be assigned through the Credit process.
Displayed details
- Code – Short code assigned to the company.
- UID – Unique system identifier for the company.
- Name – Company name.
- Type – Classification of the company.
- Country – Country in which the company is associated or registered.
- Limit – Limit value configured for the company.
- Status – Indicates whether the company is currently active or inactive.
View Company
The View Company page provides a complete profile of the selected company and brings together its related information in one place.
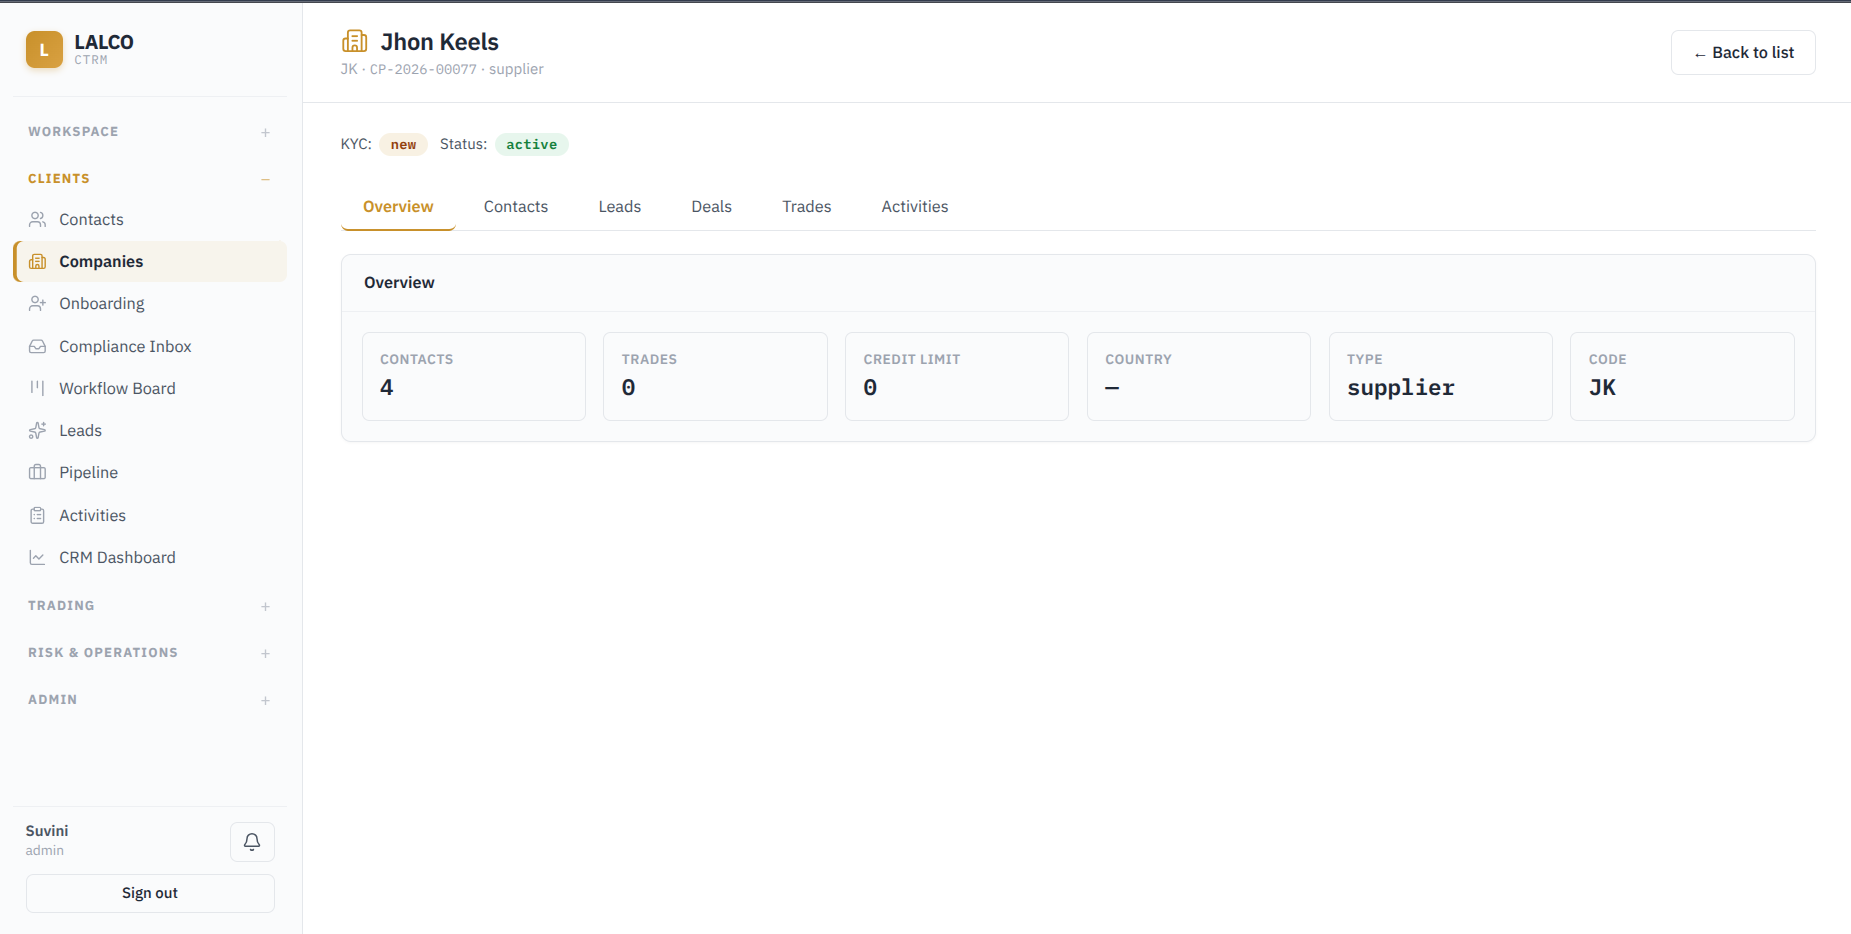
Provides a summary of :
- Contacts – Number of contacts linked to the company.
- Trades – Number of trades associated with the company.
- Credit Limit – Current credit limit assigned to the company.
- Country – Country associated with the company.
- Type – Counterparty type, such as supplier or customer.
- Code – Short code used to identify the company.
Edit Company details
- Legal Name – Updates the official company name.
- Type – Changes the counterparty type, such as supplier or customer.
- Country – Updates the country associated with the company.
- Status – Changes whether the company is active or inactive.
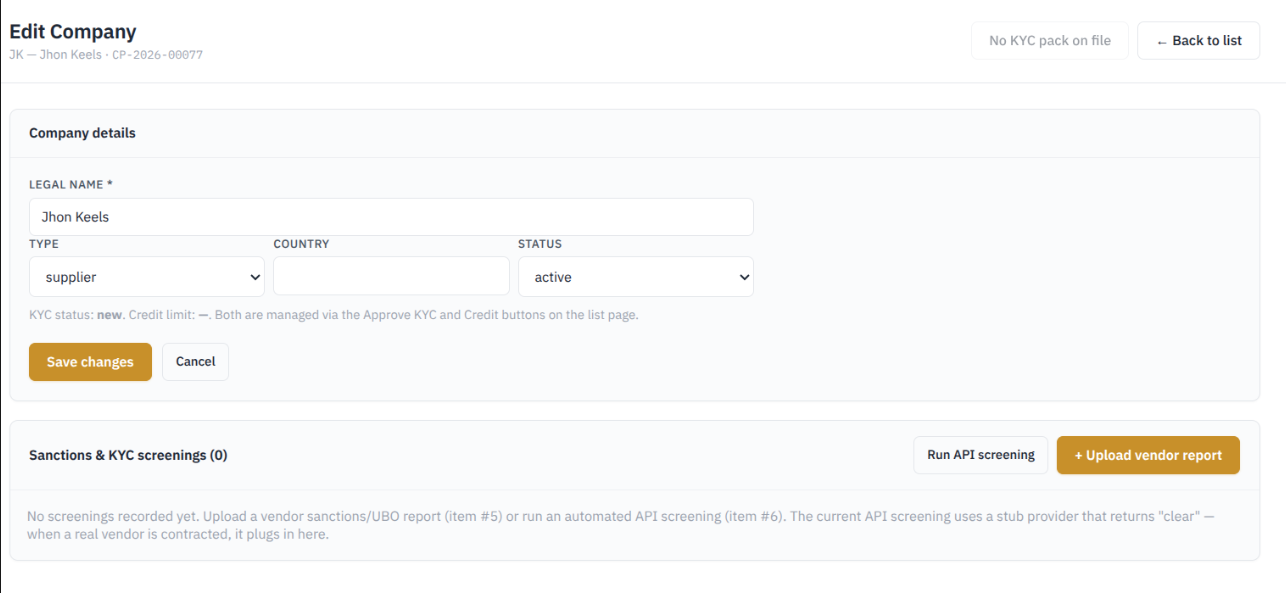
The KYC status and Credit Limit cannot be changed directly from this page. These are managed separately through the relevant KYC approval and credit functions.
Sanctions & KYC Screening
Used to record checks performed on the company as part of the KYC and compliance process.
- Run API Screening – Performs an automated screening of the company. Currently, the system uses a test/stub screening provider (To be edited)
- Upload Vendor Report – Allows a sanctions or UBO (Ultimate Beneficial Owner) screening report obtained from an external provider to be uploaded.
- Previous screening results are recorded in this section when available
2.3 Onboarding
The Onboarding module is used to manage potential companies before they become approved counterparties. It helps track leads through the early sales, onboarding, and KYC stages.
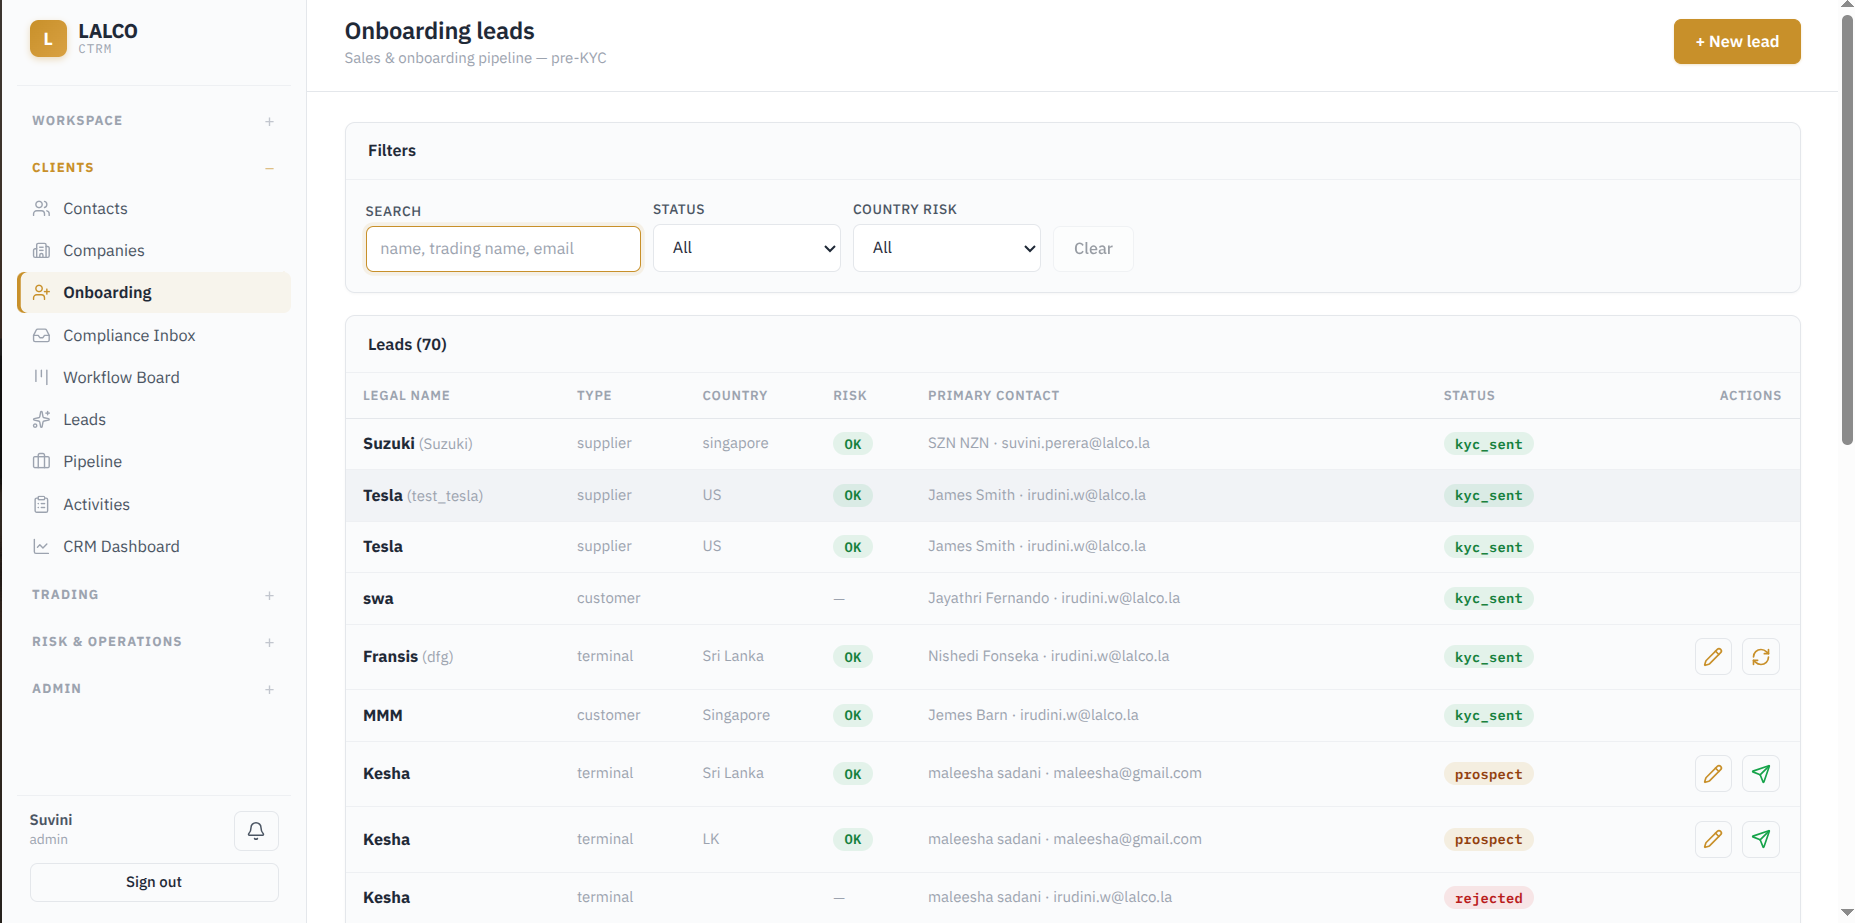
Filters
- Search – Finds leads using the legal name, trading name, or email.
- Status – Filters leads according to their current onboarding status.
- Country Risk – Filters leads based on the risk level associated with their country.
Leads information displayed
- Legal Name – Official name of the potential company.
- Type – Counterparty type, (eg: - customer, supplier, or terminal.)
- Country – Country associated with the lead.
- Risk – Indicates the country risk result.
- Primary Contact – Main contact person associated with the lead.
- Status – Shows the current stage of the onboarding process.
Status of onboarding leads
- Prospect – The company is still a potential counterparty and has not yet moved through the KYC process.
- KYC Sent – The KYC request has been sent and the lead is progressing through onboarding. (documents are expected for review)
- KYC Submitted – The requested KYC information or documents have been submitted and are ready for review.
- Returned – The submitted KYC information has been sent back because corrections, missing information, or additional documents are required.
Onboarded – The company has successfully completed the onboarding process and has been accepted as a counterparty.
- Rejected – The lead has been rejected during the onboarding process.
General flow of a lead:
Prospect → KYC Sent → KYC Submitted → Onboarded
If there is an issue with the submitted information:
KYC Submitted → Returned → Corrected/Resubmitted
If the lead is not approved:
KYC Submitted → Rejected
Country Risk
- OK
- High Risk
- Banned
- Unknown
Add a new Onboarding Lead
A. Company details
- Company
- Legal Name (official registered name)
- Trading Name (business conducting name if diff)
- Type
- Country of incorporation
- Business Activity
- UBO Name
- UBO Nationality
B. Contact Details
- Contact
- Contact Name
- Designation
- Phone
- Bank Name
- Bank Country
- Expected Commodity
- Expected Volume
- Expected Routes
- Introduced By / Notes
The lead information is first checked by the Compliance team. After that, the company receives a secure link to complete the required KYC form and submit its details for review.
2.4 Compliance Inbox
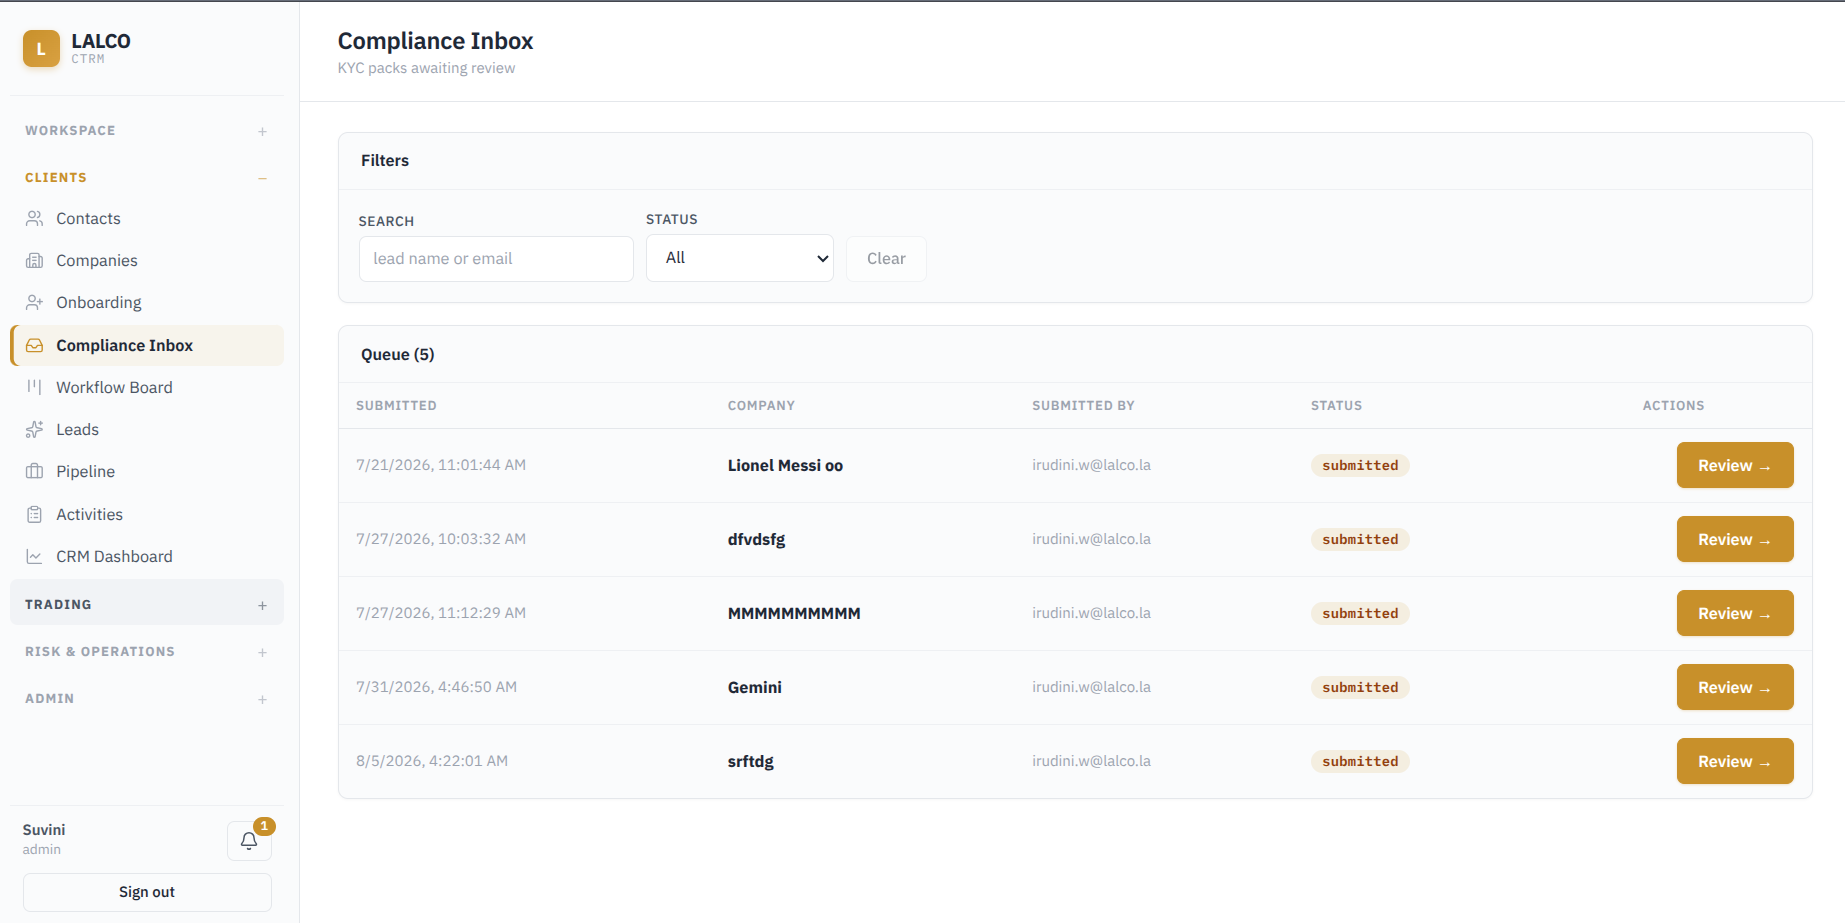
Used to review KYC submissions that haved been submitted and sent for compliance checking.
Filters
- Search based on Lead name and email
- Status based on current review status (submitted, Under review)
Statuses
- Submitted
- Under review
Details displayed
- Submitted
- Company
- Submitted by
- Status
- Actions (Review)
2.5 Onboarding Workflow
The Workflow Board gives a visual view of where each company currently stands in the onboarding process. Companies are grouped into columns based on their current stage
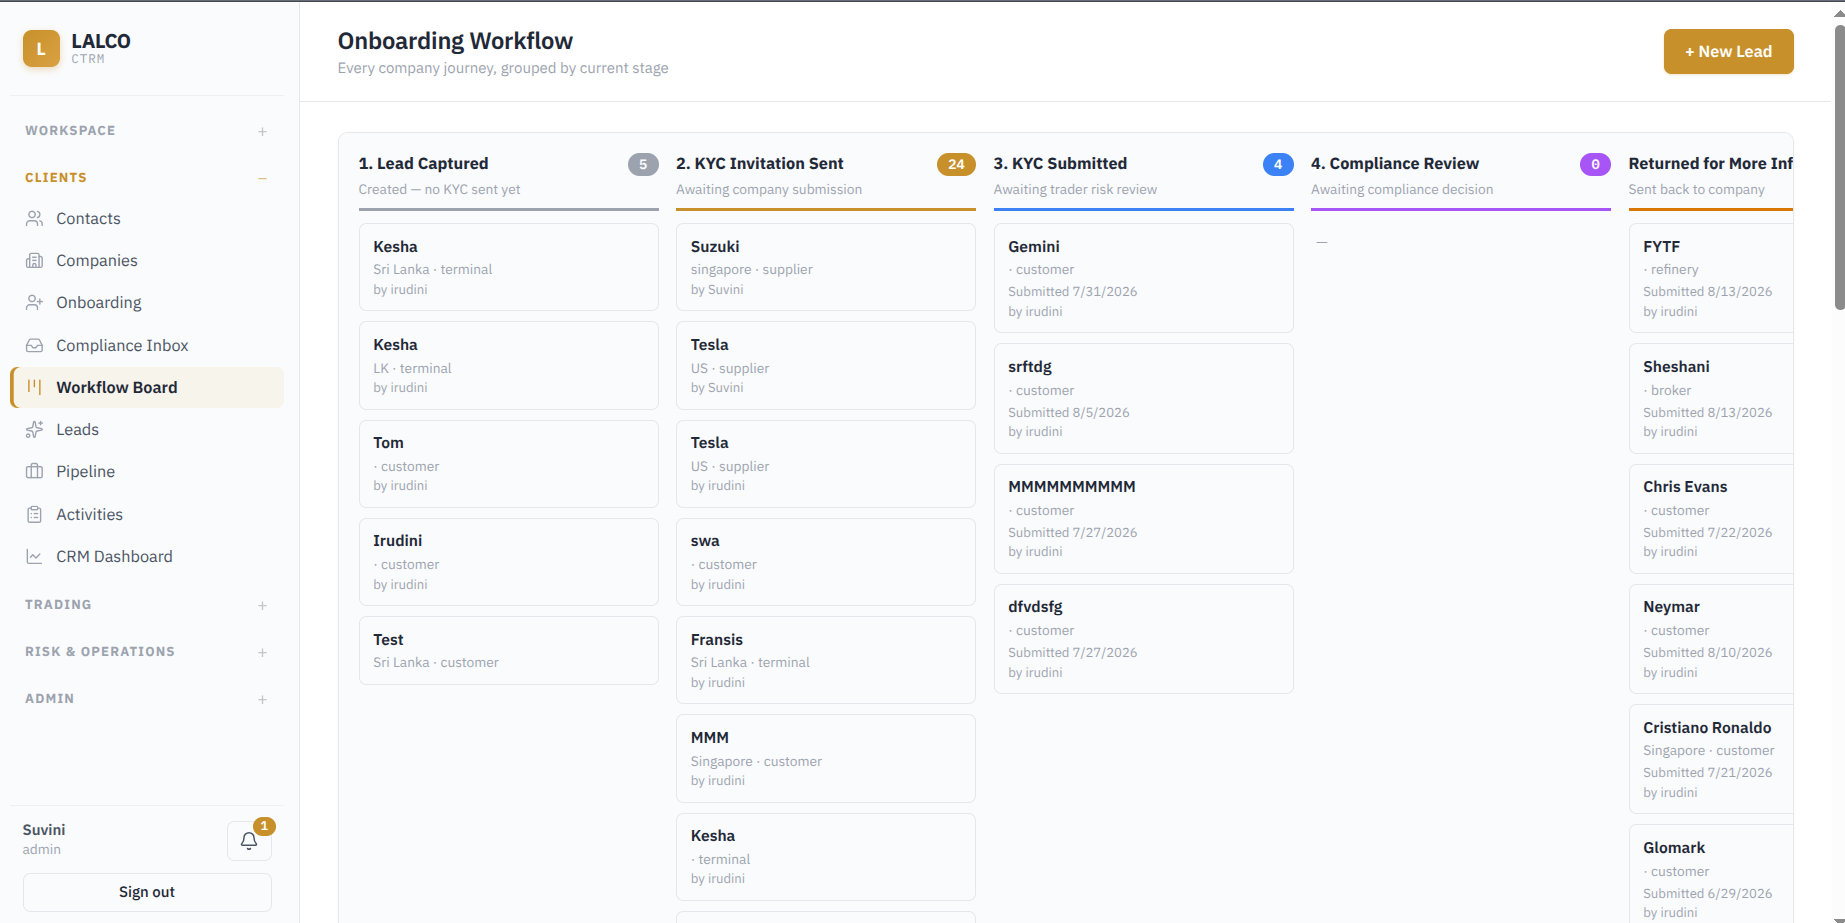
Stages
1. Lead Captured – The lead has been created, but the KYC invitation has not yet been sent.
2. KYC Invitation Sent – The KYC request has been sent and the company is expected to complete and submit it.
3. KYC Submitted – The company has submitted the KYC information and it is waiting for further review.
4. Compliance Review – The submitted KYC information is being reviewed by the Compliance team.
Returned for More Information – The submission has been sent back to the company because additional information or corrections are required.
2.6 Leads
Used to manage potential trading opportunities before they become actual deals. A lead represents an opportunity linked to a company, contact, and commodity.
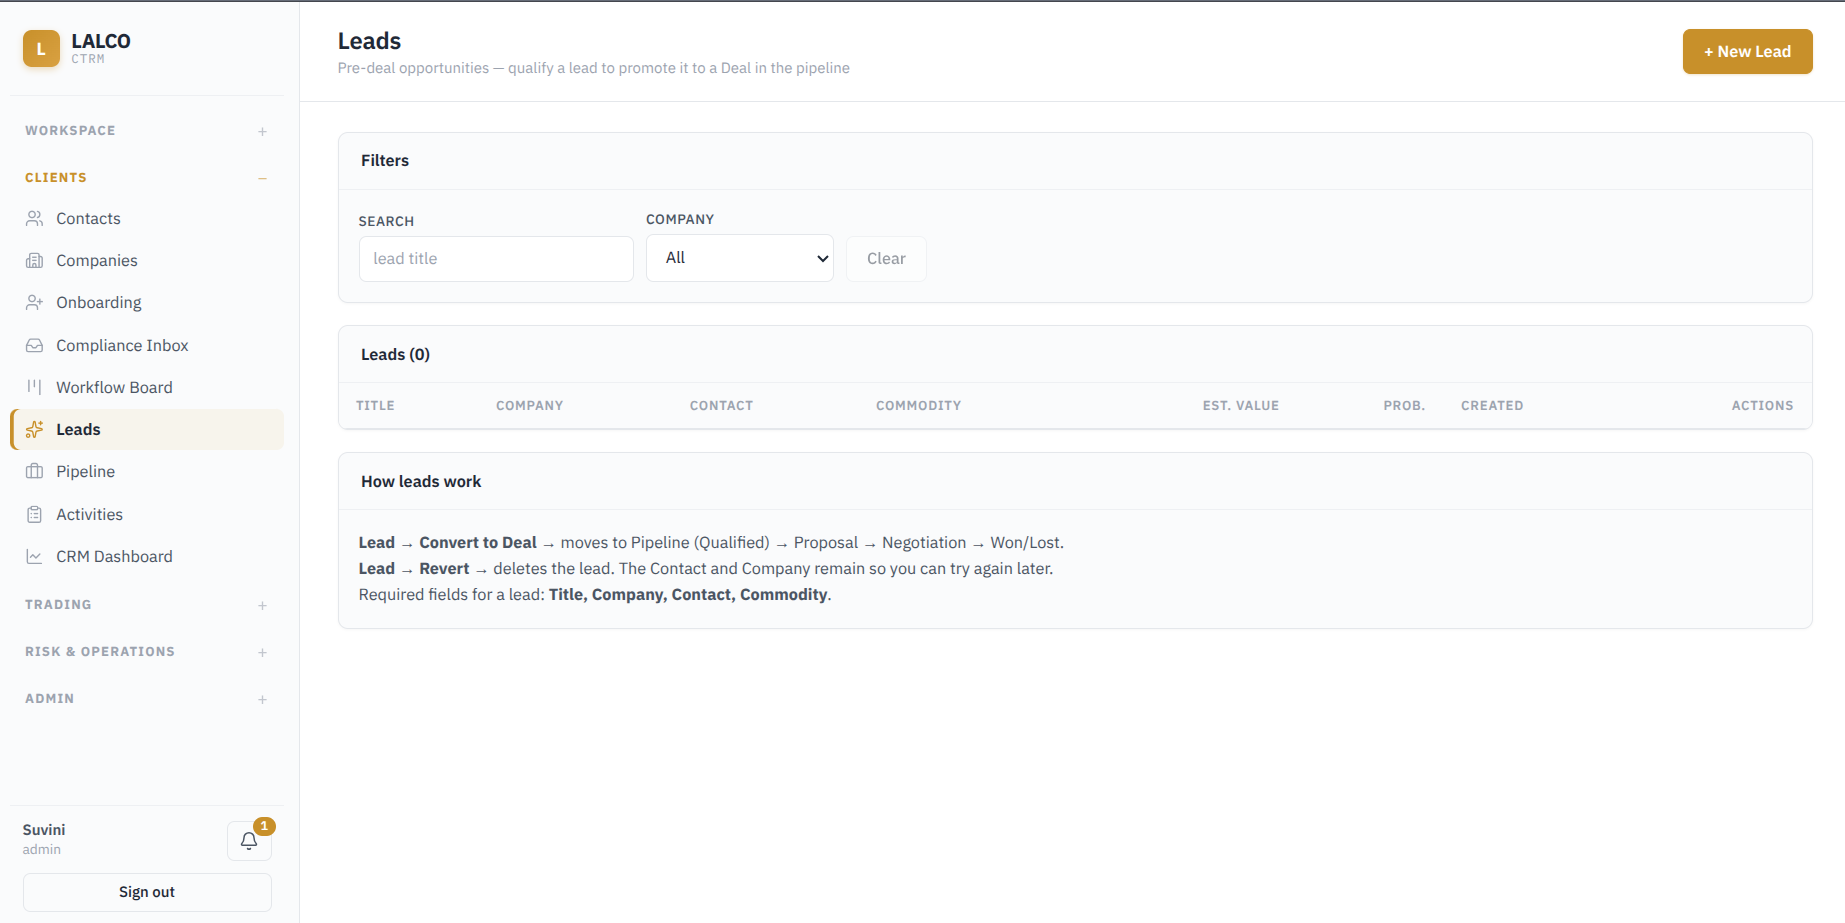
Filters
- Search a lead using the lead title
- Company
Lead information
- Title
- Company
- Contact
- Commodity
- Estimated value (expected value of the opportunity)
- Probability (chance of the opportunity progressing)
- Created
Convert Lead To Deal
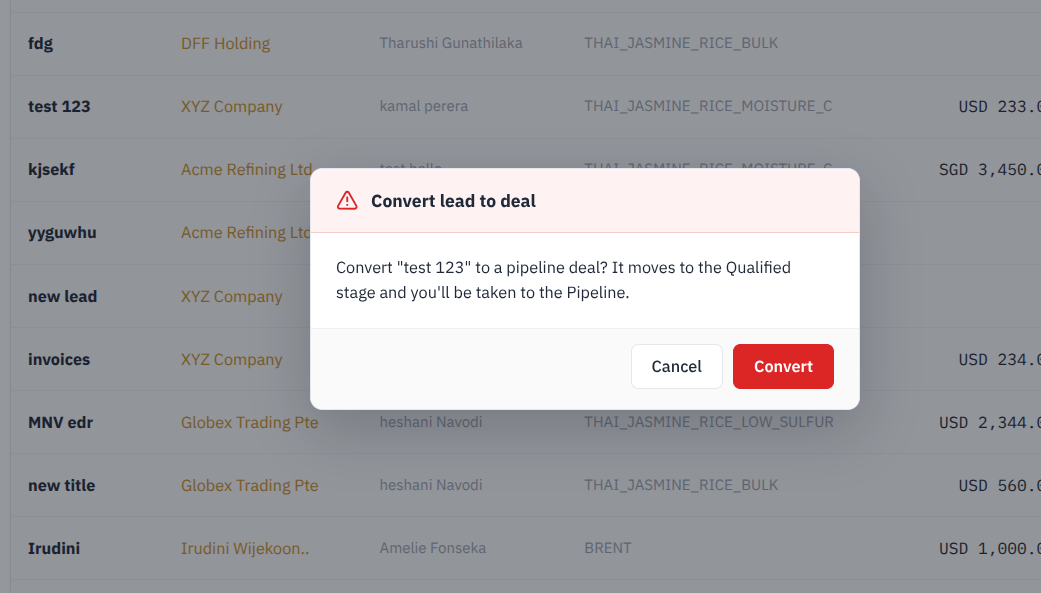
When a lead becomes a qualified business opportunity, the user can select Convert to Deal.
- The system asks for confirmation before converting the lead.
- Once confirmed, the lead is moved to the Pipeline as a deal.
- The new deal starts at the Qualified stage.
- After conversion, the user is redirected to the Pipeline to continue managing the deal.
How Leads Work
Possible trading opportunity→Lead → Convert to Deal → Qualified → Proposal → Negotiation → Won/Lost
Lead → Revert : Deletes the lead. The Contact and Company remain so you can try again later.
Create a new lead
The New Lead form is used to record a potential trading opportunity before it becomes a deal.
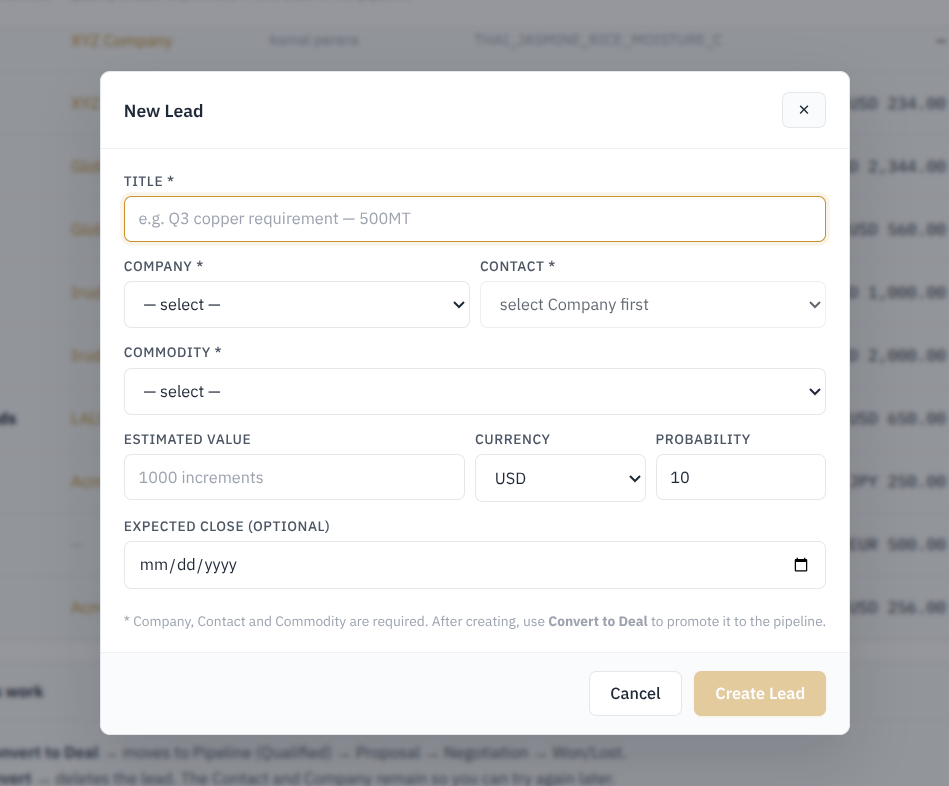
- Title* – Short description of the opportunity, for example, Q3 Copper Requirement – 500MT. (Required)
- Company* – Select the company related to the opportunity. (Required)
- Contact* – Select the relevant contact person from the chosen company. (Required)
- Commodity* – Select the commodity involved in the opportunity. (Required)
- Estimated Value – Enter the expected value of the opportunity.
- Currency – Select the currency used for the estimated value.
- Probability – Enter the estimated chance of the opportunity becoming a deal.
- Expected Close – Optional date indicating when the opportunity is expected to be completed.
2.7 Pipeline
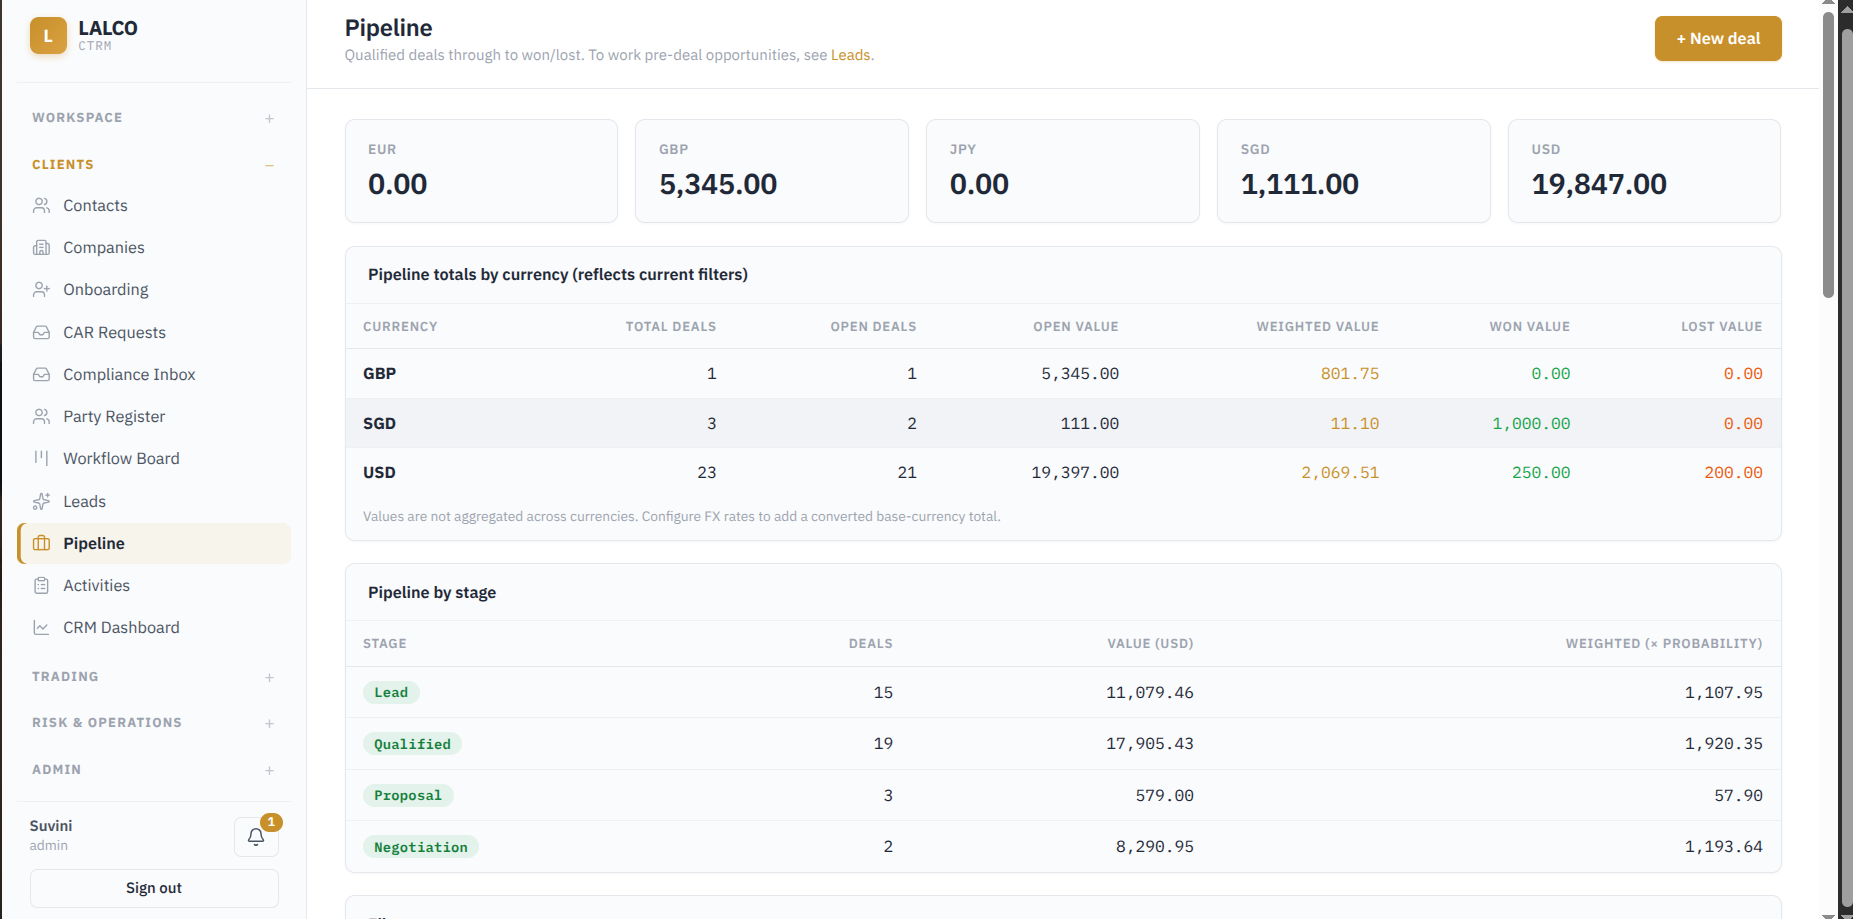
Used to track trading opportunities after they have been converted into deals. It shows how deals progress through different sales stages until they are either won or lost.
Create a new deal
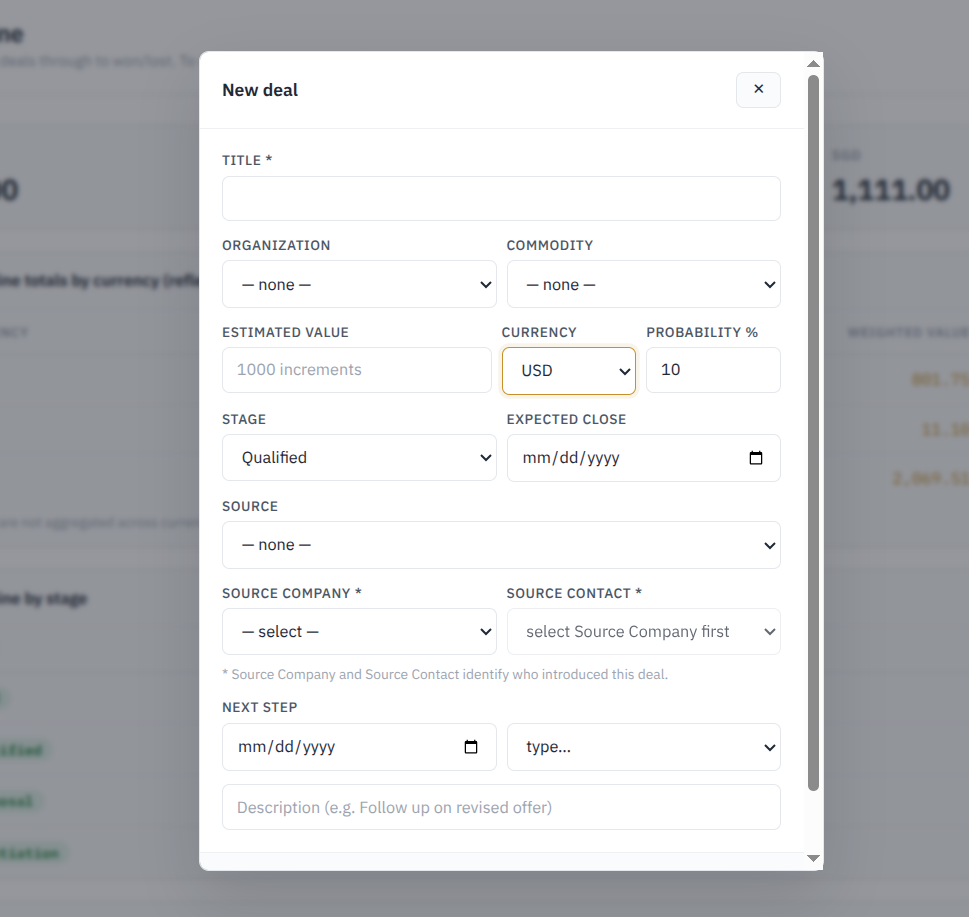
Allows a deal to be created directly in the Pipeline without first creating it as a Lead.
Pipeline deals can be added by :
1. Lead → Convert to Deal → Pipeline
2. New Deal → Create directly in Pipeline.
Deal Details
- Title* – Name or short description of the deal. (Required)
- Organization – Company or counterparty related to the deal.
- Commodity – Commodity involved in the deal.
- Estimated Value – Expected monetary value of the deal.
- Currency – Currency used for the estimated value.
- Probability % – Estimated chance of successfully winning the deal.
- Stage – Current stage of the deal
- Expected Close – Expected date for the deal to be completed.
Source Information : - Source – Indicates how the deal originated.
- Source Company* – Company that introduced or referred the deal. (Required)
- Source Contact* – Contact person from the source company who introduced the deal. (Required)
The Source Company and Source Contact therefore help identify where the business opportunity came from.
Next Step :
The user can also record the next planned action for the deal:
- Date – When the next action should take place.
- Type – Type of follow-up/action.
- Description – Additional details, such as “Follow up on revised offer.”
Pipeline Summary
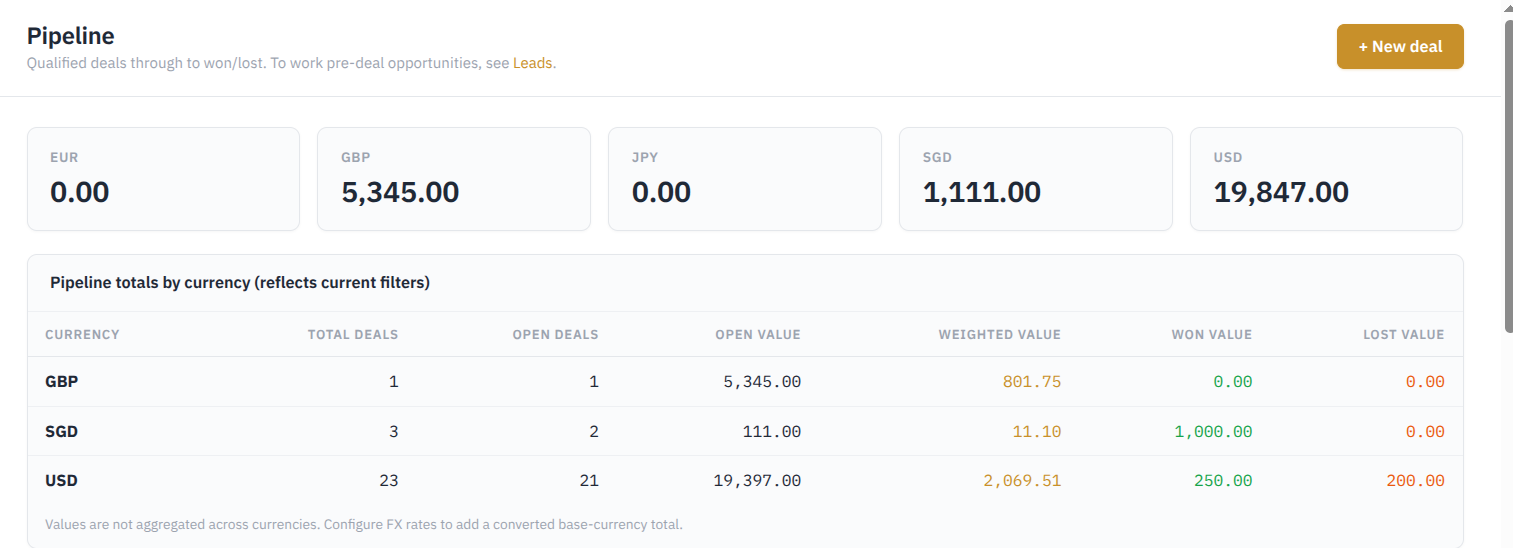
Pipeline value by currency :
- EUR
- GBP
- JPY
- SGD
- USD
(Each currency shows its own pipeline value so that amounts from different currencies are not mixed together.)
Pipeline Totals by Currency
For each currency, the system displays:
- Total Deals – Total number of deals recorded in that currency.
- Open Deals – Number of deals that are still in progress.
- Open Value – Total value of all open deals.
- Weighted Value – Expected value of open deals after considering their probability of success.
- Won Value – Total value of deals marked as Won.
- Lost Value – Total value of deals marked as Lost.