
Customers Screen
 |
 |
 |
The Customers Screen allows staff to view and manage all customers in the system. It provides a searchable list, filter options, and quick access to customer details.
Header Section
Page Title
Customers
Description
View your customer list and manage customer records.
Search Function
Search Bar
Search by customer
Allows users to search by:
-
Customer Name
-
Phone Number
Filter Options
Users can filter customers by status:
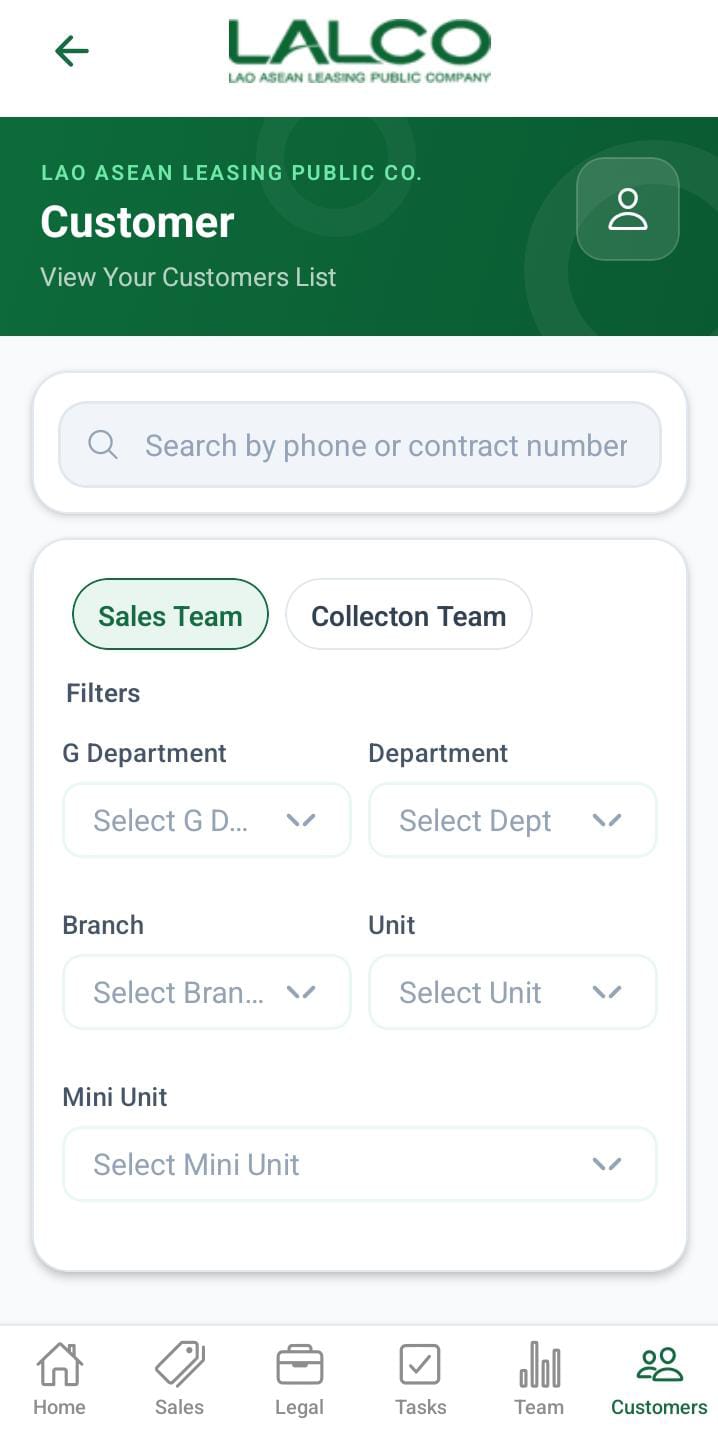
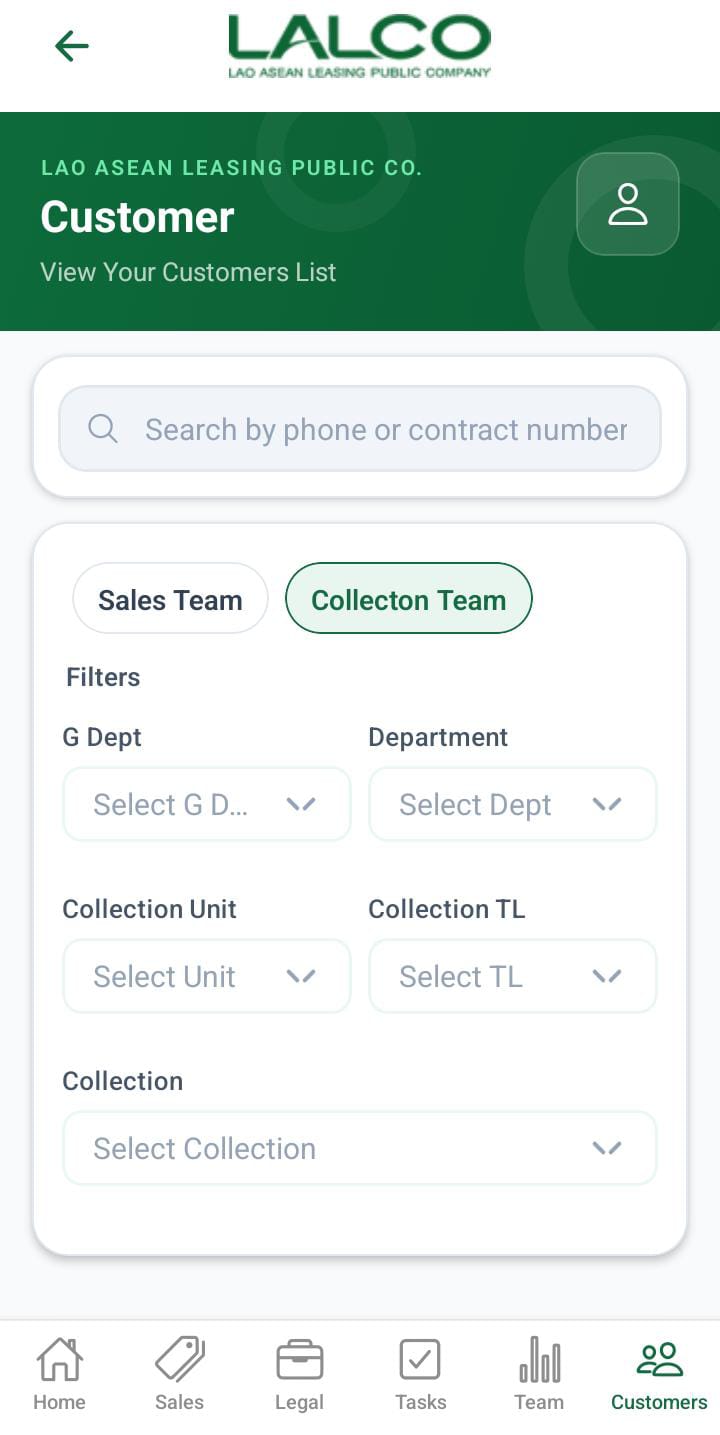
In the filter options, there are two main sections.
- Sales Team
- Collection Team
When the filter is Sales Team below filters can apply,
- G department
- Department
- Branch
- Unit
- Mini Unit
When the filter is Collection Team below filters can apply,
- G department
- Department
- Collection Unit
- collection tl
- collection
The above filters will display like this.
When the user role is admin
- The admin has both sales and collections and can apply all the filters mentioned above.
When the user role is gdept
- The gdept has both sales and collections and can apply all the filters mentioned above except G department.
When the user role is dept
- The dept has both sales and collections and can apply all the filters mentioned above except G department and department
When the user role is branch.
- Display only the sales team.
- Display the unit and Munit filters
When the user role is unit.
- Display only the sales team.
- Display the Munit.
When the user role is MUnit.
- Only the search bar filter can be applied.
When the user role is collection unit.
- Display only the collection team.
- Display the collection tl and collection filters
When the user role is Collection tl.
- Display only the collection team.
- Display the collection.
When the user role is Collection.
- Only the search bar filter can be applied.
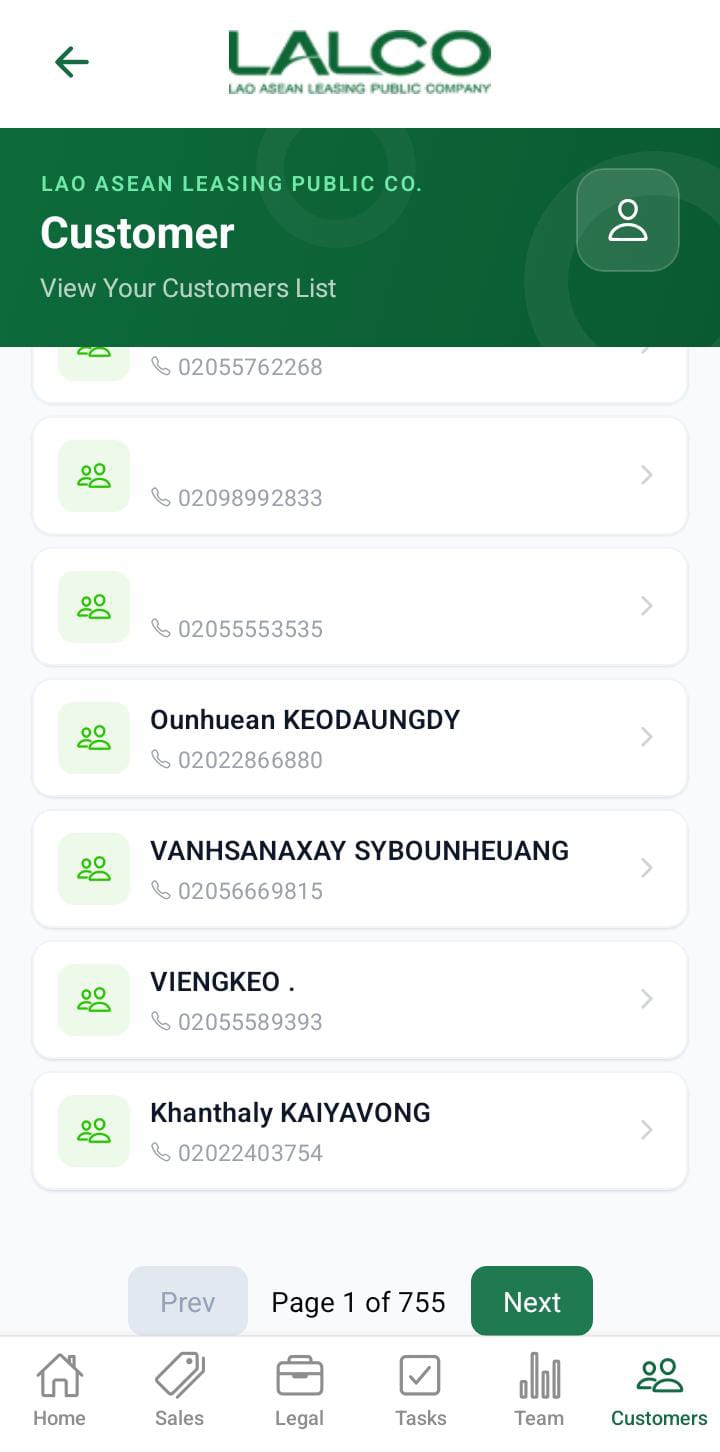
Customer List
Each item represents a customer.
Example:
-
user – 02056087740
· Closed
Information Displayed
Each record shows:
-
Customer Name
-
Phone Number
Status
How to Use
View a Customer
-
Open the Customers tab
-
Browse or search the list
-
Tap a customer to view details
Add a Customer
Tap+ Add CustomerFill in required fields: Name, Phone, Address, Province → City → Village, NIC/Family Book, Birth DateTapSave
Customer Details Screen
 |
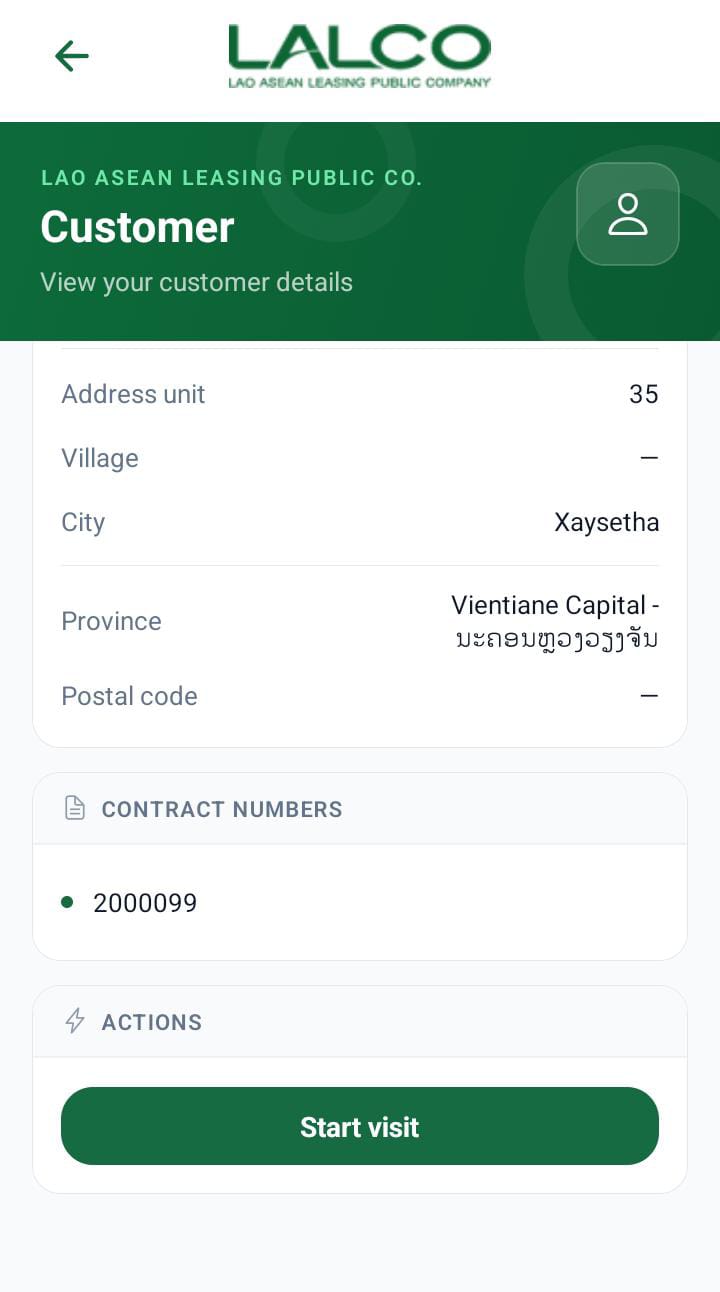 |
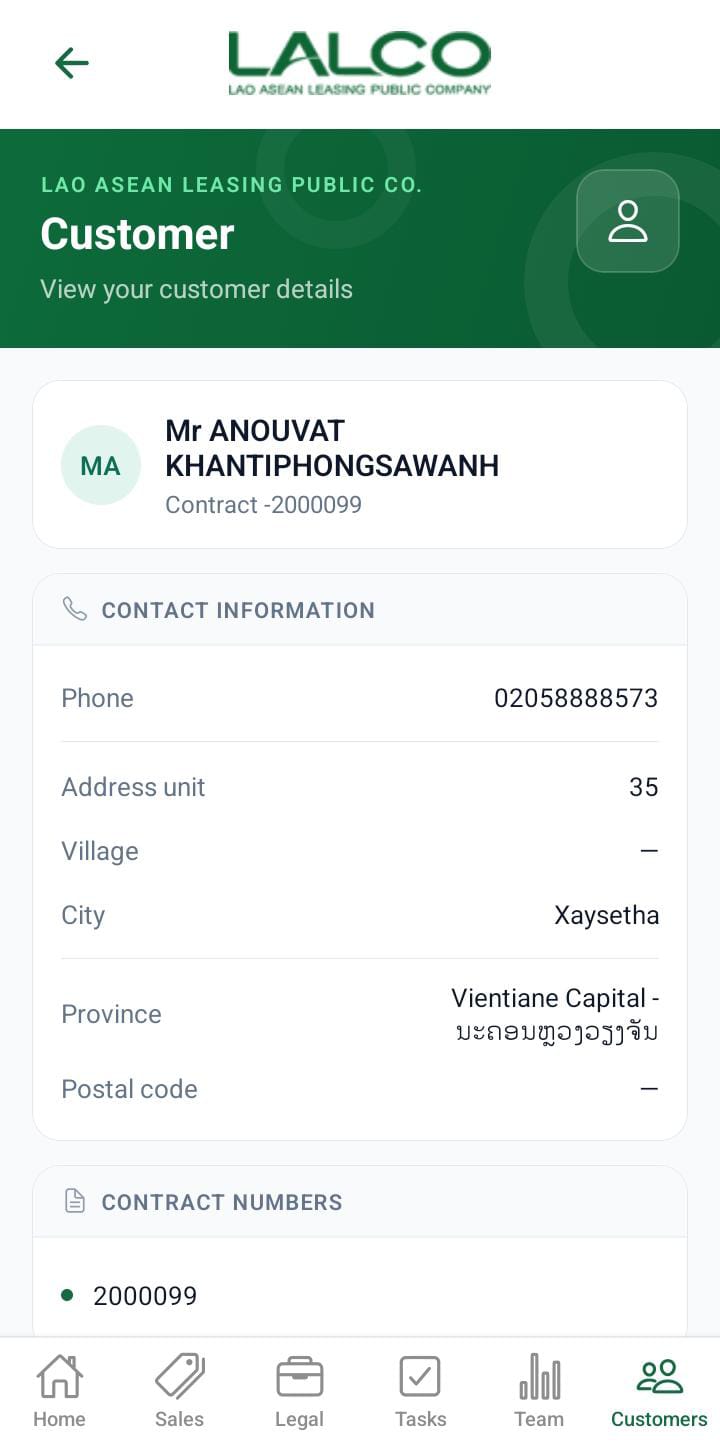
The Customer Details Screen shows detailed information about a selected customer and allows staff to start visits orto update records.cutomer.
Customer Details Section
Displays key information:
-
Name → Customer Name
-
Phone Number → Contact number
-
Address → Unit, Village, City, Province
-
Contract Numbers → Linked contracts
Actions
Start Visit
Used to begin a field visit related to the customer.
Used for:
-
Customer visits
Payment follow-upsField verification
How to Use
View Details
-
Select a customer from the list
-
Review all details
Start Visit
-
Tap Start Visit
-
Proceed with visit
-
Update visit remarks, GPS location, payment status if needed
Navigation
Customers Screen → Select Customer → Customer Details Screen → Start Visit
Add Visit Result Screen
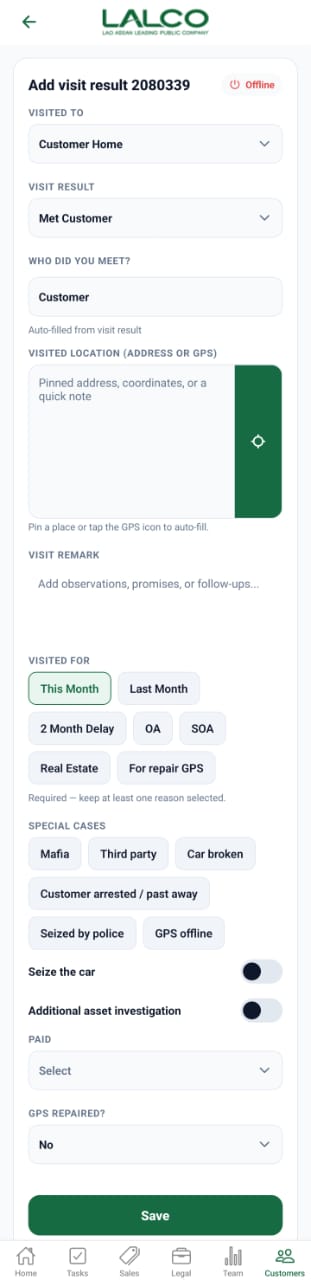
The Visit Result Screen allows staff to record the outcome of a customer visit, including visit details, GPS location, remarks, and status updates.
Visit Details Section
Visited To
Select where the visit occurred (e.g., Customer Home)
Visit Result
Choose the result of the visit (e.g., Met Customer, Not Available)
Who Did You Meet
Auto-filled or manually selected
Location Section
Visited Location
Enter address manually ORTap GPS icon to auto-fill current location
Tip: Always use GPS if possible for accurate tracking
Remarks Section
Visit Remark
Free text notes about the visit(Example: “Customer promised to pay next week”)
Visit Reason Section
Select at least one reason for the visit:
This
screenMonthis Last Month2 Month DelayOA / SOAReal EstateGPS Repair
Special Cases Section (Optional)
Select only if applicable:
Third PartyCar BrokenCustomer Arrested / Passed AwaySeized by PoliceGPS Offline
Additional Options
Seize the Car→ Toggle ON if the vehicle was seizedAdditional Asset Investigation→ Toggle ON if required
Payment & GPS Status
Paid→ Select payment statusGPS Repaired→ Yes / No
How to Use
Record Visit
TapStart Visitfrom Customer Details ScreenFill all required fieldsAdd GPS location and remarksSelect reasons for visitUpdate special cases and additional options if neededTapSave
Navigation
Customer Details Screen → Start Visit → Visit Result Screen → Save
Add New Customer Screen
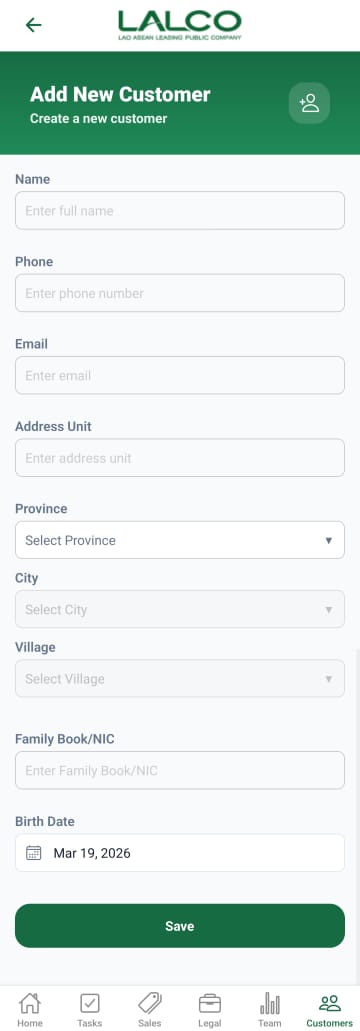
The Add New Customer Screen allows staff to create and register a new customerexplained in the system.task Thisdescription. informationThe isnavigation usedalso forredirects managingto customerthe records,same loans,screen and follow-up activities.
Header Section
Page Title
Add New Customer
Description
Customer Information Form
Users must filldescribed in the following details:
Name
Enter the customer’s full name.
Example:
Phone
Enter the customer’s contact number.
Example:
Email
Enter the customer’s email addresstask (optional if not available).
Example:
Address Unit
Enter the customer’s address or house/unit details.
Province
Select the province from the dropdown list.
City
Select the city based on the chosen province.
Village
Select the village or local area.
Family Book / NIC
Enter the customer’s identification number.
Example:
Birth Date
Select the customer’s date of birth using the date picker.
Example:
Action Button
Save
Tap Save to create the new customer.
If all required fields are filled correctly, the customer will be added successfully.If there are missing or invalid details, the system may show an error.
How to Use
Add a New Customer
Open theCustomers tabTapAdd New CustomerFill in all required detailsTapSaveCustomer
will be added to the systemVisit).